

Recon Backup lights Ram 3rd Gen by RedRam05Baby

Thread Starter
|
Admin formally known as 94rt10ohio
Joined: Apr 2005
Posts: 9,025
Likes: 3
From: Curtice, OH
In This DIY I Will Show You How To Install Recon Backup Lamps To Run On A Switch & In Reverse.
Now, There Are Many Ways of Installing Them, Including Wiring Methods, Wiring Connectors, And Other Variables - In This Install I Will Show You My Method of Install
_________________________________________________
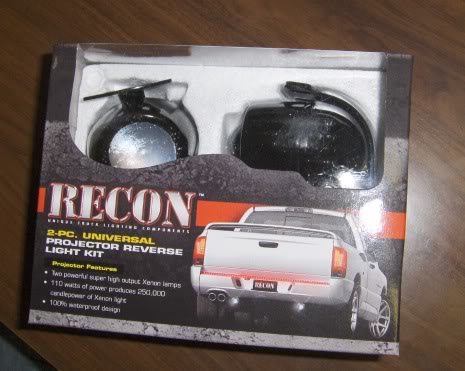
- Go Over The Equipment You Received - Look For Blemishes, or Missing Parts
You Should Have:
[ul]
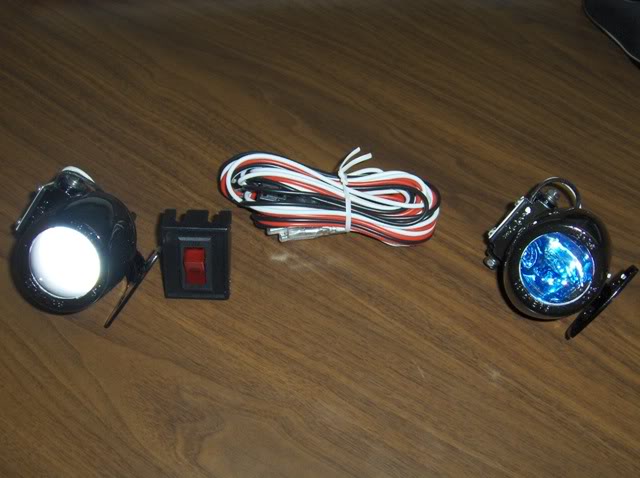
[*] 2 Projector Lamps
[*] 1 Switch
[*] Wire Harness [/ul]
__________________________________________________ ________
Tools Required:

A Good Assortment of Hand Tools are Recommended, Required Hand tools Are As Followed:
[ul][*] Drill
[*] Drill Bit Set
[*] Phillips Bit
[*] DC Voltage Meter
[*] Screw Drivers Phillips & Flat Head (Small Flat Head)
[*] Wire Strippers & Crimper's[*] Choice of Connectors +/- Soldering Tools
[*] Electrical Tape
[/ul]
Components You'll Need To Get:
[ul]
[*] Insulated Terminal Connectors
[*] Heat Shrink Tubing
[*] Stranded LV Wire (Spec'd At Least At 20 Amp)
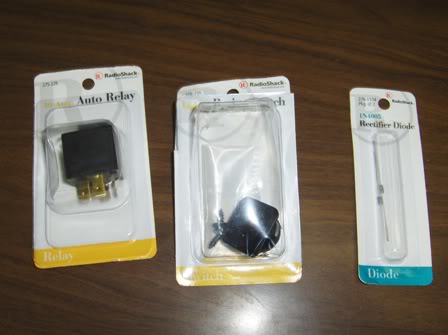
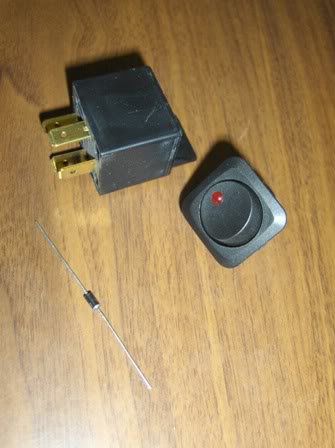
[*] 30A Relay (Auto 12V)
[*] 1N4005 Diode
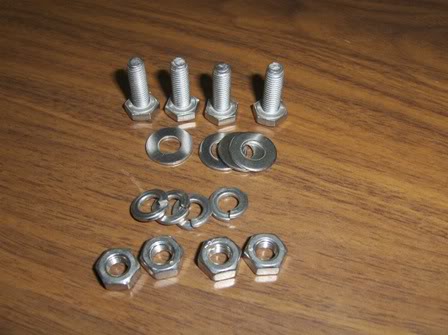
[*] 4 Stainless Bolts
[*] 4 Stainless Washers
[*] 4 Stainless Lock Washers
[*]4 Stainless Nuts
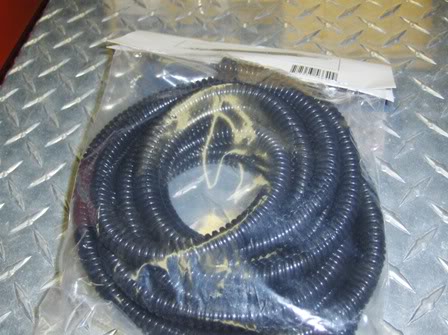
[*] At Least 15ft of Wire Loom
[/ul]
__________________________________________________ ____________________________
Projector Layout & Drilling.
It Is Not Required, But Disconnecting Your Batteries Negative Cable Is Recommended
[ul]
[*] Figure Out Where You Want To Mount Your Backup Lamps
[*] Find A Center Point To Measure Off Of.
[*] Now, Make Two Marks Per Projector Lamp - 7/8" Apart

[*] With The Holes Laid Out, Drill Using Proper Drill Bit (According To Bolt Diameter)
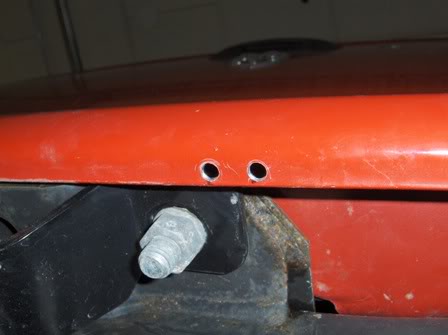
[*] You Can Now Mount The Projectors, Flip Down The Bracket To Allow Hardware To Slip In (Make Sure The Bolt Head Is On The Bottom Side)
[*] With The Hardware Installed - Flip The Projector Up and Tighten The Hinge.
[/ul]
You Are Now Set To Wire
__________________________________________________ ___________________
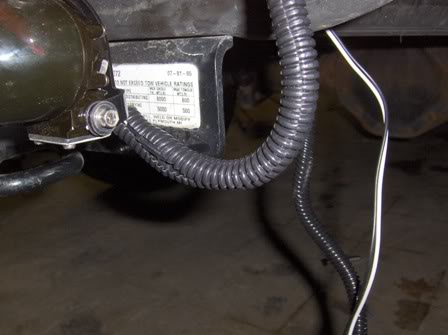
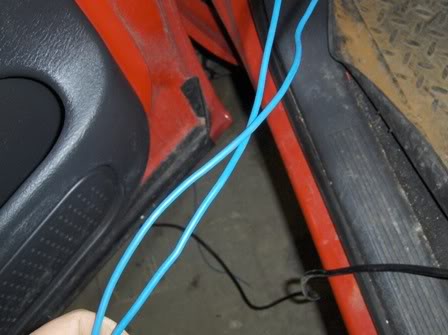
Running Wires - Front To Back
I Have Found It Easier To Prepare The Wire & Loom First - Then Run It Along TheFrame Rail.
[ul]
[*] Stretch Out Approx. 15ft Of Wire Loom
[*] Run 2 -15' Lengthsof Wire Through The Loom (One Will Be For The Reverse Lamp Wire, One For The Projectors)
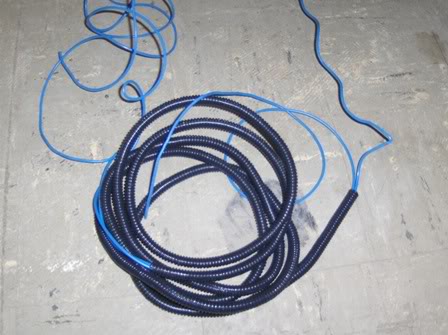
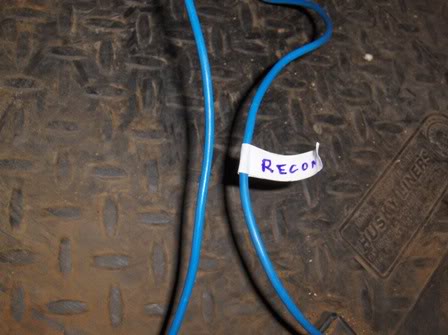
*Be Sure To Mark Each End Of The Wires. Label One Wire: Backup Lamps - and Label The Other: Reverse Light
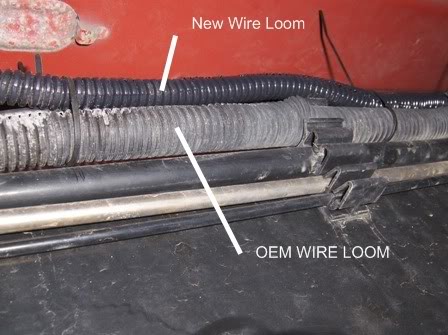
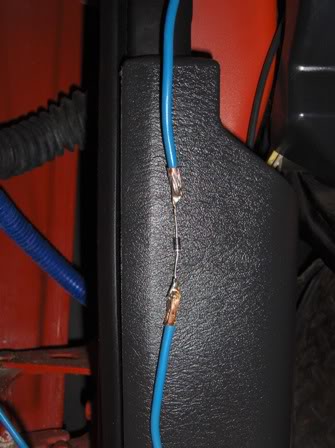
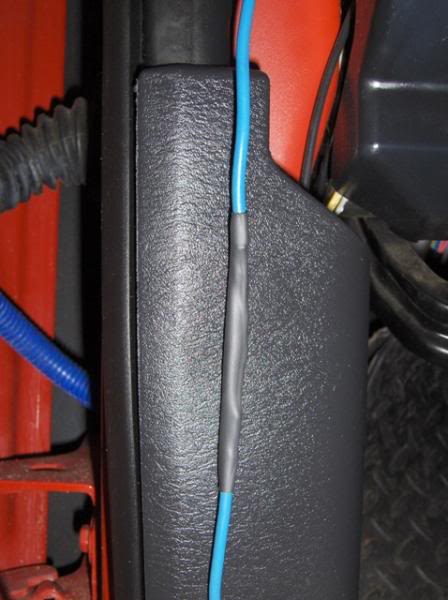
[*] With The Pre- Wired Loom, Run It From The Rear To The Front - Along The OEM Wire Loom. Tie Up Loom.
[/ul]
__________________________________________________ _________
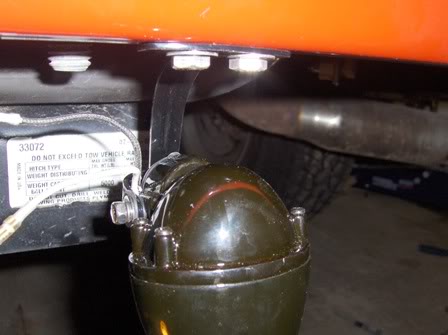
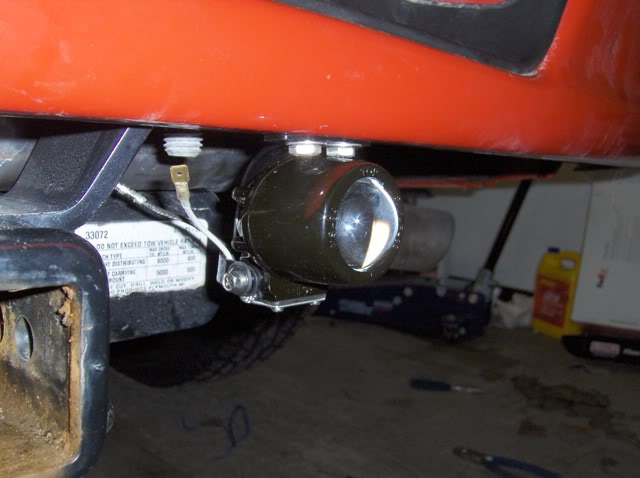
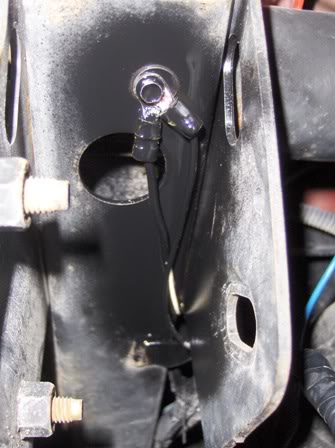
Tie Into Backup Lamps & Wire Projectors
[ul]
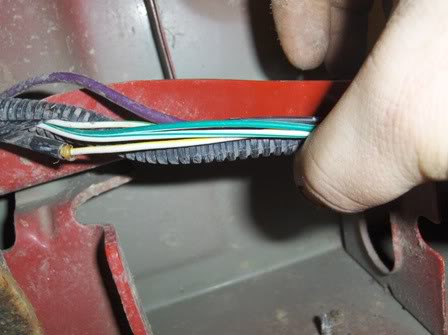
[*] Locate The OEM Wires Going To Your Tail lamp - Peal The Wires Out From The Loom
[*] With A Multi Meter, Find Out Which Wire Powers Your Reverse Light Bulb
[*] Cut Out A Section of Wire To Solder To & Solder To The New Wire Labeled "Reverse Light"
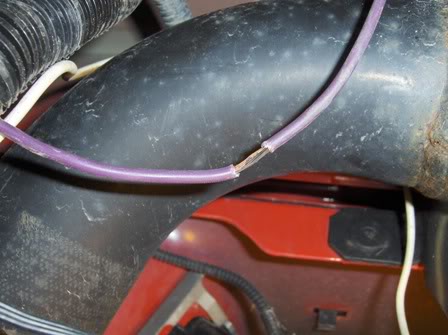
[*] Tape and Cover Splice With Loom
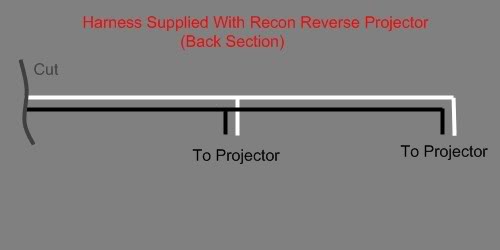
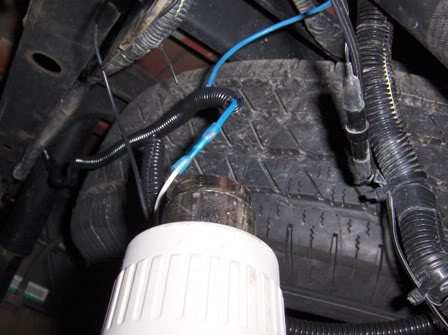
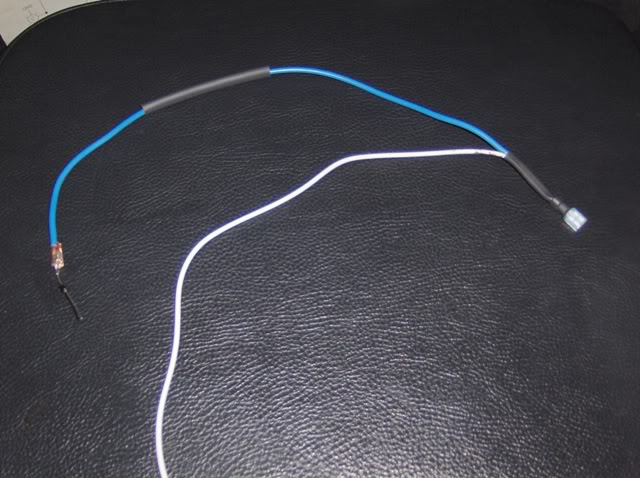
[*] With The Supplied Wire Harness (The One That Came With The Recon Projectors) Cut The White and Black Wires Designed To Wire Up The Projectors - Approx. Half Way.
[*] Loom The Harness & Connect Harness PowerTo The Newly RanWire Labeled "Backup Lamps"
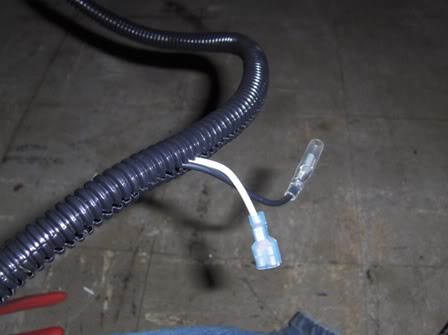
* To Protect Connectors From Weathering - Be Sure To Use Heat Shrink Connectors - Or Heat Shrink Tubing.
[*] Connect Harness To Projectors
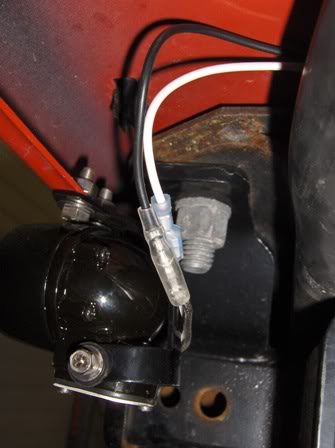
[*] Connect Harness To A Solid Ground (To Prevent Rusting, It Is Recommended To Spray Terminals With Rust Blocking Agent)
[*] Finish Running Loom Around Wires, Tape And Zip Tie Everything Up.
[/ul]
The Rear Is Now Complete.
__________________________________________________ _____________________
Onto The Front Layout & Wiring Switch
** This Is The Wiring Diagram To Use While Wiring Your Setup
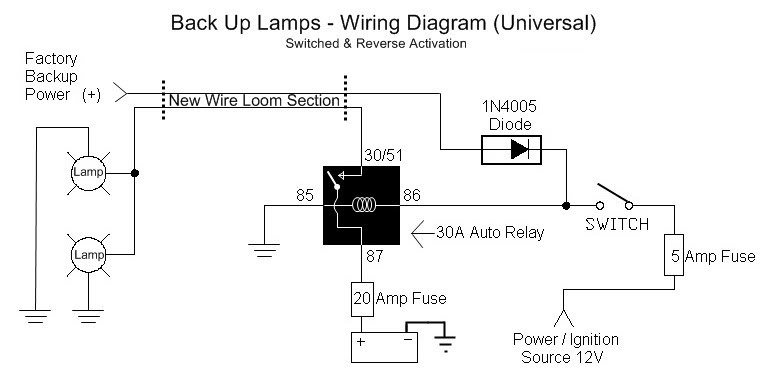
It Is Now Time To Wire The Front, You Will Need To Find A Location To Run Through Your Firewall. Either Drill Through Your Firewall & Use Sealed Grommets (Recommended). Or Find An Existing Hole To Run Your Wires.

[ul]
[*] Find The Location You Would Like To Mount Your Switch
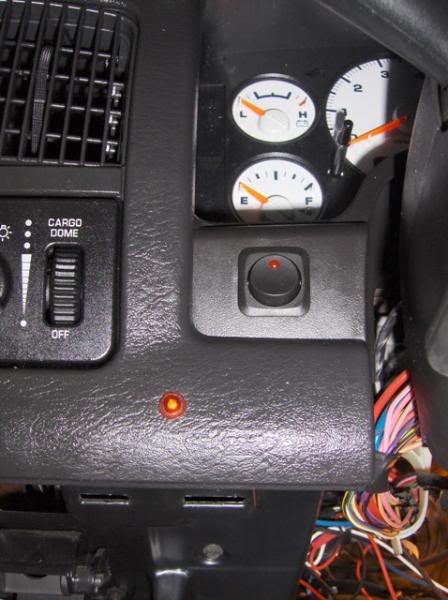 [*] Wire Your Switch With The Remaining Part of The Harness Supplied With Your Recons. Wired Accordingly
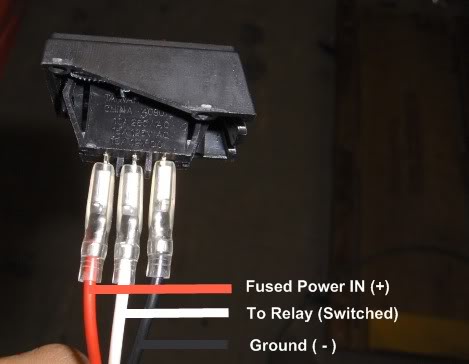
** The Fused Power Wire Is Not The Power Wire Being Ran To Power The Reverse Projector Lights (This Should Be A 5 Amp Fuse)
[/ul]
__________________________________________________ _________________________
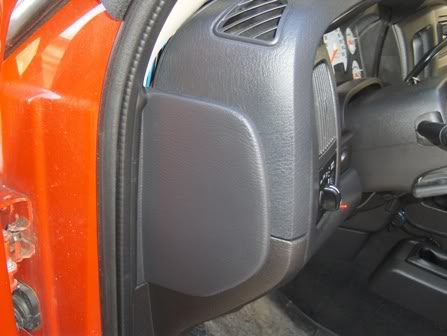
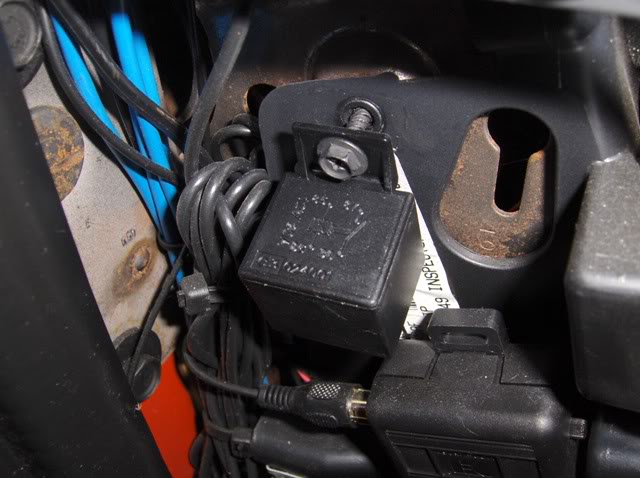
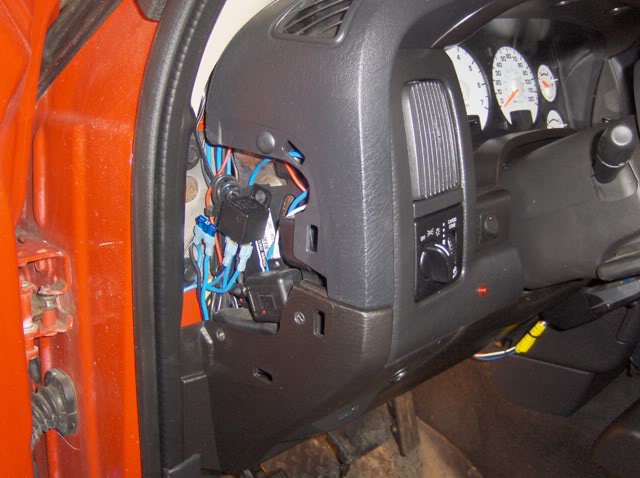
[ul][*]It Is Required At This Time, To Decided Where To Mount The Relay. In This Install, I Chose The Drivers Side Panel On The Dash - Which Will Simply Pop Off With A Small Screw Driver. The Relay Can Then Screw Onto The OEM Dash Screw.
[/ul]
You Are Now Ready To Wire The Relay
__________________________________________________ ____________________________
Wiring The Relay
[ul]
[*] Start By Running The Wires Ran From The Rear, Up To The Open Panel In The Dash.
 [*] Cut A Short Piece of Wire, Strip Both Ends - Install The 1N4005 Diode - With The Wire RanFrom The OEM Reverse Lamps, - ***BE SURE TO INSTALL FACING THE PROPER WAY*** The Stripe On The Diode Should Be Facing The Relay.

 [*] Use Heat Shrink To Protect The Diode
 [*] Connect The Strip of Wire Connected To The Diode To The White Wire From Your Switch (This Will Be The 86 Terminal On The Relay)
 [*] Run A Power Wire From Your Battery (+) and Install A 15-20AMP Fuse & Holder. (This Will Be The 87 Terminal On Your Relay)
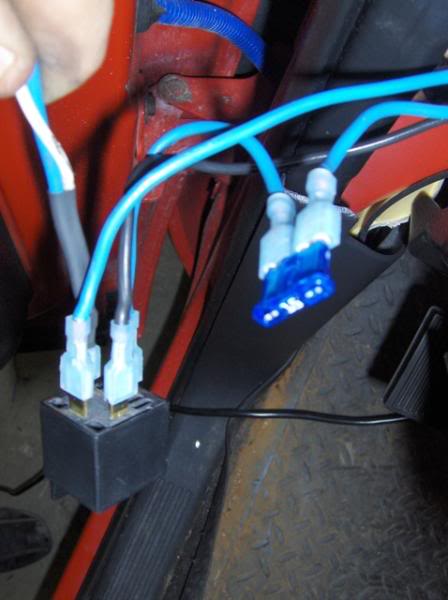
[*] Connect The Power Wire That Is Going To The Recon Projector Lights. (This Will Be The 30/51 Terminal On The Relay)
[*] Now Run A AdequateGround Wire (This Will Be 85 Terminal on The Relay)
__________________________________________________ _______________
Tuck In All Your Wires, And Test The System.
At This Time Your Projectors Should Work Off Of The Switch & While Vehicle Is In Reverse.


 [/ul]
[/ul]
Ram3rdGen
Now, There Are Many Ways of Installing Them, Including Wiring Methods, Wiring Connectors, And Other Variables - In This Install I Will Show You My Method of Install
_________________________________________________
- Go Over The Equipment You Received - Look For Blemishes, or Missing Parts
You Should Have:
[ul]
[*] 2 Projector Lamps
[*] 1 Switch
[*] Wire Harness [/ul]
__________________________________________________ ________
Tools Required:
A Good Assortment of Hand Tools are Recommended, Required Hand tools Are As Followed:
[ul][*] Drill
[*] Drill Bit Set
[*] Phillips Bit
[*] DC Voltage Meter
[*] Screw Drivers Phillips & Flat Head (Small Flat Head)
[*] Wire Strippers & Crimper's[*] Choice of Connectors +/- Soldering Tools
[*] Electrical Tape
[/ul]
Components You'll Need To Get:
[ul]
[*] Insulated Terminal Connectors
[*] Heat Shrink Tubing
[*] Stranded LV Wire (Spec'd At Least At 20 Amp)
[*] 30A Relay (Auto 12V)
[*] 1N4005 Diode
[*] 4 Stainless Bolts
[*] 4 Stainless Washers
[*] 4 Stainless Lock Washers
[*]4 Stainless Nuts
[*] At Least 15ft of Wire Loom
[/ul]
__________________________________________________ ____________________________
Projector Layout & Drilling.
It Is Not Required, But Disconnecting Your Batteries Negative Cable Is Recommended
[ul]
[*] Figure Out Where You Want To Mount Your Backup Lamps
[*] Find A Center Point To Measure Off Of.
[*] Now, Make Two Marks Per Projector Lamp - 7/8" Apart
[*] With The Holes Laid Out, Drill Using Proper Drill Bit (According To Bolt Diameter)
[*] You Can Now Mount The Projectors, Flip Down The Bracket To Allow Hardware To Slip In (Make Sure The Bolt Head Is On The Bottom Side)
[*] With The Hardware Installed - Flip The Projector Up and Tighten The Hinge.
[/ul]
You Are Now Set To Wire
__________________________________________________ ___________________
Running Wires - Front To Back
I Have Found It Easier To Prepare The Wire & Loom First - Then Run It Along TheFrame Rail.
[ul]
[*] Stretch Out Approx. 15ft Of Wire Loom
[*] Run 2 -15' Lengthsof Wire Through The Loom (One Will Be For The Reverse Lamp Wire, One For The Projectors)
*Be Sure To Mark Each End Of The Wires. Label One Wire: Backup Lamps - and Label The Other: Reverse Light
[*] With The Pre- Wired Loom, Run It From The Rear To The Front - Along The OEM Wire Loom. Tie Up Loom.
[/ul]
__________________________________________________ _________
Tie Into Backup Lamps & Wire Projectors
[ul]
[*] Locate The OEM Wires Going To Your Tail lamp - Peal The Wires Out From The Loom
[*] With A Multi Meter, Find Out Which Wire Powers Your Reverse Light Bulb
[*] Cut Out A Section of Wire To Solder To & Solder To The New Wire Labeled "Reverse Light"
[*] Tape and Cover Splice With Loom
[*] With The Supplied Wire Harness (The One That Came With The Recon Projectors) Cut The White and Black Wires Designed To Wire Up The Projectors - Approx. Half Way.
[*] Loom The Harness & Connect Harness PowerTo The Newly RanWire Labeled "Backup Lamps"
* To Protect Connectors From Weathering - Be Sure To Use Heat Shrink Connectors - Or Heat Shrink Tubing.
[*] Connect Harness To Projectors
[*] Connect Harness To A Solid Ground (To Prevent Rusting, It Is Recommended To Spray Terminals With Rust Blocking Agent)
[*] Finish Running Loom Around Wires, Tape And Zip Tie Everything Up.
[/ul]
The Rear Is Now Complete.
__________________________________________________ _____________________
Onto The Front Layout & Wiring Switch
** This Is The Wiring Diagram To Use While Wiring Your Setup
It Is Now Time To Wire The Front, You Will Need To Find A Location To Run Through Your Firewall. Either Drill Through Your Firewall & Use Sealed Grommets (Recommended). Or Find An Existing Hole To Run Your Wires.
[ul]
[*] Find The Location You Would Like To Mount Your Switch
[*] Wire Your Switch With The Remaining Part of The Harness Supplied With Your Recons. Wired Accordingly ** The Fused Power Wire Is Not The Power Wire Being Ran To Power The Reverse Projector Lights (This Should Be A 5 Amp Fuse)
[/ul]
__________________________________________________ _________________________
[ul][*]It Is Required At This Time, To Decided Where To Mount The Relay. In This Install, I Chose The Drivers Side Panel On The Dash - Which Will Simply Pop Off With A Small Screw Driver. The Relay Can Then Screw Onto The OEM Dash Screw.
[/ul]
You Are Now Ready To Wire The Relay
__________________________________________________ ____________________________
Wiring The Relay
[ul]
[*] Start By Running The Wires Ran From The Rear, Up To The Open Panel In The Dash.
[*] Cut A Short Piece of Wire, Strip Both Ends - Install The 1N4005 Diode - With The Wire RanFrom The OEM Reverse Lamps, - ***BE SURE TO INSTALL FACING THE PROPER WAY*** The Stripe On The Diode Should Be Facing The Relay. [*] Use Heat Shrink To Protect The Diode [*] Connect The Strip of Wire Connected To The Diode To The White Wire From Your Switch (This Will Be The 86 Terminal On The Relay) [*] Run A Power Wire From Your Battery (+) and Install A 15-20AMP Fuse & Holder. (This Will Be The 87 Terminal On Your Relay) [*] Connect The Power Wire That Is Going To The Recon Projector Lights. (This Will Be The 30/51 Terminal On The Relay)
[*] Now Run A AdequateGround Wire (This Will Be 85 Terminal on The Relay)
__________________________________________________ _______________
Tuck In All Your Wires, And Test The System.
At This Time Your Projectors Should Work Off Of The Switch & While Vehicle Is In Reverse.
[/ul]Ram3rdGen