


Need help finding right wires to tap for gauge


Thread Starter
|
Registered User
Joined: Feb 2009
Posts: 23
Likes: 0
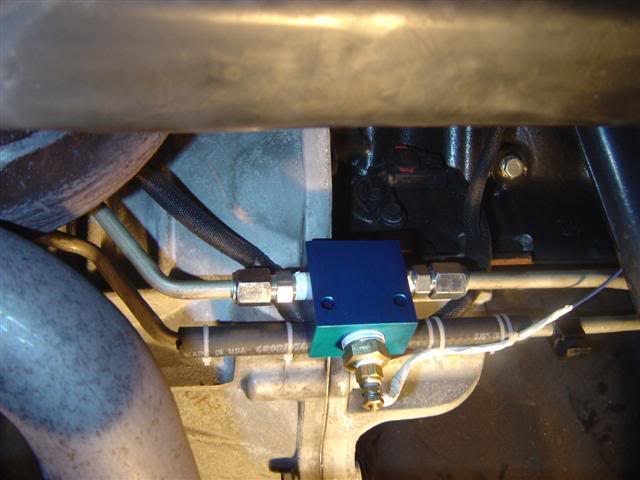
I'm adding a trans temp gauge to my 2003 1500, I used a manifold in the line to the trans cooler. Got that mostly installed and sensor line ran, see picture below (going to add some hose clamps to the piece of fuel line protecting the other line, didn't have any on hand). However with the fuse box out in the engine bay I need some help locating appropriate power wires for the gauge. It requires an ignition positive, a lighting positive, and then a ground (should I tap into a negative line or just ground to the steel under the dash)?
Anyone got a quick reference that'd point me to the location and wire jacket color I should be looking for among the bundles or wires...
Anyone got a quick reference that'd point me to the location and wire jacket color I should be looking for among the bundles or wires...

Veteran
Joined: Feb 2009
Posts: 329
Likes: 0
From: Michigan
for the light wire I ran, I removed the piece of dash that the headlight switch is in. It just pulls straight out. I disconnected the wiring from the switch and tapped into the orange wire that is in that bundle. As for an ignition wire, all i did was got down by my pedals, found a factory wiring harness, and used a test light to find a wire that was activated by the ignition. And for ground, I removed the side panel that is covered by the door, where the fuses used to be, and tapped into the metal in there. I hope my vague description and lack of better terms helps ya out!

Amateur
Joined: Dec 2008
Posts: 45
Likes: 0
From: Pittsburgh
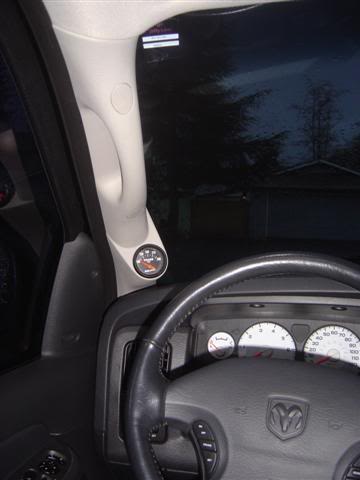
Did you get the pillar mount from Dodge? I just tried to order on and they told me they are backordered but they were not sure why.
Where did you get the manifold?
Where did you get the manifold?
Trending Topics
Thread Starter
|
Registered User
Joined: Feb 2009
Posts: 23
Likes: 0
Order the parts, duh!
Then crawl under to find a good area to mount the manifold, mine is the horizontal runs of the translines near the rear of the engine/trans bellhousing. I installed it into the upperline which I believed to be the hot one (verification?). You preassemble the manifold fittings with teflon tape then with the female flare fitting caps off you measure the total disance from fitting to fitting. Subtract 1/2" and that is how much transline you need to cut out. I used one of those mini tubing cutters you can find in the plumbing section and HD or such. To get access to be able to spin it around the line you need to undo all the clip restraints on the lines in those sections then I jabbed the handle of a screw driver up between the two lines where they connect into the transmission which opened the gap betwen them up enough. Slid a drip pan under there and get to work, a little pressure on the wheel, spin, a little more pressure, spin, etc. till you cut through. Then the other cut mark. You'll drip out a bit of fluid but all told I'd say 1/8c tops came out when I did it.
Then slide the female flare nuts onto the lines and then the inner flare parts (are they called bushings?). They have a profile to them and I installed the longer narrower portion towards the manifold. Start snugging things up. Takes a while with a wrench a little bit at a time due to the confines but eventually gets there.
The you need to run a sender line, I went up the passenger fender wall then over top the original wiring harness along the firewal and then back do to pop through the firewall near the peddals. I just poked the wire though one of the existing boots. Route the line under the dash to where the pillar goes (pillar comes out by removing the two bolts under the caps and giving it a tug). Other lines needed are power for light (tapped a orange/white wire coming out of the light switch, just pull that whole panel straight out), ignition power for gauge with a 4amp busman fuse (tapped a larger pink wire coming out of the ingnition harness and installed a fuse holder there), ground (I lossened the bracket holding the ignition module and put a blade connector under that then tightened it back up). Fish these lines up to the pillar area as well and prep them with appropriate connectors to connect to the gauge.
Install the gauge in the pillar, I had to shave some of the piece that goes on the back of the gauge that holds the gauge in place so it fit into the pullar okay (not enough clearance). It never fully tightened down but its jammed in place and the nuts have engaged enough thread to easily hold the little gauge from moving. Connect the wires and snap the pillar into place (mine didn't come with any hardward so I took it off the old piller). The caps over the bolts didn't fit tightly so I put a small piece of double sided foam mounting tape on them and they fit fine now.
Drive truck.
https://www.dodgeparts.com/product_i...oducts_id/1629
Manifold is from summit, part ATM-2286
http://store.summitracing.com/partde...5&autoview=sku
Gauge is also summit ATM-2640
http://store.summitracing.com/partde...5&autoview=sku