


DIY CAI question


Thread Starter
|
Amateur
Joined: Jun 2011
Posts: 48
Likes: 0
Planning on doing a DIY CAI. I was wondering if anyone knows a part number for a heat shield like the K&N or spectre? Just the heat shield, Like the one in Hammers CAI pics. Or is it even necessary? I do alot of gravel road driving.
Also I was wanting an Dry cone filter. If anyone has the part number for that two I would appreciate it. Or just the size that hose clamps to the piping. Thanks in advance.
Also I was wanting an Dry cone filter. If anyone has the part number for that two I would appreciate it. Or just the size that hose clamps to the piping. Thanks in advance.
Administrator
Joined: Jul 2007
Posts: 24,686
Likes: 21
From: South Georgia/East Florida
Mine is the K&N kit, I actually bought it way back in '04 when the truck was about three months old and I didn't know a thing about making one. Ain't replaced it yet cause I'm of the "if it ain't broke, don't fix it" mentality, but it's fixin' to get replaced because I'm about to cut out my hood under my scoop, take out the front of the scoop and re-route my CAI into the scoop for a TRUE Ram Air Intake.
Not that I'm unhappy with the $300 K&N CAI, but I need the side where it's at for a 2nd battery. Kinda a "kill two mods in one" deal.
I've done two I think, where the owner had a cheap fleabay CAI that failed, but came with a shield, so I just kept the shield and built everything else.
I did make one out of sheet aluminum and a brake for a guy, came out good, but it's a PIA to try to bend sheet aluminum if you don't have a brake.
Also, I've made some for guys who wanted the filter WAY down in almost into the tire well to get all the cool air it could, so no shield. This is very efficient UNLESS you have a 4x4 and off road in water or deep mud, or even have a 4x2 and live where heavy rains can produce deep standing water.
Last couple I've built, I've used the stock airbox as a heatshield. Works well, it's plastic, so it won't absorb heat like steel or aluminum would and it's got it's own built in air tube to direct flow into the box. All you gotta do for this one is either drill a hole in the side for the 3" tube and place the filter on inside the box or route the tube over the top of the box.
As far as the filter goes, just measure how much room you have and get the largest cone you can fit (more surface area = more air) and match the opening to the size PVC you use.
CAI using the existing air box:
Administrator
Joined: Jul 2007
Posts: 24,686
Likes: 21
From: South Georgia/East Florida
That is the crankcase breather tube. In stock form this tube goes into the intake after the filter and before the throttle body. Ever wonder why so many threads abound on how important it is to clean the throttle body? Oil gases and contaminants enter the TB and make it a gummy, sticky mess. Used to was, before the govt. got into all this emissions crap, they were vented into the outside air.
Two cherces here, drill a hole in the CAI tube and shove it in there. Will do exactly what it did in stock form OR stick a filter on it (about $7 at any auto parts store) and let the filter catch all the crap. Well actually there is a third choice, you could invest in a catch can to catch all the crap if you wanna drop $50-$100 or more on one:

There are some who say that you need the vacuum created by the intake to properly vent the gases, so they'll stick it in the PVC (most if not all commercial CAIs have a hole for it). But I'm old enough to remember when they were just a rigid tube sticking straight up, so it didn't need vacuum to vent then, I doubt it makes much of a difference now.
If you choose the filter route, you'll still need to drill a hole in the PVC for the sensor, I make one just slightly larger than the sensor and put a rubber grommet in it (about $2 for a 5 pack at the same store you'll buy the PVC), look for the grommets with a slit in the middle of it so it'll actually hug both sides of the PVC. It makes a tight fit and I doubt the sensor will ever come out, but I seal the deal with just a smidge of the PVC cement for good measure. If you ever have to replace the sensor, just take a razor blade to the glue.
Two cherces here, drill a hole in the CAI tube and shove it in there. Will do exactly what it did in stock form OR stick a filter on it (about $7 at any auto parts store) and let the filter catch all the crap. Well actually there is a third choice, you could invest in a catch can to catch all the crap if you wanna drop $50-$100 or more on one:
There are some who say that you need the vacuum created by the intake to properly vent the gases, so they'll stick it in the PVC (most if not all commercial CAIs have a hole for it). But I'm old enough to remember when they were just a rigid tube sticking straight up, so it didn't need vacuum to vent then, I doubt it makes much of a difference now.
If you choose the filter route, you'll still need to drill a hole in the PVC for the sensor, I make one just slightly larger than the sensor and put a rubber grommet in it (about $2 for a 5 pack at the same store you'll buy the PVC), look for the grommets with a slit in the middle of it so it'll actually hug both sides of the PVC. It makes a tight fit and I doubt the sensor will ever come out, but I seal the deal with just a smidge of the PVC cement for good measure. If you ever have to replace the sensor, just take a razor blade to the glue.
Last edited by HammerZ71; Jul 24, 2011 at 06:54 PM.
Rookie
Joined: Jun 2011
Posts: 73
Likes: 0
From: Manahawkin, NJ
Hey Hammer, the pic you posted is confusing to me, you mention that pic shows using the OEM aribox as a heat shield, but I don't see the OEM airbox. Any additional pics of what you described with using the OEM airbox? I installed an Airaid Jr kit, black plastic PVC intake tube direct to OEM airbox with drop in high flow airfilter. I was thinking about making it a full CAI, but the price for a heat shield frame and cone filter is ridiculous! $230 for a piece of metal and filter? If I can mod the OEM airbox with cone filter, I'd try that out. Do you have to put any foam runner around it to get a seal around the hood?
On another note, you mention using your hood airdam to get real ram air, any info to share on that? I searched the web to find anybody or any kit that took advantage of the Daytona/SRT-10 OEM hood scoop (which is open to outside air) and couldn't find anything. I have a 2005 Daytona.
On another note, you mention using your hood airdam to get real ram air, any info to share on that? I searched the web to find anybody or any kit that took advantage of the Daytona/SRT-10 OEM hood scoop (which is open to outside air) and couldn't find anything. I have a 2005 Daytona.
Administrator
Joined: Jul 2007
Posts: 24,686
Likes: 21
From: South Georgia/East Florida
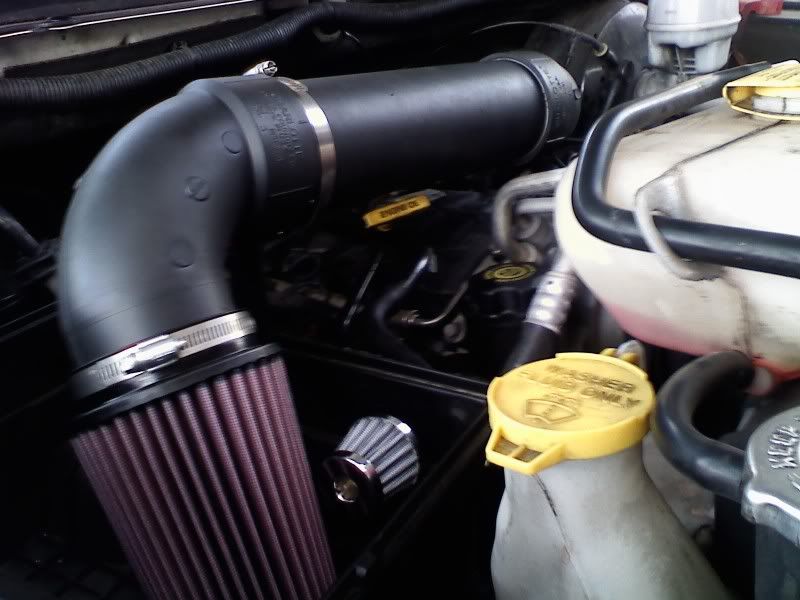
If you look at the pic closely, you will notice it's the stock air box sans the top. Also I drilled a hole in the side to mount the breather filter in there. I doesn't really need to be in there or behind any heat shield, but I thought it looked cool and holds the thing in place well.
What I plan on doing with my existing CAI is basically removing the heat shield and tubing. Make a new tube that will simply come straight out and then a 45* bend to pick the filter up and pointed into the scoop (remember, with the hole cut in the hood just under the size of my scoop, my hood will be about 1-2" taller there). I thought about maybe a simple aluminum plate for under the filter, to act as a heat shield, but I think with the thing sitting right in the flow of all the air entering thru the scoop, I shouldn't really need it and I don't want the shield trapping heat at the engine, anyway. I'll be reusing the K&N and the boot at the throttle body.
Other than removing the hood and cutting the hole, this one is a 30 minute modification. I'd have it done by now, but I'm dealing with a little medical issue and can't lift anything. So the removal and re-installation of the hood by myself is out, it'll have to wait till after I have surgery...
Trending Topics
Rookie
Joined: Jun 2011
Posts: 73
Likes: 0
From: Manahawkin, NJ
ahhh, ok, now I see it. Do you think the bottom alone of the OEM box is enough to block the heat from the engine? I like the breather filter, nice touch. On the air scoop, I'm surprised no kit exists based on your plan, I would have thought some company would have built a kit with an intake tube coming straight out to even a circular high flow filter with a think square and foam sealer around the top to seal off air from the engine compartment, but wonder if that would allow enough air flow with the smaller opening on the hood, plus I wondered about issues with water coming in and how that would get filtered out.
I may do the mod to the OEM airbox as you show. Thanks for the info.
I may do the mod to the OEM airbox as you show. Thanks for the info.
Thread Starter
|
Amateur
Joined: Jun 2011
Posts: 48
Likes: 0
Hammer, in your pic above is that just 2 street 90's about 3' of pipe and a coupler? Cant tell if the 90 on the filter side has a lip on both sides. Also what is the hose clamp right before the last 90 for?
Administrator
Joined: Jul 2007
Posts: 24,686
Likes: 21
From: South Georgia/East Florida
Yeah that's two 90s, one is flanged on both ends, the other on one, but it could be different depending on your routing, if going to the stock air box, that's all you'll need. I have done them with two 90s, a 90 & a 45, two 90s and a 45 depending on vehicle and where the filter is intended to go. If you can't find a 90 that's not flanged on one side, no biggie, just cut a piece of PVC pipe long enough to glue into the elbow with enough sticking out to put the filter over and the clamp around. Been there, done that too.
I did that on Pyro's truck, he had one of the fleabay ones that broke. Used to be a moderator here but finished grad school and got too big for us, LOL. You'll see the flange on that 90 at the filter:
Lots of guys ask me to build them for them, but I have only built one not on the vehicle, so much easier when you have the vehicle because you can measure and cut as you go.
Hose clamp on the last 90 is holding it to a bracket I've got screwed into the air box for support, the bracket in this case is a simple $2 aluminum "L" bracket from the same hardware store where everything else came from (except the filter). This one is basically just a shelf bracket. Again, I've used all kinds of different things depending on where the filter went and what I had available to tie into.
You basically just need something to hold it in place, especially in a 4x4 where it'll knock around a bit. That's what does in the cheapo ebay ones, they are usually made of cheap pot metal and the welds crack after a couple months of vibrations. I know about five or six guys who had the same one off ebay break in the same place, right where there is a tab which connects to a bolt they supply that goes into the sidewall to hold it in place. I've brazed a couple together for guys, because it's cheapo metal and welding would just melt it. They never stay fixed though and end up breaking in another spot before too long...
Last edited by HammerZ71; Jul 25, 2011 at 03:07 PM.