


Passenger windows will not go down...

Champion
Joined: Aug 2007
Posts: 4,702
Likes: 2
From: N. Florida
DON'T pry on the board! That fiberglass will break in a heart beat! The solder connections are all on one side of the board, as I recall. It'll be the "bottom" of the board, the side opposite the window switches.
Do you already have the cover off the board? If so, you're 85% done. If not, go carefully. You'll find the black cover attached to the board by 4-6 screws, plus about 6 snap-clips (those d@mn things are what gave me such a hard time). If I were doing it over, I'd pop the clips and then wedge toothpicks or something to keep them from re-engaging.
Remember the buttons must come off the actual switches - pry them carefully. I don't know how easily they break and I don't want to know. You can't get the board out of that black plastic box until the buttons are off the switches.
Once you have just the board in your hand, it's smooth sailing from there. The terminals for the switch are near it toward the front of the board. Sharp eyes can see the cracks in the solder, I had to use a magnifying glass. Anyway, let the soldering iron heat up. I have an iron for working on circuit boards. If you have a soldering gun, be careful! They can get too hot! If you lift the "land" off the board, you're done.
Heat the connection, not the solder - that's a common mistake and results in a "cold" solder joint. The existing solder will melt and that may be enough. I chose to add a touch of solder (rosin-core, NOT acid-core) to each connection.
Since it's such a pain to get into the switch-box, take a few minutes with some fine sand-paper or an emery board and clean the carbon build-up off ALL the switch contacts. Some electrical contact cleaner is a good thing to have.
Button up the box, snapping the clips back in and putting the screws back in. Push the switch buttons back on the switches making sure you put the buttons for the lighted switches back on the lighted switches.
Spray the harness contacts with the cleaner and let it dry for a few minutes. Put some dielectric grease on the harness pins (or on the switch pins, I put a tiny bit down into the harness slots).
After I put it all back together, ALL the windows were reluctant at first, but since then they work perfectly and no more ribbing from my Friday lunch buddies!
Last edited by MikeHTally; Aug 24, 2011 at 10:15 PM.

Veteran
Joined: Jul 2006
Posts: 498
Likes: 0
From: Saskatoon, Saskatchewan
i got sick of taking the switch apart all the time so i used a splice connecter from the big tan wire to the big yellow wire so it has power to it all the time the window lock doesn't work anymore but its better then having the roll the windows down all the time.
Champion
Joined: Aug 2007
Posts: 4,702
Likes: 2
From: N. Florida
It's already been too long for me to remember all the details  . They could be. The ones on mine were forward of the switch. I was thinking all the solder connections are on the same side.
. They could be. The ones on mine were forward of the switch. I was thinking all the solder connections are on the same side.


Registered User
Joined: Aug 2011
Posts: 5
Likes: 0
I used the instructions from Denniss66 to remove and disassemble the master window assembly. As has been stated before, removing the button covers is the hardest part of the entire job.
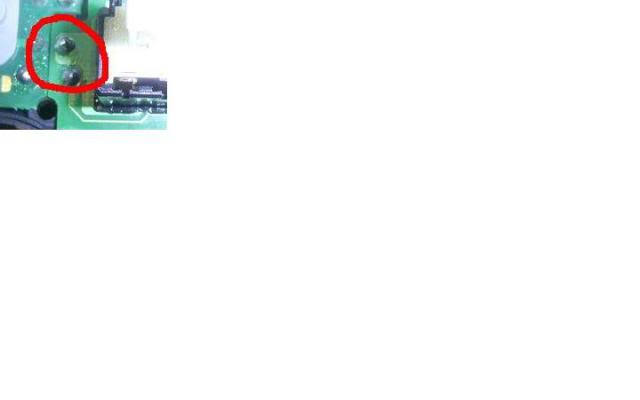
On mine I could see that the two solder joints beside the window lock were bad, so I re-soldered them. That fixed it for me. I did not take the lock assembly apart like Denniss66 did. Also, I copied one of his photos and annotated it to show the two pins that I re-soldered.
Denniss66: Thanks a million for the instructions and photos! https://dodgeforum.com/forum/3rd-gen...-lock-diy.html
Last edited by Florida Ram Man; Aug 25, 2011 at 05:29 PM. Reason: to add URL to Denniss66's instructions

Veteran
Joined: Feb 2010
Posts: 423
Likes: 0
From: Houston, TX
So I finally tested my switch today and as I played with the window lockout, sometimes I'd get continuity. Instead of taking apart the switch anymore I did what Denniss66 said, and jumpered pin 9 and pin 8 together. Mine was also a Tan wire and a yellow wire. Now all doors have fully functioning window controls. The lockout feature doesn't work anymore but that isn't an issue for me.
