


How to make your BakFlip F1 WaterTight


Thread Starter
|
Veteran
Joined: Mar 2009
Posts: 325
Likes: 0
Yes, I know this has been beaten to death, and Yes I know your thinking "Whatever, Water-tight, I have tried everything including midnight chants"
I have been battling the issue of water leakage for over a year now, understand how the covers work, how water gets in, and how to prevent it. As this forum has given me so much, I'm giving back.
The main things to check for with water leakage are:
1) spacing between the cover, and the rails. More than 1/4" and water will drip underneath the rails, making it look like A) you need shims or B) the rails are leaking
2) shimming the correct way if you need to move your cover closer to the rails
3) using Black RTV silicone for the final step (more to come on this)
Below is an image of a cover with the proper spacing
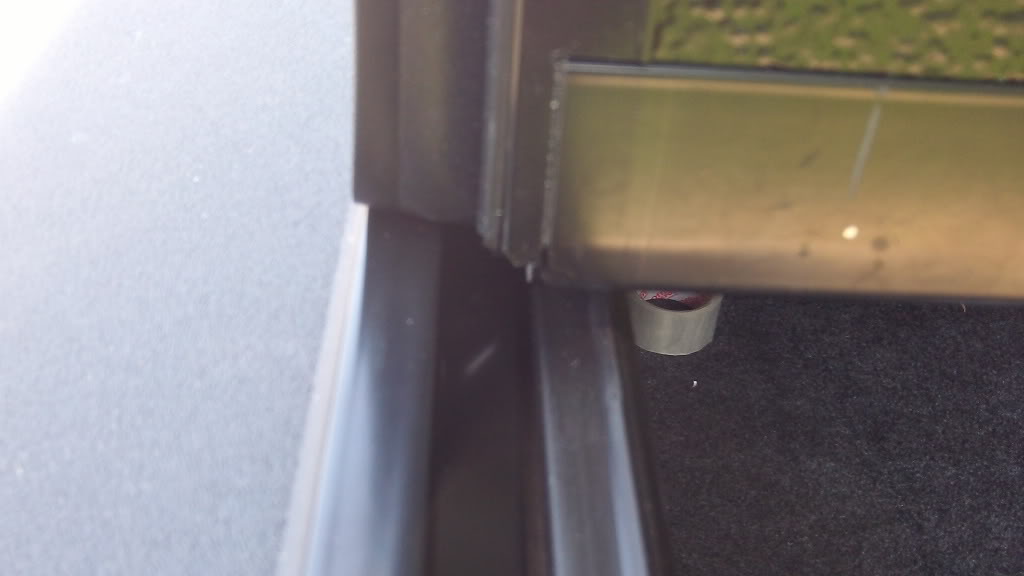
You will notice that there is just shy of a 1/4". Look at the rubber seals, and imagine water coming off the cover, it hits the rails, does it have room to drain into the steel channel? The above image shows it does..
Once you get to the point where your saying, I want my cover to be just a tad bit tighter, use the steps below to shim it in. DON'T USE THE PLASTIC SHIMS. think about it in a logical sense. The shims are plastic, they attach to the steel rail. Notice an issue??Plastic moving a rail outwards creates a gap, a gap not sealed will cause a leak..
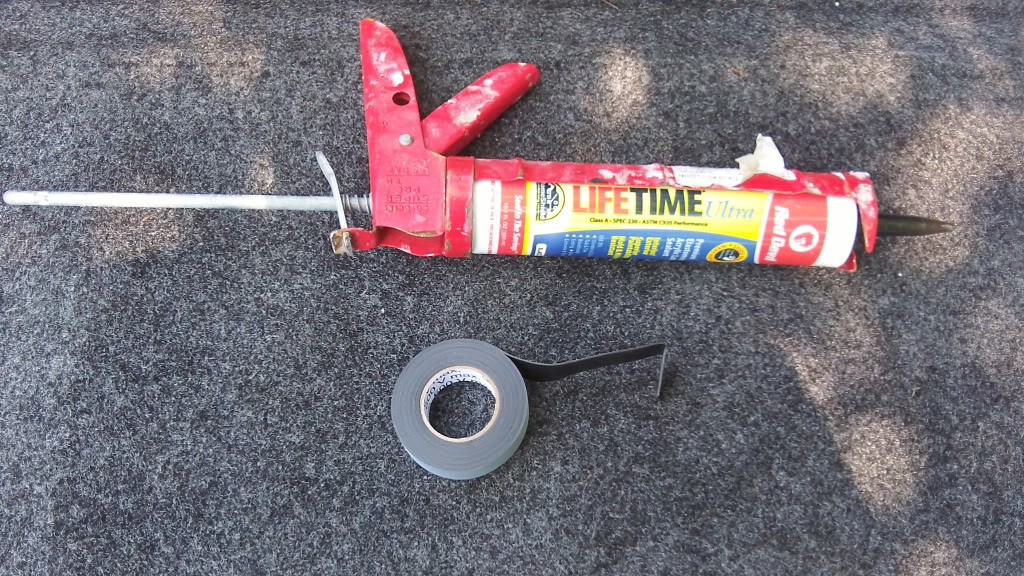
Instead-- I use Electricians Rubber Tape or most commonly known as electrical splicing tape or even temflex (I was an electrician for 5 years).
Clean your rails, and lay the splicing tap on your rail making a tight fit with the top part, close to the existing rubber seal already on it. Cut to fit, and lay the rail down.
*HAVE YOUR WRENCH/SOCKETS READY TO TIGHTEN NOW*
Next, get a tube of BLACK Silicon sealant, and run a bead from the back of the plastic bed cap (By the rear window) all the way to the end of the truck by your tailgate. Then take the rail that has your electrical rubber tape on it, and carefully press it against the bed-cap to form a tight fit. Press it against the rail, and while doing this press down (This will make sure the rail is tight against your bed-cap and resting down right on the bed-cap <you don't want any gaps when looking at the rail from the side of the truck>)
Tighten the middle rail clamp first, and then the two outer ones front and rear.
Place the cover on, and check for a position as needed, also, i used the silicone to run a bead along the top of the bed-cap where the rear foam strip and bed-cap meet to ensure no leakage.
Once its positioned, let it dry for the day or overnight and water test in the morning...Best way to test it spray directly on top, and also take the spray nozzle off, and let puddles accumulate on top of the cover to check for leakage.
Hope this helps out
Materials:
I have been battling the issue of water leakage for over a year now, understand how the covers work, how water gets in, and how to prevent it. As this forum has given me so much, I'm giving back.
The main things to check for with water leakage are:
1) spacing between the cover, and the rails. More than 1/4" and water will drip underneath the rails, making it look like A) you need shims or B) the rails are leaking
2) shimming the correct way if you need to move your cover closer to the rails
3) using Black RTV silicone for the final step (more to come on this)
Below is an image of a cover with the proper spacing
You will notice that there is just shy of a 1/4". Look at the rubber seals, and imagine water coming off the cover, it hits the rails, does it have room to drain into the steel channel? The above image shows it does..
Once you get to the point where your saying, I want my cover to be just a tad bit tighter, use the steps below to shim it in. DON'T USE THE PLASTIC SHIMS. think about it in a logical sense. The shims are plastic, they attach to the steel rail. Notice an issue??Plastic moving a rail outwards creates a gap, a gap not sealed will cause a leak..
Instead-- I use Electricians Rubber Tape or most commonly known as electrical splicing tape or even temflex (I was an electrician for 5 years).
Clean your rails, and lay the splicing tap on your rail making a tight fit with the top part, close to the existing rubber seal already on it. Cut to fit, and lay the rail down.
*HAVE YOUR WRENCH/SOCKETS READY TO TIGHTEN NOW*
Next, get a tube of BLACK Silicon sealant, and run a bead from the back of the plastic bed cap (By the rear window) all the way to the end of the truck by your tailgate. Then take the rail that has your electrical rubber tape on it, and carefully press it against the bed-cap to form a tight fit. Press it against the rail, and while doing this press down (This will make sure the rail is tight against your bed-cap and resting down right on the bed-cap <you don't want any gaps when looking at the rail from the side of the truck>)
Tighten the middle rail clamp first, and then the two outer ones front and rear.
Place the cover on, and check for a position as needed, also, i used the silicone to run a bead along the top of the bed-cap where the rear foam strip and bed-cap meet to ensure no leakage.
Once its positioned, let it dry for the day or overnight and water test in the morning...Best way to test it spray directly on top, and also take the spray nozzle off, and let puddles accumulate on top of the cover to check for leakage.
Hope this helps out
Materials:

Veteran
Joined: Dec 2010
Posts: 422
Likes: 0
From: North Aurora, Il - 40 miles west of Chicago
I'm also a lucky one - mine is basically dry all the time. Once in awhile, I get a little dust or spray in under the tailgate, but not enuf to wet anything.
One of these days, I'll figure out a way to make the bottom of the tailgate more watertight/airtight, and still functional..
It's just not enuf of a problem to take any action.
One of these days, I'll figure out a way to make the bottom of the tailgate more watertight/airtight, and still functional..
It's just not enuf of a problem to take any action.
Champion
Joined: May 2009
Posts: 3,497
Likes: 1
From: MN
This ought to take care of that problem. Plus it makes it a lot easier when you are unloading brush and gravel. Only reason I don't run one is that I've frequently got to remove my tailgate.

Registered User
Joined: Sep 2012
Posts: 7
Likes: 0
Trending Topics

Professional
Joined: Jul 2012
Posts: 128
Likes: 0
There are two oval plastic plugs on the front stake pocket channels (one on each side). I cut the centers out leaving a sort of grommet and pushed the supplied drain tubes through the cut outs. The hoses fit snuggly and seal it nicely. Perfect fit.