


Real quick All-Gig install ?


Professional
Joined: May 2009
Posts: 197
Likes: 0
I just installed the Mopar (AKA factory) camera on my truck. There were three wires with three terminals that I had to insert into the gray connector that plugs into the back of the MyGig. The AllGig plugs into the MyGig where the white connector goes. So the Mopar camera isn't unplugged when you install or uninstall the AllGig.
Mine is because my Allgig A/V harness does not piggy back. You have to unplug the factory plug from the back of the radio and leave it unplugged. My harness is not like the one shown on their website.
Veteran
Joined: Oct 2005
Posts: 461
Likes: 0
From: NW Arkansas
Ok, here is a quick run down on how I was able to get my camera to function both in reverse and by using the 12V camera output from the AllGig.
Supplies:
Wires - I just used what I had. We're not talking about much current here so 18 gauge is probably enough
Relay - (1) 4 Pin 30 AMP 12V Relay: http://www.autozone.com/autozone/cat...uestid=2250277
Diodes - (2) 12V Zener Diodes from Radio Shack: http://www.autozone.com/autozone/cat...uestid=2250277
References:
Diodes - http://www.the12volt.com/diodes/diodes.asp
Relays - http://www.the12volt.com/relays/relays.asp
Wiring Run Down:
The goal was to be able to power the camera in both reverse (factory style) and from the AllGig (by pressing the power button on the radio two times quickly).
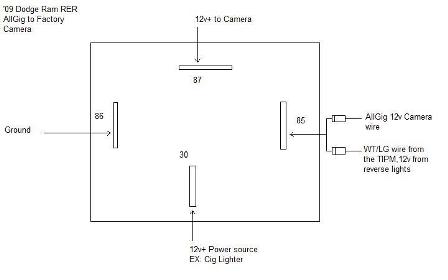
The relay has four terminals that are used (a five pin can be used but terminal 87a won't be needed).
- Terminals 85 & 86 are for the coil. One of these will be grounded and the other will act as the switch to control when to energize the circuit. More about this below.
- Terminal 30 is the 12v+ input power supply to the camera. I ran a wire from the cig ligther to it but any switched source will do. I wanted something already fused.
- Terminal 87 is the output 12v+ to the camera. This is what will turn the camera on and off. The WT/LG wire to the factory camera will go here.
Two wires will be used as the switch and will be joined at either terminal 85 or 86, whichever is not your ground; (1) the Camera 12v+ wire from the AllGig and (2) the WT/LG wire from the TIPM that powers the camera when put into reverse. Each of these wires will need to have a diode soldered in at the connection to the terminal. You want the ends of the diodes with the stripe closest to the terminal. Think of the stripe as a wall that prevents a positive signal from passing it. If it's on the input, it stops it; if it's on the output, it allows it to pass. You want the signal to be able to come from the source and reach the relay but not go from the relay back to either source.
Here is an image I threw together using MS Paint.
Supplies:
Wires - I just used what I had. We're not talking about much current here so 18 gauge is probably enough
Relay - (1) 4 Pin 30 AMP 12V Relay: http://www.autozone.com/autozone/cat...uestid=2250277
Diodes - (2) 12V Zener Diodes from Radio Shack: http://www.autozone.com/autozone/cat...uestid=2250277
References:
Diodes - http://www.the12volt.com/diodes/diodes.asp
Relays - http://www.the12volt.com/relays/relays.asp
Wiring Run Down:
The goal was to be able to power the camera in both reverse (factory style) and from the AllGig (by pressing the power button on the radio two times quickly).
The relay has four terminals that are used (a five pin can be used but terminal 87a won't be needed).
- Terminals 85 & 86 are for the coil. One of these will be grounded and the other will act as the switch to control when to energize the circuit. More about this below.
- Terminal 30 is the 12v+ input power supply to the camera. I ran a wire from the cig ligther to it but any switched source will do. I wanted something already fused.
- Terminal 87 is the output 12v+ to the camera. This is what will turn the camera on and off. The WT/LG wire to the factory camera will go here.
Two wires will be used as the switch and will be joined at either terminal 85 or 86, whichever is not your ground; (1) the Camera 12v+ wire from the AllGig and (2) the WT/LG wire from the TIPM that powers the camera when put into reverse. Each of these wires will need to have a diode soldered in at the connection to the terminal. You want the ends of the diodes with the stripe closest to the terminal. Think of the stripe as a wall that prevents a positive signal from passing it. If it's on the input, it stops it; if it's on the output, it allows it to pass. You want the signal to be able to come from the source and reach the relay but not go from the relay back to either source.
Here is an image I threw together using MS Paint.

Amateur
Joined: Sep 2009
Posts: 32
Likes: 0
From: Ontario Ca.
I installed the lockpick to the factory camera.Install sounds the same as the allgig install.Wanted to be able to display the camera in park and drive.No great reason,other then having complete control of what I own.Lockpick states you have to install the new power wire from the lockpick to the camera.It then states to cut old power wire from the reverse lights, so they don't turn on when you turn on the camera in park or drive.If you try to turn on the camera,with out installing the new power wire.You will get a black screen.I thought I would try it anyway.Some how it's working in park and drive with the reverse light power lead only connected.Don't know why it's not blank like lockpick states.Glad not to have to install new power wire.Maybe 2010 are wired different from 2009.
Champion
Joined: Dec 2007
Posts: 3,563
Likes: 0
From: Ontario, Canada
Hey that makes it look easier............way to go.
Just realized this is for RER dang I have REN no matter I am going with Lock pick....both have their issues and that means I am going with the cheaper version,might wait on it a bit but REN in discontinued after 2010 with be replaced with RBZ and made by Mitsubishi from what I hear.
Just realized this is for RER dang I have REN no matter I am going with Lock pick....both have their issues and that means I am going with the cheaper version,might wait on it a bit but REN in discontinued after 2010 with be replaced with RBZ and made by Mitsubishi from what I hear.
Last edited by 72combo; Oct 23, 2009 at 01:28 AM.
Registered User
Joined: Jun 2008
Posts: 5
Likes: 0
From: Peoria,IL
do you have to run a wire back to the rear camera from the back of the radio?does anybody know where the factory splice is located where camera gets its power in reverse, in front or out back?
Thread Starter
|
Professional
Joined: Sep 2009
Posts: 138
Likes: 0
with a factory install it gets it up by the TIPM under the hood from the wire for the reverse lights....
I was there when the idiot put it in...(long story and bad dealer problem) would have done myself but just has knee surgery....
I was there when the idiot put it in...(long story and bad dealer problem) would have done myself but just has knee surgery....

Rookie
Joined: Feb 2007
Posts: 66
Likes: 0
Just thought I would share my experience. I installed the Mopar camera and the Allgig. My camera works just like factory and I can also turn it on anytime I want. I didn't go through all the trouble of the crazy wiring schematics shown to get it to work. I followed the Mopar instructions except for hooking up power. For the power, I hooked straight to the red/white power wire supplied with the Allgig. Works perfect so far and easy to do.
Veteran
Joined: Oct 2005
Posts: 461
Likes: 0
From: NW Arkansas
Just thought I would share my experience. I installed the Mopar camera and the Allgig. My camera works just like factory and I can also turn it on anytime I want. I didn't go through all the trouble of the crazy wiring schematics shown to get it to work. I followed the Mopar instructions except for hooking up power. For the power, I hooked straight to the red/white power wire supplied with the Allgig. Works perfect so far and easy to do.
Champion
Joined: Dec 2007
Posts: 3,563
Likes: 0
From: Ontario, Canada
Well I have been reading about all the people having problems with their lockpick, haven't done anything yet except play with a door handle adding my own camera and possible lock cylinder and rods.
But the cold has put all that on hold.
I think I might go with the allgig since ranjr has done such an awesome job of explaining and drawing up the wiring. Makes it look a bit easier when it is in diagram form rather than text. Good job by the way and thanks.
But the cold has put all that on hold.
I think I might go with the allgig since ranjr has done such an awesome job of explaining and drawing up the wiring. Makes it look a bit easier when it is in diagram form rather than text. Good job by the way and thanks.
Captain
Joined: Jan 2009
Posts: 505
Likes: 0
From: Dayton, OH suburbs
Well I have been reading about all the people having problems with their lockpick, haven't done anything yet except play with a door handle adding my own camera and possible lock cylinder and rods.
But the cold has put all that on hold.
I think I might go with the allgig since ranjr has done such an awesome job of explaining and drawing up the wiring. Makes it look a bit easier when it is in diagram form rather than text. Good job by the way and thanks.
But the cold has put all that on hold.
I think I might go with the allgig since ranjr has done such an awesome job of explaining and drawing up the wiring. Makes it look a bit easier when it is in diagram form rather than text. Good job by the way and thanks.