Dodge Ram 1994-2001: How to Replace Brake Pads, Calipers, and Rotors
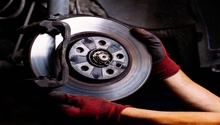
The brake system is one of the most important systems of a car from a safety standpoint. Ensure that your brakes are up to the task when you need to stop. A vehicle with its brake system in poor condition can be extremely dangerous and not only for the driver, but for everyone on the road.
This article applies to the Dodge Ram 1500 2nd Generation (1994-2001).
In a world concerned with horsepower numbers, torque ratings, and towing capacities, we often forget about one of the most important systems on a vehicle: the brake system. Brake rotors, calipers, drums, pads, and shoes are punished day in and day out as vehicles are driven. This is especially true of Dodge Ram trucks, as individuals and businesses regularly use them to haul heavy payloads in rain or shine. While the Ram truck's brake components are fairly robust, they are wear items that occasionally need replacement. For your safety and the safety of others, proper brake system maintenance is of utmost importance. Parts are relatively cheap and can be installed with common tools as well as basic mechanical knowledge. Slow down and keep your brakes in order with this DIY guide to replacing brake system components on your 2nd generation Dodge Ram 1500.

Materials Needed
- Floor jack and jack stands
- Multipurpose drum brake tool
- Ratchet
- American sockets and combination wrenches
- 3/8" Allen wrench
- Brake cleaner
- C-clamp
- Rubber mallet
- Brake adjusting tool
- Screwdriver
- Shop rags
- Rubber snubber, wire hanger, or bungie strap
It is highly recommended that new brake components be installed on a per axle basis as opposed to installing new components on a single corner of the vehicle. This will allow both sides of an axle to work in tandem for maximum braking efficiency.
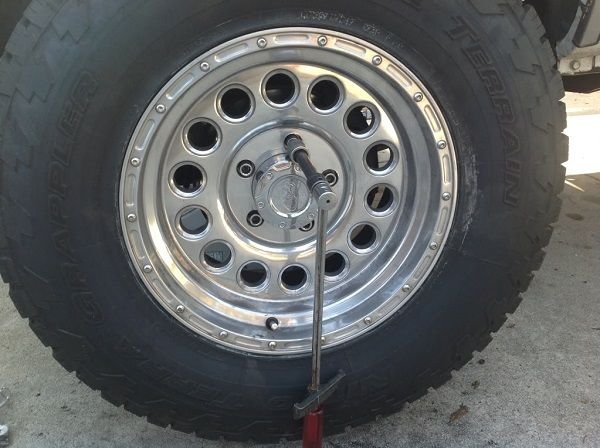
Step 1 – Lift vehicle and remove wheels
- To gain access to the truck's brake components, the truck must be lifted with a floor jack on level ground and supported with jack stands. It is only necessary to lift and support the truck on the axle that you are working on.
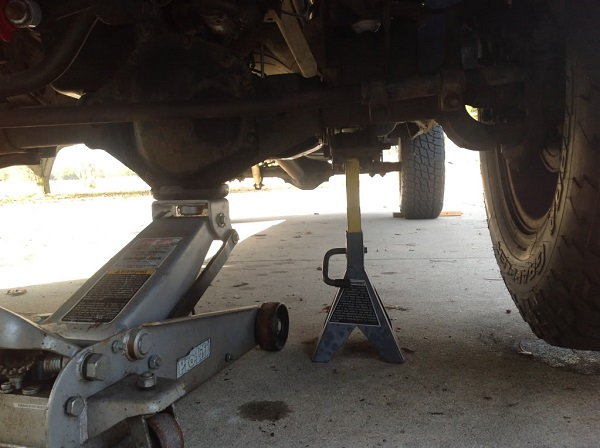
- Remove the wheels to gain access to the brake components.
(Related Article: How to Jack Up Your Truck - DodgeForum.com)
Step 2 – Remove and replace front brake pads
With the front wheels removed, the brake components are now easily accessible.

Brake Pads
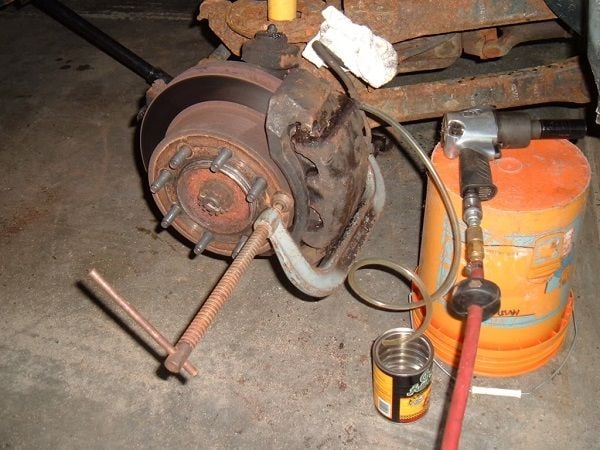
- Whether you are replacing brake pads, brake calipers, or brake rotors, the first step is to remove the brake caliper from the knuckle. Using a 3/8" Allen (Hex) socket an ratchet or 3/8" Allen wrench, remove the two socket head bolts securing the brake caliper to the steering knuckle.
Pro Tip
If planning to replace the brake calipers as well as brake pads, the brake line should be loosend prior to removing the caliper. This will allow for more leverage as the brake line can often be frozen in place and difficult to loosen if the caliper has been removed. See Figure 9 below.
- With the bolts removed, the caliper can be slid off of the brake rotor. In some cases, the caliper may be stuck in place because of a sticking caliper piston. In this case, position a C-clamp with one end on the hat of the brake rotor and the other on the backside of the caliper. Tighten the C-clamp to compress the caliper piston. This will allow the caliper to loosen its hold on the rotor and be removed. It should not take much tightening from the C-clamp to accomplish this.
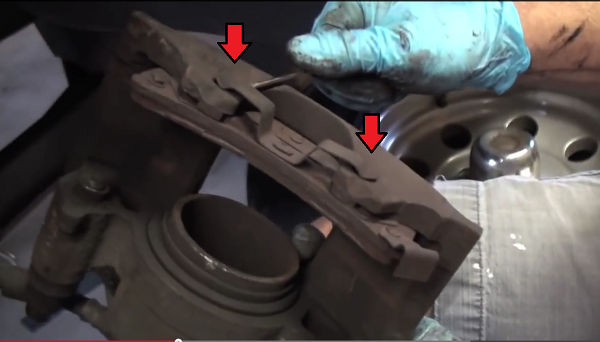
- With the caliper free, the brake pads can be replaced. The inner brake pad simply pops into the caliper piston via a spring clip, and can be easily removed by pulling it away from the piston. The outside pad is held in place with clips that slide over the caliper body. The pad can be removed with the use of a small screwdriver to spread the spring clips and lever the pad away from the caliper.
-
Compress the caliper piston using a C-clamp. A small piece of wood or the old brake pad can be used to apply even pressure to the caliper piston. This will allow the caliper with new brake pads to easily be installed onto the rotor.

Figure 6. Compressing caliper piston.
-
Install new brake pads into the brake caliper. Be sure the spring clips properly engage the piston and caliper body during installation.

Figure 7. New brake pads installed in the caliper. - Slide the brake caliper over the brake rotor and install the fastening bolts. Torque to 38 ft/lbs.
-
After installing new pads on the front axle, several pumps of the brake pedal will be required to move the caliper pistons into position and restore proper brake pedal travel.
Step 3 – Replace front caliper
- With the front brake caliper removed from the steering knuckle (see Step 2), remove the brake line from the caliper using a 3/8" combination wrench or socket.

-
Install the the brake line into the new brake caliper. Use new copper crush washers to ensure the banjo bolt properly seats. This will prevent the loss of brake fluid and the potential for the loss of stopping power in the brake system. Torque to approximately 25 ft/Lbs.

Figure 9. Brake line installed with the new crush washers. - Install brake pads into the new brake calipers as outlined in Step 2 and re-install the brake calipers.
- Proceed to bleed the brakes because air will have entered the brake lines during the caliper replacement procedure.
Pro Tip
Brake fluid is highly corrosive to the vehicle's paint. Clean up any spilled fluid immediately to avoid damage to the vehicle's finish.
Step 4 – Replace front brake rotor
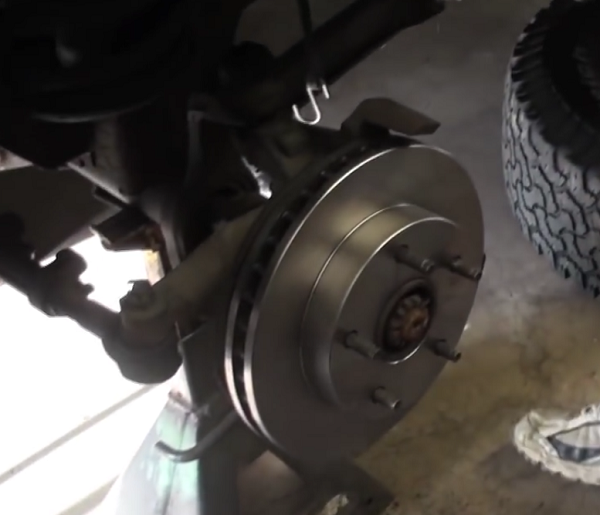
- With the brake caliper removed, it is only a matter of sliding the old brake rotor off of the hub and replacing it with a new one.
- The rotors usually have a lock washer or two over some of the wheel studs to keep the rotor in place. Remove the washers before attempting to remove the rotor.
- While most rotors will usually slide off of the hub with ease, some will be a bit stubborn because of rust or scale buildup. In this case, a rubber mallet can be used to tap the edge of the rotor to free it from the hub. In extreme cases, the use of a torch may be required to heat the rotor hat enough to allow for it to expand and be removed from the hub.
- With the old rotor removed, slide the new rotor in place onto the hub. Install any lock washers that were removed.
- Proceed to re-install the brake caliper and brake pads as outlined above.
Pro Tip
While replacing brake rotors, support the brake calipers in a way that they do not hang from their brake lines. The use of a rubber snubber, wire hanger, or bungie strap are popular methods of tying the caliper up and out of the way without damaging the brake line.
Step 5 – Remove and replace rear brake
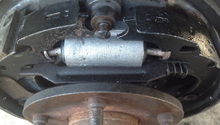
The rear brakes on the 2nd Generation Ram are of a drum design and are a bit more complex than contemporary disc brakes. Servicing of brake drums can be overwhelming for some, but do no fret as you can disassemble one drum assembly at a time while using the other as a guide. This will allow you to ensure your work is correct by using the assembled drum as a diagram.
- Remove the drum. There is a small hole in the backing plate that allows for adjustment of brakes via a star wheel. Using a screwdriver or brake adjusting tool, spin the star wheel enough to loosen tension of the brake shoes on the drum and remove the drum.

Figure 11. Rear brake drum. 
Figure 12. View of drum brake components.
Using a multipurpose brake tool, remove the the two return springs (#1 and #2 in Figure 13) from the anchor pin. Once released, they can be removed from the brake shoes and set aside. Keep track of which spring goes where as they are different sizes.
-
Next, remove the two hold-down springs (#3). These are removed by rotating either the hold-down pin or spring washer while compressing the spring until the pin and washer holes align. Be careful as these springs are liable to shoot off when pressure is released.
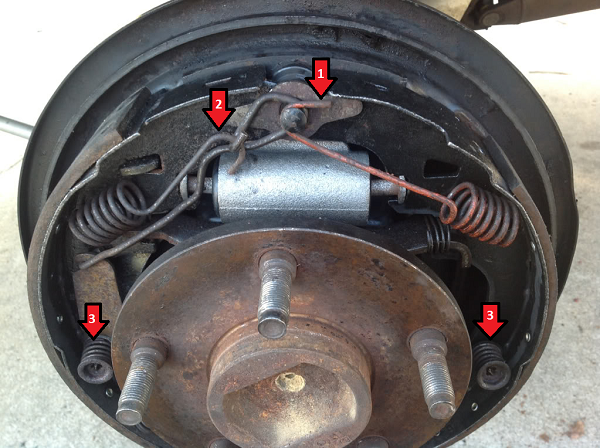
Figure 13. Spring removal procedure. -
Remove the rod running from the anchor pin to the parking brake lever.

Figure 14. Parking brake lever removal. -
At this point, the shoes can be spread apart near the brake cylinder and removed. Be sure to remove the parking brake cable from the parking brake lever while removing the shoes. Also, the parking brake strut and springs are likely to fall out while removing the brake shoes. Clean all brake components (springs, adjuster, parking brake lever, etc.) with a brake cleaner before re-installation.

Figure 15. Brake shoes removed from vehicle. - If replacing the brake cylinder, remove the brake line with a 3/8" wrench on the backside of the backing plate. Remove the two brake cylinder mounting bolts using a 1/2" wrench and remove the brake cylinder.
-
Install the new brake cylinder. Note that you may have to reuse the old brake cylinder links (a.k.a plungers) if your new brake cylinder does not include them. Torque the mounting bolts to approximately 20 ft/lbs. Install the brake line and tighten securely.
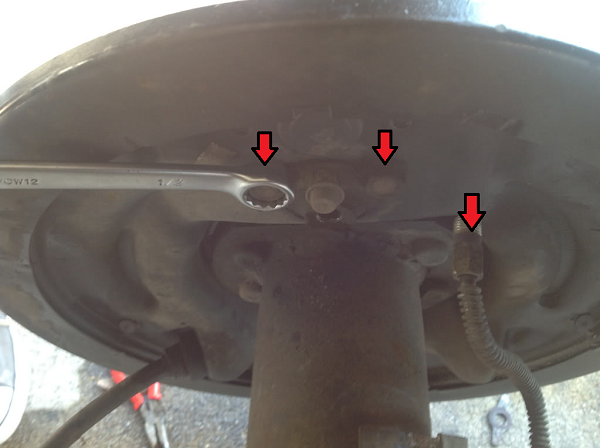
Figure 16. Brake cylinder removal points. 
Figure 17. New brake cylinder and links installed.
- With the brake cylinder replaced, new brake shoes can be re-installed.
-
Install the star wheel adjuster and spring, as well as the parking brake lever onto the new shoes. Be sure the star wheel faces towards the rear as shown. Also, note that the larger of the two brake shoes faces the rear.

Figure 18. Star wheel adjuster and parking brake lever in place. - Attach the parking brake cable to the parking brake lever before installing the shoes into place.
-
Install the the parking brake strut and spring in place between the two shoes. Also, be sure the brake cylinder links (plungers) are in place on the shoes as well. The cylinder's pistons can be compressed by hand to get the links in place.
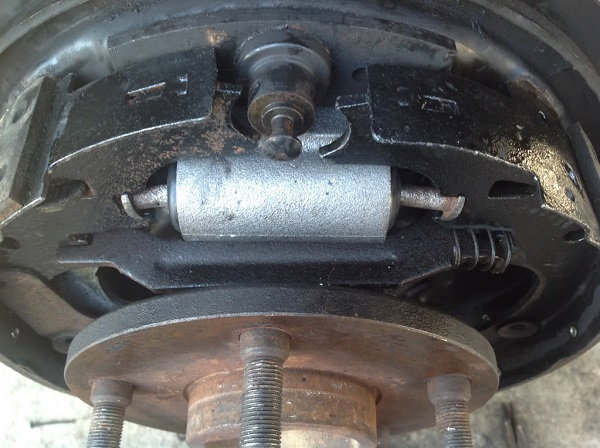
Figure 19. Brake shoes in place along with strut and strut spring. - Install the shoe guide plate onto the anchor pin. Using your multipurpose brake tool, re-install the shoe retainer springs, parking lever rod, and return springs. The return springs will require a good amount of leverage to get them into place on the anchor pin.
- If the brake drum is in poor condition, consider installing a new drum or having the old one turned at a competent shop.
- With the brake reassembled, install the brake drum. Adjust the brakes by turning the star wheel through the hole in the backing plate. Adjust the brakes until there is a light drag while spinning the drum, then back off the star wheel 2-3 notches. The brakes will self-adjust when backing up and braking for the first time.
- If you replaced a brake cylinder, bleed the brake system before installing the wheels and lowering the vehicle off of jack stands.
Featured Video: Dodge Ram 1500 Drum Brakes
Related Discussions
- DIY Front Brakes and Caliper Replacement - DodgeForum.com
- DIY Rear Brake and Wheel Cylinder Replacement - DodgeForum.com
- Problem Bleeding My 99's Brakes- DodgeForum.com