
Radio / Console Removal Instructions
#1
 10-04-2007, 10:09 PM


I thought it might be helpful topoststep by step instructions with images of how to remove the Radio in a 2008 Dodge Avenger for anyone who is looking to change radios or mod their car and wants to minimize the damage to their car due to lack of familiarity with the interior components.
All of the pictures were taken by me and are of my car that I took apart for the purpose of this guide. Sorry about the dumb looking pushpins but I couldnt find anything better suited to illustrating fasteners in my photoshop shapes
ok, so here goes..
Note: The only item that has screws holding it in is the radio itself. Everything else pops off by pulling on it.
Legend:
Red arrows are either places of interest or areas to pull on.
Red Push pins are where the fasteners are behind the plastic face.
Green arrowsindicate areas that you should pull on.
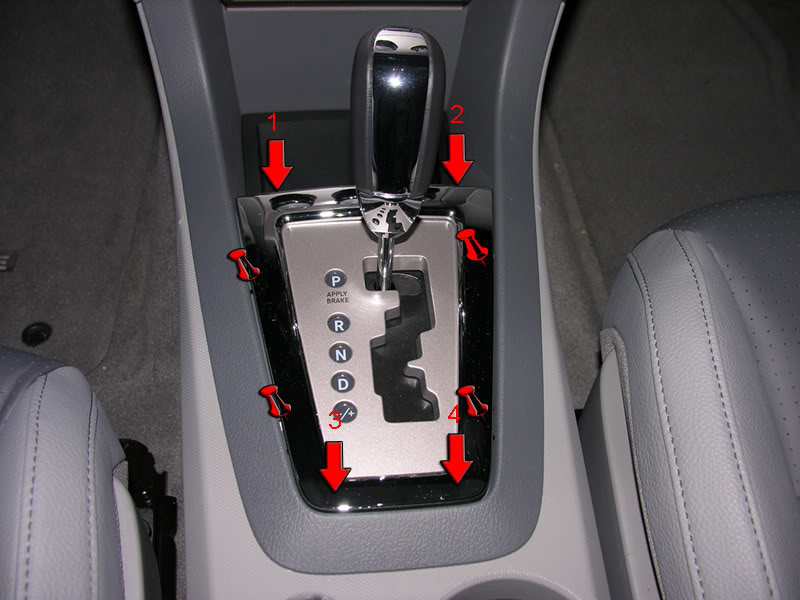
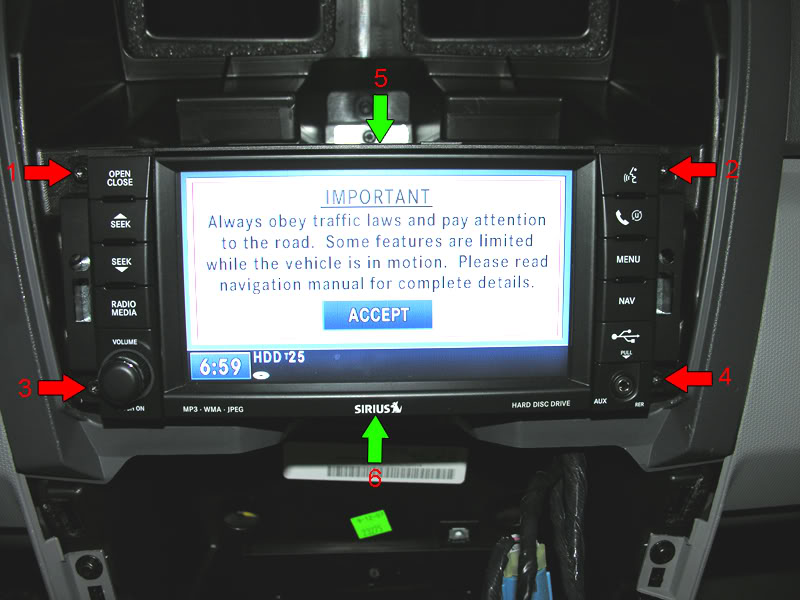
1) Pull upwards on the frontof the silver trim bezel that goes around your shifter (Arrows 1 and 2) when you have some clearance you can start pulling upwards on the 3 and 4 arrows. There are step fasteners on all 4 sides and the trim bezel will come off semi easily if you pull on one side then work the opposite side until the whole bezel pops off. Work around the trim a little on each end at a time.(Sometimes the whole bezel will just pop off if you only pull up on 1 and 2)
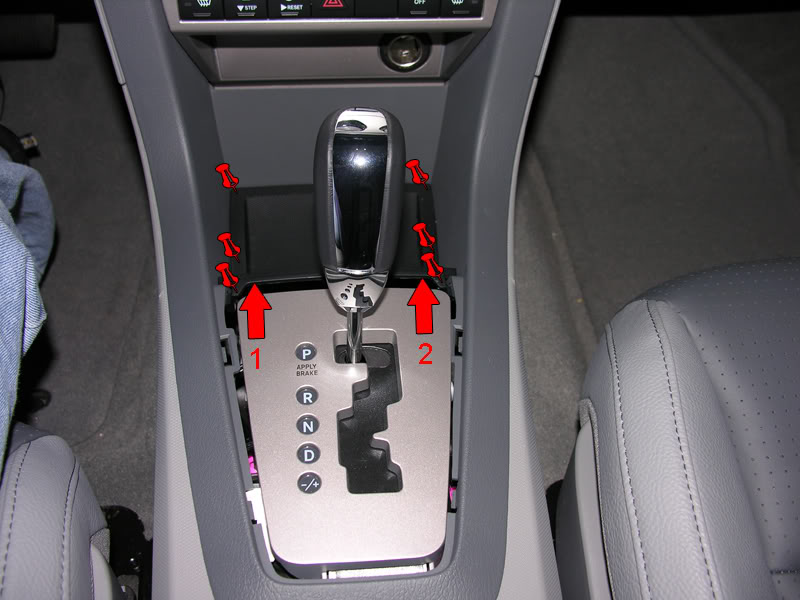
2) Pop off the black rubber tray. Grab the lip of the tray closest to you (Arrows 1 and 2)and push towards the front of the car,after the 2 fasteners closest to you pop,then pull straight up on the edge closest to you (Arrows 1 and 2) and the rest of the fastenerswill pop off freeing the tray.
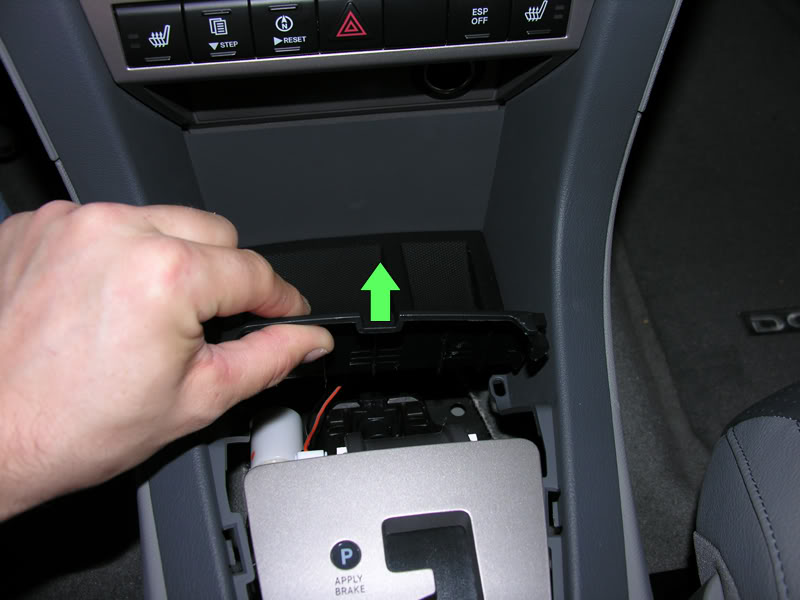
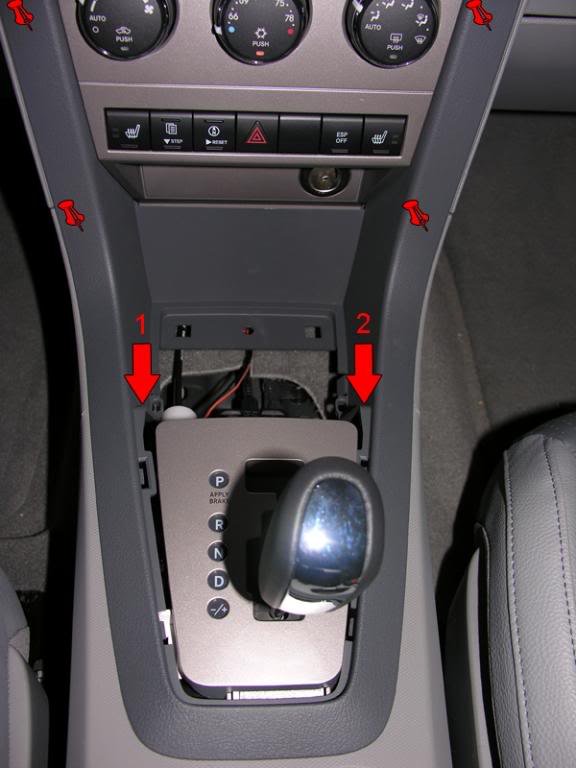
3) Remove the large plasticbezel that goes around your shifter and up the sides of the radio. This part is kind of cool the way it comes off... Just pull onit (Arrows 1 and 2)straight back (towards the back of your car) and the whole piece pops off easily.. you don't need to mess with the 2 side pieces that run up the side.. Just pull back on the base (the part just in front of your shifter) and the whole unit will pop off neatly. Remember.. Do not pull upwards on this part!
4) Remove the control panel/radio bezel. This part always makes me nervous because I am always afraid I'm going to break it because it requires more force than the rest of the pieces to remove.. Don't worry thoughit will be ok.. Place your fingers in the very last vent hole of each of the 2 vents (Arrows 1 and 2). (Don't pull on a vent slat but on the solid plastic under the last vent slat) I place 4 fingers of each hand in each vent hole and pull back towards the back of your car. It takes some force but it will pop off.. If only one side pops out then just work the other side and don't pull on the side that has already been released.
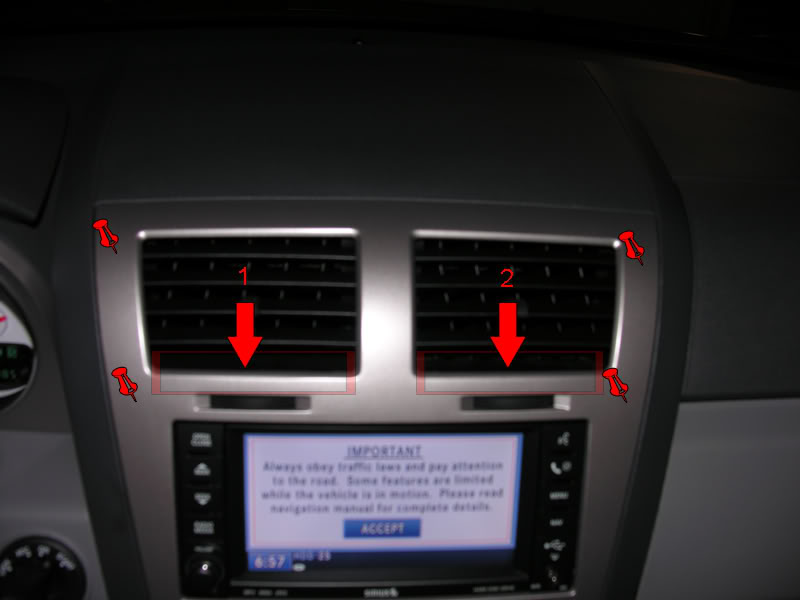
After the 2 top fasteners have popped free, you can give a light tug on the lower area of the panel (Arrows 1 and 2) to release the bottom fasteners.. these 2 should be easy to remove.
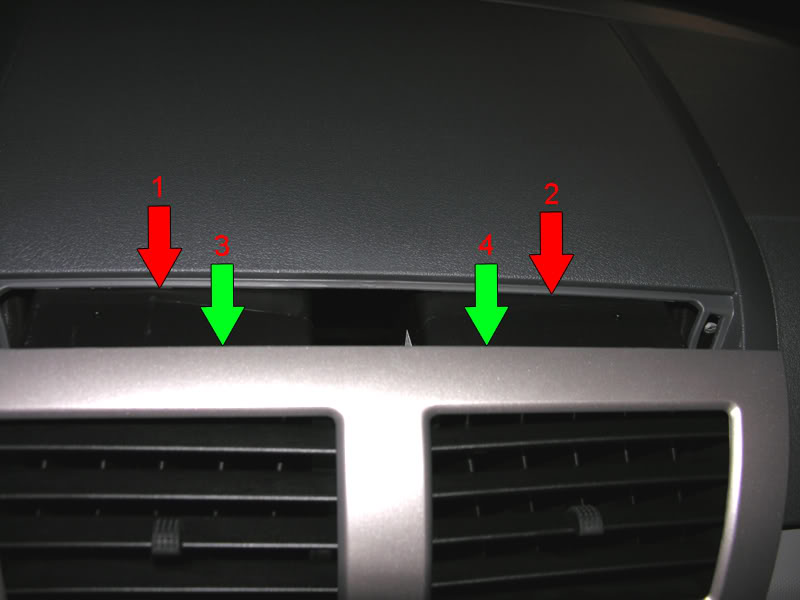
Chances are now the vents themselves will be stuck in there so all you need to do is gently and slightly bend the panel inwards to free the vents.. then pull the panel out. (Arrows 1 and 2 Illustrate the stuck Vents) Apply pressure on the green arrows and gently bend the entire face place inward while pulling the entire plate out (Towards the back of the car). The control panel/bezel/face plateshould now be free.
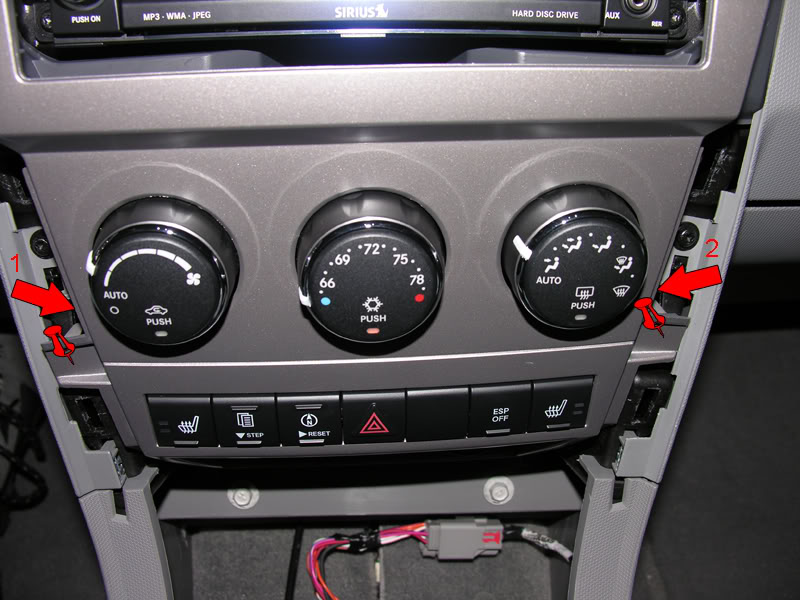
5) Disconnect the 3 plugs connected to the control panel, The Climate control plug (Arrow 3), The Button plug (Arrow 2), and The Lighter plug (Arrow 1). Now the panel is free and you can place it in a safe place so it wont get scratched.
ASSEMBLY NOTE: When reattaching the plugs, remember to place the button plug into the Arrow 2 position as it will also fit into the #4 Arrow plug which wont harm your car but will make all of your buttons inactive. Having to take the dash apart again after its all back together to fix a plug sucks
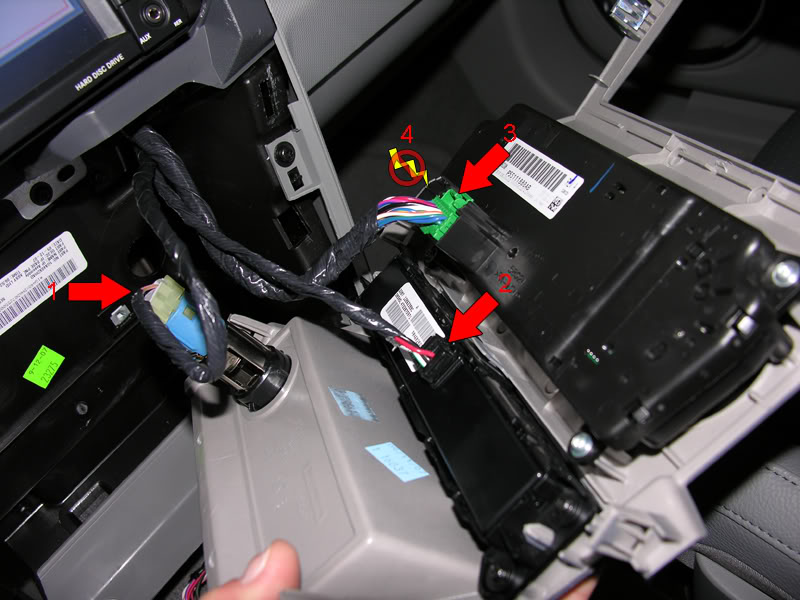
6) Radio removal: The radio uses 4 torx (Size T-20) screws to hold it in place (Arrows 1-4), unscrew them and then the radio will slide out easily.You can grab the radio by the front top and bottom bezel (Arrows 5 and 6) and pull towards the back of the vehicle.
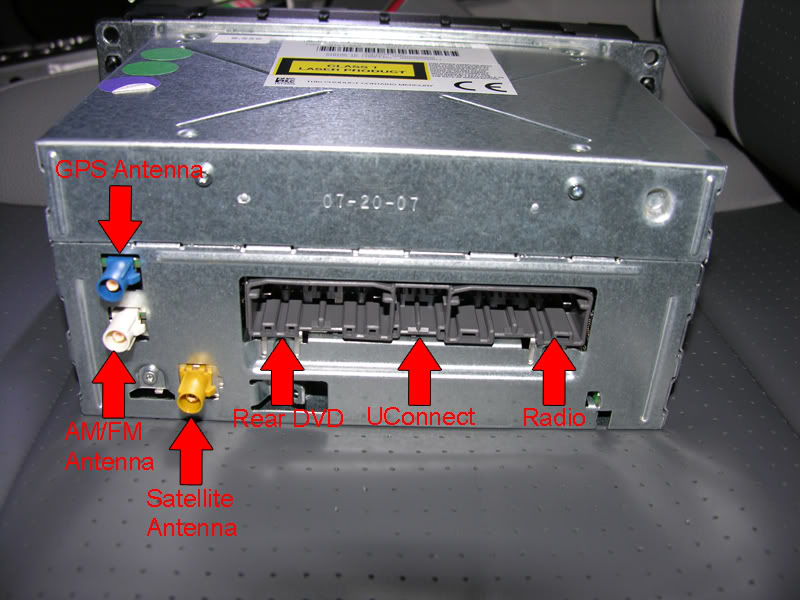
The following image is an illustration of the rearradio plugs and their purpose.
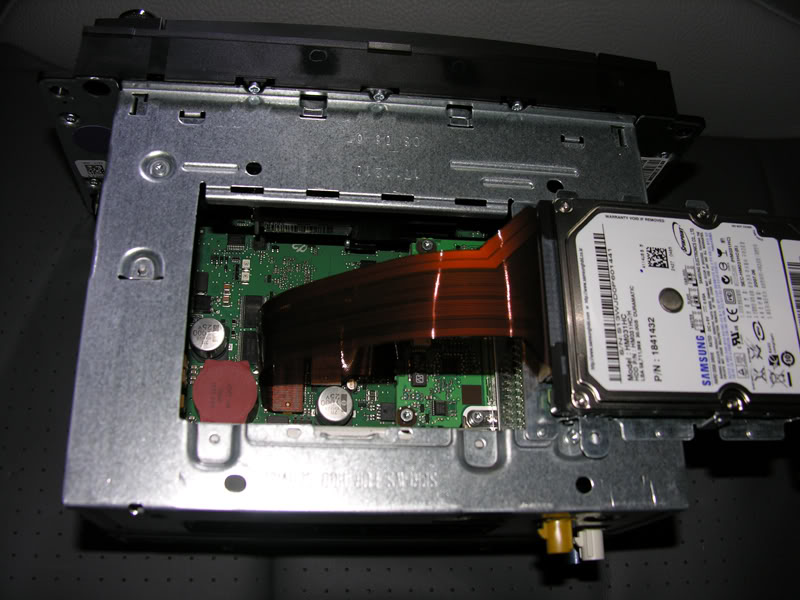
The MyGIG radio with its hard drivecover removed and the hard drive flipped over.
The drive is a 2.5" 30GB IDE Samsung Automotive drive - Model HM031HC / 5400 RPM
Thats about it..
Reassembly is performed with the steps in reverse and applying pressure to the parts in reverse.
hopefullysomeone will find this guideusefuland save some damaged plastic on someone's car..
All of the pictures were taken by me and are of my car that I took apart for the purpose of this guide. Sorry about the dumb looking pushpins but I couldnt find anything better suited to illustrating fasteners in my photoshop shapes
ok, so here goes..
Note: The only item that has screws holding it in is the radio itself. Everything else pops off by pulling on it.
Legend:
Red arrows are either places of interest or areas to pull on.
Red Push pins are where the fasteners are behind the plastic face.
Green arrowsindicate areas that you should pull on.
1) Pull upwards on the frontof the silver trim bezel that goes around your shifter (Arrows 1 and 2) when you have some clearance you can start pulling upwards on the 3 and 4 arrows. There are step fasteners on all 4 sides and the trim bezel will come off semi easily if you pull on one side then work the opposite side until the whole bezel pops off. Work around the trim a little on each end at a time.(Sometimes the whole bezel will just pop off if you only pull up on 1 and 2)
2) Pop off the black rubber tray. Grab the lip of the tray closest to you (Arrows 1 and 2)and push towards the front of the car,after the 2 fasteners closest to you pop,then pull straight up on the edge closest to you (Arrows 1 and 2) and the rest of the fastenerswill pop off freeing the tray.
3) Remove the large plasticbezel that goes around your shifter and up the sides of the radio. This part is kind of cool the way it comes off... Just pull onit (Arrows 1 and 2)straight back (towards the back of your car) and the whole piece pops off easily.. you don't need to mess with the 2 side pieces that run up the side.. Just pull back on the base (the part just in front of your shifter) and the whole unit will pop off neatly. Remember.. Do not pull upwards on this part!
4) Remove the control panel/radio bezel. This part always makes me nervous because I am always afraid I'm going to break it because it requires more force than the rest of the pieces to remove.. Don't worry thoughit will be ok..
Place your fingers in the very last vent hole of each of the 2 vents (Arrows 1 and 2). (Don't pull on a vent slat but on the solid plastic under the last vent slat) I place 4 fingers of each hand in each vent hole and pull back towards the back of your car. It takes some force but it will pop off.. If only one side pops out then just work the other side and don't pull on the side that has already been released. After the 2 top fasteners have popped free, you can give a light tug on the lower area of the panel (Arrows 1 and 2) to release the bottom fasteners.. these 2 should be easy to remove.
Chances are now the vents themselves will be stuck in there so all you need to do is gently and slightly bend the panel inwards to free the vents.. then pull the panel out. (Arrows 1 and 2 Illustrate the stuck Vents) Apply pressure on the green arrows and gently bend the entire face place inward while pulling the entire plate out (Towards the back of the car). The control panel/bezel/face plateshould now be free.
5) Disconnect the 3 plugs connected to the control panel, The Climate control plug (Arrow 3), The Button plug (Arrow 2), and The Lighter plug (Arrow 1). Now the panel is free and you can place it in a safe place so it wont get scratched.
ASSEMBLY NOTE: When reattaching the plugs, remember to place the button plug into the Arrow 2 position as it will also fit into the #4 Arrow plug which wont harm your car but will make all of your buttons inactive. Having to take the dash apart again after its all back together to fix a plug sucks
6) Radio removal: The radio uses 4 torx (Size T-20) screws to hold it in place (Arrows 1-4), unscrew them and then the radio will slide out easily.You can grab the radio by the front top and bottom bezel (Arrows 5 and 6) and pull towards the back of the vehicle.
The following image is an illustration of the rearradio plugs and their purpose.
The MyGIG radio with its hard drivecover removed and the hard drive flipped over.
The drive is a 2.5" 30GB IDE Samsung Automotive drive - Model HM031HC / 5400 RPM
Thats about it..
Reassembly is performed with the steps in reverse and applying pressure to the parts in reverse.
hopefullysomeone will find this guideusefuland save some damaged plastic on someone's car..

#3
10-06-2007, 08:22 PM
#4
10-06-2007, 09:59 PM

Professional
Join Date: Feb 2006
Location: Waukegan, IL
Posts: 198
Likes: 0
Received 0 Likes
on
0 Posts
#5
10-06-2007, 10:15 PM
#6
10-07-2007, 01:50 AM
Thanks for the props I was thinking of writing an Avenger Amplifier/Subwoofer specific guide next even though it will probably not be as needed/useful as this one..
As Turfgrass said, it is a standard sized laptop hard drive but the only difference is it was designed with superior resistance to shock (Although most laptop drives are designed that way because people sometimes drop them)
An excellent replacement drive would be a Seagate Momentus drive as they are built to similar specs. I haven't gotten to a point where I need the extra space on theMyGIG yet as I'm adding songs little by little but I'm sure when I have the need, I will be upgrading the drive to see what happens. (Im still recovering from the shock of everything not working for over 20 minutes when I disconnected my battery.. But as soon as Irecover Im sureI will start modding stuff again)
I have been using Momentus drives in my car as storage for my entire MP3 collection and for videos for use with my handheld computer and they have been handling shocks without ever becoming corrupted for over 2 years so I would imaging they would be fine for this application as well. Most automotive computer hardware retailers carry and recommend the Seagate Momentus line as well.
I am a Systems Administrator and have access totons of laptop drives of various sizes (Mostly Seagate Momentus as thats all I buy anyway) and have all the software and adapters required for this mod so I guess that I will have to just try it out and see what happens.
Using Norton Ghost may be a little risky because Norton or your Operating system may write data to the drive.. But using theDOS based version would probably be safer. I'm sure I'mprobably just being paranoid since I haven't tried it yet but ghosting the drive then using partition magic to resize the partitions technically should work.
The other unknown is what the radio's limit is in terms of hard drive size. It may not be able to interface correctly with huge drives.. So if someone gets excited and runs out to get a 300GB drive it may not work simply because the radio can'trecognize that size drive/partition.
I was thinking of writing an Avenger Amplifier/Subwoofer specific guide next even though it will probably not be as needed/useful as this one..As Turfgrass said, it is a standard sized laptop hard drive but the only difference is it was designed with superior resistance to shock (Although most laptop drives are designed that way because people sometimes drop them)
An excellent replacement drive would be a Seagate Momentus drive as they are built to similar specs. I haven't gotten to a point where I need the extra space on theMyGIG yet as I'm adding songs little by little but I'm sure when I have the need, I will be upgrading the drive to see what happens. (Im still recovering from the shock of everything not working for over 20 minutes when I disconnected my battery.. But as soon as Irecover Im sureI will start modding stuff again)
I have been using Momentus drives in my car as storage for my entire MP3 collection and for videos for use with my handheld computer and they have been handling shocks without ever becoming corrupted for over 2 years so I would imaging they would be fine for this application as well. Most automotive computer hardware retailers carry and recommend the Seagate Momentus line as well.
I am a Systems Administrator and have access totons of laptop drives of various sizes (Mostly Seagate Momentus as thats all I buy anyway) and have all the software and adapters required for this mod so I guess that I will have to just try it out and see what happens.
Using Norton Ghost may be a little risky because Norton or your Operating system may write data to the drive.. But using theDOS based version would probably be safer. I'm sure I'mprobably just being paranoid since I haven't tried it yet but ghosting the drive then using partition magic to resize the partitions technically should work.
The other unknown is what the radio's limit is in terms of hard drive size. It may not be able to interface correctly with huge drives.. So if someone gets excited and runs out to get a 300GB drive it may not work simply because the radio can'trecognize that size drive/partition.
#7
10-07-2007, 07:30 AM
ORIGINAL: futil
Thanks for the props I was thinking of writing an Avenger Amplifier/Subwoofer specific guide next even though it will probably not be as needed/useful as this one..
As Turfgrass said, it is a standard sized laptop hard drive but the only difference is it was designed with superior resistance to shock (Although most laptop drives are designed that way because people sometimes drop them)
An excellent replacement drive would be a Seagate Momentus drive as they are built to similar specs. I haven't gotten to a point where I need the extra space on theMyGIG yet as I'm adding songs little by little but I'm sure when I have the need, I will be upgrading the drive to see what happens. (Im still recovering from the shock of everything not working for over 20 minutes when I disconnected my battery.. But as soon as Irecover Im sureI will start modding stuff again)
I have been using Momentus drives in my car as storage for my entire MP3 collection and for videos for use with my handheld computer and they have been handling shocks without ever becoming corrupted for over 2 years so I would imaging they would be fine for this application as well. Most automotive computer hardware retailers carry and recommend the Seagate Momentus line as well.
I am a Systems Administrator and have access totons of laptop drives of various sizes (Mostly Seagate Momentus as thats all I buy anyway) and have all the software and adapters required for this mod so I guess that I will have to just try it out and see what happens.
Using Norton Ghost may be a little risky because Norton or your Operating system may write data to the drive.. But using theDOS based version would probably be safer. I'm sure I'mprobably just being paranoid since I haven't tried it yet but ghosting the drive then using partition magic to resize the partitions technically should work.
The other unknown is what the radio's limit is in terms of hard drive size. It may not be able to interface correctly with huge drives.. So if someone gets excited and runs out to get a 300GB drive it may not work simply because the radio can'trecognize that size drive/partition.
Thanks for the props
I was thinking of writing an Avenger Amplifier/Subwoofer specific guide next even though it will probably not be as needed/useful as this one..As Turfgrass said, it is a standard sized laptop hard drive but the only difference is it was designed with superior resistance to shock (Although most laptop drives are designed that way because people sometimes drop them)
An excellent replacement drive would be a Seagate Momentus drive as they are built to similar specs. I haven't gotten to a point where I need the extra space on theMyGIG yet as I'm adding songs little by little but I'm sure when I have the need, I will be upgrading the drive to see what happens. (Im still recovering from the shock of everything not working for over 20 minutes when I disconnected my battery.. But as soon as Irecover Im sureI will start modding stuff again)
I have been using Momentus drives in my car as storage for my entire MP3 collection and for videos for use with my handheld computer and they have been handling shocks without ever becoming corrupted for over 2 years so I would imaging they would be fine for this application as well. Most automotive computer hardware retailers carry and recommend the Seagate Momentus line as well.
I am a Systems Administrator and have access totons of laptop drives of various sizes (Mostly Seagate Momentus as thats all I buy anyway) and have all the software and adapters required for this mod so I guess that I will have to just try it out and see what happens.
Using Norton Ghost may be a little risky because Norton or your Operating system may write data to the drive.. But using theDOS based version would probably be safer. I'm sure I'mprobably just being paranoid since I haven't tried it yet but ghosting the drive then using partition magic to resize the partitions technically should work.
The other unknown is what the radio's limit is in terms of hard drive size. It may not be able to interface correctly with huge drives.. So if someone gets excited and runs out to get a 300GB drive it may not work simply because the radio can'trecognize that size drive/partition.
I wonder why that happens? Maybe it wasn't the FreeGIG that made my system go crazy, maybe that just happens when you mess around with these cars and eventually it fixes itself.
When my new FreeGIG comes in I think i'll leave it in for half an hour or so, even if the car goes crazy... see if it sorts itself out.
Trending Topics
#8
12-08-2007, 05:13 PM

Nice work. I did this earlier this year and I broke one of the clips on the bottom of the chrome plastic trim surround that goes around the shifter. Be careful when pulling this up because those tabs are brittle. It kinds of rattles now. 
I didn't get rear seat video so I wired up an RCA cable to the back of the myGIG to get the video and audio outputs from the radio and ran them to a headrest monitor with IR headphones. This setup works awesome and is great for the little one. She loves watching Little Einsteins on the way to daycare!
I didn't get rear seat video so I wired up an RCA cable to the back of the myGIG to get the video and audio outputs from the radio and ran them to a headrest monitor with IR headphones. This setup works awesome and is great for the little one. She loves watching Little Einsteins on the way to daycare!
#9
12-09-2007, 05:49 PM


#10
12-10-2007, 02:52 PM
There are no input connections in the back of the radio that can be tapped into..
There may be something inside the radio that can be tapped into but I never got around to stripping the radio down past getting the hard drive out.. If there is anything inside the radio it would involve soldering multiple wires and probably not be worth the effort depending on how many wires would need to be soldered..
I would guess around 8 wires which wouldn't be too bad.. but I have seen up to 40 wires having to be soldered (The Camera and Video screenin my old phone that I was going to turn into a backup camera project had so many wires thatI would have had to re-solder to move the video out of the phone that I decided to scrap the project.)
You can however tap into the outputs for the rear video screen and add more screens, or even watch video while the car is moving by placing the added screen in the front seat area..