

How to: Dakota Gen 1 4x4 Lower Control Arm Bushings


Thread Starter
|
Professional
Joined: Jun 2009
Posts: 235
Likes: 2
From: Canada
Hello everyone,
In the process of ordering new control arm bushings for my 1st generation 4WD Dakota, I discovered the same thing that others have.
While MOOG makes good replacement UPPER bushings for the 4wd model, lower control arm bushings are another matter.
In a nutshell:
1)Rumour has it, Dodge sold replacement lower control arms with the bushings already installed and new lower control arms are no longer available.
2)Contrary to #1, The 1990-93 Parts Catalog lists lower control arm bushings: 4322 549 Front 4322 550 Rear. Unfortunately the front one is listed as discontinued.
3) You can't buy new aftermarket lower bushings.
Well.. this post will show why #3 is NOT "totally" correct.
-----------------
Energy Suspension makes control arm bushing kit 5.3139 for 1997-2004 Dakota/Durangos.
"89Dakota318" posted that the 1997 kit would work on a 1st generation 4wd with some modifications.
https://dodgeforum.com/forum/2688995-post18.html
I decided to take a chance and buy the kit.
I used Part# 5.3139G
1997-04 DODGE DAKOTA/DURANGO FRONT CONTROL ARM BUSHING SET.
I can't find where I put my info on the individual components for just the lower bushings.
Call Energy Suspension and they will be able to give you a list of the individual parts for just the lower control arms, that are in the above kit.
---------
UPPER CONTROL ARM BUSHINGS:
I already had brand new MOOG upper bushings installed, but since the "energy suspension" kit came with new uppers I thought I'd try swapping them out.
Unfortunately, while the Energy Suspension bushings looked to be the right size, they were in fact, very very slightly too small in diameter.
The OEM and MOOG bushings have to be pressed into the upper control arm. They fit TIGHT.
The Energy Suspension bushings, fit snug, but NOT tight. You could slide the bushing in, and out of, the upper control arm with your hand.
After talking with a journeyman mechanic about this, he suggested that I could tack weld the metal bushing shell into the arm, otherwise the shell would spin in the control arm and wear out prematurely.
In the end, I opted to simply use the new MOOG upper control arm bushings I already had.
(Next summer I may burn the rubber out of a new upper moog bushing and test if the polyurethane bushings will fit in the MOOG shell)
LOWER CONTROL ARM BUSHINGS:
The whole point of me buying the Energy Suspension kit was to replace my lower bushings.
Here's a series of photos to show how I did it.
The 2 bushings each consist of a metal sleeve and 2 urethane halves
One bushing is larger in diameter than the other. The diameters matched the control arm
I assembled the bushings and compared them to the lower control arm.
You will notice that the 2nd bushing is too long.


I carefully measured the difference and carefully cut one of the bushing halves to the correct length.
I measured and marked it all the way around, so that I could cut it in a straight line.
I cut it with a new heavy duty blade in an Olfa utility knife, but you may come up with better method.
The photo below shows the bushing halves after I cut one to length.

Note: Someone with more tools would do this quicker and better, but this is how I did it with my very limited metal cutting tools
I GENTLY clamped the new sleeve into a vise and held the sleeve from the old bushing against it.
(I wanted to clamp both sleeves in the vise but the vise jaw wouldn't hold them together)
Making sure the left side of the sleeves were aligned, I used a hack saw to cut a shallow slot into the new sleeve.
HACK SAWS HAVE FLEXIBLE AND THIN BLADES AND ARE DAMN NEAR IMPOSSIBLE TO CUT 100% STRAIGHT WITH.
SO, I DIDN'T SIMPLY CUT ALL THE WAY THROUGH.
I JUST CUT A SHALLOW SLOT.
I MADE SURE THAT THE CUT WOULD MAKE THE SLEEVE A TINY BIT LONGER THAN NEEDED. SEE LATER PHOTOS FOR WHY.
I then loosened the new sleeve in the vise, rotated it a bit, tightened the vise and repeated the process.
Cut.... Rotate...Cut..Rotate..
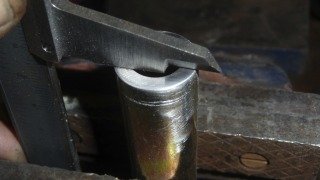
Once I had a shallow slot cut all the way around the circumference of the sleeve, I carefully repeated the process until I cut all the way through, using the slot as a guide.
Rotate... Cut... Rotate.. Cut... Repeat..
I was VERY careful to make sure I cut as straight as possible.


Notice how rough the edges were after it was cut ?
That's not a good thing because the rough edges will damage bushings.
I had to:
A) clean up the rough surface
b) make sure the sleeve was the correct length
C) make sure the cut face was square to the sides of the sleeve
I gently clamped the sleeve into the vise and used a "scotch brite pad style" surface prep disk on my die grinder to slowly polish/grind the cut face.
(The scotch brite style prep pad enabled me to sloooowly clean up the cut end of the sleeve. A sanding type disk would have been too rough and fast cutting)
I used a vernier caliper to measure the length of the old sleeve, and repeatedly compared it to the new sleeve.
Polish... measure...polish..measure.. ..repeat until done.
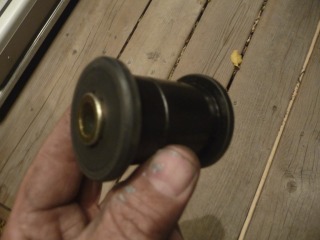
By checking with a caliper, I was able to, not only get the sleeve to the correct length, but to make sure that the face was flat, and square to the sides/parallel to the other end.
After it was the correct length and flat/square , I very gently used the prep disk to smooth the outside edge.
I then gave the cut end of the sleeve a thin quick shot of clear coat to protect it from rusting


The finished Bushing ready to be installed.
To install the bushing into the control arm:
1) I separated the bushing into it's 3 parts...
2) I inserted the poly bushing halves into the control arms...
(I used a tiny tiny amount of permatex never-seize on the bushing lip to make it easier to get it started into the hole in the control arm)
3) I liberally lubricated the sleeve and the hole in the poly bushing with never-seize...
4) I pushed the sleeve into the bushing until it was centered
-------------------
I bought my bushings online from Suspension Restoration Parts in California. http://www.suspension.com
They had them in stock and shipped the next business day.
I chose them, because their website has a lot of tips and info about bushings, including the recommendation to use permatex never-sieze instead of the supplied bushing lubricant.
After talking to the owner on the phone... he knows his stuff.. unlike most places, who simply sell you parts.
if you call him he should be able to set you up with just the lower bushings, instead of buying the complete kit.
I have no affiliiation with him/them, other than being a satisfied customer. So far they have been great to buy from.
IMPORTANT LEGAL BLAH BLAH BLAH NOTE:
This is just MY way of handling the job. Some people might be able to do it in a better way.
If you use the info in this thread, you accept all responsibility for doing it correctly and safely, and for any and all future consequences.
aka If you are a dumbass.. then hire a pro to do the work.
Hope this info this helps someone.
P.S.
I also purchased Energy Suspension cab mounts and leaf spring bushings
The cab mounts are only listed for the 2WD gen 1 Dakota, but I think they "should" work fine on the 4WD Gen 1.
I'll post a thread on the results, once I get to the point of remounting the cab on the frame.
In the process of ordering new control arm bushings for my 1st generation 4WD Dakota, I discovered the same thing that others have.
While MOOG makes good replacement UPPER bushings for the 4wd model, lower control arm bushings are another matter.
In a nutshell:
1)Rumour has it, Dodge sold replacement lower control arms with the bushings already installed and new lower control arms are no longer available.
2)Contrary to #1, The 1990-93 Parts Catalog lists lower control arm bushings: 4322 549 Front 4322 550 Rear. Unfortunately the front one is listed as discontinued.
3) You can't buy new aftermarket lower bushings.
Well.. this post will show why #3 is NOT "totally" correct.
-----------------
Energy Suspension makes control arm bushing kit 5.3139 for 1997-2004 Dakota/Durangos.
"89Dakota318" posted that the 1997 kit would work on a 1st generation 4wd with some modifications.
https://dodgeforum.com/forum/2688995-post18.html
I decided to take a chance and buy the kit.
I used Part# 5.3139G
1997-04 DODGE DAKOTA/DURANGO FRONT CONTROL ARM BUSHING SET.
I can't find where I put my info on the individual components for just the lower bushings.
Call Energy Suspension and they will be able to give you a list of the individual parts for just the lower control arms, that are in the above kit.
---------
UPPER CONTROL ARM BUSHINGS:
I already had brand new MOOG upper bushings installed, but since the "energy suspension" kit came with new uppers I thought I'd try swapping them out.
Unfortunately, while the Energy Suspension bushings looked to be the right size, they were in fact, very very slightly too small in diameter.
The OEM and MOOG bushings have to be pressed into the upper control arm. They fit TIGHT.
The Energy Suspension bushings, fit snug, but NOT tight. You could slide the bushing in, and out of, the upper control arm with your hand.
After talking with a journeyman mechanic about this, he suggested that I could tack weld the metal bushing shell into the arm, otherwise the shell would spin in the control arm and wear out prematurely.
In the end, I opted to simply use the new MOOG upper control arm bushings I already had.
(Next summer I may burn the rubber out of a new upper moog bushing and test if the polyurethane bushings will fit in the MOOG shell)
LOWER CONTROL ARM BUSHINGS:
The whole point of me buying the Energy Suspension kit was to replace my lower bushings.
Here's a series of photos to show how I did it.
The 2 bushings each consist of a metal sleeve and 2 urethane halves
One bushing is larger in diameter than the other. The diameters matched the control arm
I assembled the bushings and compared them to the lower control arm.
You will notice that the 2nd bushing is too long.
I carefully measured the difference and carefully cut one of the bushing halves to the correct length.
I measured and marked it all the way around, so that I could cut it in a straight line.
I cut it with a new heavy duty blade in an Olfa utility knife, but you may come up with better method.
The photo below shows the bushing halves after I cut one to length.
Note: Someone with more tools would do this quicker and better, but this is how I did it with my very limited metal cutting tools
I GENTLY clamped the new sleeve into a vise and held the sleeve from the old bushing against it.
(I wanted to clamp both sleeves in the vise but the vise jaw wouldn't hold them together)
Making sure the left side of the sleeves were aligned, I used a hack saw to cut a shallow slot into the new sleeve.
HACK SAWS HAVE FLEXIBLE AND THIN BLADES AND ARE DAMN NEAR IMPOSSIBLE TO CUT 100% STRAIGHT WITH.
SO, I DIDN'T SIMPLY CUT ALL THE WAY THROUGH.
I JUST CUT A SHALLOW SLOT.
I MADE SURE THAT THE CUT WOULD MAKE THE SLEEVE A TINY BIT LONGER THAN NEEDED. SEE LATER PHOTOS FOR WHY.
I then loosened the new sleeve in the vise, rotated it a bit, tightened the vise and repeated the process.
Cut.... Rotate...Cut..Rotate..
Once I had a shallow slot cut all the way around the circumference of the sleeve, I carefully repeated the process until I cut all the way through, using the slot as a guide.
Rotate... Cut... Rotate.. Cut... Repeat..
I was VERY careful to make sure I cut as straight as possible.
Notice how rough the edges were after it was cut ?
That's not a good thing because the rough edges will damage bushings.
I had to:
A) clean up the rough surface
b) make sure the sleeve was the correct length
C) make sure the cut face was square to the sides of the sleeve
I gently clamped the sleeve into the vise and used a "scotch brite pad style" surface prep disk on my die grinder to slowly polish/grind the cut face.
(The scotch brite style prep pad enabled me to sloooowly clean up the cut end of the sleeve. A sanding type disk would have been too rough and fast cutting)
I used a vernier caliper to measure the length of the old sleeve, and repeatedly compared it to the new sleeve.
Polish... measure...polish..measure.. ..repeat until done.
By checking with a caliper, I was able to, not only get the sleeve to the correct length, but to make sure that the face was flat, and square to the sides/parallel to the other end.
After it was the correct length and flat/square , I very gently used the prep disk to smooth the outside edge.
I then gave the cut end of the sleeve a thin quick shot of clear coat to protect it from rusting
The finished Bushing ready to be installed.
To install the bushing into the control arm:
1) I separated the bushing into it's 3 parts...
2) I inserted the poly bushing halves into the control arms...
(I used a tiny tiny amount of permatex never-seize on the bushing lip to make it easier to get it started into the hole in the control arm)
3) I liberally lubricated the sleeve and the hole in the poly bushing with never-seize...
4) I pushed the sleeve into the bushing until it was centered
-------------------
I bought my bushings online from Suspension Restoration Parts in California. http://www.suspension.com
They had them in stock and shipped the next business day.
I chose them, because their website has a lot of tips and info about bushings, including the recommendation to use permatex never-sieze instead of the supplied bushing lubricant.
After talking to the owner on the phone... he knows his stuff.. unlike most places, who simply sell you parts.
if you call him he should be able to set you up with just the lower bushings, instead of buying the complete kit.
I have no affiliiation with him/them, other than being a satisfied customer. So far they have been great to buy from.
IMPORTANT LEGAL BLAH BLAH BLAH NOTE:
This is just MY way of handling the job. Some people might be able to do it in a better way.
If you use the info in this thread, you accept all responsibility for doing it correctly and safely, and for any and all future consequences.
aka If you are a dumbass.. then hire a pro to do the work.
Hope this info this helps someone.
P.S.
I also purchased Energy Suspension cab mounts and leaf spring bushings
The cab mounts are only listed for the 2WD gen 1 Dakota, but I think they "should" work fine on the 4WD Gen 1.
I'll post a thread on the results, once I get to the point of remounting the cab on the frame.
Last edited by RobertMc; May 13, 2014 at 12:53 PM.
Thread Starter
|
Professional
Joined: Jun 2009
Posts: 235
Likes: 2
From: Canada
Part #5.3139G
1997-04 DODGE DAKOTA/DURANGO FRONT CONTROL ARM BUSHING SET.
I can't find where I put my info on the individual components for just the lower bushings.
Once I find it I'll update my original post.
That way people can order just the lower bushings instead of the whole kit.
All Star
Joined: Apr 2013
Posts: 941
Likes: 22
From: Connecticut
I know this is an older post, but in the event that you're still on this forum and keeping an eye on this thread, I just wanted to say THANK YOU very much. This helps tremendously for my '93 4x4, which needs every bushing in the front suspension replaced.
This is why I love the internet.
This is why I love the internet.
Thread Starter
|
Professional
Joined: Jun 2009
Posts: 235
Likes: 2
From: Canada
I know this is an older post, but in the event that you're still on this forum and keeping an eye on this thread, I just wanted to say THANK YOU very much. This helps tremendously for my '93 4x4, which needs every bushing in the front suspension replaced.
This is why I love the internet.
This is why I love the internet.
You are more than welcome.
I've been away for a bit but I'm back now and working on the the truck again.
I'm probably going to make a build thread for it.

All Star
Joined: Apr 2013
Posts: 941
Likes: 22
From: Connecticut
For what it's worth I ended up doing exactly what RobertMC did here and it worked great! Very time consuming to make sure everything was just right but totally worth it! I have a bunch of pics I took but Robert pretty much covers all of it...thanks again!
Trending Topics
All Star
Joined: Apr 2013
Posts: 941
Likes: 22
From: Connecticut
I'm not sure why you can't see the pictures but I saved the post as a PDF and it is right here. https://drive.google.com/file/d/0B0l...ew?usp=sharing