

View Poll Results: A poll


Voters: 11. You may not vote on this poll
CAI or lowering kit


Captain
Joined: Dec 2005
Posts: 520
Likes: 0
From: Cloquet, Minnesota
It would probably just be easier to buy the shocks struts and springs and switch them all at once instead of gambling the chance of your stock shocks and struts going out fairly quickly.

Thread Starter
|
Veteran
Joined: Aug 2007
Posts: 444
Likes: 0
From: AR
i dont know crap about installing stuff.. and deffinately dont have the equipment for this one.. but maybe my g-pa could help.. i dont know.. i wouldn't even know where to start

Grand Champion
Joined: Nov 2005
Posts: 6,258
Likes: 0
From: Charleston, SC
This where you start...
**Removal and Installation Of Struts**
REMOVAL - STRUT ASSEMBLY (FRONT)
1. Raise the vehicle.
2. Remove tire and wheel assembly from location on front of vehicle requiring strut removal.
3. If both strut assemblies are to be removed, mark the strut assemblies right or left according to which side of the vehicle they were removed from
4. Remove the screw securing the ground strap to the rear of the strut.
5. If the vehicle is equipped with Antilock brakes (ABS) , remove the screw securing the ABS wheel speed sensor to the rear of the strut.
CAUTION: The strut assembly-to-steering knuckle attaching bolts are serrated and must not be turned during removal. Hold the bolts stationary in the steering knuckle while removing the nuts, then tap the bolts out using a pin punch.
6. Remove the two bolts attaching the strut to the steering knuckle.
7. Lower the vehicle just enough to open the hood, but without letting the tires touch the floor.
8. Remove the three nuts attaching the upper mount of the strut assembly to the vehicle's strut tower.
9. Remove the strut assembly from the vehicle.
DISASSEMBLY - STRUT ASSEMBLY (FRONT)
The Strut assembly must be removed from the vehicle for it to be disassembled and assembled.
For the disassembly and assembly of the strut assembly, use strut spring compressor, or the equivalent, to compress the coil spring. Follow the manufacturer's instructions closely.
1. If both struts are being serviced at the same time, mark the coil spring and strut assembly according to which side of the vehicle the strut was removed from, and which strut the coil spring was removed from.
2. Position the spring compressors as shown below.
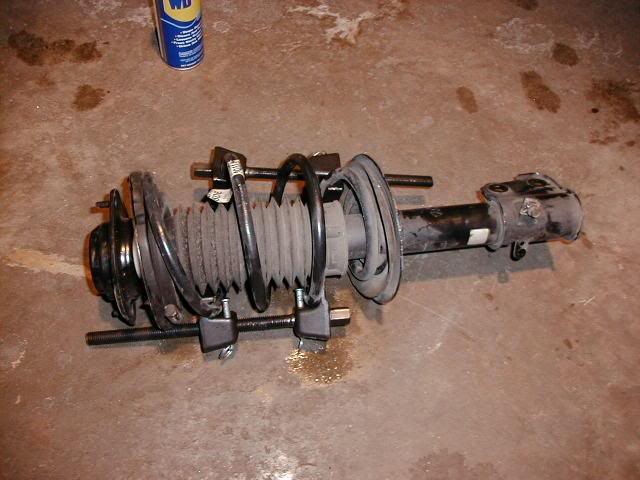
WARNING: DO NOT REMOVE THE STRUT SHAFT NUT BEFORE THE COIL SPRING IS COMPRESSED. THE COIL SPRING IS HELD UNDER PRESSURE AND MUST BE COMPRESSED, REMOVING SPRING TENSION FROM THE UPPER MOUNT AND PIVOT BEARING, BEFORE THE SHAFT NUT IS REMOVED.
3. Compress the coil spring until all coil spring tension is removed from the upper mount.
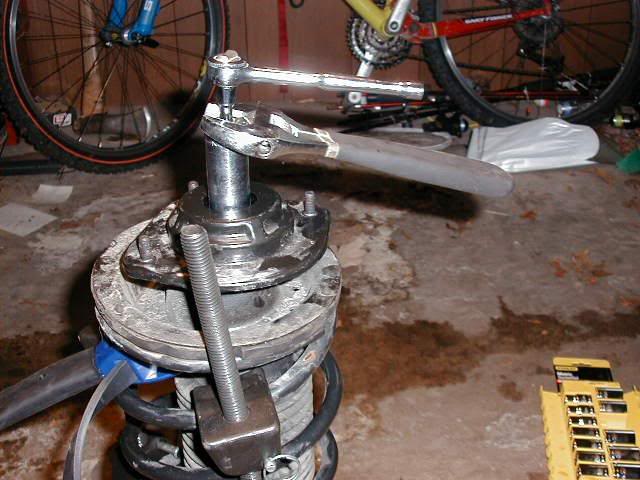
4. Once the spring is sufficiently compressed, install the custom tool shown below on the strut shaft retaining nut. Next, install a 10mm socket with extension on the hex on the end of the strut shaft. While holding the strut shaft from turning, remove the nut from the strut shaft.
(Pictures is a pair of vice-grips and a tractor spark plug socket)
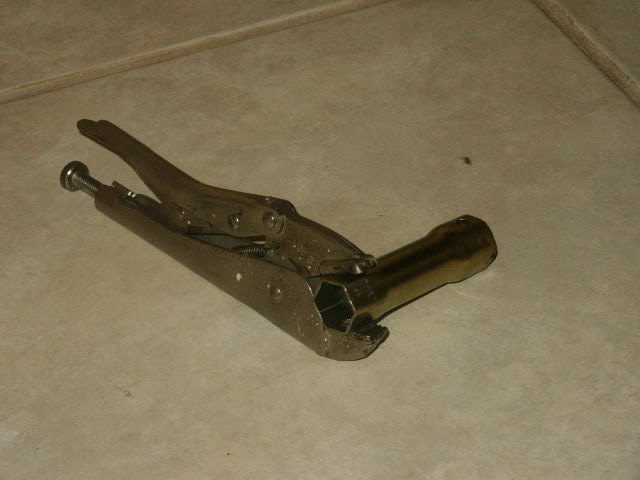
(Pictured below is a 21mm 1/2" drive deepwell socket with a 10mm socket and extension)
5. Remove the upper mount from the strut shaft.
6. Remove the upper spring seat and bearing, along with the upper spring isolator as an assembly from the top of the coil spring by pulling them straight up. The upper spring isolator can be separated from the spring seat and bearing once removed from vehicle.
7. Remove the dust shield, then the jounce bumper from the strut shaft by pulling each straight up.
8. Remove the clamp from the bottom of the coil spring and remove the strut out through the bottom of the coil spring.
9. Remove the lower spring isolator from the lower spring seat on the strut.
ASSEMBLY - STRUT ASSEMBLY (FRONT)
For the disassembly and assembly of the strut assembly, use strut spring compressor, available for rental or purchase at any autoparts store.
1. Place the coil spring in the compressor following the manufacturers instructions. Before compressing the spring, rotate the spring so the end of the top coil is directly in the back as shown.
2. Slowly compress the coil spring until enough room is available for strut assembly reassembly.
3. Install the lower spring isolator on the lower spring seat of the strut.
4. Install the strut through the bottom of the coil spring until the lower spring seat contacts the lower end of the coil spring. Rotate the strut as necessary until the clevis bracket is positioned straight outward away from the compressor. Install the clamp on the lower end of the coil spring and strut, so the strut is held in place.
5. Install the jounce bumper on the strut shaft. The jounce bumper is to be installed with the smaller end pointing downward toward the lower seat.
6. Install the dust shield on the strut shaft. The bottom of the dust shield will snap past the retainer on top of the strut housing.
7. If disassembled, reinstall the upper spring isolator on the upper spring seat and bearing.
8. Install the upper spring seat and bearing on top of the coil spring. Position the notch formed into the edge of the upper seat straight out away from the compressor.
9. Install the strut upper mount over the strut shaft and onto the top of the upper spring seat and bearing.
10. Loosely install the retaining nut on the strut shaft. While holding the strut shaft from turning, tighten the strut shaft retaining nut to a torque of 55 ft. lbs..
11. Slowly release the tension from the coil spring by backing off the compressor drive completely. As the tension is relieved, make sure the upper mount and seat and bearing align properly. Verify the upper mount does not bind.
12. Remove the clamp from the lower end of the coil spring and strut. Push back the spring compressor upper and lower hooks, then remove the strut assembly from the spring compressor.
13. Install the strut assembly on the vehicle.
INSTALLATION - STRUT ASSEMBLY (FRONT)
1. Install the strut assembly into the strut tower, aligning the three studs on the strut upper mount with the holes in strut tower. Install the three mounting nuts on the studs. Tighten the three nuts to a torque of 300 inch lbs..
2. Close the hood of the vehicle.
CAUTION: The strut assembly-to-steering knuckle attaching bolts are serrated and must not be turned during installation. Install the nuts while holding the bolts stationary in the steering knuckle.
3. Position the lower end of the strut assembly in line with the upper end of the steering knuckle and align the mounting holes. Install the two attaching bolts. The bolts should be installed with so that the nuts face towards the front of the vehicle once installed. Install the nuts. Holding the bolts in place tighten the nuts to a torque of 40 ft. lbs. plus an additional 90°turn after the specified torque is met.
4. If the vehicle is equipped with Antilock brakes (ABS) , attach the ABS wheel speed sensor to the rear of the strut (rearward ear) using its mounting screw. Tighten the mounting screw to a torque of 120 inch lbs.
5. Attach the ground strap to the rear of the strut (forward ear) using its mounting screw. Tighten the mounting screw to a torque of 120 inch lbs.
6. Install the tire and wheel assembly. Install and tighten the wheel mounting nuts in proper sequence until all nuts are torqued to half specification. Repeat the tightening sequence to the full specified torque of 100 ft. lbs.
7. Lower the vehicle.
**Removal and Installation Of Struts**
REMOVAL - STRUT ASSEMBLY (FRONT)
1. Raise the vehicle.
2. Remove tire and wheel assembly from location on front of vehicle requiring strut removal.
3. If both strut assemblies are to be removed, mark the strut assemblies right or left according to which side of the vehicle they were removed from
4. Remove the screw securing the ground strap to the rear of the strut.
5. If the vehicle is equipped with Antilock brakes (ABS) , remove the screw securing the ABS wheel speed sensor to the rear of the strut.
CAUTION: The strut assembly-to-steering knuckle attaching bolts are serrated and must not be turned during removal. Hold the bolts stationary in the steering knuckle while removing the nuts, then tap the bolts out using a pin punch.
6. Remove the two bolts attaching the strut to the steering knuckle.
7. Lower the vehicle just enough to open the hood, but without letting the tires touch the floor.
8. Remove the three nuts attaching the upper mount of the strut assembly to the vehicle's strut tower.
9. Remove the strut assembly from the vehicle.
DISASSEMBLY - STRUT ASSEMBLY (FRONT)
The Strut assembly must be removed from the vehicle for it to be disassembled and assembled.
For the disassembly and assembly of the strut assembly, use strut spring compressor, or the equivalent, to compress the coil spring. Follow the manufacturer's instructions closely.
1. If both struts are being serviced at the same time, mark the coil spring and strut assembly according to which side of the vehicle the strut was removed from, and which strut the coil spring was removed from.
2. Position the spring compressors as shown below.
WARNING: DO NOT REMOVE THE STRUT SHAFT NUT BEFORE THE COIL SPRING IS COMPRESSED. THE COIL SPRING IS HELD UNDER PRESSURE AND MUST BE COMPRESSED, REMOVING SPRING TENSION FROM THE UPPER MOUNT AND PIVOT BEARING, BEFORE THE SHAFT NUT IS REMOVED.
3. Compress the coil spring until all coil spring tension is removed from the upper mount.
4. Once the spring is sufficiently compressed, install the custom tool shown below on the strut shaft retaining nut. Next, install a 10mm socket with extension on the hex on the end of the strut shaft. While holding the strut shaft from turning, remove the nut from the strut shaft.
(Pictures is a pair of vice-grips and a tractor spark plug socket)
(Pictured below is a 21mm 1/2" drive deepwell socket with a 10mm socket and extension)
5. Remove the upper mount from the strut shaft.
6. Remove the upper spring seat and bearing, along with the upper spring isolator as an assembly from the top of the coil spring by pulling them straight up. The upper spring isolator can be separated from the spring seat and bearing once removed from vehicle.
7. Remove the dust shield, then the jounce bumper from the strut shaft by pulling each straight up.
8. Remove the clamp from the bottom of the coil spring and remove the strut out through the bottom of the coil spring.
9. Remove the lower spring isolator from the lower spring seat on the strut.
ASSEMBLY - STRUT ASSEMBLY (FRONT)
For the disassembly and assembly of the strut assembly, use strut spring compressor, available for rental or purchase at any autoparts store.
1. Place the coil spring in the compressor following the manufacturers instructions. Before compressing the spring, rotate the spring so the end of the top coil is directly in the back as shown.
2. Slowly compress the coil spring until enough room is available for strut assembly reassembly.
3. Install the lower spring isolator on the lower spring seat of the strut.
4. Install the strut through the bottom of the coil spring until the lower spring seat contacts the lower end of the coil spring. Rotate the strut as necessary until the clevis bracket is positioned straight outward away from the compressor. Install the clamp on the lower end of the coil spring and strut, so the strut is held in place.
5. Install the jounce bumper on the strut shaft. The jounce bumper is to be installed with the smaller end pointing downward toward the lower seat.
6. Install the dust shield on the strut shaft. The bottom of the dust shield will snap past the retainer on top of the strut housing.
7. If disassembled, reinstall the upper spring isolator on the upper spring seat and bearing.
8. Install the upper spring seat and bearing on top of the coil spring. Position the notch formed into the edge of the upper seat straight out away from the compressor.
9. Install the strut upper mount over the strut shaft and onto the top of the upper spring seat and bearing.
10. Loosely install the retaining nut on the strut shaft. While holding the strut shaft from turning, tighten the strut shaft retaining nut to a torque of 55 ft. lbs..
11. Slowly release the tension from the coil spring by backing off the compressor drive completely. As the tension is relieved, make sure the upper mount and seat and bearing align properly. Verify the upper mount does not bind.
12. Remove the clamp from the lower end of the coil spring and strut. Push back the spring compressor upper and lower hooks, then remove the strut assembly from the spring compressor.
13. Install the strut assembly on the vehicle.
INSTALLATION - STRUT ASSEMBLY (FRONT)
1. Install the strut assembly into the strut tower, aligning the three studs on the strut upper mount with the holes in strut tower. Install the three mounting nuts on the studs. Tighten the three nuts to a torque of 300 inch lbs..
2. Close the hood of the vehicle.
CAUTION: The strut assembly-to-steering knuckle attaching bolts are serrated and must not be turned during installation. Install the nuts while holding the bolts stationary in the steering knuckle.
3. Position the lower end of the strut assembly in line with the upper end of the steering knuckle and align the mounting holes. Install the two attaching bolts. The bolts should be installed with so that the nuts face towards the front of the vehicle once installed. Install the nuts. Holding the bolts in place tighten the nuts to a torque of 40 ft. lbs. plus an additional 90°turn after the specified torque is met.
4. If the vehicle is equipped with Antilock brakes (ABS) , attach the ABS wheel speed sensor to the rear of the strut (rearward ear) using its mounting screw. Tighten the mounting screw to a torque of 120 inch lbs.
5. Attach the ground strap to the rear of the strut (forward ear) using its mounting screw. Tighten the mounting screw to a torque of 120 inch lbs.
6. Install the tire and wheel assembly. Install and tighten the wheel mounting nuts in proper sequence until all nuts are torqued to half specification. Repeat the tightening sequence to the full specified torque of 100 ft. lbs.
7. Lower the vehicle.
Thread Starter
|
Veteran
Joined: Aug 2007
Posts: 444
Likes: 0
From: AR
damn.. talk about complicated.. i think i'll leave it to the professionals.. unless you want to come to arkansas and do it for me.. lol jk.. but thanks for all the help