sport Headlights
#1
I have an 01 sport and my headlights are a nasty yellow color. I was wanting to get some others but the sport lights are pretty expensive compared to the normal ram lights. Whats the difference on these ? also i heard you can clean the yellow off of them how would i go about doing that ?
#2
hey. you can buy kits to restore headlights. but they never work 100% and as i recall there a lil expensive. at least the kit i used at a shop was. anyway, at the dealership we recently had an acura in and we replaced one headlight cuz it was broken but the other one was cloudy still. we went over to the cleanup bay and found an assortment of rubbing/polishing compounds and we used the harsher ones first then gradually moved up. we only used a paper towel to rub them in. and it turned out pretty awsome. you can tell its not brand new but it took the yellow off and it looks 80% better. just food for thought bro.
#4
hey sorry i dont know the exact names becuase the labels were half falling off. but one was called cutting cream. we use it to get surface scratches off of new cars and thing of that nature. its abrasive but clearly not enough to damage paint. the others we used had no labels. all i can tell u is that it was pink and smelled wierd:P but it was less abrasive. lol:P sorry about the lack of detail.
#5
I used somemild paint buffing compound, 3m I think. I rubbed that on then down to scratch-X and then some wax and they look great. This was all some stuff that I had laying around. Even if I have to do this twice a year to make this lights last as long as possible then I am money a head for other mods.
#6
#7
Trending Topics
#8
#9
#10
How To: Clean up headlight fog (yellowing)
-WorldHazard
I just finished up cleanin up my headlights on my first gen Protege. I do not see a reason why this how to wouldn't work on any other car. So here ya go!
USE AT YOUR OWN RISK!!! If you screw up, you did it.. I had no part in it
Tools:
1 sponge
1 can of Clear Coat Spray (i used Krylon)
1 sheet of 1000 grit wet/dry sand paper
1x sheet of 2000 grit wet/dry sand paper
1x roll of tape (i used painter tape, just had it available)
2x full size pages out of your newspaper
1x big thing to paint on, I used a trash bag
1x spray bottle filled with tap water
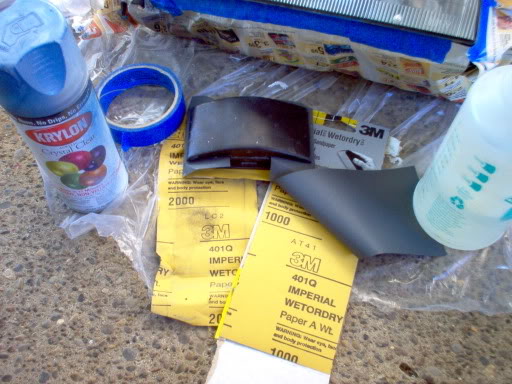
Your weather should be good. Temperatire outside should be no less than 65 F. If it's less, these steps won't help. And you really shouldn't do this till a better day. Also be sure to do this in a well ventillated area.. I did this outside on my driveway
Step 1:
Cleaning your lights
Clean ur headlights with the sponge very throughouly. I spent a couple minutes wiping and spraying down my lights.. Using the soft side with some elbow grease.
Step 2:
Sanding with 1000 grit
Be sure your lights are still wet, if they dry out, spray again. Get them wet.. Using your 1000 grit sandpaper, begin rubbing the lense in small cirular motions. Work side to side from top to bottom. Be sure to keep the lense wet all the time. If you sand it while dry... it will scratch the lense.. I re-sprayed my lense after i completed one full pass on the lense.. Just for safety sake.. Repeat this step multiple times over a couple minutes..
Step 3:
Sanding with 2000 grit
as recommended on a previous how to, I went ahead and used 2000 grit paper.. They used 1500, I didn't have any.. Do exactly what you did in step 2, only using 2000 grit sand paper instead of the 1000. Again, do this for a couple minutes in small circular motions side by side from top to bottom.. Keeping the light wet all the time.
Step 4:
Tapping and prepping lights
DRY YOUR LIGHTS!!!
Using the tape you have, and the newspaper, begin taping the paper around the border of your lense.. Whatever you don't want clear-coated... TAPE IT!.
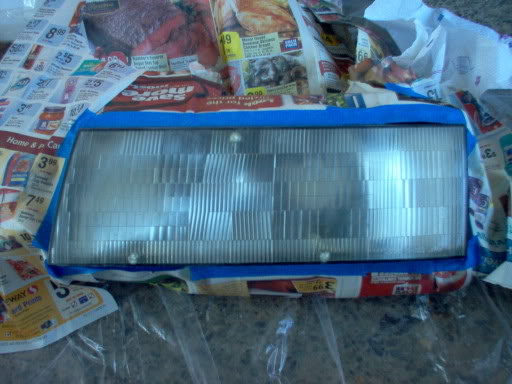
Step 5:
Sprayin ClearCoat
Make sure your lights are dry.. I wiped mine down with paper towels, and air dry for about 10 minutes after.. Now that everything's taped, and dried, be sure your light are laid over your bag, have a few heavy objects holding the bag corners down. Begin spraying using proper paint technique. Holding the car away at least 10-12 inches, spray side to side, top to bottom. Do not continue until your reach a couple inches off the lense, and then continue. I sprayed a complete layer once, and then over again..
Reapeat these at least 2 times, and allowing 10-20 minutes to dry in between re-sprays. I sprayed 3 times on my first lense and i belive twice on my second.. It's up to you and your preference.. Both lenses turned out great for me. Let your final coat dry for at least 30 minutes to make sure they are DRY!
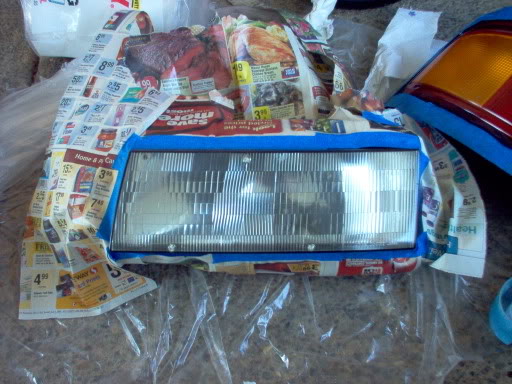
When you've completed this, and your lenses would hot, take the tape off, throw away the paper and tape, clean your mess up.. And go put your lights on.. plug in, give em power, and take pics!!! I wanna see em
This image is comparing the lights after i completed my first one. The top light is completed, while the 2nd light is getting ready to be worked on.
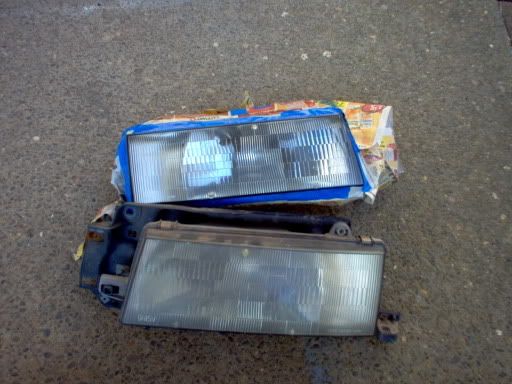
AFter i did this.. I went ahead, cleaned my old rear light, taped the black border off, and just wanted to see what it looked like with a coat of clear.. This is it. The one on the right is not cleaned or sprayed, while the one on the left is. This is 2 hours after the job was done and they were sitting outside, with the wind blowing
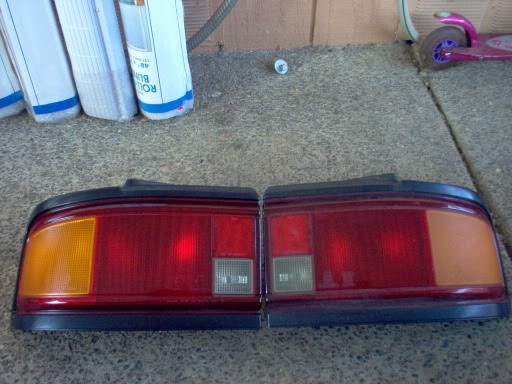
I hope this thread is useful. Remember to do this process at your own risk
-WorldHazard
I just finished up cleanin up my headlights on my first gen Protege. I do not see a reason why this how to wouldn't work on any other car. So here ya go!
USE AT YOUR OWN RISK!!! If you screw up, you did it.. I had no part in it
Tools:
1 sponge
1 can of Clear Coat Spray (i used Krylon)
1 sheet of 1000 grit wet/dry sand paper
1x sheet of 2000 grit wet/dry sand paper
1x roll of tape (i used painter tape, just had it available)
2x full size pages out of your newspaper
1x big thing to paint on, I used a trash bag
1x spray bottle filled with tap water

Your weather should be good. Temperatire outside should be no less than 65 F. If it's less, these steps won't help. And you really shouldn't do this till a better day. Also be sure to do this in a well ventillated area.. I did this outside on my driveway
Step 1:
Cleaning your lights
Clean ur headlights with the sponge very throughouly. I spent a couple minutes wiping and spraying down my lights.. Using the soft side with some elbow grease.
Step 2:
Sanding with 1000 grit
Be sure your lights are still wet, if they dry out, spray again. Get them wet.. Using your 1000 grit sandpaper, begin rubbing the lense in small cirular motions. Work side to side from top to bottom. Be sure to keep the lense wet all the time. If you sand it while dry... it will scratch the lense.. I re-sprayed my lense after i completed one full pass on the lense.. Just for safety sake.. Repeat this step multiple times over a couple minutes..
Step 3:
Sanding with 2000 grit
as recommended on a previous how to, I went ahead and used 2000 grit paper.. They used 1500, I didn't have any.. Do exactly what you did in step 2, only using 2000 grit sand paper instead of the 1000. Again, do this for a couple minutes in small circular motions side by side from top to bottom.. Keeping the light wet all the time.
Step 4:
Tapping and prepping lights
DRY YOUR LIGHTS!!!
Using the tape you have, and the newspaper, begin taping the paper around the border of your lense.. Whatever you don't want clear-coated... TAPE IT!.

Step 5:
Sprayin ClearCoat
Make sure your lights are dry.. I wiped mine down with paper towels, and air dry for about 10 minutes after.. Now that everything's taped, and dried, be sure your light are laid over your bag, have a few heavy objects holding the bag corners down. Begin spraying using proper paint technique. Holding the car away at least 10-12 inches, spray side to side, top to bottom. Do not continue until your reach a couple inches off the lense, and then continue. I sprayed a complete layer once, and then over again..
Reapeat these at least 2 times, and allowing 10-20 minutes to dry in between re-sprays. I sprayed 3 times on my first lense and i belive twice on my second.. It's up to you and your preference.. Both lenses turned out great for me. Let your final coat dry for at least 30 minutes to make sure they are DRY!

When you've completed this, and your lenses would hot, take the tape off, throw away the paper and tape, clean your mess up.. And go put your lights on.. plug in, give em power, and take pics!!! I wanna see em

This image is comparing the lights after i completed my first one. The top light is completed, while the 2nd light is getting ready to be worked on.

AFter i did this.. I went ahead, cleaned my old rear light, taped the black border off, and just wanted to see what it looked like with a coat of clear.. This is it. The one on the right is not cleaned or sprayed, while the one on the left is. This is 2 hours after the job was done and they were sitting outside, with the wind blowing

I hope this thread is useful. Remember to do this process at your own risk


 yeah try all differends componds. nothing like super abrasive. you obviously know that . good luck bro
