


Is there no end to the madness?


Record Breaker
Joined: Nov 2005
Posts: 1,827
Likes: 3
From: Ontario Canada
ORIGINAL: aim4squirrels
RM_Indy,
Thank you, thank you, thank you for posting this up. I broke about 3 of those little red retainers when I pulled the intake 6 months ago; they just crumbled in my hand they were so brittle. I ordered them immediately.
Just a question as it's hard to tell from the pics...are these a replacement connector, or an anchor housing that holds the existing connectors together? Do you just cut and splice in the new connectors on the wire looms?
ORIGINAL: RM_Indy
Quick search on Summit and the only one that came up were these. Number sounds familiar
http://store.summitracing.com/partdetail.asp?autofilter=1&part=MSD%2D2400&am p;N=700+115&autoview=sku
Quick search on Summit and the only one that came up were these. Number sounds familiar
http://store.summitracing.com/partdetail.asp?autofilter=1&part=MSD%2D2400&am p;N=700+115&autoview=sku
Thank you, thank you, thank you for posting this up. I broke about 3 of those little red retainers when I pulled the intake 6 months ago; they just crumbled in my hand they were so brittle. I ordered them immediately.
Just a question as it's hard to tell from the pics...are these a replacement connector, or an anchor housing that holds the existing connectors together? Do you just cut and splice in the new connectors on the wire looms?
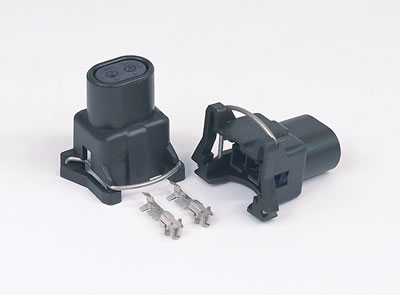
Complete replacement connector. The small metal pieces are the pins inside the connector.
Remove the rubber 2 holed grommet/seal from the top of one msd clip.
Cut, one oem injector clip after exposing the wires to see which color is on rad/firewall side.
(black & green or grey?) Be sure to cut it as close to the oem clip as possible.Take the rubber grommet/seal from the msd and push the wires threw each hole. Push the grommet upa ways soyou can strip 1/4 of the wire. Take the small metal pins (in pic above) and lay the wire in the crimping end(crimp), soilder it, then repeat for the other wire. Carefully push the metal pins down into the injector clip,(spare pins included)once both are in, slide the grommet/seal back down untill its inside the clip again. Depress the wire lock and push onto the injector. Move on to the next one till finished


Thread Starter
|
Rookie
Joined: Jan 2007
Posts: 80
Likes: 0
RM_Indy I am installing the new connector clips now. I've run into a problem with the first one. Do the clips press in from the backside (square end first) or do you pull the wires all of the way through the connector, solder the clips, then pull the clips back into the connector?
Thread Starter
|
Rookie
Joined: Jan 2007
Posts: 80
Likes: 0
RM_Indy I worked through it. It took about three hours to install all six and that was with the first one taking an hour due to the learning curve. The bad news is that after replacing all six connectors, it still runs rough. The good news is that there are now fewer possibilities as to what the problem is and that effort cost less than $20.

Record Breaker
Joined: Nov 2005
Posts: 1,827
Likes: 3
From: Ontario Canada
Sorry to hear it didnt help, but as mentioned at under 20bucks its worth trying incase it was the issue.
Site instructions for embedding pics and second link has other site options you maybe interested in
https://dodgeforum.com/m_584033/tm.htm
https://dodgeforum.com/m_584033/tm.htm
Site instructions for embedding pics and second link has other site options you maybe interested in
https://dodgeforum.com/m_584033/tm.htm
https://dodgeforum.com/m_584033/tm.htm
Thread Starter
|
Rookie
Joined: Jan 2007
Posts: 80
Likes: 0
The three photos attached were taken while installing the MSD connector clips. The two wires will be of different colors. Make note of this so they will go back in the same order. The wires can be snipped close to the old connector or the connector can be cut into as shown in the photo which will save a little more of the original wiring. Peel away about 1 1/2" of the black wrapping. Use a small screw driver to remove the rubber grommet from the new clip, route the wires throughthe grommetand then through the connector body. For my engine, the green wire with the orange stripe always went on the left. Strip about 1/4" of insulation from each wire and apply a light coating of solder to the copper strands. Crimp the terminals onto the wire. This is a somewhat tedious maneuver because the parts are so small. I used a pair of needle nosed pliers for the small tangs and acommon crimping tool on the larger tangs on the end.The crimping tangs are facing upwards in the photo. This is important because the terminal will not fit into the connector if it is turned the wrong way. Apply another coat of solder to the crimped area and then push the terminals into the connector body. They will click into place when pushed in sufficiently. Next, reseat the rubber grommet. Press the new connector down firmly onto the fuel injector body. You will feel it snap into place when it engages. Expect it to fit much more securely than the factory clip. The job took me three hours for a V6 but that included the one hour learning curve on the first one. Hopefully I've helped you through that a bit.
[IMG]local://upfiles/53935/D08EF1E44F8040B0B012ABE9DF34333A.jpg[/IMG]
[IMG]local://upfiles/53935/EE592AB94B80433A92A8BD104D1DCD64.jpg[/IMG]
[IMG]local://upfiles/53935/3A938F97B0504187A4307FEBF88CF0B0.jpg[/IMG]
[IMG]local://upfiles/53935/D08EF1E44F8040B0B012ABE9DF34333A.jpg[/IMG]
[IMG]local://upfiles/53935/EE592AB94B80433A92A8BD104D1DCD64.jpg[/IMG]
[IMG]local://upfiles/53935/3A938F97B0504187A4307FEBF88CF0B0.jpg[/IMG]