


Check Valve Delete/Tranny Filter Install

This is how I deleted the check valve and installed an external transmission filter. The reason to remove the transmission line check valve is so there is more fluid going to your cooler. The reason for an external filter is simple: more filtering. DUH!! 
DISCLAMER!!! https://dodgeforum.com/m_306208/tm.htm
Use this as a guide!!
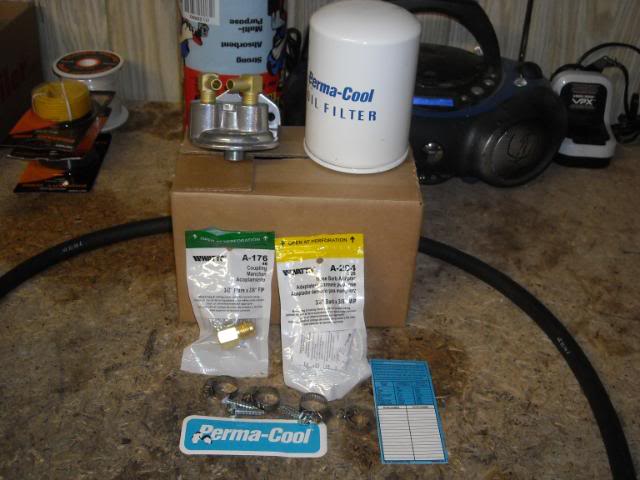
Here is what you need:
-Perma-cool Remote-mount transmission filter kit(comes with 4 feet of hose, hose clamps, Ford Fl-1A Style filter, and 90* fittings.
http://store.summitracing.com/partde...5&autoview=sku
-3/8'' flare thread to 3/8'' FIP Adapter- P/N A-176 @ Lowes
-3/8'' MIP Barb hose adapter- P/N A-204 @ Lowes
-3, 5/16'' Stainless Steel Bolts, and 5/16'' compression nuts; The Perma-cool kit comes with 3 self-tapping screws, but if you are mounting the filter on your fender, it is a good idea to use compression nuts and bolts.
FIPK II OWNERS BEWARE!!!! Mounting this transmission filter will interfere with the "heat shield" on the K&N kit. You will have to remove the "heat shield" and keep it off FOREVER!! BTW I am selling an orange FIPK!!
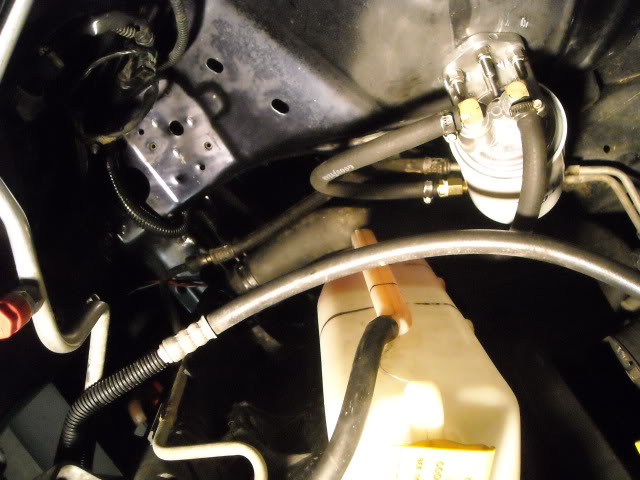
Here is the check valve portion that is in question:

Procedure:
Step 1- Gather parts and carefully read the Perma-Cool instructions.
Step 2- Remove the passenger-side inner fender liner.
Step 2A- Remove K&N FIPK air filter and heat shield.
Step 3- Place a drain pan under the truck
Step 4- Using 2 cresent wrenches, remove the transmission-side/Check Valve.
Step 5- Since I did not have the right Quick-Disconnect tool, I cut the radiator-side fitting off using my Dremel tool with a cutting wheel.

Now you are ready to install the Check valve delete fittings
Step 6- Assemble Adapter and barb fitting on your work bench using Teflon tape only on the pipe threads. DO NOT USE Teflon On the flare fitting!!!
Step 7- Install fittings onto transmission line.
Step 8- Assemble 90* fittings and filter bolt onto the filter mount
Step 9- Decide where you want to put the filter mount at. Mark and drill holes with a 3/8'' drill bit
Step 10- Install the filter mount onto the fender with the bolts listed above.
Step 11- Before putting the filter on, fill the filter with ATF+4 to minimize the air in the system.
Step 12- Install Filter
Step 13- Cut and install the hose going in and out of the filter.
Step 14- Take the truck for a drive and check for any leaks. Add fluid if necessasary.
Step 15- Write a check for $50 and send it to me.
-PurplDodge
DISCLAMER!!! https://dodgeforum.com/m_306208/tm.htm
Use this as a guide!!
Here is what you need:
-Perma-cool Remote-mount transmission filter kit(comes with 4 feet of hose, hose clamps, Ford Fl-1A Style filter, and 90* fittings.
http://store.summitracing.com/partde...5&autoview=sku
-3/8'' flare thread to 3/8'' FIP Adapter- P/N A-176 @ Lowes
-3/8'' MIP Barb hose adapter- P/N A-204 @ Lowes
-3, 5/16'' Stainless Steel Bolts, and 5/16'' compression nuts; The Perma-cool kit comes with 3 self-tapping screws, but if you are mounting the filter on your fender, it is a good idea to use compression nuts and bolts.
FIPK II OWNERS BEWARE!!!! Mounting this transmission filter will interfere with the "heat shield" on the K&N kit. You will have to remove the "heat shield" and keep it off FOREVER!! BTW I am selling an orange FIPK!!
Here is the check valve portion that is in question:
Procedure:
Step 1- Gather parts and carefully read the Perma-Cool instructions.
Step 2- Remove the passenger-side inner fender liner.
Step 2A- Remove K&N FIPK air filter and heat shield.
Step 3- Place a drain pan under the truck
Step 4- Using 2 cresent wrenches, remove the transmission-side/Check Valve.
Step 5- Since I did not have the right Quick-Disconnect tool, I cut the radiator-side fitting off using my Dremel tool with a cutting wheel.
Now you are ready to install the Check valve delete fittings
Step 6- Assemble Adapter and barb fitting on your work bench using Teflon tape only on the pipe threads. DO NOT USE Teflon On the flare fitting!!!
Step 7- Install fittings onto transmission line.
Step 8- Assemble 90* fittings and filter bolt onto the filter mount
Step 9- Decide where you want to put the filter mount at. Mark and drill holes with a 3/8'' drill bit
Step 10- Install the filter mount onto the fender with the bolts listed above.
Step 11- Before putting the filter on, fill the filter with ATF+4 to minimize the air in the system.
Step 12- Install Filter
Step 13- Cut and install the hose going in and out of the filter.
Step 14- Take the truck for a drive and check for any leaks. Add fluid if necessasary.
Step 15- Write a check for $50 and send it to me.
-PurplDodge

Professional
Joined: Nov 2008
Posts: 247
Likes: 0
From: Adams Center, NY/ Bagram, Afghani Land
Very nice.....Not to cut you down or anything, but whats the psi drop after the filter? I know the check valve cut the pressure down, but how much is that filter going restrict fluid flow? Another thing to keep in mind is the outside air temp. Depending where you are at, you might have gelling problems in the filter. Dont want you to burn your tranny up before you even get to drive your truck (legally).
Trending Topics
BTW my tranny guy got pissed at my work and put a different check valve in AFTER the filter, so I cannot recommend this anymore! But he also put a Valucrap filter on there so I guess we are even!