


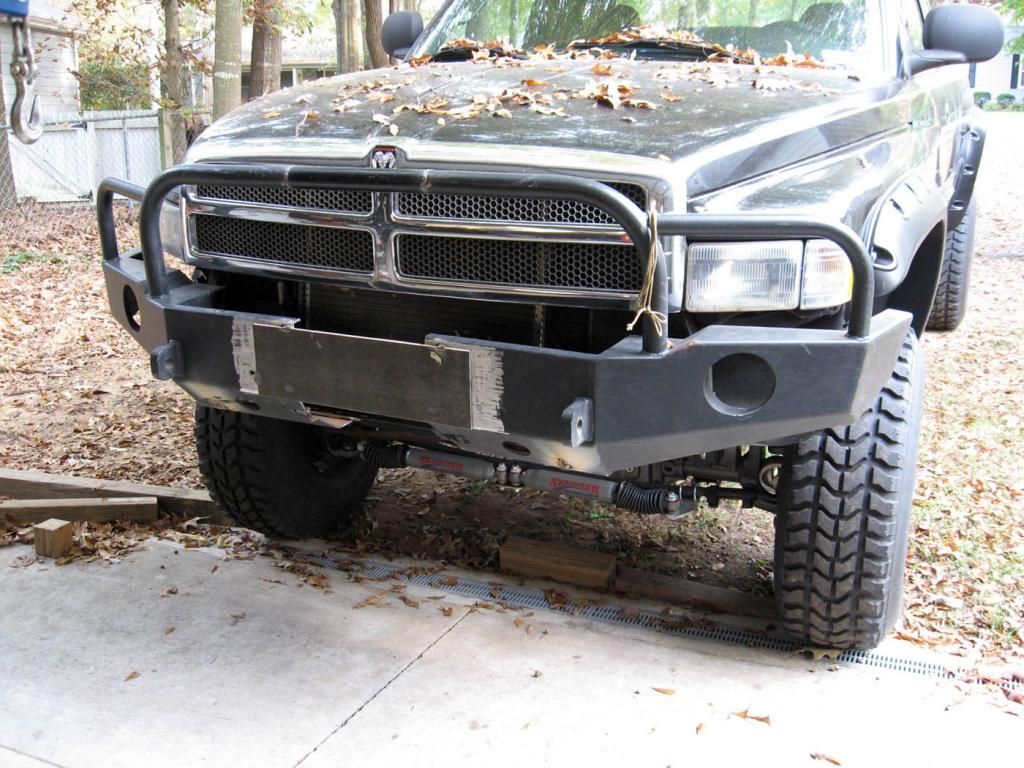
Durango bumper on Ram


Champion
Joined: Sep 2011
Posts: 3,891
Likes: 8
From: NorCal
Big big kudos on repurposing the bumper. This will be a great example for others to follow if they come across it. I really like your detail on the split and alignment. You finished it clean with the hitch receiver, which implies your going to use a winch at that position?
I've got a few structural observations/comments for ya based on the work I've done and in conjunction with other builds. I'm not meaning to be critical or bumming at all. You'll be fine with small to moderate loads, but just some awareness based on what I've directly experienced.
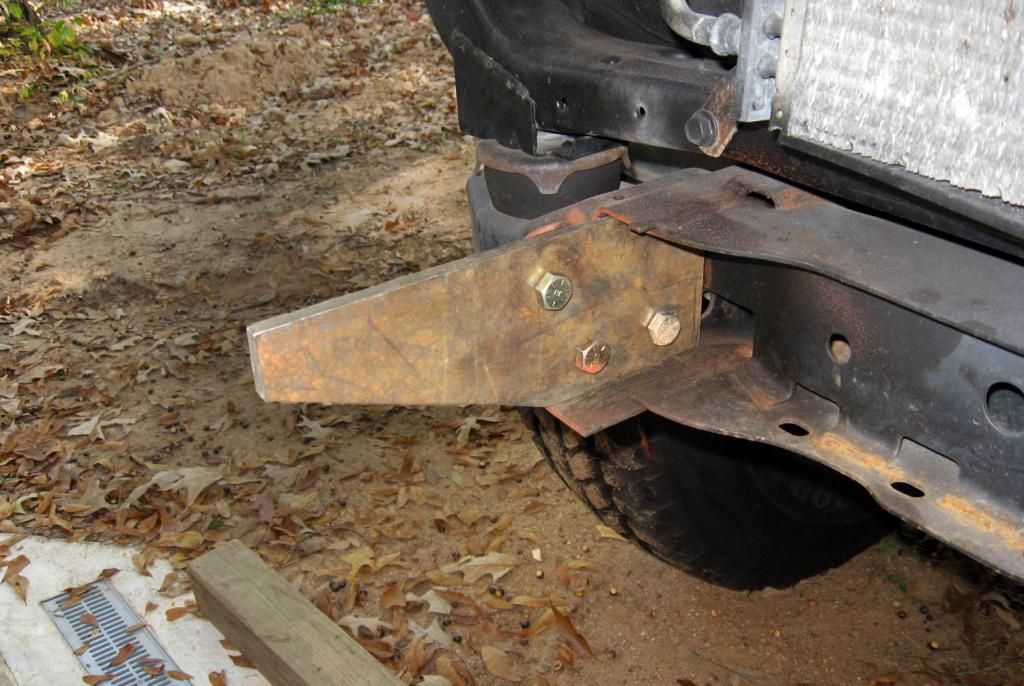
I like your use of the 3/8" plate for the brackets as they're VERY meaty, especially in comparison to the 1/8" frame material. I see your are using the factory 3 bolt locations. There is a 4th one back further. My caution here is the beefy brackets reacting a lateral load (let's say from pass to driver side) into the frame. That thin frame material will just fold over. The body mount bracket does help with some stiffness back there, but it's set aft of the location. An additional complication is that you welded the nuts onto the frame web. This softened up that material creating a greater tendency for the bolt to tear out the material.
To help improve this, which you can do going by your fab skills shown is to added a stiffener directly to your brackets. Similar to what I've done here (2x4x0.25"). Also notice the bracket as it goes back inside the bumper further and able to use the bolt location. Try to avoid using the upper bolt location. I think you recall how little frame material is there (close to edge) as it is first to go given the moment loading applied. The tongue I did to back inside counteracts that.
The other part to do is to plate up the outside of the frame web, which means take your bolts off. I did an extra 1/8" of plate.
I admit I don't see how your tied things together on the inside and that can help offset some of comments. For example, the bumper had a flat plate which the winch mounted to. Did you replace that or some other way? Is the hitch receiver tied to that? The hitch should be tied in back there so that it reacts the load through a greater portion of the bumper and not just the plate that its welded to as seen in your finished pictures.
I'm not assuming what you have at all, just inferring.
Food for thought.
I've got a few structural observations/comments for ya based on the work I've done and in conjunction with other builds. I'm not meaning to be critical or bumming at all. You'll be fine with small to moderate loads, but just some awareness based on what I've directly experienced.
I like your use of the 3/8" plate for the brackets as they're VERY meaty, especially in comparison to the 1/8" frame material. I see your are using the factory 3 bolt locations. There is a 4th one back further. My caution here is the beefy brackets reacting a lateral load (let's say from pass to driver side) into the frame. That thin frame material will just fold over. The body mount bracket does help with some stiffness back there, but it's set aft of the location. An additional complication is that you welded the nuts onto the frame web. This softened up that material creating a greater tendency for the bolt to tear out the material.
To help improve this, which you can do going by your fab skills shown is to added a stiffener directly to your brackets. Similar to what I've done here (2x4x0.25"). Also notice the bracket as it goes back inside the bumper further and able to use the bolt location. Try to avoid using the upper bolt location. I think you recall how little frame material is there (close to edge) as it is first to go given the moment loading applied. The tongue I did to back inside counteracts that.
The other part to do is to plate up the outside of the frame web, which means take your bolts off. I did an extra 1/8" of plate.
I admit I don't see how your tied things together on the inside and that can help offset some of comments. For example, the bumper had a flat plate which the winch mounted to. Did you replace that or some other way? Is the hitch receiver tied to that? The hitch should be tied in back there so that it reacts the load through a greater portion of the bumper and not just the plate that its welded to as seen in your finished pictures.
I'm not assuming what you have at all, just inferring.
Food for thought.

Thread Starter
|
Rookie
Joined: Jan 2011
Posts: 72
Likes: 0
From: upstate SC
Big big kudos on repurposing the bumper. This will be a great example for others to follow if they come across it. I really like your detail on the split and alignment. You finished it clean with the hitch receiver, which implies your going to use a winch at that position?
I've got a few structural observations/comments for ya based on the work I've done and in conjunction with other builds. I'm not meaning to be critical or bumming at all. You'll be fine with small to moderate loads, but just some awareness based on what I've directly experienced.
I like your use of the 3/8" plate for the brackets as they're VERY meaty, especially in comparison to the 1/8" frame material. I see your are using the factory 3 bolt locations. There is a 4th one back further. My caution here is the beefy brackets reacting a lateral load (let's say from pass to driver side) into the frame. That thin frame material will just fold over. The body mount bracket does help with some stiffness back there, but it's set aft of the location. An additional complication is that you welded the nuts onto the frame web. This softened up that material creating a greater tendency for the bolt to tear out the material.
To help improve this, which you can do going by your fab skills shown is to added a stiffener directly to your brackets. Similar to what I've done here (2x4x0.25"). Also notice the bracket as it goes back inside the bumper further and able to use the bolt location. Try to avoid using the upper bolt location. I think you recall how little frame material is there (close to edge) as it is first to go given the moment loading applied. The tongue I did to back inside counteracts that.
The other part to do is to plate up the outside of the frame web, which means take your bolts off. I did an extra 1/8" of plate.
I admit I don't see how your tied things together on the inside and that can help offset some of comments. For example, the bumper had a flat plate which the winch mounted to. Did you replace that or some other way? Is the hitch receiver tied to that? The hitch should be tied in back there so that it reacts the load through a greater portion of the bumper and not just the plate that its welded to as seen in your finished pictures.
I'm not assuming what you have at all, just inferring.
Food for thought.
Funny you should mention the frame mounts. As I lay under there soldering up the wiring for the lights, an idea popped in my head

Yes, the front receiver hitch is about a foot long, it goes through the front outer plate (which is 3/16" thick) and the back end is welded to the 1.5"x3" piece I mentioned above. Its stout.
Last edited by jeff351; Dec 8, 2012 at 10:38 PM.
Champion
Joined: Sep 2011
Posts: 3,891
Likes: 8
From: NorCal
Thanks for confirming the configuration of the hitch receiver.
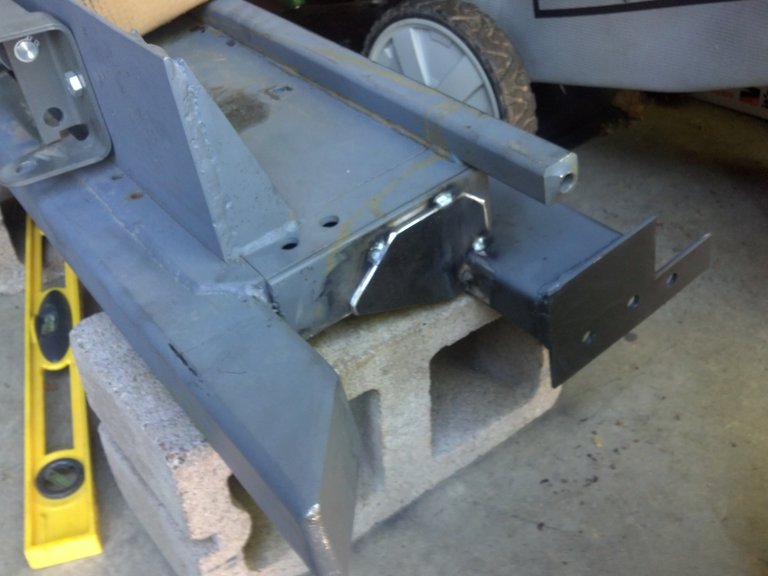
Your 46" length of 1.5x3 is effectively taking the place of the winch plate. That is not the piece in this picture is it as it appears to be angle.
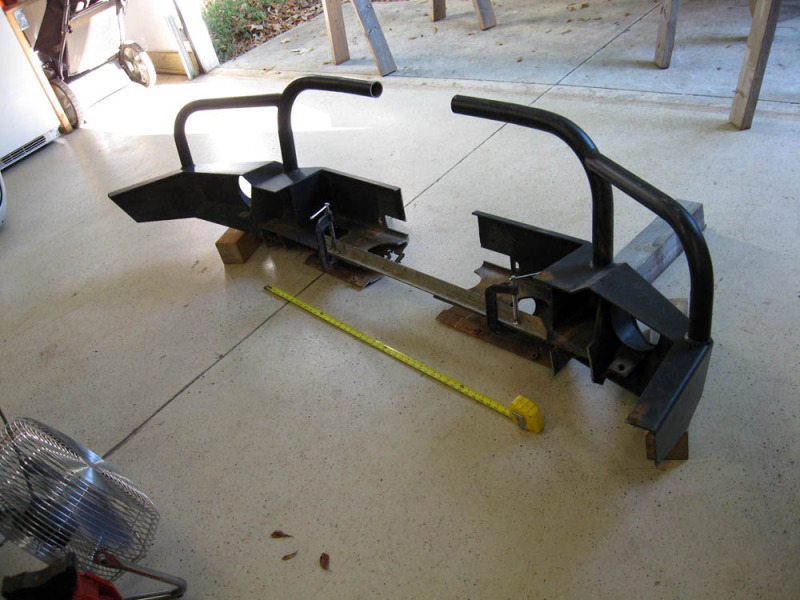
Your 1.5x3 square tube is joined to the halves of the winch plate and butted up against the sidewall? Cool!!
I still encourage you to stiffen the mounting brackets in the frame horns with a beam across, even if its 1x1 square. It will be a significant improvement in overall stiffness transfer to the crossmember.
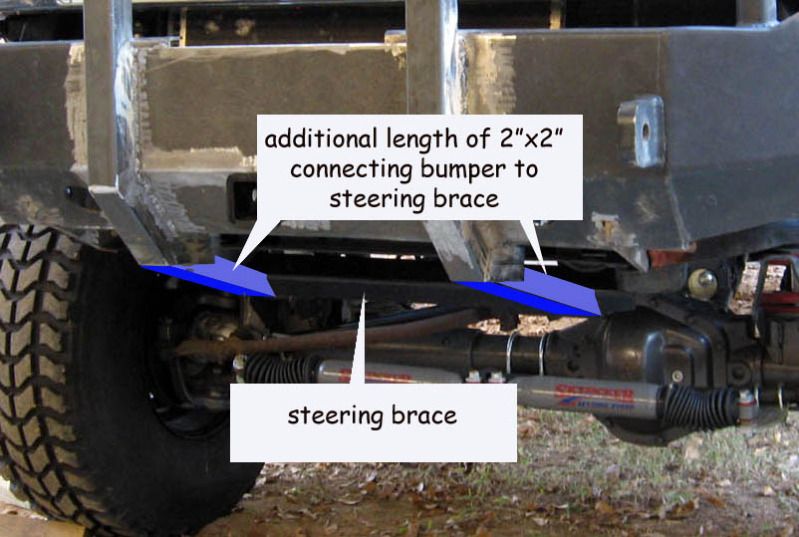
As for your idea of the running to the steering stabilizer, I'm sorry but that is a really bad idea. For winching, yeah no big deal it will help. But let's say you have an impact. You don't want the load to go to that steering stabilizer. It is tied to the frame behind the crossmember also to the steering gear box sector shaft (bearing). Those things already have questionable benefit by themselves and have function for the steering box. You would now be altering its function and stiffness. Taking a hit would then potentially take OUT your steering box.
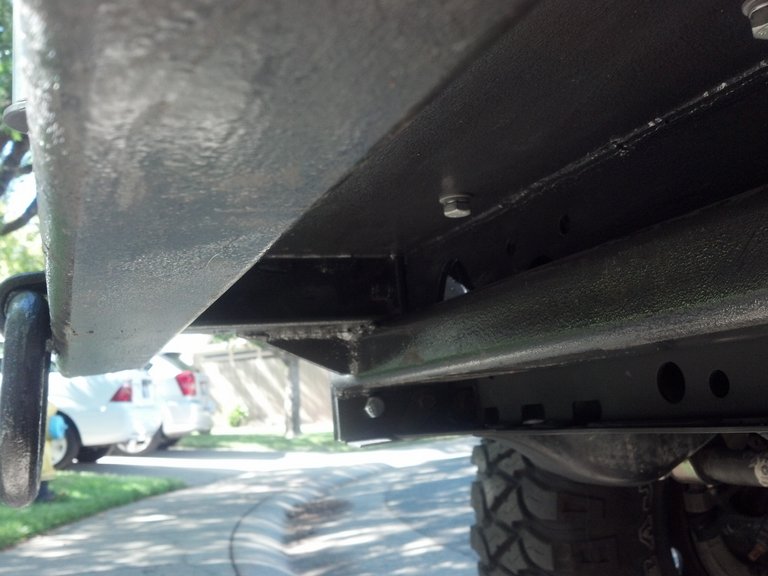
Allow me to suggest a slight twist to your idea though. On the bottom of the crossmember, front edge, you would have noticed some bolt holes. There are 6 of them and these are used for the factory tow hooks. I had them on my rig. I'd suggest a plate welded to the bottom surface of the crossmember that is extended forward to those holes. Drill out to match those holes.
Now take your bottom runners to that location. Weld a plate those ends (web) and have that plate on the TOP side of that lip. Bolt and sandwich it up. Now you have you direct integration to the crossmember, it maintains bolt in status, no impact to steering stab bar, and can be a great skid plate!!
Hope you take that well and if not, my apologies and no grumbles from me. Like I said, it's a great re-purpose of a bumper.
I try where I can!
Your 46" length of 1.5x3 is effectively taking the place of the winch plate. That is not the piece in this picture is it as it appears to be angle.
Your 1.5x3 square tube is joined to the halves of the winch plate and butted up against the sidewall? Cool!!
I still encourage you to stiffen the mounting brackets in the frame horns with a beam across, even if its 1x1 square. It will be a significant improvement in overall stiffness transfer to the crossmember.
As for your idea of the running to the steering stabilizer, I'm sorry but that is a really bad idea. For winching, yeah no big deal it will help. But let's say you have an impact. You don't want the load to go to that steering stabilizer. It is tied to the frame behind the crossmember also to the steering gear box sector shaft (bearing). Those things already have questionable benefit by themselves and have function for the steering box. You would now be altering its function and stiffness. Taking a hit would then potentially take OUT your steering box.
Allow me to suggest a slight twist to your idea though. On the bottom of the crossmember, front edge, you would have noticed some bolt holes. There are 6 of them and these are used for the factory tow hooks. I had them on my rig. I'd suggest a plate welded to the bottom surface of the crossmember that is extended forward to those holes. Drill out to match those holes.
Now take your bottom runners to that location. Weld a plate those ends (web) and have that plate on the TOP side of that lip. Bolt and sandwich it up. Now you have you direct integration to the crossmember, it maintains bolt in status, no impact to steering stab bar, and can be a great skid plate!!
Hope you take that well and if not, my apologies and no grumbles from me. Like I said, it's a great re-purpose of a bumper.
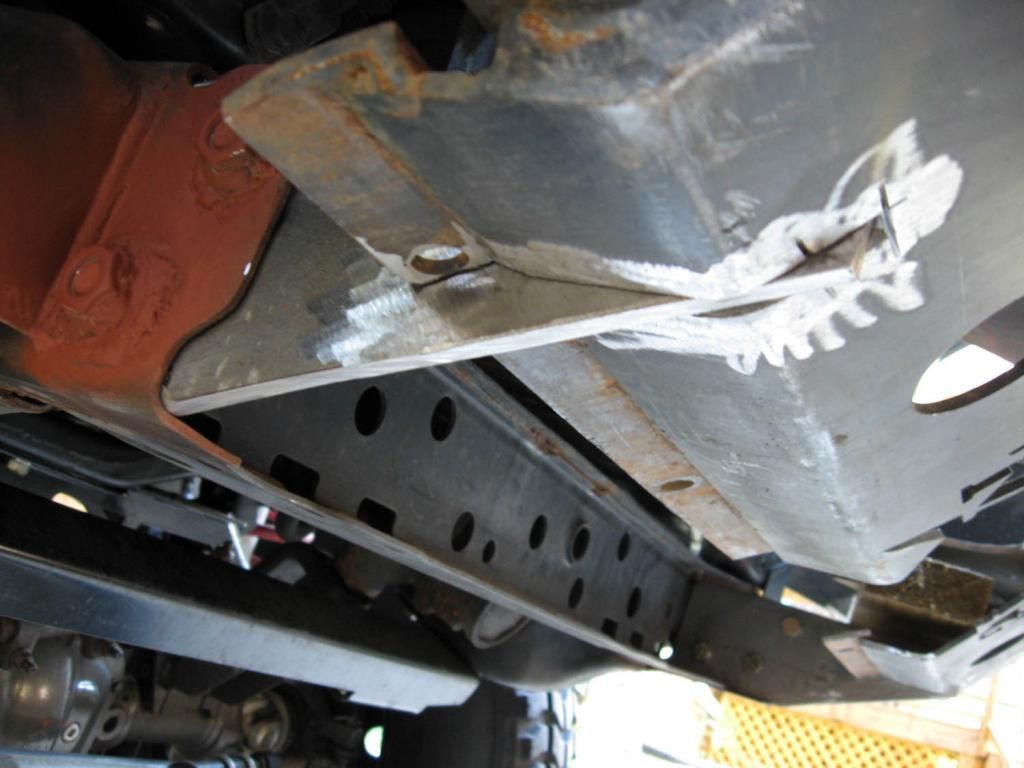
Thanks for the input. I should have taken some detail pics of the backside. The lower half has a 46" long piece of 1.5"x3" rectangle tubing...it held the 2 halves of the bumper together after I first hacked it. Then I welded in the 2" pipe to connect the hoop, and then the length of 1.5"x1.5" (or close to it) which is visibile directly under the grille.
Funny you should mention the frame mounts. As I lay under there soldering up the wiring for the lights, an idea popped in my head My plan is extend the 2 vertical push-bar looking things and connect them onto the steering brace. Wouldn't require much fabrication and would triangulate the stress points resulting in much better overall strength (see image)
Yes, the front receiver hitch is about a foot long, it goes through the front outer plate (which is 3/16" thick) and the back end is welded to the 1.5"x3" piece I mentioned above. Its stout.
Funny you should mention the frame mounts. As I lay under there soldering up the wiring for the lights, an idea popped in my head
Yes, the front receiver hitch is about a foot long, it goes through the front outer plate (which is 3/16" thick) and the back end is welded to the 1.5"x3" piece I mentioned above. Its stout.
I try where I can!
Thread Starter
|
Rookie
Joined: Jan 2011
Posts: 72
Likes: 0
From: upstate SC
(yes, in that picture of the bumper cut in half, its only mocked up with a piece of angle iron held in with C-clamps)
You are right! I didn't think of the damage to the steering box, but realized that at the angle the brace is bolted up, it would cause 3 issues; 1) the angle how the brace is bolted to the frame would place a bulk of the stress on the 4 bolts that hold the brace itself, not the frame, 2) just like you said, I didnt consider what would happen to the steering box, 3) with the angle the brace sits at, if I welded it up, I would not be able to remove the bumper!
Great points. I like your idea better of tying it directly into the frame. Wouldnt take much more fabrication to make it work. So as it sits now, I consider it deer-proof more so than Honda-proof!