

powertrax noslip for rear - yes or no ?
#31
 03-06-2007, 02:16 AM

Professional
Join Date: Jan 2007
Location: Kitchener, ON, Canada
Posts: 205
Likes: 0
Received 0 Likes
on
0 Posts
I've just put a lock-right in my rear this past weeked.
Daily driver. Works great, and I don't find it overkill.
Can get you sideways quite fast if you're not gentle on the go pedal in turns.
Only noticeble on hard breaking or shifting from forward to reverse
Daily driver. Works great, and I don't find it overkill.
Can get you sideways quite fast if you're not gentle on the go pedal in turns.
Only noticeble on hard breaking or shifting from forward to reverse
#32
03-09-2007, 01:15 AM
well i feel like an idiot. i put it in the truck just easy as pie, but it failed the differentiation test that you do at the end. so i've taken it back out, and put it together on the bench about 25 times. there are only 3 parts per side, and not only are those parts keyed so they can only go together one way, but then the two sides are keyed so they can only fit one way. when its all assembled the driver mechanism is in a locked position, and it doesn't seem to seperate so that one side can differentiate. i'll have to call them in the morning unless anyone else knows anything about this thing ????
#33
03-09-2007, 01:26 AM
Record Breaker
#34
03-09-2007, 01:43 AM
i feel stupid because i can't figure out what is supposed to make it release. the original side gears and thrust washers are removed, along with the spiders, and the shaft, to create an empty carrier. then there are only 3 parts per side (splined outside piece. inside piece that wraps around the shaft, and then this magical piece that i think is supposed to slide back and forth and seperate, or not seperate the inner/outer pieces. the other side is a mirror image. but when its all put together its tighter'n dicks hat band, and the magical piece doesn't seem to be doing anything. it got cold outside so i came in to ride the recliner and have a beer.
instruction manual and exploded view for chrysler 9.25 open diff.
part number 92-0392-3105
http://www.richmondgear.com/0002pdfs/8221002.pdf
instruction manual and exploded view for chrysler 9.25 open diff.
part number 92-0392-3105
http://www.richmondgear.com/0002pdfs/8221002.pdf
#35
03-09-2007, 02:26 AM

#36
03-09-2007, 03:06 AM
hey zique, i was hoping you were around.
How about the keyed sides of each of the spacers? Are they facing opposite when you install them?
yes
How about the carrier? Is the condition of that okay?
seems ok, not broke or damaged. its a tight fit, but all the pieces fit inside it, like the instructions describe.
the spacers (the middle piece of the 3) have the wide tab called the paddle. there is a wide slot on both the outer piece, and also the inner piece. the only way for the teeth to fit flat is to get the paddle inside both wide slots. then when you put the left half with right half, and the shaft between them, the two halfs have the paddle on opposite sides. the innermost halves have studs that only allow them to fit one way.
once all this is together, both the inner piece and the spacer are wrapped around the shaft, so they can't move relative to each other nor the shaft. the spacer could possibly slide out and push the outer piece outward, but there is nothing to push it out. if it did slide out, the paddle of the spacer (the middle piece, remains locked in the wide slot of the outer piece, and also remains wrapped around the shaft, so the 3 pieces stay completely locked together.
questions for you.
1. at the end of your install, did yours pass the test where you leave one wheel on the ground and jack up the other, and try to rotate it forward (it should not turn forward), and then try to rotate it backwards (its supposed to turn backward). mine fails this test because it stays completely locked.
2. was yours a pretty snug fit inside the carrier.
3. is your part number 92-0392-3105
4. do you recall if your outer piece had the wide slot to catch the paddle
5. reckon what makes it release in order to differentiate
#37
03-09-2007, 04:16 PM
Oooooooooo...the test you mentioned before, I thought you were meaning using the little metal block to check the gap between the two drivers. The spacer test did work, right? If yes...
2. It is a very tight fit. I am lucky that I have lanky fingers to match my lanky body.
3. Yes mine is p/n 92-0392-3105
4. Yes, both sides had slots. I believe the instruction manual called it a "not extended tooth" or something wierd like that.
5. I believe the combination of the inner (along the pinion shaft) and outer springs (at the outside of the case) keeps the unit apart under normal conditions. However, when slip begins to occur and more torque is applied, the springs compress (because of the load) and the drivers come together. I figured it sounded logical to me, but I'm no engineer.
I saved question 1 for last because I think this may be your problem.
1. I left both sides up on the stands for the test because it asks you to place the tire against the driveshaft backlash. With just the tire on the ground, it wouldn't necessarily be against the shaft. I had my roomate hold it there while I tested. At first it seemed it wasn't disconnecting, but it actually takes a descent jolt (not Heman or anything, just expect to get some resistance at first) to get it to do so, but then it spins very freely. The same jolt in the other direction still would not disengage the unit. Mostly I just mean taking it until it stops in the forward rotation then giver 'er a good spin backwards, it should disengage. You will hear the unit disengage.
Long story short, from the sounds of it, you may have actually installed it correctly, but just misunderstood the test.
When driving, you will also notice that the backlash for your driveline has increased a bit. It scared me at first and I called powertrax and they said that most times the unit does increase that a bit. I haven't had any problems with it, it just scared me is all. Mines a 5spd, so now I'm having to remember to not push the clutch in on tight turns in the parking lot until I'm fairly straightened out, but I expected that anyway. I love the unit though, it hooks up like nothing I've ever had and is still safe for a daily driver. Hope that answers your questions.
Good luck!
#38
03-09-2007, 07:00 PM
SUCCESS !!!
short report. this is actually a very easy install that anyone can do, provided you have some patience, a safe and clean place to work, jack stands, jack, etc. so far, this product is everything its advertised as - an easy to install, affordable locker with decent road manners.
now the long report.
for some reason that i still don't understand, my first install resulted in a bind, and didn't work right. at the end of the install, the instructions tell you to lower one wheel to the ground, in neutral, attempt to turn the other wheel forward (it shouldn't), and then attempt to turn it backwards (it should). mine failed this test. well, me being me thought i would try it anyway, so i started the truck and pulled forward a little in a straight line. ok. turn the steering wheel a little and ease forward. i could feel the tires start to bind, then scuff, then BANG. i dont mean just bang i mean BANG. oh crap. backed it up into the garage and BANG again. oh crap.
took it all completely back apart to check for damage. looked ok, one little scratch on one of the teeth. cleaned all the parts and layed them out and studied them and had a few thinking beers. called Powertrax tech support on friday and talked to Jeff. we verified part number, he asked me about the gauge test on the gap (ok), and then the differentiation test (failed), and he asked me about the paddles, and the teeth mesh, and said that was all correct and try it again.
so i started all over and installed it a few more times, and eventually it worked out right. the instructions are pretty good, with one mistake regarding the back and forth rotation. If you are going to install one of these, here are some more things you need to know.
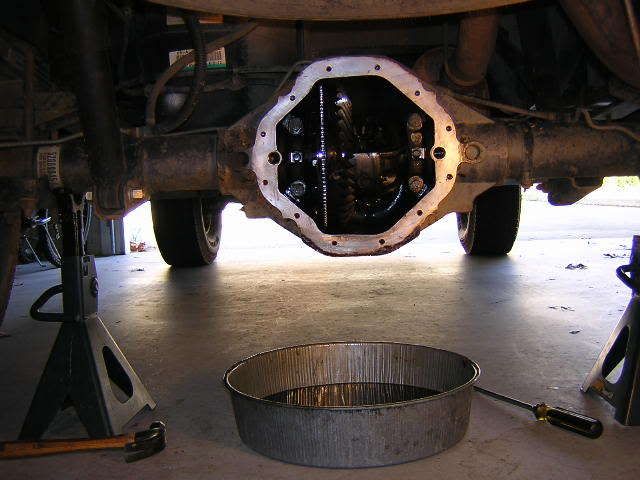
allow plenty of time for this in case you have trouble like i did. be aware that powertrax tech support is only m-f 9-5. wash the mud off the truck so its clean and not dripping dirt/mud all over the floor. put the rear end up on jack stands. in neutral. remove the passenger side tire. you can leave the drivers side on. work on a clean floor or put down a white towel. there are several small parts including some little springs that you don't want to lose.
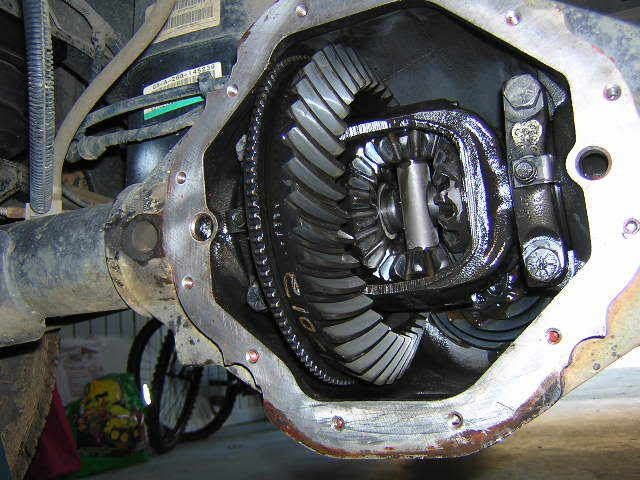
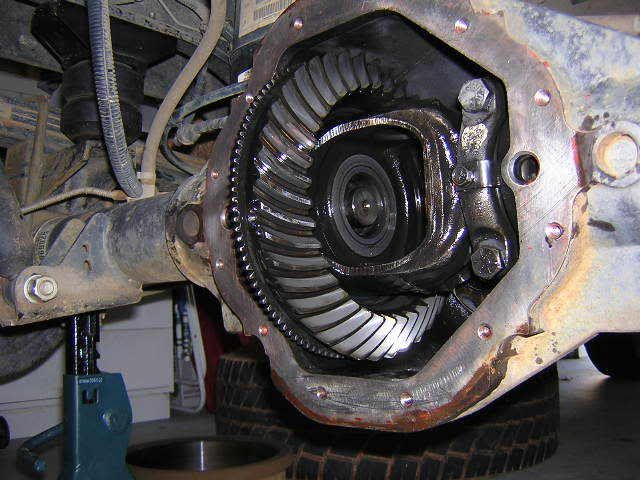
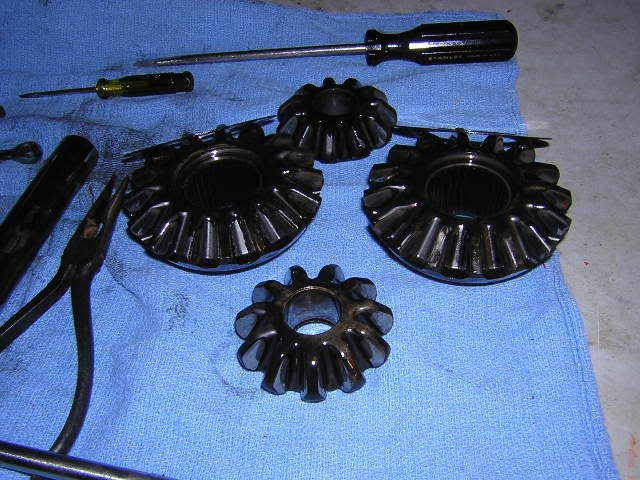
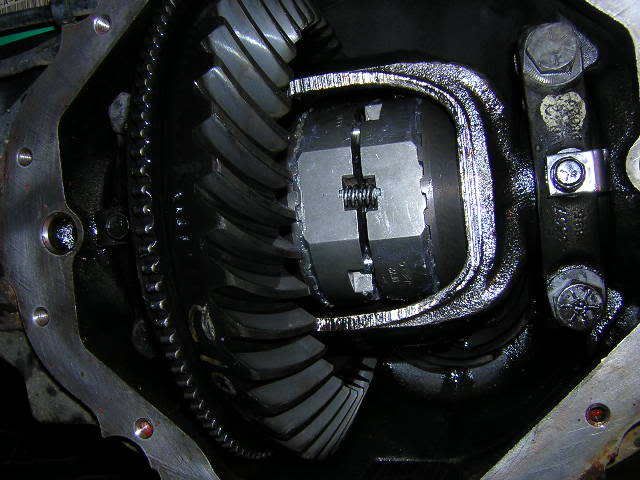
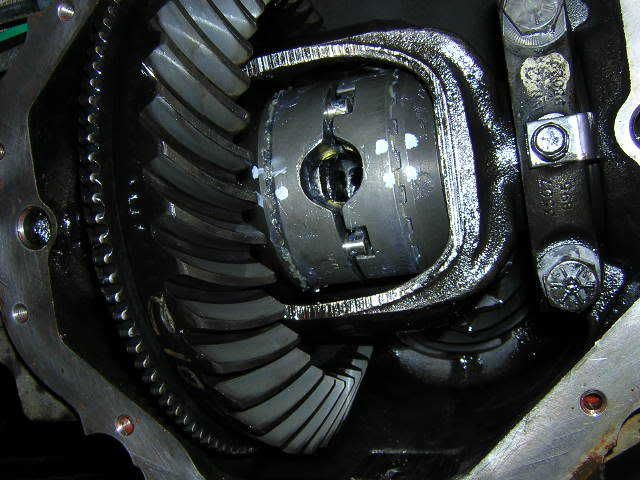
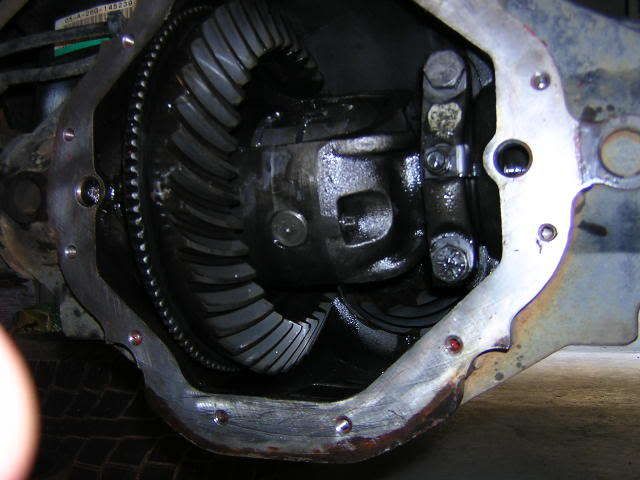
drain fluid. wipe out the bottom of the case, and then spray everything inside the case with brake cleaner and keep wiping out the bottom to get it clean. understand the old rear end parts - side gears on the axles, spiders on top and bottom. the rectangular box is the carrier. a pinon shaft holds it all together. c-clips hold the axles in. rotate the carrier (and ring gear) so the end of the pinon shaft with the retaining bolt is visible. remove it (8mm). push the pinon shaft out. this releases the spider gears. wiggle things around until the spider gears just sort of fall out. push each axle in, which will release the c clips. just pull them out - don't loose them because you will reuse them. pull the drives side axle out a couple of inches, remove the side gear and thrust washer. i marked mine as drivers side in case i ever need to put them back. i don't know if i needed to or not, but it sounded good. pull the passenger side axle out a couple of inches and remove the side gear and thrust washer. slide passenger axle out another couple of inches, so its not sticking into the carrier. i didn't have any thrust washers on the spiders. the carrier is now completely empty of gears and washers. spray it all down with brake cleaner again and wipe out the bottom.
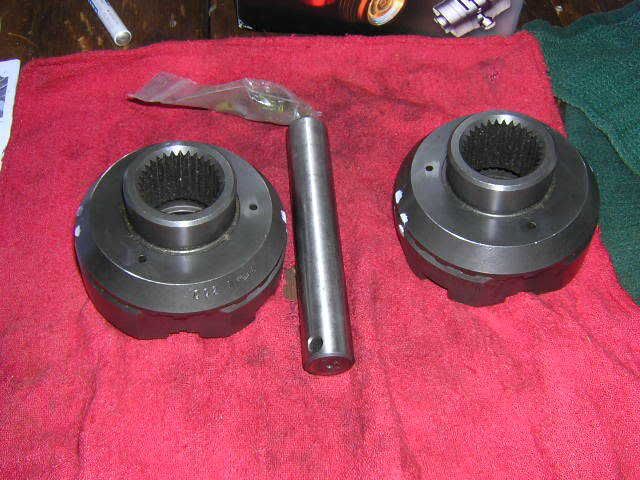
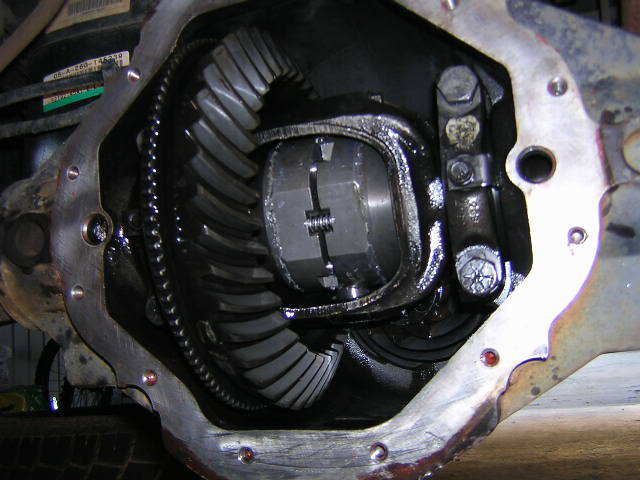
assembly: study the noslip parts and undertand that there are 3 parts per side, a pinion shaft in the middle, and some springs. the outermost part is the same for both driver and passenger side. the other two are not. passenger side is slotted (for c clip) and drivers side is not. when you put the 3 pieces together, you will only see the innermost and outermost. the middle piece, called the spacer, is hidden from view. it the magical piece !! it has a wide tab called the paddle. the innermost and outermost pieces have one, and only one, wide slot for that paddle to fit into. when the paddle is seated properly in the wide slots, the teeth will mesh tight. if its not in the right place, the teeth only half mesh.
this is sort of in the instructions as step 11, but its not clear what it means -> verify gaps in coupler teeth. i think this might have been my problem the first time. take the outermost piece and study it. it has a splined center for the axle shaft, and then it has 2 rows of teeth around the outside. this looks like all one solid piece. IT IS NOT. the inner teeth are a seperate piece, that will rotate in relationship to the outer teeth. ANOTHER MAGICAL PIECE. so put this outer piece in the vise (don't scar it up), put the middle piece's paddle in the wide slot. lay the pinion shaft into the slot for the pinon shaft, and rotate the shaft. this will rotate the inner teeth relative to the outer teeth. align it so that every other outer slot perfectly matches an
inner slot.
this is a also very important - position all 3 pieces together properly, and write with a marker on the outside edge of the inner and outer pieces where the paddle is. I used PP for passenger paddle (slotted) and PD for drivers paddle. 180 degrees opposite the paddle, mark another straight line across them. in my pictures below i put some dots, but then i forgot whether the paddle was one dot or two. this is important because you have to assemble all these pieces inside the carrier, and you have to keep rotating it back and forth, and you have to keep up with where the paddle is, and you have to get it all meshed exactly right in order to get the pinon shaft in. so these marks allow you to do that.
the assembly instruction say to use wheel bearing grease on the springs and teeth. you do need a little to help hold things together. but use ONLY A LITTLE BIT, just a little in the saddle springs, and a little on the innermost piece and middle piece (the magical spacer that has the magical paddle). use just enough to make the teeth sticky. do not coat everything in grease and DO NOT NOT NOT NOT get any grease in the slot where the passenger side c-clip goes. more on that later.
install driver's side outermost piece and c-clip. slide axle in all the way , put c-clip in slot, then slide axle back out to hold it. put in passenger side outermost piece. slide axle in only a litte, don't let it extend past the piece you just put in. add driver side inner&spacer. a little grease holds it. add passenger side inner&spacer (very tight fit). add the double springs. this is where the marks you made earlier help out. as all these pieces start rotating independently, you can verify proper alignment. test fit the pinion shaft into ONLY the noslip pieces (not the carrier). note the tapered end should be inserted. it should slide in very easy, then take it back out. now push the passenger side axle all the way in, rotate the c-clip slot up to about 10 o'clock, drop in the c clip, and rotate it up to 12 o'clock and it will drop over the axle. pull
out on the passenger side axle to seat it. test fit the pinion shaft again. verify alignment of your marks. rotate the carrier so the pinion shaft retaining bolt hole is exposed, align noslip and insert shaft. it should go in pretty easy, and all the noslip teeth should be firmly meshed. if they are not, its not right. once the pinion shaft is in, you can no longer see the paddle marks that you made. check the gap between the halves with the gauge provide. thin side must fit within gap. thick side must not fit.
don't put the cover on yet, don't put oil in it. don't locktite the pinon shaft bolt yet. put passenger side tire on with only 2-3 lugs. still jacked up, still in neutral, rotate tires, both should go foward, and then both should go backward. lower one side to the ground. tire in air should not rotate forward. with pretty good pressure, tire in air should rotate backward with a noticable click as it releases.
the pinon shaft compresses the 8 saddle springs, and contacts the spacer, which tries to push outward, compressing the innermost pieces against the double springs. they compresses into the center gap which releases the outer teeth. Pure Fxxxxxx Magic. repeat this test with the other tire. if it passes your good. if you cannot rotate the tire in the air backward, then somethings wrong, and you need to start over.
this was probably not the best thing to do, but at this point i drove very very slowly down the driveway turning back and forth with no cover and no oil. it wanted to make sure it worked before putting oil in it.
if you have to start over, then just remove everything in reverse, starting with pinion shaft, then passenger side c-clip. if you didn't use grease on the c-clip you can push in on the axle, rotate the noslip pieces so the slot is down, and the c-clip will fall out the slot. if you did use grease (i told you not to), then spray brake cleaner into the c-clip slot and move it around and spray it somemore and keep messing around until it eventually falls out.
if everything is ok, back out the pinion bolt and add a little locktite. check everything over one last time, install cover, put tire back on, and fill up with oil.
pics to follow...
short report. this is actually a very easy install that anyone can do, provided you have some patience, a safe and clean place to work, jack stands, jack, etc. so far, this product is everything its advertised as - an easy to install, affordable locker with decent road manners.
now the long report.
for some reason that i still don't understand, my first install resulted in a bind, and didn't work right. at the end of the install, the instructions tell you to lower one wheel to the ground, in neutral, attempt to turn the other wheel forward (it shouldn't), and then attempt to turn it backwards (it should). mine failed this test. well, me being me thought i would try it anyway, so i started the truck and pulled forward a little in a straight line. ok. turn the steering wheel a little and ease forward. i could feel the tires start to bind, then scuff, then BANG. i dont mean just bang i mean BANG. oh crap. backed it up into the garage and BANG again. oh crap.
took it all completely back apart to check for damage. looked ok, one little scratch on one of the teeth. cleaned all the parts and layed them out and studied them and had a few thinking beers. called Powertrax tech support on friday and talked to Jeff. we verified part number, he asked me about the gauge test on the gap (ok), and then the differentiation test (failed), and he asked me about the paddles, and the teeth mesh, and said that was all correct and try it again.
so i started all over and installed it a few more times, and eventually it worked out right. the instructions are pretty good, with one mistake regarding the back and forth rotation. If you are going to install one of these, here are some more things you need to know.
allow plenty of time for this in case you have trouble like i did. be aware that powertrax tech support is only m-f 9-5. wash the mud off the truck so its clean and not dripping dirt/mud all over the floor. put the rear end up on jack stands. in neutral. remove the passenger side tire. you can leave the drivers side on. work on a clean floor or put down a white towel. there are several small parts including some little springs that you don't want to lose.
drain fluid. wipe out the bottom of the case, and then spray everything inside the case with brake cleaner and keep wiping out the bottom to get it clean. understand the old rear end parts - side gears on the axles, spiders on top and bottom. the rectangular box is the carrier. a pinon shaft holds it all together. c-clips hold the axles in. rotate the carrier (and ring gear) so the end of the pinon shaft with the retaining bolt is visible. remove it (8mm). push the pinon shaft out. this releases the spider gears. wiggle things around until the spider gears just sort of fall out. push each axle in, which will release the c clips. just pull them out - don't loose them because you will reuse them. pull the drives side axle out a couple of inches, remove the side gear and thrust washer. i marked mine as drivers side in case i ever need to put them back. i don't know if i needed to or not, but it sounded good. pull the passenger side axle out a couple of inches and remove the side gear and thrust washer. slide passenger axle out another couple of inches, so its not sticking into the carrier. i didn't have any thrust washers on the spiders. the carrier is now completely empty of gears and washers. spray it all down with brake cleaner again and wipe out the bottom.
assembly: study the noslip parts and undertand that there are 3 parts per side, a pinion shaft in the middle, and some springs. the outermost part is the same for both driver and passenger side. the other two are not. passenger side is slotted (for c clip) and drivers side is not. when you put the 3 pieces together, you will only see the innermost and outermost. the middle piece, called the spacer, is hidden from view. it the magical piece !! it has a wide tab called the paddle. the innermost and outermost pieces have one, and only one, wide slot for that paddle to fit into. when the paddle is seated properly in the wide slots, the teeth will mesh tight. if its not in the right place, the teeth only half mesh.
this is sort of in the instructions as step 11, but its not clear what it means -> verify gaps in coupler teeth. i think this might have been my problem the first time. take the outermost piece and study it. it has a splined center for the axle shaft, and then it has 2 rows of teeth around the outside. this looks like all one solid piece. IT IS NOT. the inner teeth are a seperate piece, that will rotate in relationship to the outer teeth. ANOTHER MAGICAL PIECE. so put this outer piece in the vise (don't scar it up), put the middle piece's paddle in the wide slot. lay the pinion shaft into the slot for the pinon shaft, and rotate the shaft. this will rotate the inner teeth relative to the outer teeth. align it so that every other outer slot perfectly matches an
inner slot.
this is a also very important - position all 3 pieces together properly, and write with a marker on the outside edge of the inner and outer pieces where the paddle is. I used PP for passenger paddle (slotted) and PD for drivers paddle. 180 degrees opposite the paddle, mark another straight line across them. in my pictures below i put some dots, but then i forgot whether the paddle was one dot or two. this is important because you have to assemble all these pieces inside the carrier, and you have to keep rotating it back and forth, and you have to keep up with where the paddle is, and you have to get it all meshed exactly right in order to get the pinon shaft in. so these marks allow you to do that.
the assembly instruction say to use wheel bearing grease on the springs and teeth. you do need a little to help hold things together. but use ONLY A LITTLE BIT, just a little in the saddle springs, and a little on the innermost piece and middle piece (the magical spacer that has the magical paddle). use just enough to make the teeth sticky. do not coat everything in grease and DO NOT NOT NOT NOT get any grease in the slot where the passenger side c-clip goes. more on that later.
install driver's side outermost piece and c-clip. slide axle in all the way , put c-clip in slot, then slide axle back out to hold it. put in passenger side outermost piece. slide axle in only a litte, don't let it extend past the piece you just put in. add driver side inner&spacer. a little grease holds it. add passenger side inner&spacer (very tight fit). add the double springs. this is where the marks you made earlier help out. as all these pieces start rotating independently, you can verify proper alignment. test fit the pinion shaft into ONLY the noslip pieces (not the carrier). note the tapered end should be inserted. it should slide in very easy, then take it back out. now push the passenger side axle all the way in, rotate the c-clip slot up to about 10 o'clock, drop in the c clip, and rotate it up to 12 o'clock and it will drop over the axle. pull
out on the passenger side axle to seat it. test fit the pinion shaft again. verify alignment of your marks. rotate the carrier so the pinion shaft retaining bolt hole is exposed, align noslip and insert shaft. it should go in pretty easy, and all the noslip teeth should be firmly meshed. if they are not, its not right. once the pinion shaft is in, you can no longer see the paddle marks that you made. check the gap between the halves with the gauge provide. thin side must fit within gap. thick side must not fit.
don't put the cover on yet, don't put oil in it. don't locktite the pinon shaft bolt yet. put passenger side tire on with only 2-3 lugs. still jacked up, still in neutral, rotate tires, both should go foward, and then both should go backward. lower one side to the ground. tire in air should not rotate forward. with pretty good pressure, tire in air should rotate backward with a noticable click as it releases.
the pinon shaft compresses the 8 saddle springs, and contacts the spacer, which tries to push outward, compressing the innermost pieces against the double springs. they compresses into the center gap which releases the outer teeth. Pure Fxxxxxx Magic. repeat this test with the other tire. if it passes your good. if you cannot rotate the tire in the air backward, then somethings wrong, and you need to start over.
this was probably not the best thing to do, but at this point i drove very very slowly down the driveway turning back and forth with no cover and no oil. it wanted to make sure it worked before putting oil in it.
if you have to start over, then just remove everything in reverse, starting with pinion shaft, then passenger side c-clip. if you didn't use grease on the c-clip you can push in on the axle, rotate the noslip pieces so the slot is down, and the c-clip will fall out the slot. if you did use grease (i told you not to), then spray brake cleaner into the c-clip slot and move it around and spray it somemore and keep messing around until it eventually falls out.
if everything is ok, back out the pinion bolt and add a little locktite. check everything over one last time, install cover, put tire back on, and fill up with oil.
pics to follow...
#40
03-09-2007, 07:39 PM
congrats, that's good to hear. I didn't realize those teeth on the driver could move either. It does mention at the beginning of the instructions to make sure they are aligned properly. Mine were and since I didn't think they could move, I thought it was dumb they put that in there, but now it makes sense.