


Hughes FI Airgap Install Thread

Thread Starter
|
Veteran
Joined: Dec 2012
Posts: 487
Likes: 1
From: Evans City, PA
I've been a member here for a little while now and I've added my little comments here and there, but nothing too major yet. I figure it's about time I make up a thread to contribute to the good of the cause and hopefully answer some future questions. Last week I ordered my Hughes airgap intake to correct the plenum gasket issue (https://dodgeforum.com/forum/2nd-gen...um-thread.html) and hopefully provide me with a little more power. This thread is intended to document the process and provide tips and tricks to help with the install - not to rehash the M1 vs. Airgap debate.
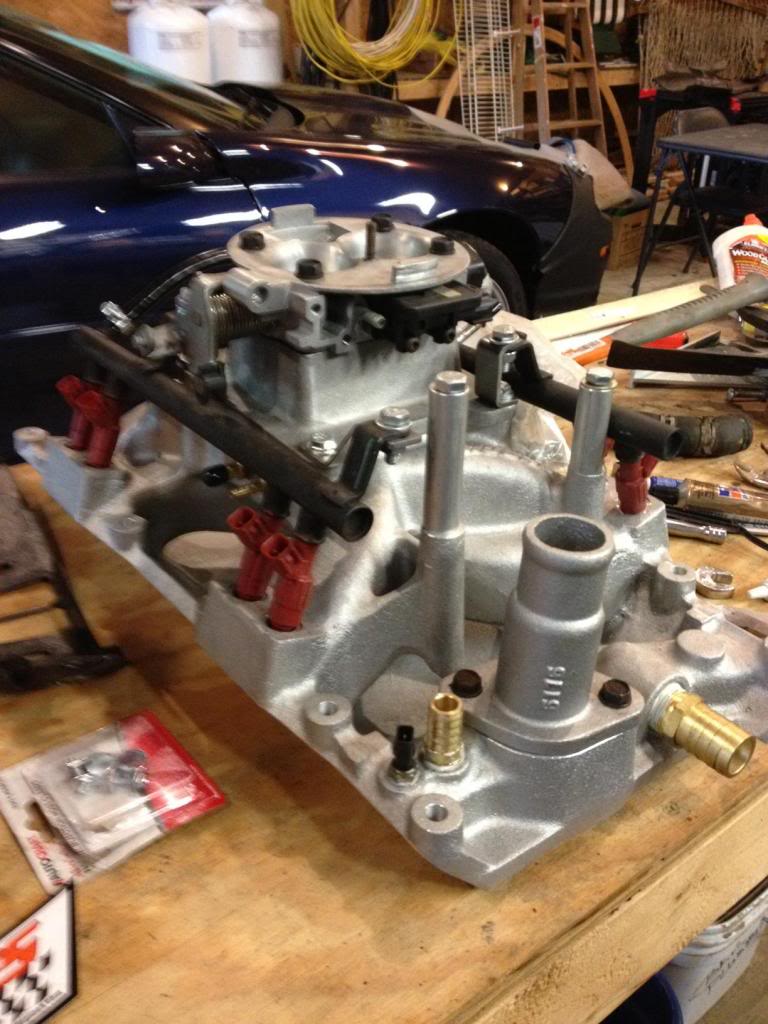
Here are some pics of the intake itself....it comes from Hughes with a questionable gasket set, instruction packet (which is actually pretty useful), some new bolts and washers, and a throttle body adapter shown in the second pic.


First things first: I disconnected the battery, removed my K&N cold air intake tube and heat shield, removed the serp. belt and alternator, took out the upper rad hose, and removed the fan shroud along with the coolant and washer reservoirs.
Install note: Notice that the fan clutch and blade are still on the engine. Repair manuals will say that the fan shroud and clutch have to be removed together. I didn't have the proper tool at the time to remove the fan clutch so I removed the four bolts holding on the blade and separated it from the clutch itself. This allowed me to wiggle the shroud out so I could keep working until I could find the right tool to hold the water pump pulley still. Proper tool:
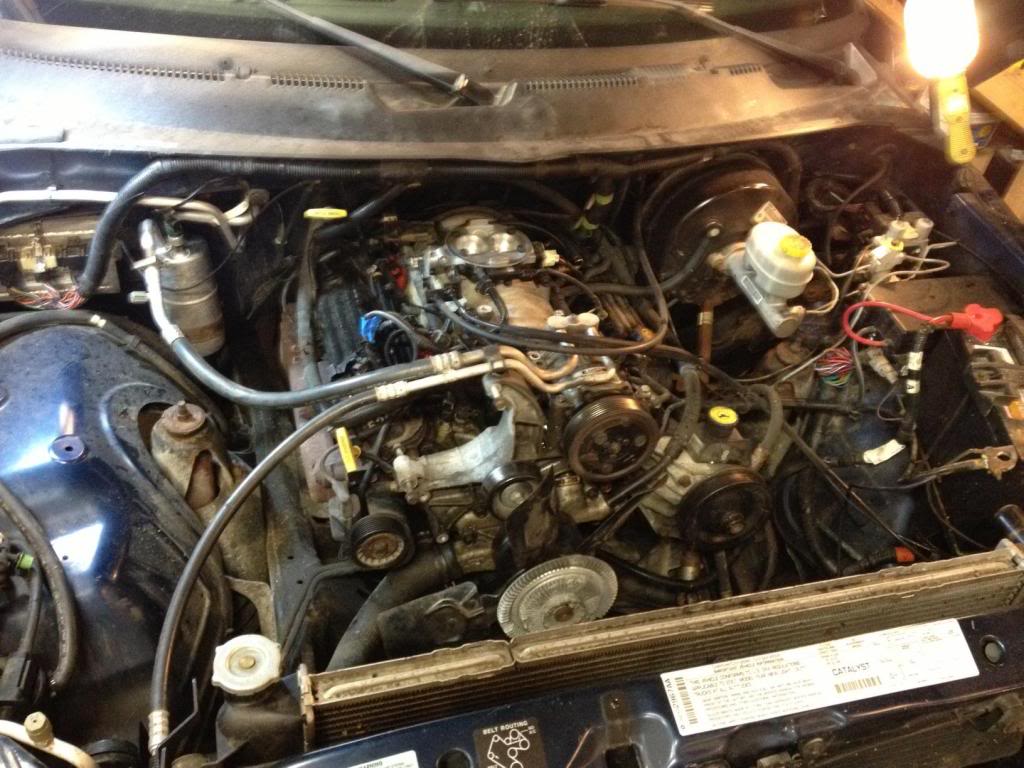
Clear area in front of the intake: Now is a good time to disconnect the AC compressor and lay it on the passenger side fender. DO NOT disconnect the AC lines. With the compressor out of the way, you can remove the accessory bracket, water outlet, and thermostat.
Install note: There is an accessory bracket bolt hiding behind the idler pulley...don't forget about it like I did and spend 10 minutes tugging and prying on the bracket like a moron.
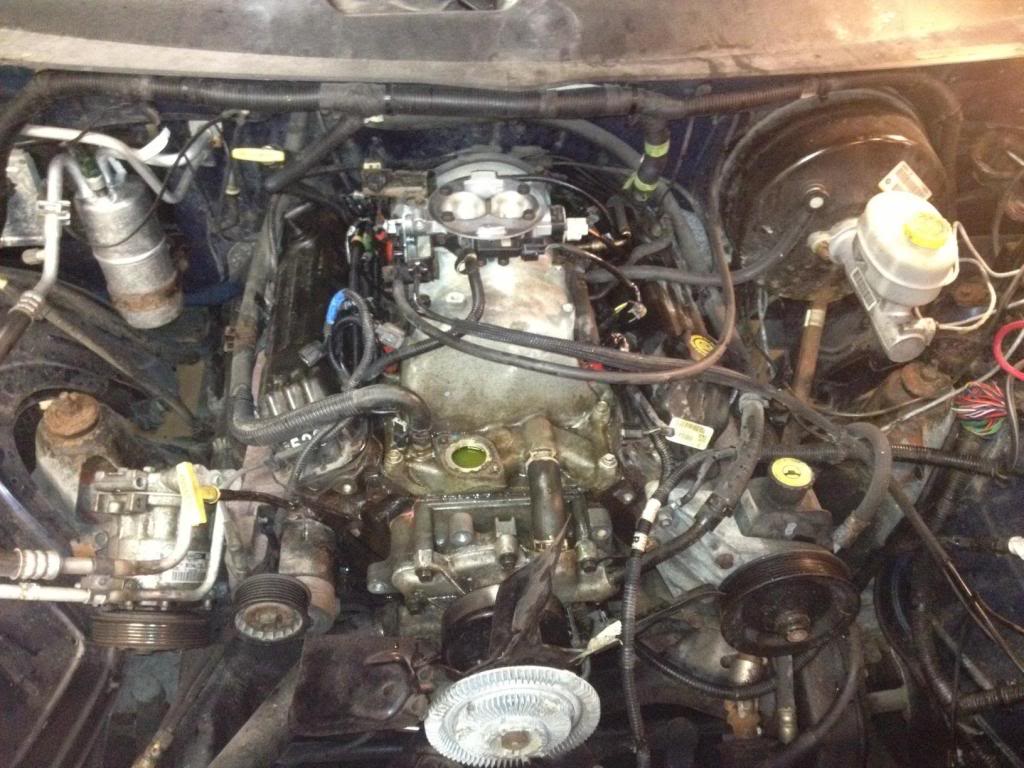
Remove and label: Next I disconnected the sensors attached to the throttle body, popped the trans kickdown cable and throttle cables off, and removed the entire throttle body from the top of the intake. This goes against what the Hughes instructions say, but I wanted to clean the IAC anyway and removing the throttle body means one less thing to get in your way during the rest of the install. I also pulled off the bypass hose and the heater hose from the manifold to the water pump. I then zip tied the cables and bracket that are attached to the throttle body up out of the way in the top right of the photo. I was also able to finally get the fan clutch off using a spanner wrench from a local auto parts store.
Install note: Labels are your friend - I used masking tape to label each plug, wire, and vacuum line that I removed during the installation process. This makes things much less complicated later on when you're getting anxious to be done.
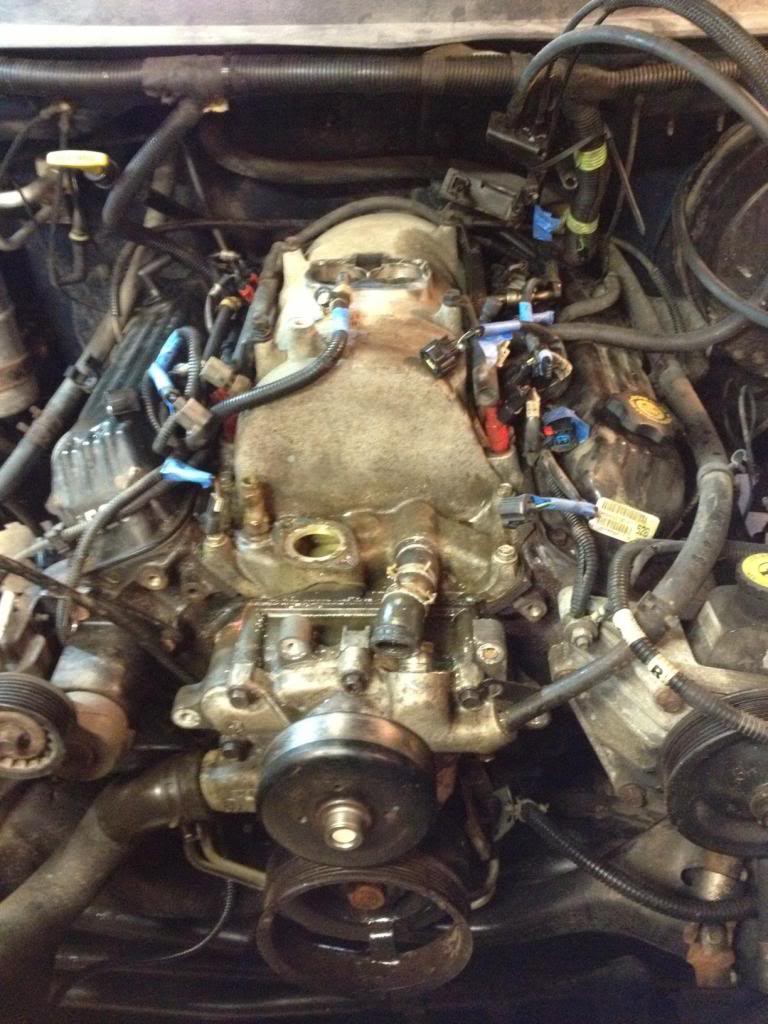
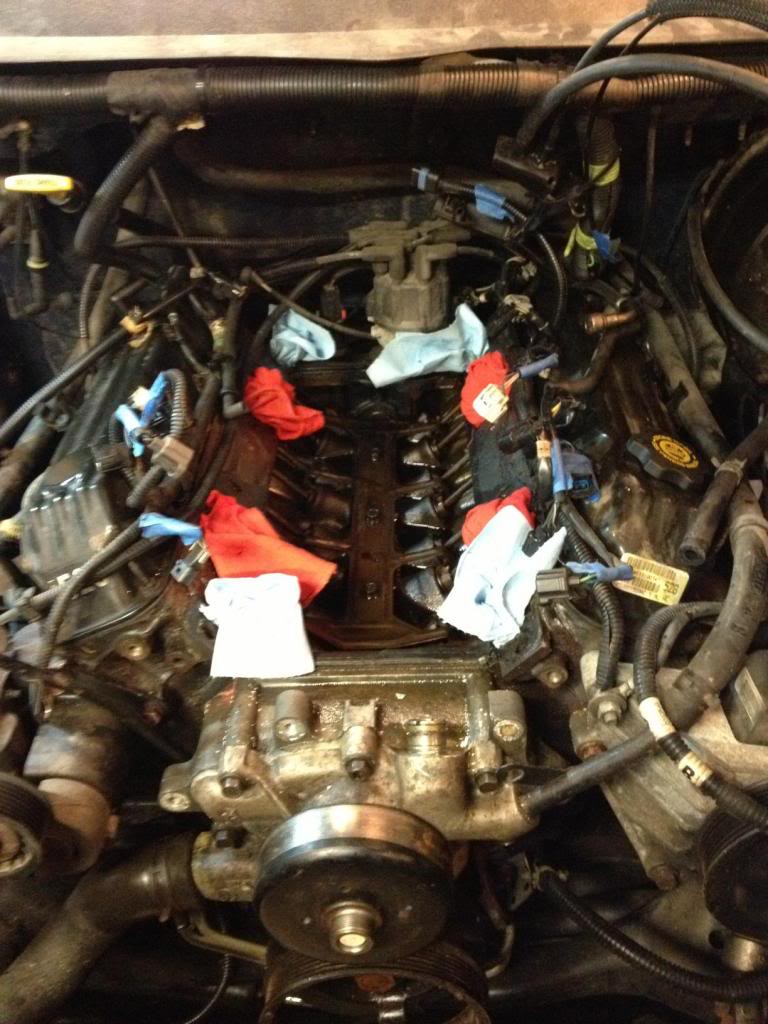
Now for the fun part: It's time to get the kegger off - unplug the fuel injectors and clear away any hanging plugs and vacuum lines as best you can. Gently remove the twelve bolts holding the kegger manifold. If you snap one of these bolts off, it's bad news. Mine weren't rusted at all, so after the had broken lose I was able to remove them nearly the entire way using just my fingers. They shouldn't be torqued on too tight, I only used a 3/8" drive ratchet with a deep well socket on mine. This step is another area in which I deviated from Hughes' instructions. I left the injectors and fuel rails on the manifold when I removed it because my injectors were really stuck and difficult to remove (I had to put the manifold on the ground, brace it with my foot, and use vice grips to tug the injectors out). As you can see in the picture, you have to stuff rags down in the holes to prevent debris from falling into your heads and causing all kinds of hell. Use towels or rags to cover the lifter valley as well. With the kegger out of the way, I took the opportunity to give my truck a full tune up. New cap, rotor button, plugs, and wires will do wonders for an aging truck (mine has 88k miles on it with stock wires and cap).
Install Note: Some debris likely will fall down in the lifter valley - I used a shopvac to get it out. Nothing went down there that caused any problems, just cover it as best you can.
Bench Assembly: After the tune up was done (not pictured), I installed the injectors, fuel rails, throttle body, and appropriate gaskets onto the airgap intake on my work bench. I went to advance and got a nice set of Felpro gaskets and fuel injector O-rings to use instead of the crap that came with the kit. I also chose to use rubber fuel line to connect the rails on the back of the intake...time will tell if that will hold up. I did use fuel injection hose clamps to clamp the hose to the barbs.
Install note:Hughes mentions in their instructions that you will likely have to trim the right-hand spacer (to mount the AC cond. bracket) so that it will fit around the fuel rail. See 2nd pic. Now is also the time to remove the gaskets from the heads and front and back of the lifter valley. I used a razor blade scraper to get the remaining gasket material off the heads. When installing the new gaskets, a little bit of copper rtv will help seal up the front and rear manifold gaskets and hold them in place while you place the airgap in.
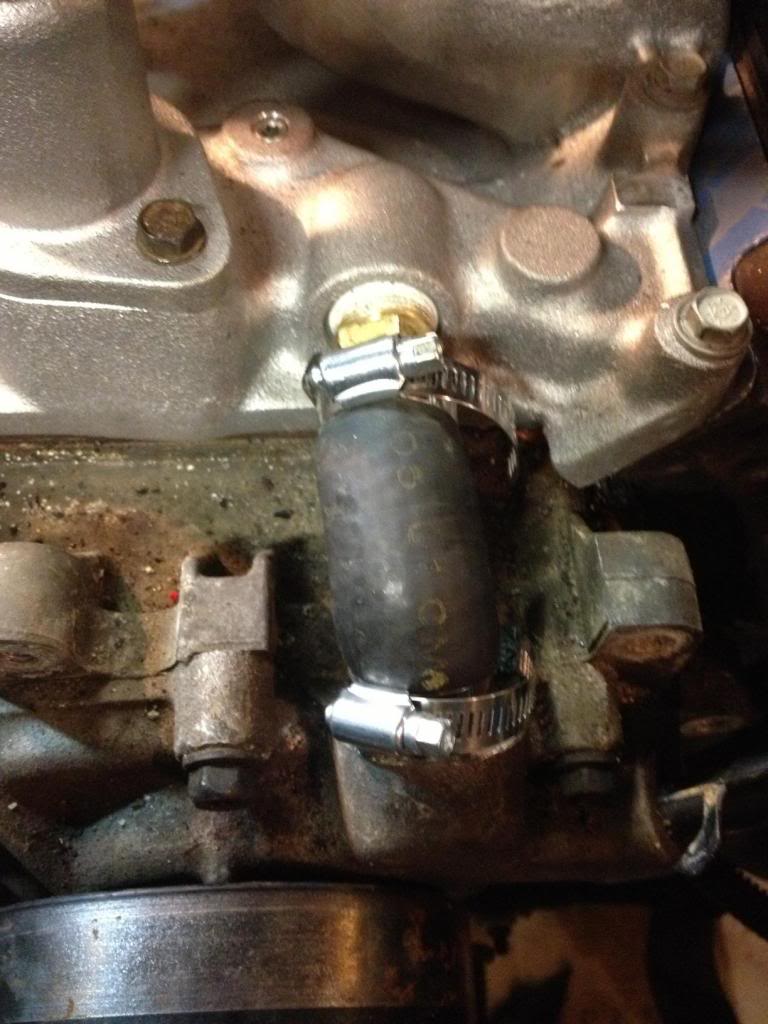
Airgap Fitment: The airgap manifold can now be installed - use the hardware and spacers provided to ensure that the mounting brackets in the Hughes kit are properly spaced and will mount to the fuel rails (see Hughes' packet for good install pics). If you look at my bench install pic above, you can see the front two fuel rail mounting brackets. You'll have to trim the water pump to manifold coolant hose a good amount depending on how far your barbed pipe fitting will thread into the manifold. Mine wouldn't go in very far, so I had to trim the hose a good bit (see 2nd pic). The 12 new manifold bolts that came in the kit with the airgap should be torqued to 12 ft-lbs.
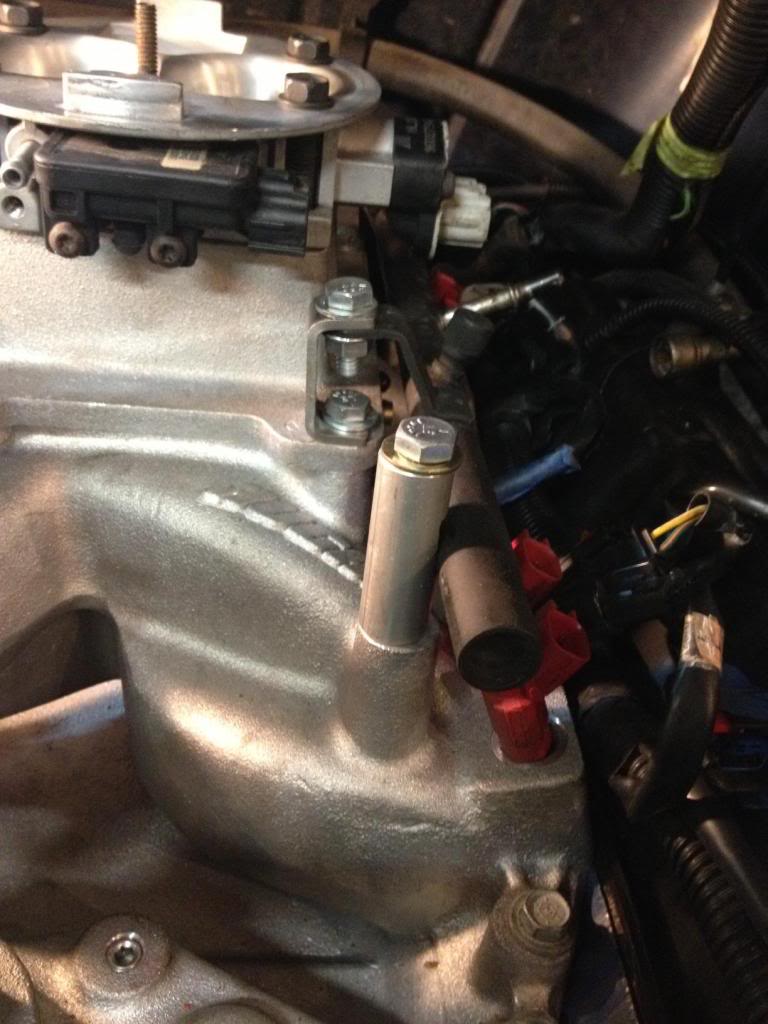
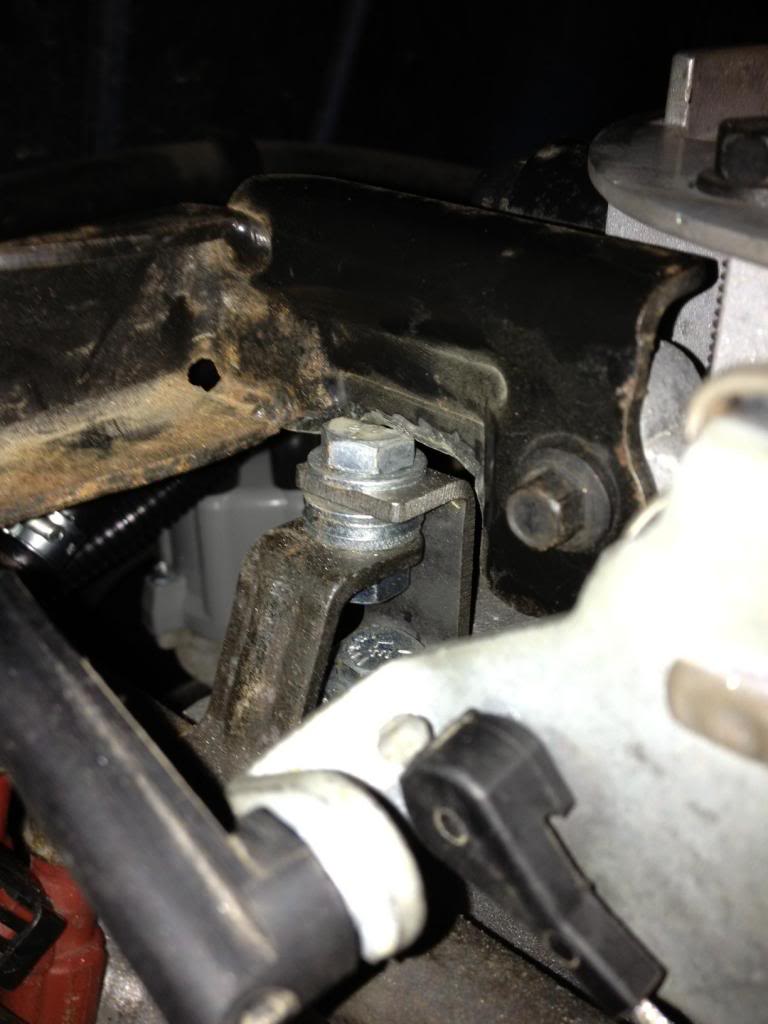
At this point in the install, I ran into something that was not covered by the Hughes instruction packet. When I tried to install the throttle body cable bracket, it would hit the rear bolt on the passenger side fuel rail and would make it impossible to thread the three holding bolts into the throttle body. To remedy this, I was forced to trim both the fuel rail bolt and the cable bracket itself (see picture). A dremel tool works wonders in tight spaces...
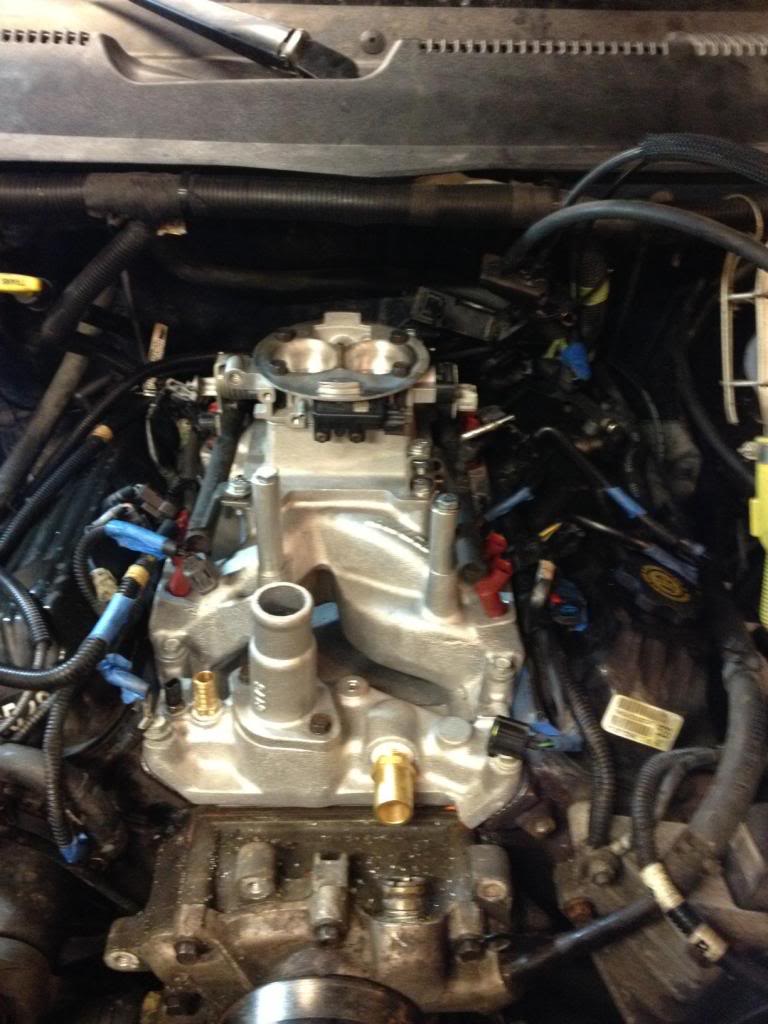
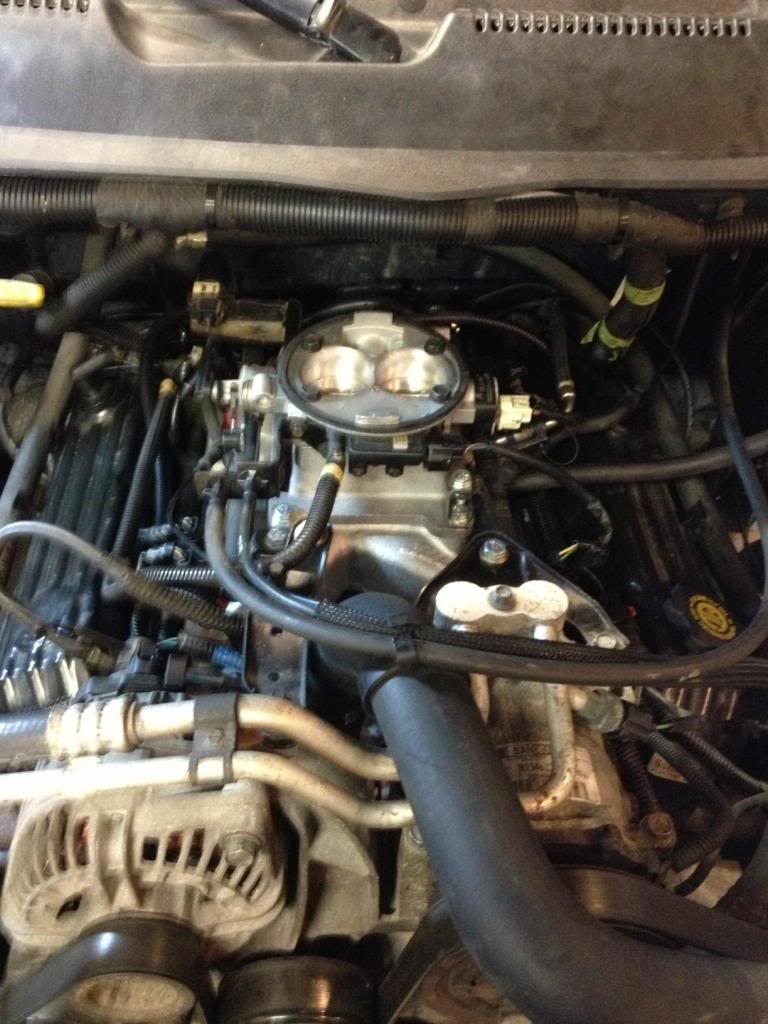
Almost done: Once my little throttle cable bracket mod had been done, I was able to bolt the throttle body, accessory bracket, alt, ac comp, ect. back to the engine and reconnect all vacuum lines, sensors, hoses to the intake. Those two long cylindrical spacers will bolts through them (at the front of the airgap) are used to connect the ac comp. bracket and the bracket bolts in next to the alternator.
One final mod: Now to deal with the IAT sensor. There are a couple other suggested ways to deal with relocating this thing, none of which sounded very appealing to me. I also didn't want to discard my K&N intake...luckily the tube runs right down next to where the IAT sensor was originally located. I drilled a hole approx. 5/8" in diameter into the tube and then super glued a pcv valve grommet (universal from advance auto) that I had trimmed to fit very tightly over the threads of the IAT sensor. The 5/8" hole was approximately the same diameter as the inner part of the grommet to provide a good fit into the tube and reduce vibrations. I didn't need to extend the sensor wires at all.

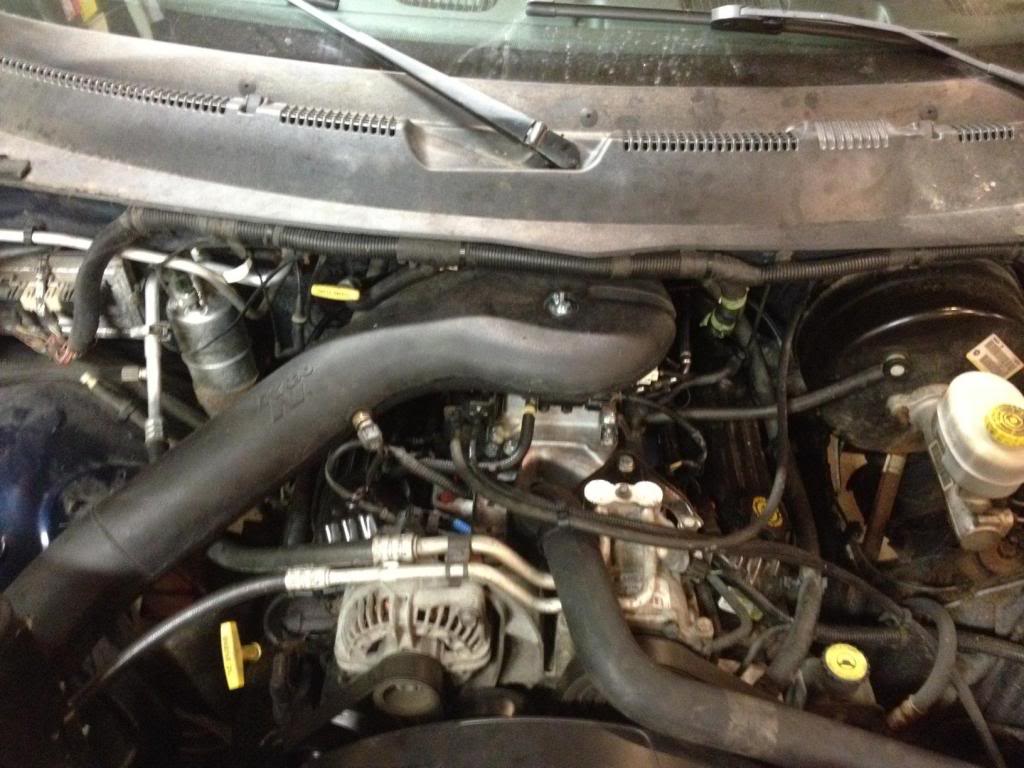
Final Product: It's pretty covered by the K&N and all the wiring, but it runs like a freakin beast. I was going through about a half quart a month but I hadn't been having any pinging yet. The biggest fault I noticed in the truck was that it would fall on its face during acceleration around 3000-3500 rpms. Needless to say, that doesn't happen any longer. I also have the SCT 93 octane tune on the truck and it seems to respond well to that. I'll keep this thread updated with any changes/problems I have. So far, there have been no check engine lights and no rough idling. I'll keep you all posted on any fuel mileage/oil consumption improvements. Feel free to comment and ask me any questions....take it easy fellas.
Airgap link:
http://www.hughesengines.com/Index/p...=&partid=24773
Here are some pics of the intake itself....it comes from Hughes with a questionable gasket set, instruction packet (which is actually pretty useful), some new bolts and washers, and a throttle body adapter shown in the second pic.
First things first: I disconnected the battery, removed my K&N cold air intake tube and heat shield, removed the serp. belt and alternator, took out the upper rad hose, and removed the fan shroud along with the coolant and washer reservoirs.
Install note: Notice that the fan clutch and blade are still on the engine. Repair manuals will say that the fan shroud and clutch have to be removed together. I didn't have the proper tool at the time to remove the fan clutch so I removed the four bolts holding on the blade and separated it from the clutch itself. This allowed me to wiggle the shroud out so I could keep working until I could find the right tool to hold the water pump pulley still. Proper tool:
Clear area in front of the intake: Now is a good time to disconnect the AC compressor and lay it on the passenger side fender. DO NOT disconnect the AC lines. With the compressor out of the way, you can remove the accessory bracket, water outlet, and thermostat.
Install note: There is an accessory bracket bolt hiding behind the idler pulley...don't forget about it like I did and spend 10 minutes tugging and prying on the bracket like a moron.
Remove and label: Next I disconnected the sensors attached to the throttle body, popped the trans kickdown cable and throttle cables off, and removed the entire throttle body from the top of the intake. This goes against what the Hughes instructions say, but I wanted to clean the IAC anyway and removing the throttle body means one less thing to get in your way during the rest of the install. I also pulled off the bypass hose and the heater hose from the manifold to the water pump. I then zip tied the cables and bracket that are attached to the throttle body up out of the way in the top right of the photo. I was also able to finally get the fan clutch off using a spanner wrench from a local auto parts store.
Install note: Labels are your friend - I used masking tape to label each plug, wire, and vacuum line that I removed during the installation process. This makes things much less complicated later on when you're getting anxious to be done.
Now for the fun part: It's time to get the kegger off - unplug the fuel injectors and clear away any hanging plugs and vacuum lines as best you can. Gently remove the twelve bolts holding the kegger manifold. If you snap one of these bolts off, it's bad news. Mine weren't rusted at all, so after the had broken lose I was able to remove them nearly the entire way using just my fingers. They shouldn't be torqued on too tight, I only used a 3/8" drive ratchet with a deep well socket on mine. This step is another area in which I deviated from Hughes' instructions. I left the injectors and fuel rails on the manifold when I removed it because my injectors were really stuck and difficult to remove (I had to put the manifold on the ground, brace it with my foot, and use vice grips to tug the injectors out). As you can see in the picture, you have to stuff rags down in the holes to prevent debris from falling into your heads and causing all kinds of hell. Use towels or rags to cover the lifter valley as well. With the kegger out of the way, I took the opportunity to give my truck a full tune up. New cap, rotor button, plugs, and wires will do wonders for an aging truck (mine has 88k miles on it with stock wires and cap).
Install Note: Some debris likely will fall down in the lifter valley - I used a shopvac to get it out. Nothing went down there that caused any problems, just cover it as best you can.
Bench Assembly: After the tune up was done (not pictured), I installed the injectors, fuel rails, throttle body, and appropriate gaskets onto the airgap intake on my work bench. I went to advance and got a nice set of Felpro gaskets and fuel injector O-rings to use instead of the crap that came with the kit. I also chose to use rubber fuel line to connect the rails on the back of the intake...time will tell if that will hold up. I did use fuel injection hose clamps to clamp the hose to the barbs.
Install note:Hughes mentions in their instructions that you will likely have to trim the right-hand spacer (to mount the AC cond. bracket) so that it will fit around the fuel rail. See 2nd pic. Now is also the time to remove the gaskets from the heads and front and back of the lifter valley. I used a razor blade scraper to get the remaining gasket material off the heads. When installing the new gaskets, a little bit of copper rtv will help seal up the front and rear manifold gaskets and hold them in place while you place the airgap in.
Airgap Fitment: The airgap manifold can now be installed - use the hardware and spacers provided to ensure that the mounting brackets in the Hughes kit are properly spaced and will mount to the fuel rails (see Hughes' packet for good install pics). If you look at my bench install pic above, you can see the front two fuel rail mounting brackets. You'll have to trim the water pump to manifold coolant hose a good amount depending on how far your barbed pipe fitting will thread into the manifold. Mine wouldn't go in very far, so I had to trim the hose a good bit (see 2nd pic). The 12 new manifold bolts that came in the kit with the airgap should be torqued to 12 ft-lbs.
At this point in the install, I ran into something that was not covered by the Hughes instruction packet. When I tried to install the throttle body cable bracket, it would hit the rear bolt on the passenger side fuel rail and would make it impossible to thread the three holding bolts into the throttle body. To remedy this, I was forced to trim both the fuel rail bolt and the cable bracket itself (see picture). A dremel tool works wonders in tight spaces...
Almost done: Once my little throttle cable bracket mod had been done, I was able to bolt the throttle body, accessory bracket, alt, ac comp, ect. back to the engine and reconnect all vacuum lines, sensors, hoses to the intake. Those two long cylindrical spacers will bolts through them (at the front of the airgap) are used to connect the ac comp. bracket and the bracket bolts in next to the alternator.
One final mod: Now to deal with the IAT sensor. There are a couple other suggested ways to deal with relocating this thing, none of which sounded very appealing to me. I also didn't want to discard my K&N intake...luckily the tube runs right down next to where the IAT sensor was originally located. I drilled a hole approx. 5/8" in diameter into the tube and then super glued a pcv valve grommet (universal from advance auto) that I had trimmed to fit very tightly over the threads of the IAT sensor. The 5/8" hole was approximately the same diameter as the inner part of the grommet to provide a good fit into the tube and reduce vibrations. I didn't need to extend the sensor wires at all.
Final Product: It's pretty covered by the K&N and all the wiring, but it runs like a freakin beast. I was going through about a half quart a month but I hadn't been having any pinging yet. The biggest fault I noticed in the truck was that it would fall on its face during acceleration around 3000-3500 rpms. Needless to say, that doesn't happen any longer. I also have the SCT 93 octane tune on the truck and it seems to respond well to that. I'll keep this thread updated with any changes/problems I have. So far, there have been no check engine lights and no rough idling. I'll keep you all posted on any fuel mileage/oil consumption improvements. Feel free to comment and ask me any questions....take it easy fellas.
Airgap link:
http://www.hughesengines.com/Index/p...=&partid=24773


Record Breaker


Joined: Sep 2012
Posts: 2,437
Likes: 73
From: S. Florida
Nice write-up.
I moved my AIT sensor to the same location about a month prior to installing my FI Airgap.
I drilled a slightly undersized hole in the K&N intake tube, and threaded the sensor in.
I did this ahead of time so I could monitor the effect of the new AIT location... the AIT sees air ~50�F cooler in this location, but I did not see any MPG or performance change.
The only Hughes gasket (made in India) I used was for the 4 barrel/2barrel adapter... all others I used Fel-Pro... I didn't use their injector 'O'-rings either.
Speaking of injectors, I used a 4port Bosch, and needed the EV1-EV6 adaptors.
I used the Holley hi-flow throttle body.
I also changed out the timing set, and water pump, whilst I was in there.
The install went fine, and I'm generally pleased with the improvement it has provided.
As expected, I have lost a little bottom end, but once it gets to ~1600rpm, it's off to the races, and by 2000rpm you really notice the get up and go.
As a feel for the bottom end torque loss, previously the T-fan load would not alter the RPM, but now it will drop ~100rpm (at idle) when they turn on.
I'm now squirreling away exhaust components to do the "out" side.
PS. I'm still on the HF 87 tune... I'm waiting for the new exhaust before I step up the octane and tune.
Last edited by Spillage; Sep 9, 2013 at 08:49 PM.
Champion


Joined: Oct 2009
Posts: 4,717
Likes: 10
From: N/A
Nice write up.
Couple of things I see.
1 Drivers side injectors look to be tilted back.
2 The pass side injectors look like they are not seated.
3 You could have used the hose nipple from the keg intake instead of the brass one supplied.
4 Why not drill and tap a hole for the iac in the tb adapter?
5 I have seen a few posts on that back cross-over hose leaking and causing engine fires keep an eye on it.
Not to start anything but the M1 install had none of these issues when it was installed, drop it on and go.
Enjoy the new intake better than the kegger any day.
Record Breaker
Joined: Sep 2012
Posts: 2,437
Likes: 73
From: S. Florida
You certainly could put the sensor in the TB adapter, but this would need a cable extension.
The Hughes kit has a new fuel rail crossover tube included, since the originals tend to get brittle and crack when disturbed.
The Hughes kit has a new fuel rail crossover tube included, since the originals tend to get brittle and crack when disturbed.
Thread Starter
|
Veteran
Joined: Dec 2012
Posts: 487
Likes: 1
From: Evans City, PA
Nice write up.
Couple of things I see.
1 Drivers side injectors look to be tilted back.
2 The pass side injectors look like they are not seated.
3 You could have used the hose nipple from the keg intake instead of the brass one supplied.
4 Why not drill and tap a hole for the iac in the tb adapter?
5 I have seen a few posts on that back cross-over hose leaking and causing engine fires keep an eye on it.
Not to start anything but the M1 install had none of these issues when it was installed, drop it on and go.
Enjoy the new intake better than the kegger any day.
Couple of things I see.
1 Drivers side injectors look to be tilted back.
2 The pass side injectors look like they are not seated.
3 You could have used the hose nipple from the keg intake instead of the brass one supplied.
4 Why not drill and tap a hole for the iac in the tb adapter?
5 I have seen a few posts on that back cross-over hose leaking and causing engine fires keep an eye on it.
Not to start anything but the M1 install had none of these issues when it was installed, drop it on and go.
Enjoy the new intake better than the kegger any day.
Also, the point of putting the IAT sensor in the K&N was to avoid doing the wire extension...not a big deal but I had forgotten to order the wires and I don't trust myself drilling/tapping holes by hand...
Rookie
Joined: Sep 2013
Posts: 56
Likes: 0
From: Maple Valley, WA
Great write-up - thanks for an abundance of photos. I'm trying to decide which way to jump on the plenum fix question, but that depends on how much the tranny fix is going to set me back. Lots of helpful info on this forum!
Trending Topics
Thread Starter
|
Veteran
Joined: Dec 2012
Posts: 487
Likes: 1
From: Evans City, PA
Thank you....I'm a firm believer in not doing a job twice unless absolutely necessary - why pull the stock intake and just put a plate in there when I knew I wanted something bigger and badder down the road? I was torn between the M1 and the airgap for a while but finally decided after studying multiple forums and trying to analyze which would be best for my driving style. I really like the intake so far, I haven't noticed any loss in low end power and it pulls nicely throughout the rpm range.
Record Breaker
Joined: Sep 2012
Posts: 2,437
Likes: 73
From: S. Florida
- I drive a stick, so (based other comments in these forums) I inherently work in a lower RPM range... autos initially rev higher until everything catches up.
- My exhaust side is restricted (clogged Cat, and original muffler)... next on the list to be replaced.
- O2 sensors are also due to be replaced (~85k miles on them).
If I drive sedately, it performed just fine, and certainly better than stock... it's when I give it some juice at lower speeds that it sounds like it wants to go, but the (improved) acceleration is not there... now if I do the same thing when over 1600rpm, it's a different story... and if I do it over 2000rpm, it's time to strap in (relatively speaking).
I'm hoping LT headers (w/matching Y-pipe), new HF Cat, 24" muffler, 3" pipe all the way to a 4" tip, will help balance the in/out flow.
Beyond that will be H&S1.7's to improve flow in the middle.
I am by no means disappointed with my FI Airgap... so far, I am happy with it, but I see opportunity for it to be better, when matched with other goodies.
Champion
Joined: Oct 2009
Posts: 4,717
Likes: 10
From: N/A
You've nailed the two issues I was most concerned about when I did the install. As far as the injectors, I thought they looked to be sitting a little high when I first installed them, but when I put the fuel rail brackets on everything fit together precisely as it should....and wouldn't I be getting some side effects from injectors that aren't properly seated? The engine runs perfectly at idle and all the way up through the rpms....improperly seated injectors would cause misfires or stumbling no? I was also concerned about that cross-over fuel line, but I'm hoping that the fuel injection clamps will hold the pressure. I'll be checking for fuel smell, moisture, etc...how anyone gets that stupid hard black plastic hose back over those barbs is beyond me. I even boiled that bastard in hot water and I was still bending and kinking the hell out of it.
Also, the point of putting the IAT sensor in the K&N was to avoid doing the wire extension...not a big deal but I had forgotten to order the wires and I don't trust myself drilling/tapping holes by hand...
Also, the point of putting the IAT sensor in the K&N was to avoid doing the wire extension...not a big deal but I had forgotten to order the wires and I don't trust myself drilling/tapping holes by hand...
I am not picking on the F1 or your choice in getting one, I just see things thats all.