


Cargo Net Installed

Thread Starter
|
Professional
Joined: Jul 2012
Posts: 146
Likes: 1
I was just able to go through my records and it was the K82210267 part number I ordered. My confusion was because this site listed the 55217379 part. Great site for finding parts, horrible for figuring out what models have them. Sorry for the confusion, and most of the nets seem to be the same.
This is where I ordered the K82210267 net. The reason I ordered it is because the description listed envelope net with hardware... there was no hardware included. That's why the net sat around for a month until I found the Toyota hooks to make it work.
Again, sorry for the confusion!
This is where I ordered the K82210267 net. The reason I ordered it is because the description listed envelope net with hardware... there was no hardware included. That's why the net sat around for a month until I found the Toyota hooks to make it work.
Again, sorry for the confusion!

Rookie
Joined: Apr 2012
Posts: 58
Likes: 0
Solphurious
Make sure is the K82210267 and not the 55217379. The 55217379 is very small. I am not sure what model or year jeep uses that one but it is approx 16" X 5". I could probably install it on my son's Power Wheel jeep.
Make sure is the K82210267 and not the 55217379. The 55217379 is very small. I am not sure what model or year jeep uses that one but it is approx 16" X 5". I could probably install it on my son's Power Wheel jeep.

Professional
Joined: Jun 2006
Posts: 102
Likes: 0
From: Kennewick WA
Net installed. Thanks for the tips. I really like the functionality. One word to the wise performing this install, look behind both side panels for obstructions prior to installing your hooks. Each side is slightly different in where the panel mounts are.
Rookie
Joined: Apr 2012
Posts: 58
Likes: 0
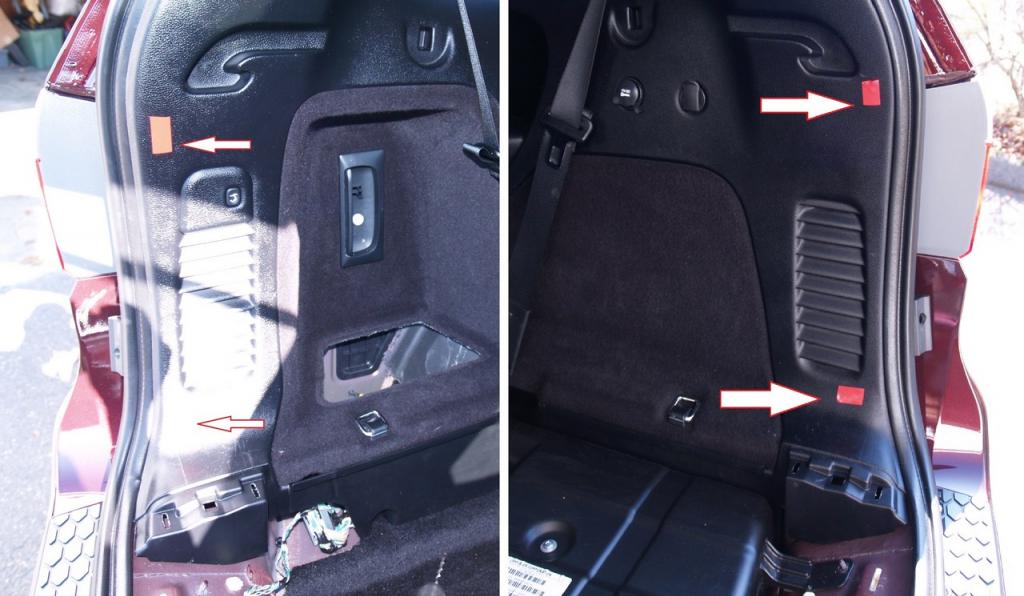
I was going to install my cargo net the same way NORGE did but I noticed that I was going to lose some trunk space when the seats were up. To avoid this I ordered two sets of hooks. I marked the location closest to the rear door as possible.
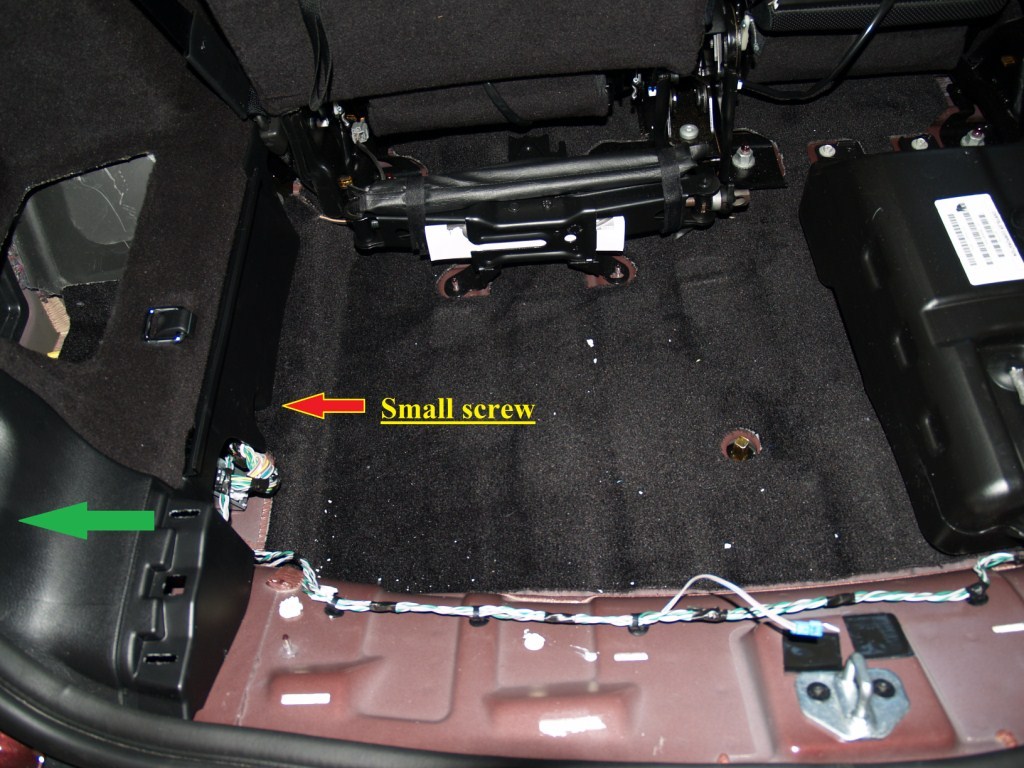
Storage compartment removal. Remove scuff plate by pulling it straight up. Next remove four bolts, two under the scuff plate and the last two are located under the tire jack. IMPORTANT… after removing the four bolts lift the storage compartments a few inches. There is a small two wire connector just under the storage compartment. Unplug it and then remove the storage compartment. If you break these wires or forget to reconnect it your Durango will not start.

To install the hooks just pull on the edge of the panel just enough to get your hand behind it. Pull on the same general area where the red tape is on my first photo. On the left side (Driver) there is a small screw on the bottom of the panel. Remove it and then pull the panel just enough to insert the hook screws from behind the panel.
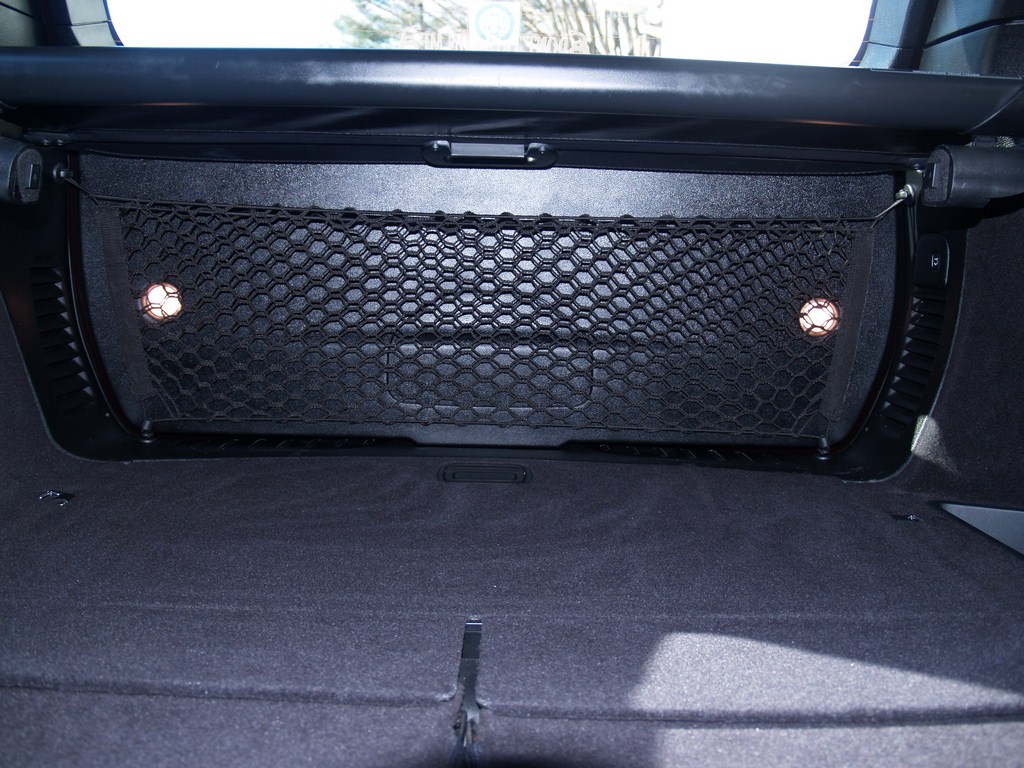
After I completed the installation, I noticed that the Cargo net was a good four inches up from the floor, therefore defeating the purpose of the net. I then drilled (I know, scary word for new car owners) two more holes at the bottom of the panel.

My cargo net had two plastic hooks on the top two corners but I removed them for the install.
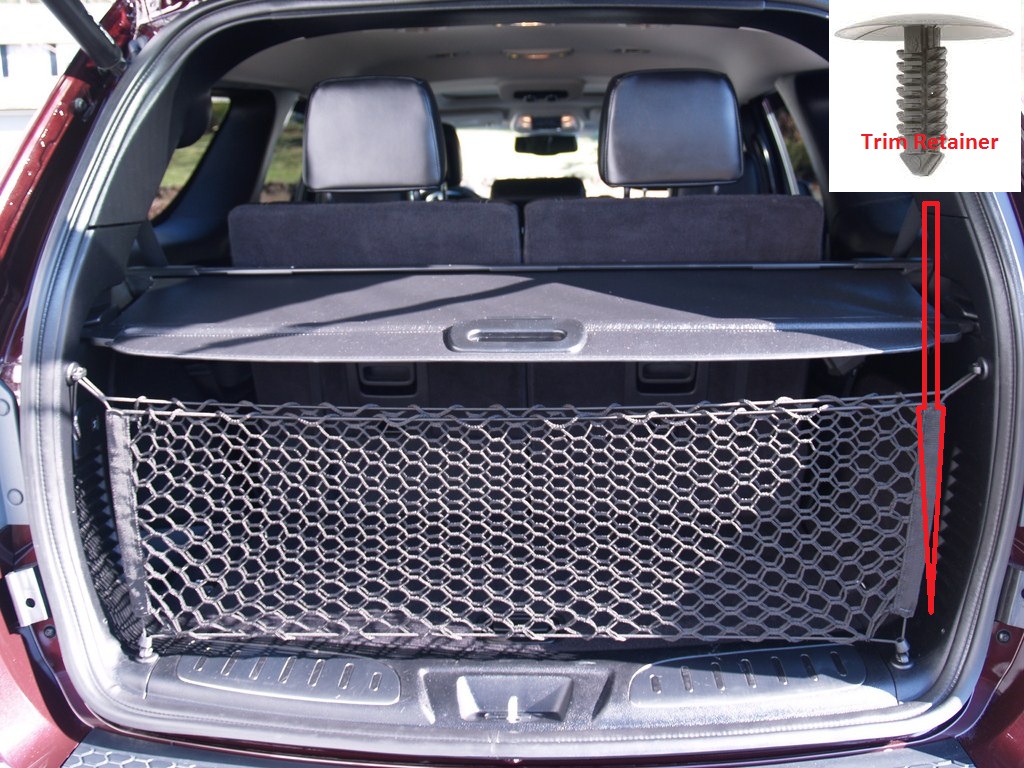
If you are wondering about the extra two holes. I purchased a box of 6 or 8 Panel Trim Retainers (Black) from advance auto parts. The retainers blended in with the black panels for a clean look.
Here is the final result.
Inside look
Outside Look
Storage compartment removal. Remove scuff plate by pulling it straight up. Next remove four bolts, two under the scuff plate and the last two are located under the tire jack. IMPORTANT… after removing the four bolts lift the storage compartments a few inches. There is a small two wire connector just under the storage compartment. Unplug it and then remove the storage compartment. If you break these wires or forget to reconnect it your Durango will not start.
To install the hooks just pull on the edge of the panel just enough to get your hand behind it. Pull on the same general area where the red tape is on my first photo. On the left side (Driver) there is a small screw on the bottom of the panel. Remove it and then pull the panel just enough to insert the hook screws from behind the panel.
After I completed the installation, I noticed that the Cargo net was a good four inches up from the floor, therefore defeating the purpose of the net. I then drilled (I know, scary word for new car owners) two more holes at the bottom of the panel.
My cargo net had two plastic hooks on the top two corners but I removed them for the install.
If you are wondering about the extra two holes. I purchased a box of 6 or 8 Panel Trim Retainers (Black) from advance auto parts. The retainers blended in with the black panels for a clean look.
Here is the final result.
Inside look
Outside Look
Last edited by Blue659; Nov 12, 2012 at 10:22 PM. Reason: typo

