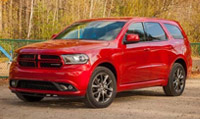
R/T-Heat Front Fascia on Crew
#1
Since I bought the Crew, there was only one part of the body that kinda bugged me, the random chrome applique on the front lower fascia. I actually like the chrome applique on the sides, but the front just seemed odd and kind took away from the aggressive looking grill/light setup. I really like the R/T & Heat's front lower fascia, but I actually don't mind the non-body painted look either since I do have to worry about rock chips, etc. on some of the roads around here. So, I decided to fix it:
Here's the original look:


I decided looked at the parts setup and decided to order the lower fascia. It only comes with black primer, but I used the aircraft paint striper for plastic and got it to the matching plastic color of the rest:

The only thing that didn't match up is the retainer clip for the bottom corner of the fog lights:

This seems pretty odd as the upper fascia is supposed to be the same part for either. And I can't find any listing of an adapter piece for the R/T style lower fascia:

Either way, it actually fits snug and the fog lights aren't loose, so I have time to make an adapter of some sorts.
Now, the Air Dam is a different part, which is on it's way. So I'll update with new pics once it's on. In the meantime, here's pics of the setup now (I also have to redo the fog light tint):


I really prefer this look and am finally satisfied with the appearance.
Here's the original look:


I decided looked at the parts setup and decided to order the lower fascia. It only comes with black primer, but I used the aircraft paint striper for plastic and got it to the matching plastic color of the rest:

The only thing that didn't match up is the retainer clip for the bottom corner of the fog lights:

This seems pretty odd as the upper fascia is supposed to be the same part for either. And I can't find any listing of an adapter piece for the R/T style lower fascia:

Either way, it actually fits snug and the fog lights aren't loose, so I have time to make an adapter of some sorts.
Now, the Air Dam is a different part, which is on it's way. So I'll update with new pics once it's on. In the meantime, here's pics of the setup now (I also have to redo the fog light tint):


I really prefer this look and am finally satisfied with the appearance.
#2
#5

Hey man, looks awesome! Great job figuring it out! Where did you get that parts list diagram? Was that something you got from a dealer, found online, or did you somehow get your hands on a parts manual? I'm really interested in trying to get my hands on a factory repair manual/shop manual, but even just a parts manual would be very helpful, especially if it comes with exploded view diagrams like the one you have above. Any help you can provide would be greatly appreciated!
#6

Hey man, looks awesome! Great job figuring it out! Where did you get that parts list diagram? Was that something you got from a dealer, found online, or did you somehow get your hands on a parts manual? I'm really interested in trying to get my hands on a factory repair manual/shop manual, but even just a parts manual would be very helpful, especially if it comes with exploded view diagrams like the one you have above. Any help you can provide would be greatly appreciated!
#7
Trending Topics
#8
SUNBURNTsnype: I got that parts diagram from here -
www.gmb.be/CJD_parts/CD5/Catalogs/06-09/11wd.PDF
It's a little better to view than some of the online parts diagrams.
www.gmb.be/CJD_parts/CD5/Catalogs/06-09/11wd.PDF
It's a little better to view than some of the online parts diagrams.


