


 Aug 12, 2015, 02:34 PM
Last edit by: IB Advertising
See related guides and technical advice from our community experts:
Browse all: Dodge Ram 1500 Exterior Guides
- Dodge Ram: How to Remove Tonneau Cover
Step by step intructions for the do-it-yourself repairs.
Browse all: Dodge Ram 1500 Exterior Guides

Got a new Peragon Tonneau cover!!!
Thread Starter
|
All Star
Joined: Jun 2008
Posts: 963
Likes: 0
From: Greenville, SC
So after seeing DirtyDog's write up and seeing how awesome the Peragon cover looks brand new i decided to bite the bullet and get a new one myself. Now remember i had the original Peragon cover so my write up wont mimic DD's but im going to concentrate on the differences.
So i got my cover a few weeks ago but i hadn't had the chance to put it on until this past weekend.
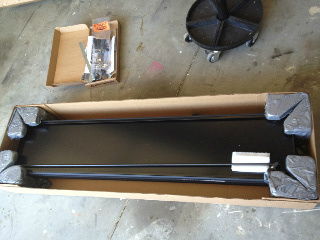
Everything was packaged great and easily definable and ready to go.
My first order of business was to take the old cover off, which wasnt too bad. The two sided tape under the plastic bed covers where the worst part of it. So after i got that off i decided to build the frame first. I didnt have any moving blankets so i opted to do it in the grass.
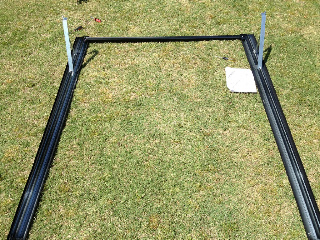
Putting the frame together was easy as i had done before. One of the new things this cover has is it stabilizes itself differently than the old one. The old one used a bar that attached to both ramps. This took away almost a foot of space in your bed. The new system uses a different method so you do not lose space which is a lot better.
After i had put the frame together i mounted all of the L brackets by drilling 4 holes in the inside of the bed rails. i like this method much better where as before the brackets used the existing holes where the 4 open spots are on the bed. Which was ok but very cumbersome to work with and actually mount.

Now as for mounting the frame to the brackets, this is the least fun part of this install. If i had one complaint it would be that the washer method (and even the nut method DD used) is horrible. There are only so many trucks out there and i would think that Peragon could take the time to measure and test and produce a spacer that would work perfect depending on your make and model and not to mention look a hell of a lot better.
So after fighting with that for a bit it was time to install the folding cover. Now the old method had this pin that you had to insert from a TEDIOUS angle. The new one was a god send. It has a push out tab and the cover snaps right in...I will definitely be taking the cover out now that its that easy. I never took the old one out due to how much trouble it was.
So once the cover was attached, i checked for any binding and then mounted the shocks...Now the new shocks have a quick release piece on the end and wow it makes it super easy and the shocks are beefier than the old ones. Upon closing the cover i noticed the strap to pull it shut is heavier duty and the panels themselves seem to be made a lot better.
So with the cover closed i checked for any gaps around the edges but everything was flush...

I also bought the pop& lock piece and it is nice to finally be able to lock my tailgate!!!
I will tell you this if you are looking for a functional tonneau cover then this is the way to go...and it looks awesome as well. This is my second one and i love it.
Rodger and the folks at Peragon are top notch. I even had a lady call me to make sure i got everything the day after Fed Ex delivered it. Now THAT is Customer Service

So i got my cover a few weeks ago but i hadn't had the chance to put it on until this past weekend.
Everything was packaged great and easily definable and ready to go.
My first order of business was to take the old cover off, which wasnt too bad. The two sided tape under the plastic bed covers where the worst part of it. So after i got that off i decided to build the frame first. I didnt have any moving blankets so i opted to do it in the grass.
Putting the frame together was easy as i had done before. One of the new things this cover has is it stabilizes itself differently than the old one. The old one used a bar that attached to both ramps. This took away almost a foot of space in your bed. The new system uses a different method so you do not lose space which is a lot better.
After i had put the frame together i mounted all of the L brackets by drilling 4 holes in the inside of the bed rails. i like this method much better where as before the brackets used the existing holes where the 4 open spots are on the bed. Which was ok but very cumbersome to work with and actually mount.
Now as for mounting the frame to the brackets, this is the least fun part of this install. If i had one complaint it would be that the washer method (and even the nut method DD used) is horrible. There are only so many trucks out there and i would think that Peragon could take the time to measure and test and produce a spacer that would work perfect depending on your make and model and not to mention look a hell of a lot better.
So after fighting with that for a bit it was time to install the folding cover. Now the old method had this pin that you had to insert from a TEDIOUS angle. The new one was a god send. It has a push out tab and the cover snaps right in...I will definitely be taking the cover out now that its that easy. I never took the old one out due to how much trouble it was.
So once the cover was attached, i checked for any binding and then mounted the shocks...Now the new shocks have a quick release piece on the end and wow it makes it super easy and the shocks are beefier than the old ones. Upon closing the cover i noticed the strap to pull it shut is heavier duty and the panels themselves seem to be made a lot better.
So with the cover closed i checked for any gaps around the edges but everything was flush...
I also bought the pop& lock piece and it is nice to finally be able to lock my tailgate!!!
I will tell you this if you are looking for a functional tonneau cover then this is the way to go...and it looks awesome as well. This is my second one and i love it.
Rodger and the folks at Peragon are top notch. I even had a lady call me to make sure i got everything the day after Fed Ex delivered it. Now THAT is Customer Service

Former Vendor
Joined: Jan 2012
Posts: 101
Likes: 1
From: Wisconsin
cjs4444,
Thank you for the great review, photos and objective feedback!
Did you remove the plastic bed rail protectors for personal reasons or otherwise? They don't have to be removed to install the cover. If you felt the instructions were asking you to do that, we need to change something in the manual ASAP. What do you think we should change?
Thank you for the suggestion on the washers. I will forward that for consideration.
Cheers!

Registered User
Joined: Apr 2012
Posts: 4
Likes: 0
I just purchased mine today. I am a little worried about installation as it looks like i'll need to cut some of my truck bed liner. in mentions in the instructions that the liner needs to be notched. Could you post picks of the area where that was needed.
Former Vendor
Joined: Jan 2012
Posts: 101
Likes: 1
From: Wisconsin
Good afternoon! Excellent question. You will not need to cut your liner...at least I've never heard of anyone needing to. DirtyDog had to "reform" part of the liner so the panels would fold completely, but that's the extent of what I'm aware of. His post discussing this is found here.
The manual speaks of liner modification IF you have a no-drill installation. This information is in the process of changing because we no longer offer no-drill installations. Therefore liner modification is no longer necessary for mounting brackets. Your brackets will mount directly to the inside edge of the bedrail, on top of the plastic bed rail caps, if you have those, and you don't have to cut or remove the rail caps.
Please call us if you have any questions, we would be happy to help!

Former Vendor
Joined: Jan 2012
Posts: 101
Likes: 1
From: Wisconsin
Trending Topics
Moderate User


Joined: Oct 2008
Posts: 17,003
Likes: 21
From: Albany, NY
Looky good my friend!
The washer deal. A specific sized washer would be nice, but not everyone will drill their holes at the same height below the rail or tighten those brackets flush. So, for this, the best solution would be to provide 2 or 3 different sized washers to meet various demands. They only need to be urethane, not metal so that should be cheap enough to provide! Maybe in 1/8" increments? I just measured my "spacers" at 3/8" exactly.
...and customer service is top notch!
Thread Starter
|
All Star
Joined: Jun 2008
Posts: 963
Likes: 0
From: Greenville, SC
Looky good my friend!
The washer deal. A specific sized washer would be nice, but not everyone will drill their holes at the same height below the rail or tighten those brackets flush. So, for this, the best solution would be to provide 2 or 3 different sized washers to meet various demands. They only need to be urethane, not metal so that should be cheap enough to provide! Maybe in 1/8" increments? I just measured my "spacers" at 3/8" exactly.
...and customer service is top notch!
The washer deal. A specific sized washer would be nice, but not everyone will drill their holes at the same height below the rail or tighten those brackets flush. So, for this, the best solution would be to provide 2 or 3 different sized washers to meet various demands. They only need to be urethane, not metal so that should be cheap enough to provide! Maybe in 1/8" increments? I just measured my "spacers" at 3/8" exactly.
...and customer service is top notch!
