


 Aug 13, 2015, 08:42 PM
Last edit by: IB Advertising
See related guides and technical advice from our community experts:
Browse all: Lighting Guides
- Dodge Ram 2009-Present: How to Replace Front Turn Signal Bulbs
Step by step intructions for the do-it-yourself repairs.
Browse all: Lighting Guides

How To: Front LED Turn Signal Install - 3G Rams
Thread Starter
|
Amateur
Joined: Aug 2010
Posts: 28
Likes: 1
From: Bad Axe, MI **Welcome 2 HICKTOWN**
I figured there were a few threads on what they look like, but none on how to.. So here is a few pics I took to make it a bit easier for those of you who would like to do this but are unsure; hope it helps. 
This is how I did it, not sure if you want to follow 100%, but this is the best and cleanest way I know to do it right.
Things you will need...
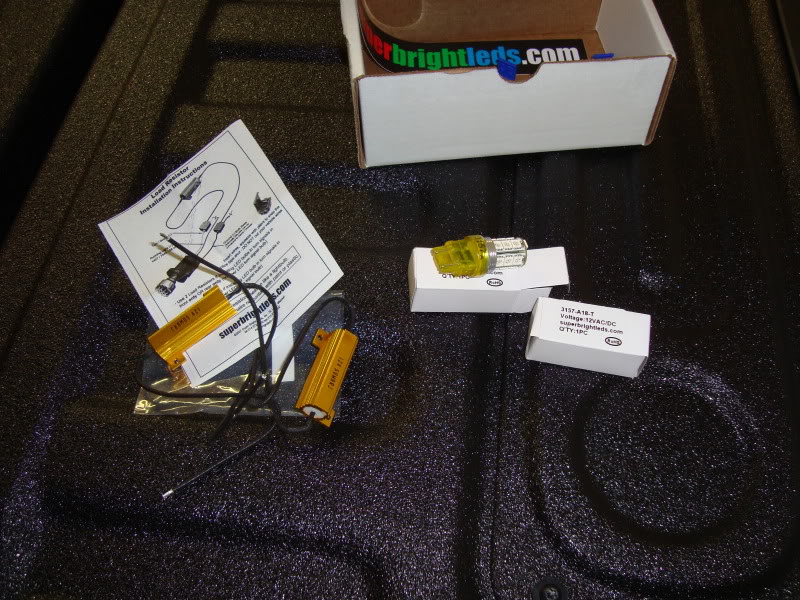
- 2: Amber 3157 LED bulbs (SuperBrightLED.com)
- 2: RL-650 Tail Light Load Resistor kit (SuperBrightLED.com)
- Electrical Tape
- White Grease / Anti Seize
- Wire Strippers
- Wire Nippers
- Terminal Connectors (2 Male / 2 Female)
- Wire Connector Crimps
- Flat Head Screw Driver
- Clean Towel or Rag
- 10 mm Socket
- Socket Driver
- Socket Extension
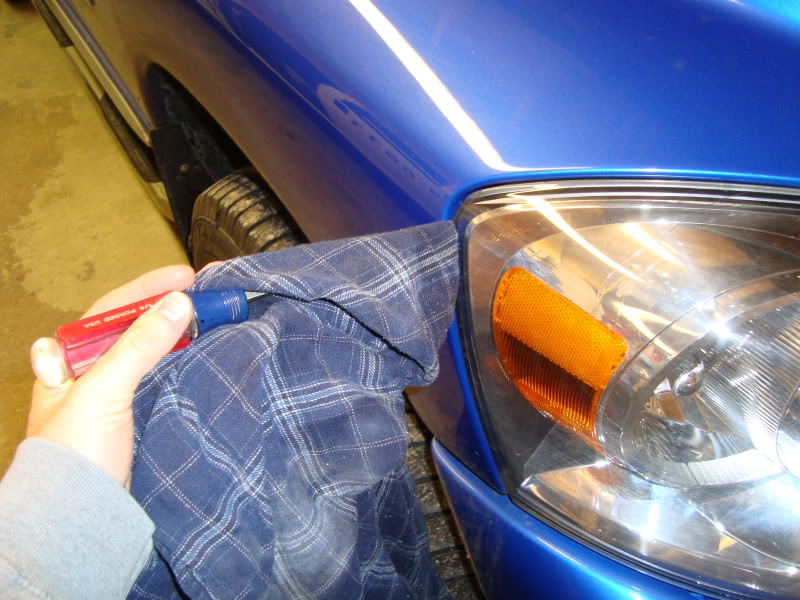
Start off by opening the hood to remove the headlights... Notice the 10mm nut/Torx heads at the front of the light...Remove them and put them in a safe place.

Go to where the bumper meets the fender, there is a hidden nut under there holding the back of the light... Remove it and put it with the others.

There it is... The drivers side has a nice rubber cover to access it. The passanger side on the other hand. You have to use your socket and the extension to get that one off; got to love Chrysler products.

Take your flat head screw driver and your rag or towel and gently pry the back of the light, she will pop right out.
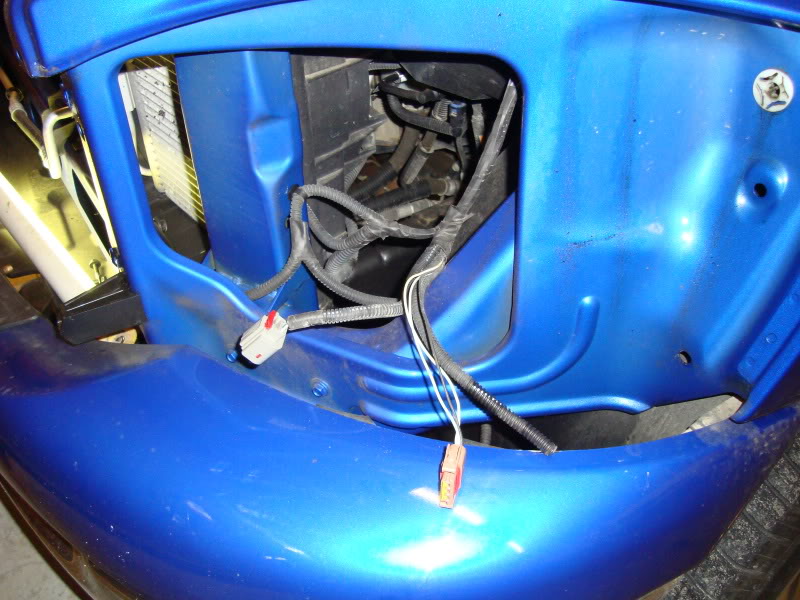
Unplug the connectors and set the light aside... It is time for a little wire modding.
Being that the LEDs are for the blinkers you need to wire of load resistors. The resistors drop the load so that the LEDs are able to follow the blinker signal, other than that the power will be too much and the LEDs will see it as constant power and will just stay solid. You NEED these to make them blink!
After you pulled back the wire loom you will notice 3 wires, the Constant, the Blinker, and Ground. Locate the Black and the White/Green (Drivers Side) and the White/tan (Passenger Side). These are the 2 wires you will be attaching your load resistors to.
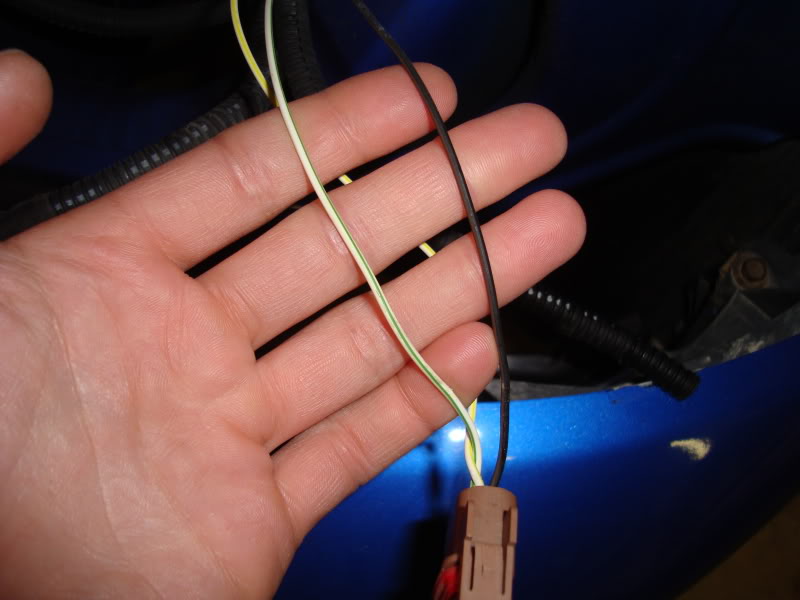
Take your wire strippers and just strip about 3/16" of coating off, so you can solder your leads on.. Do Not Cut, just strip.


Next comes the leads..... I'm using the leads (about 3" of wire Black and Red) with connectors so if I ever decide I don't want to use LEDs anymore, I can easily remove the load resistors without damaging the OEM harness.
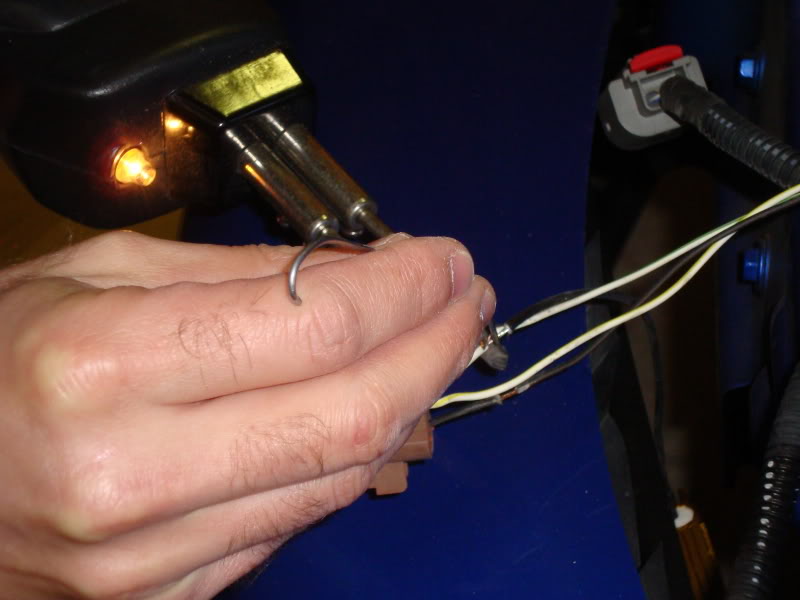
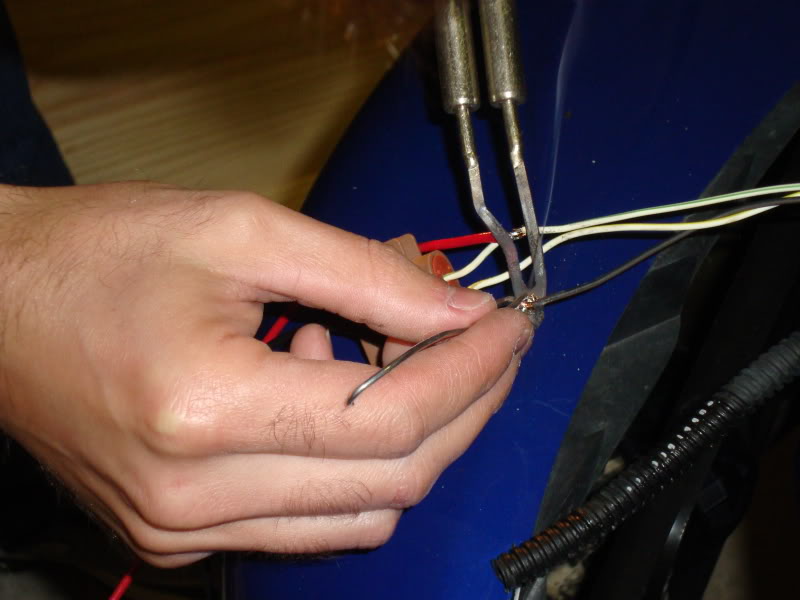
After all soldered, tape them up with some good electrical tape so the connections are not going to accidentally touch. After everything is taped up nice, push the wires back into the wire loom...That part is done.

This is how I did it, not sure if you want to follow 100%, but this is the best and cleanest way I know to do it right.
Things you will need...
- 2: Amber 3157 LED bulbs (SuperBrightLED.com)
- 2: RL-650 Tail Light Load Resistor kit (SuperBrightLED.com)
- Electrical Tape
- White Grease / Anti Seize
- Wire Strippers
- Wire Nippers
- Terminal Connectors (2 Male / 2 Female)
- Wire Connector Crimps
- Flat Head Screw Driver
- Clean Towel or Rag
- 10 mm Socket
- Socket Driver
- Socket Extension
Start off by opening the hood to remove the headlights... Notice the 10mm nut/Torx heads at the front of the light...Remove them and put them in a safe place.
Go to where the bumper meets the fender, there is a hidden nut under there holding the back of the light... Remove it and put it with the others.
There it is... The drivers side has a nice rubber cover to access it. The passanger side on the other hand.
You have to use your socket and the extension to get that one off; got to love Chrysler products.Take your flat head screw driver and your rag or towel and gently pry the back of the light, she will pop right out.
Unplug the connectors and set the light aside... It is time for a little wire modding.
Being that the LEDs are for the blinkers you need to wire of load resistors. The resistors drop the load so that the LEDs are able to follow the blinker signal, other than that the power will be too much and the LEDs will see it as constant power and will just stay solid. You NEED these to make them blink!
After you pulled back the wire loom you will notice 3 wires, the Constant, the Blinker, and Ground. Locate the Black and the White/Green (Drivers Side) and the White/tan (Passenger Side). These are the 2 wires you will be attaching your load resistors to.
Take your wire strippers and just strip about 3/16" of coating off, so you can solder your leads on.. Do Not Cut, just strip.
Next comes the leads..... I'm using the leads (about 3" of wire Black and Red) with connectors so if I ever decide I don't want to use LEDs anymore, I can easily remove the load resistors without damaging the OEM harness.
After all soldered, tape them up with some good electrical tape so the connections are not going to accidentally touch. After everything is taped up nice, push the wires back into the wire loom...That part is done.
Thread Starter
|
Amateur
Joined: Aug 2010
Posts: 28
Likes: 1
From: Bad Axe, MI **Welcome 2 HICKTOWN**
Load resistors and bulb time! Pretty!
Use your connectors and crimp 1 male and 1 female on each end of the load resistor and the leads that you soldered on. I jump them as to not mess up the connections.
**IMPORTANT** The load resistor doesn't have a right or wrong way to connect it, just make sure one wire is to the Blinker (White/Green or White/Tan) wire, and one is on the Ground (Black).
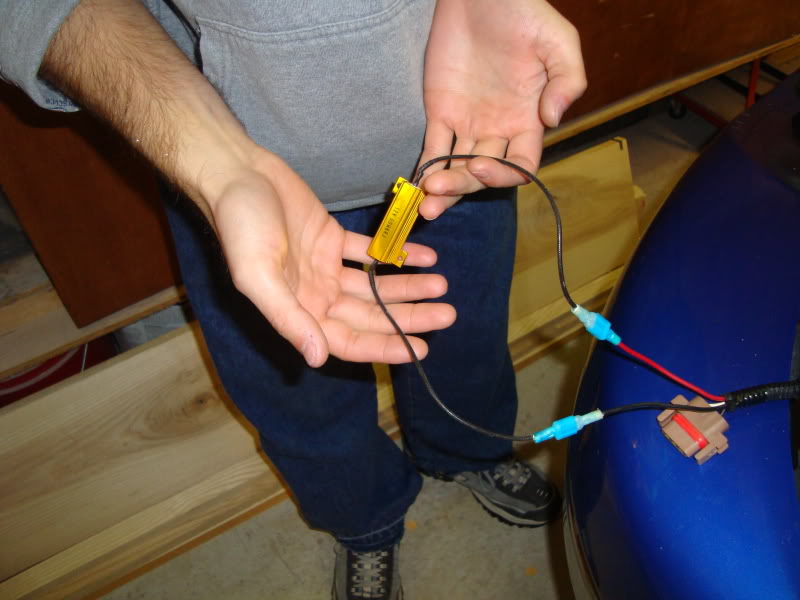
Test run, the bulb works, blinks, and running. After your test run, make sure you stick the load resistor somewhere that will keep it protected and so it will not damage anything plastic or painted. I tie strapped it to the radiator support to keep this very thought.

YouTube -LED Bulb Install - 2008 Ram Big Horn
After all is well, reverse the steps and install the connectors and the headlight. Follow the same directions for the passenger side, just keep in mind that the blinker wire for that is White/Tan. Hope this helped everyone and hope you enjoy this mod.
Use your connectors and crimp 1 male and 1 female on each end of the load resistor and the leads that you soldered on. I jump them as to not mess up the connections.
**IMPORTANT** The load resistor doesn't have a right or wrong way to connect it, just make sure one wire is to the Blinker (White/Green or White/Tan) wire, and one is on the Ground (Black).
Test run, the bulb works, blinks, and running. After your test run, make sure you stick the load resistor somewhere that will keep it protected and so it will not damage anything plastic or painted. I tie strapped it to the radiator support to keep this very thought.
YouTube -LED Bulb Install - 2008 Ram Big Horn
After all is well, reverse the steps and install the connectors and the headlight. Follow the same directions for the passenger side, just keep in mind that the blinker wire for that is White/Tan. Hope this helped everyone and hope you enjoy this mod.
Thread Starter
|
Amateur
Joined: Aug 2010
Posts: 28
Likes: 1
From: Bad Axe, MI **Welcome 2 HICKTOWN**
The only pic I have as of right now is that YouTube video, but I can snap one while I am out installing my Recon tailgate bar.


Thread Starter
|
Amateur
Joined: Aug 2010
Posts: 28
Likes: 1
From: Bad Axe, MI **Welcome 2 HICKTOWN**

Trending Topics

Thread Starter
|
Amateur
Joined: Aug 2010
Posts: 28
Likes: 1
From: Bad Axe, MI **Welcome 2 HICKTOWN**
I'm sure it will help. If you need help finding one, I can link you to the site I got mine from.