


Help with 9.25 rear end

Rookie
Joined: Mar 2009
Posts: 87
Likes: 0
From: Linn County, OR
This is what I got:
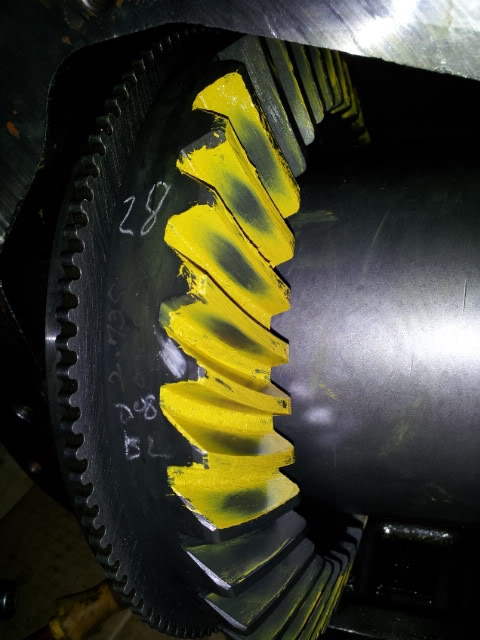
Original pinion shim was 0.023", which was stamped on the shim.
I went with 0.026", BL 0.008", and RSS (0.550") + shims (0.042") =0.592"..
Should I add another 0.002" to bring the pinion closer to the ring gear?
[IMG] [/IMG]
[IMG] [/IMG]
I could not figure out how I was going to put a slight load while checking the gear patterns, since the rear end was on a table. I added a few drops of oil on the flange and snugged a strap around it.
[IMG] [/IMG]
[IMG] [/IMG]
Original pinion shim was 0.023", which was stamped on the shim.
I went with 0.026", BL 0.008", and RSS (0.550") + shims (0.042") =0.592"..
Should I add another 0.002" to bring the pinion closer to the ring gear?
[IMG]
[/IMG][IMG]
[/IMG]I could not figure out how I was going to put a slight load while checking the gear patterns, since the rear end was on a table. I added a few drops of oil on the flange and snugged a strap around it.
[IMG]
[/IMG][IMG]
[/IMG]
Veteran
Joined: Sep 2010
Posts: 438
Likes: 0
Great job by the way! A good way to get load is to use a piece of wood and wedge it between the ring gear and the housing. You should need to use a wrench to turn the pinion with a decent bit of force. You won't hurt anything since you're not turning the assembly at high speed. Clean out the wood bits when you're done. Some suggest even using a rag with the wood. Try that first and your patterns might change a little.
Last edited by areinike; May 3, 2012 at 08:43 PM.
Rookie
Joined: Mar 2009
Posts: 87
Likes: 0
From: Linn County, OR
I added another 0.002" pinion shim and 0.002" shim for the spacer.
I moved forward with final assembly of the pinion gear... pressed on the new inner pinion bearing, then got stumped on how to get the outer pinion bearing on (also needs to be pressed in) I was hoping I could run it in with the flange and pinion nut, but there weren't enough threads for the nut to grab. I used the old crush sleeve and the old outer pinion bearing to take up the slack, followed with the flange and popped it for quick second with the impact gun. Pushed the NEW outer bearing in a inch enough, so that the flange and the pinion nut would finish the job. Finally, installed the new seal, red loctite, and pinion nut... and what do you know! The new pinion nut with the masterkit is a different size than the OEM pinion nut! I think it's a 33 or 34 mm socket. I'm done for tonight.
I moved forward with final assembly of the pinion gear... pressed on the new inner pinion bearing, then got stumped on how to get the outer pinion bearing on (also needs to be pressed in) I was hoping I could run it in with the flange and pinion nut, but there weren't enough threads for the nut to grab. I used the old crush sleeve and the old outer pinion bearing to take up the slack, followed with the flange and popped it for quick second with the impact gun. Pushed the NEW outer bearing in a inch enough, so that the flange and the pinion nut would finish the job. Finally, installed the new seal, red loctite, and pinion nut... and what do you know! The new pinion nut with the masterkit is a different size than the OEM pinion nut! I think it's a 33 or 34 mm socket. I'm done for tonight.
Veteran
Joined: Sep 2010
Posts: 438
Likes: 0
You are correct. The aftermarket nuts are 33mm and I had to take my socket and grind down the outside so it would fit inside the yoke. I actually bought an OEM nut from the dealer for like $8 - yeah, pricey, but it's all about how you feel about it.
Rookie
Joined: Mar 2009
Posts: 87
Likes: 0
From: Linn County, OR
So, everything was going smooth, got the 33mm socket, it was a tight fit like you mentioned, had to hit it on the grinding wheel. Then, tighten the NEW pinion nut down to achieve 22 in/lbs. Installed the carrier, snugged the carrier bolts in place, set the side adjuster, torq'd the carrier bolts to 100 ft/lbs and pop... broke one of the bolts .
.
I may order some ARP stud kit or just run to the hardware store and pick up some grade 8 bolts. I had an extra grade 8 same thickness, not long enough. Do you think grade 8 would be strong enough?
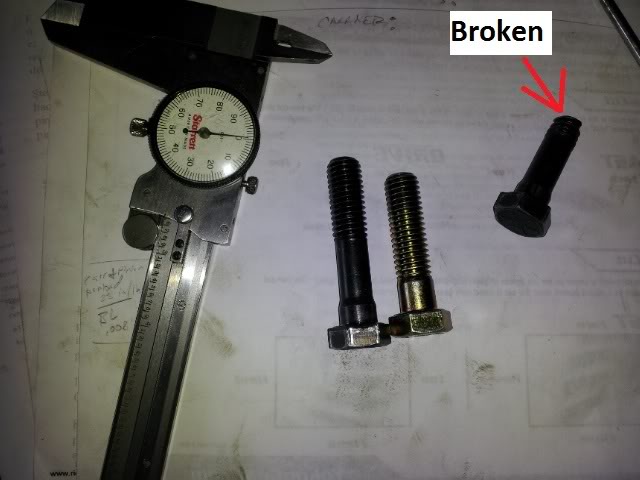
I may order some ARP stud kit or just run to the hardware store and pick up some grade 8 bolts. I had an extra grade 8 same thickness, not long enough. Do you think grade 8 would be strong enough?