


HID Projector Retrofit Morimoto Mini H1 2004 Dodge Ram 1500 (Canadian)

Thread Starter
|
Registered User
Joined: Feb 2012
Posts: 12
Likes: 0
From: Victoria, BC
Hey Everyone,
I've owned my truck for 5 years and I've always wanted to upgrade to HID's but after reading all of the horror stories on the forums about the Dodge canbus system I kept putting it off. I ended up buying a few pairs of $10 tinted 5900k head/fog light bulbs from China which looked better than stock but were no brighter and kept burning out every 8-12 months. Finally after seeing some success stories on HID Planet and talking to Todd at Retro-Solutions I went for it!
2004 Dodge Ram 1500 (Canadian = Daytime Running Lights)
Retro-Solutions Order:
Morimoto Mini BiXenon Retrofit Projectors v5.0
55w 6000k DIGITAL HID kit (H1 Bulbs)
Relay Wiring Harness for 02-05 Dodge Ram 9007 BiXenon
Projector High beam adapters
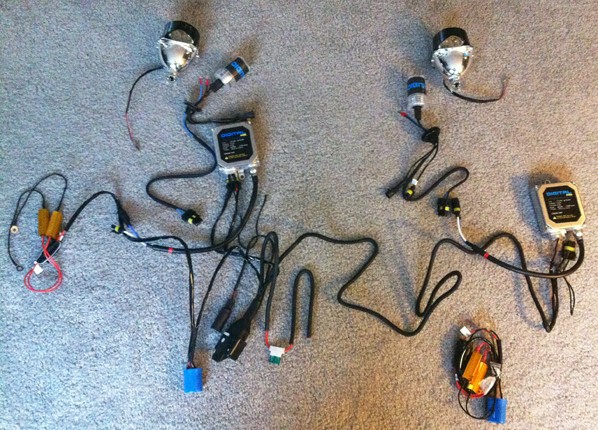
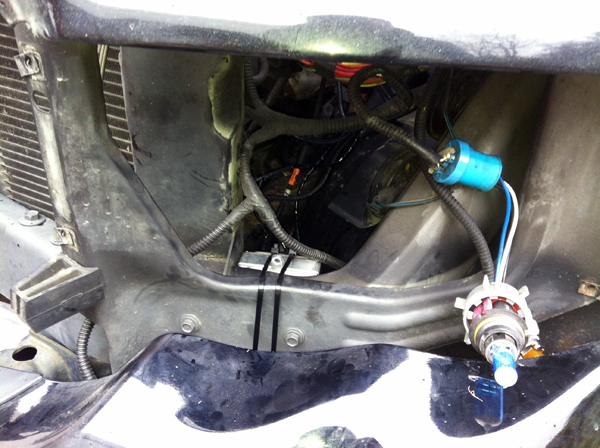
Here is what I got. You'll notice there is a separate harness for the passenger side. This is because each side is tested by the dodge canbus system and both high and low beams must have resistance or the computer will cut power to the lights which causes the dreaded flickering on/off issue. Also you can see the capacitor to the left of the relay which smoothes out the power to the ballasts:
First I wanted to test everything to make sure it all worked. Connected all grounds and power directly to the battery. Remember resistors will get as hot as a stock light bulb so do not let them touch anything plastic!
With the truck off I turned on the lights and low beams came on. High beams and flash to pass worked great. Started the truck with E-brake on (which disables Daytime Running Lights) and everything works great! No Flickering!! Disengaged E-brake to test DRL and they work as well. Only problem is the Dodge DRL normally run the high beams at low voltage but with the relay its full power high beams. So if your lights are off and you start up the truck with the E-brake disengaged the full high beams come on until you turn your lights on which will signal low beams.
Also if your truck has been sitting for more than a few minutes the Dodge computer will send a pulse to the headlights to check the system when you lock/unlock/opening a door causing your HID's to flash.
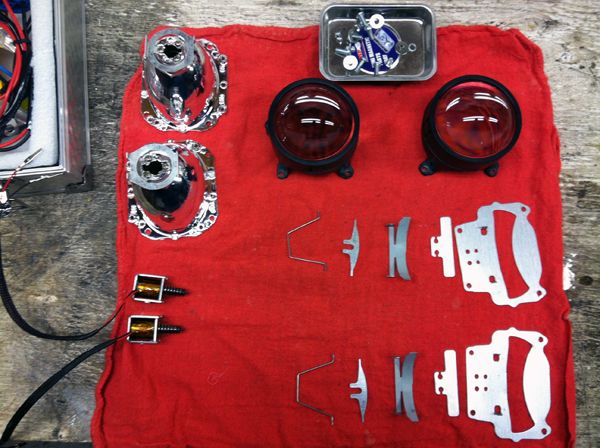
After reading the HIDPlanet University section 'How To: Preinstall Morimoto Mini Tips' I disassembled the projectors:
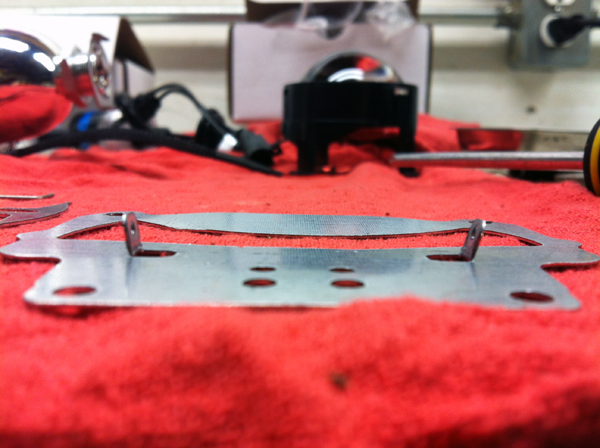
Make sure the tabs for the shields are bent slightly out.
I painted the shields flat black with high temp paint to reduce glare:
This shows the Morimoto Mini v5.0 comes with a cover for the 'squirrel finders' and a curved foreground limiter:
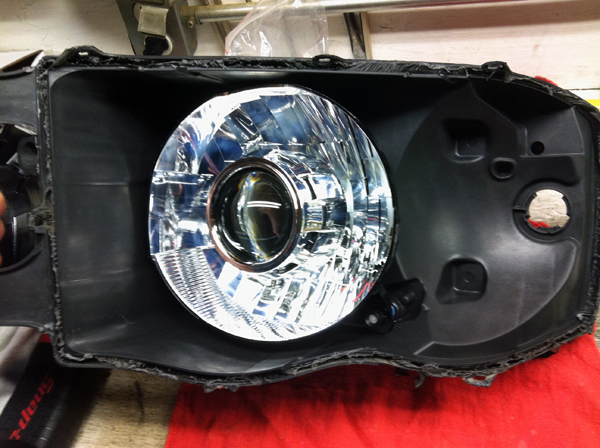
The Projectors came with 2 washers on the top 2 screws that fasten the lens to the projector. This seemed to give a nice blue cut off line so I left it as it is. Here is a shot of one projector output:

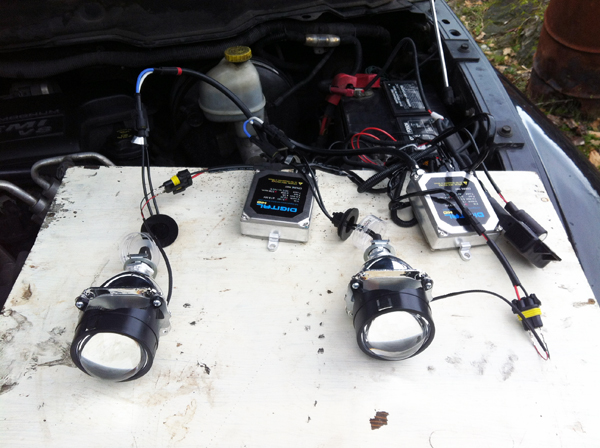
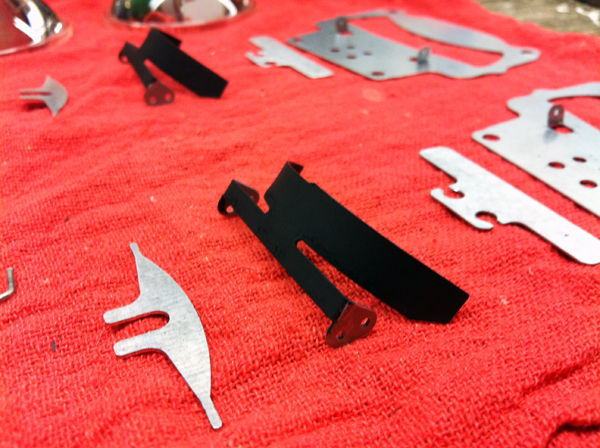
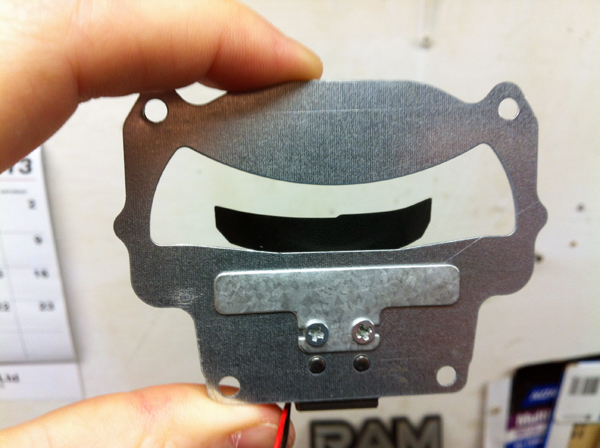
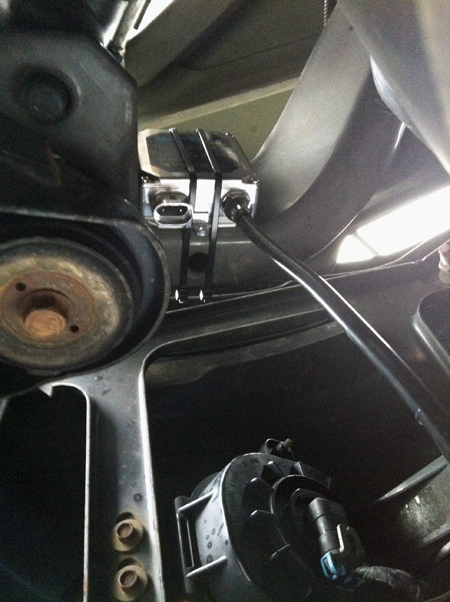
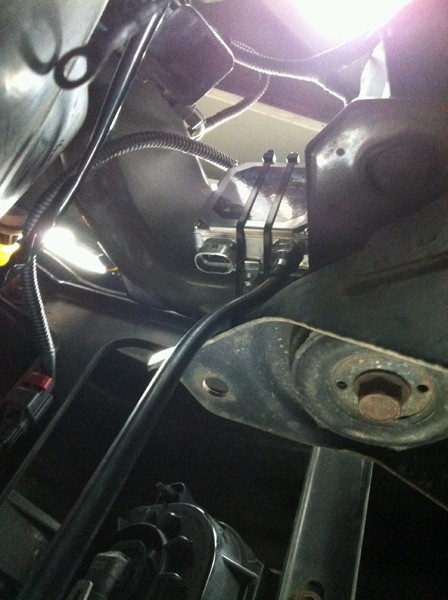
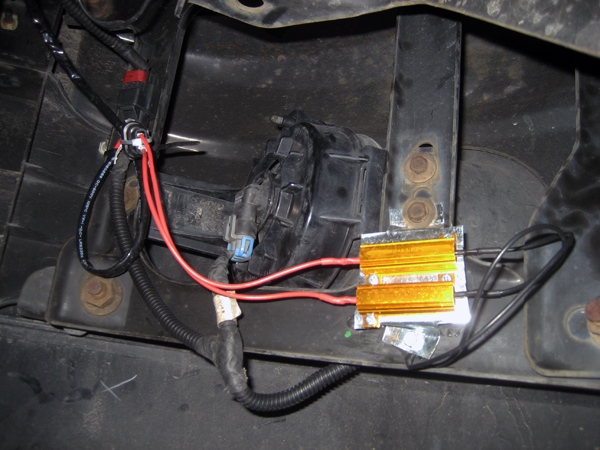
I mounted the relay and capacitor just under the fuse box on the driver�s side which gave just enough room to reach to passenger headlight. I mounted my ballasts with 3M double sided tape and zap straps to the frame behind the headlights. I used self tapping screws to ground the ballasts to the frame.
Passenger Side:

Driver Side:
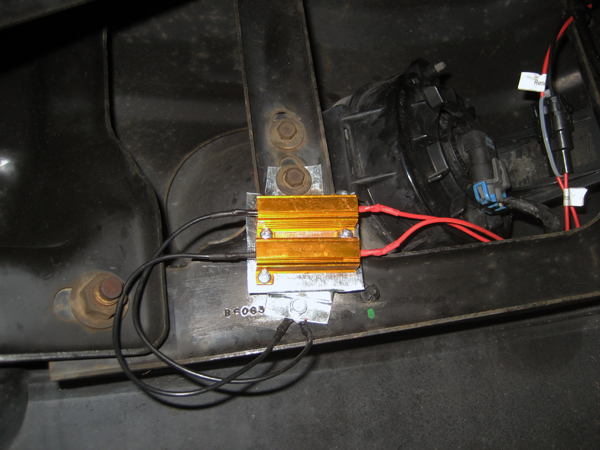
Since the resistors get as hot as a factory halogen bulbs I mounted them to some sheet metal and bent some tabs to hold them in the air and used 1 factory bolt near the fog lights and 1 self tapping screw which also worked as a ground for the resistors:
Passenger:
Driver:
I heated the headlights in the oven for 8 min at 250. Bent open the tabs and pried a corner with a flat screwdriver then pulled them apart. They separated fairly easily:
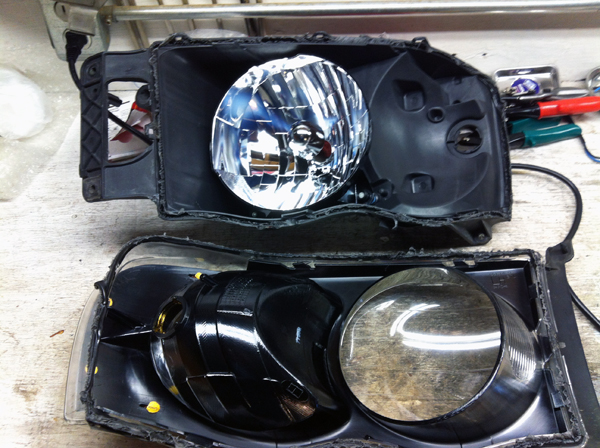
Pull the stock halogen bulb shields out with pliers. Mine were stuck in there pretty good so I had to wiggle them out. The projectors fit right into the factory 9007 hole without any modification:
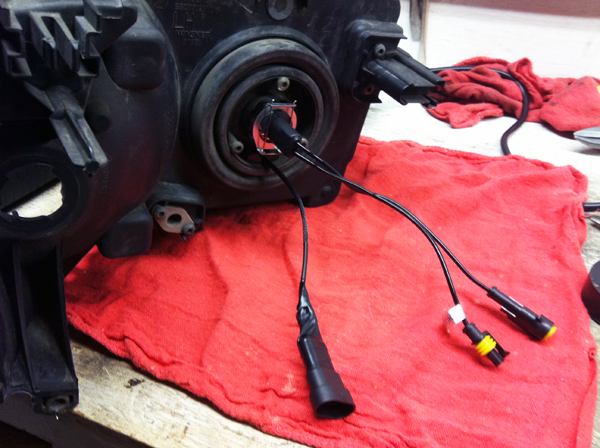
I drilled a small hole through the reflector where the factory bulb shield came out of for the high beam wires and installed the adapter plug:
Before installing on the truck take your time to adjust the bulb position before clamping it down. The first time I installed the headlights my passenger side seemed a lot dimmer than my driver side. I noticed the bulb was pointing too high above the cut off. After adjusting the 3 bulb mount screws I got the hot spot right on the cut off line and it dramatically improved the brightness of the low beams.
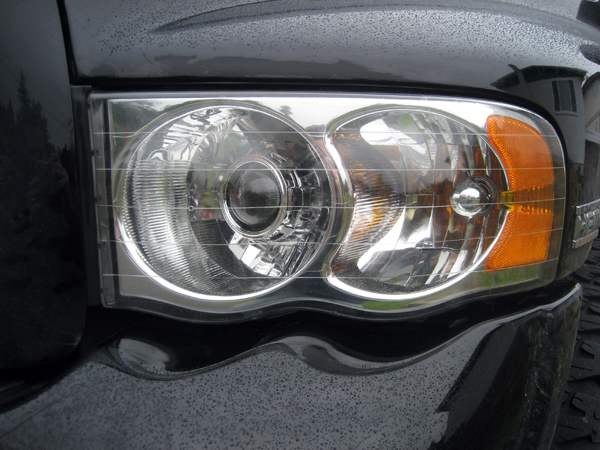
Here is the finished product with the Mini Gatling shroud that came with the projectors. I wish I got a larger shroud!:
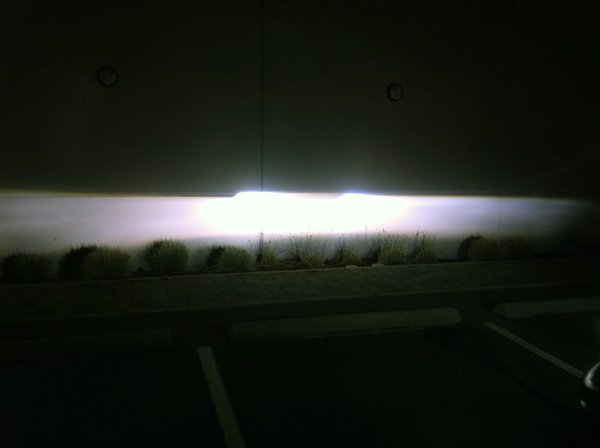
Here is an output shot with my iPhone. The parking lot was leaning toward the passenger side.
So after a weekend of tinkering I am very happy with the results!! Low beams are very bright and have a nice distracting blue cut off line that you tend to stare at for the first few days lol. High beams are very impressive! I really needed better high beams as I drive on dark roads a lot and it is seriously a night and day difference between these HID's and Projectors vs stock halogens.
I hope this helps others attempting this on their Ram Trucks!!
Dave
I've owned my truck for 5 years and I've always wanted to upgrade to HID's but after reading all of the horror stories on the forums about the Dodge canbus system I kept putting it off. I ended up buying a few pairs of $10 tinted 5900k head/fog light bulbs from China which looked better than stock but were no brighter and kept burning out every 8-12 months. Finally after seeing some success stories on HID Planet and talking to Todd at Retro-Solutions I went for it!
2004 Dodge Ram 1500 (Canadian = Daytime Running Lights)
Retro-Solutions Order:
Morimoto Mini BiXenon Retrofit Projectors v5.0
55w 6000k DIGITAL HID kit (H1 Bulbs)
Relay Wiring Harness for 02-05 Dodge Ram 9007 BiXenon
Projector High beam adapters
Here is what I got. You'll notice there is a separate harness for the passenger side. This is because each side is tested by the dodge canbus system and both high and low beams must have resistance or the computer will cut power to the lights which causes the dreaded flickering on/off issue. Also you can see the capacitor to the left of the relay which smoothes out the power to the ballasts:
First I wanted to test everything to make sure it all worked. Connected all grounds and power directly to the battery. Remember resistors will get as hot as a stock light bulb so do not let them touch anything plastic!
With the truck off I turned on the lights and low beams came on. High beams and flash to pass worked great. Started the truck with E-brake on (which disables Daytime Running Lights) and everything works great! No Flickering!! Disengaged E-brake to test DRL and they work as well. Only problem is the Dodge DRL normally run the high beams at low voltage but with the relay its full power high beams. So if your lights are off and you start up the truck with the E-brake disengaged the full high beams come on until you turn your lights on which will signal low beams.
Also if your truck has been sitting for more than a few minutes the Dodge computer will send a pulse to the headlights to check the system when you lock/unlock/opening a door causing your HID's to flash.
After reading the HIDPlanet University section 'How To: Preinstall Morimoto Mini Tips' I disassembled the projectors:
Make sure the tabs for the shields are bent slightly out.
I painted the shields flat black with high temp paint to reduce glare:
This shows the Morimoto Mini v5.0 comes with a cover for the 'squirrel finders' and a curved foreground limiter:
The Projectors came with 2 washers on the top 2 screws that fasten the lens to the projector. This seemed to give a nice blue cut off line so I left it as it is. Here is a shot of one projector output:
I mounted the relay and capacitor just under the fuse box on the driver�s side which gave just enough room to reach to passenger headlight. I mounted my ballasts with 3M double sided tape and zap straps to the frame behind the headlights. I used self tapping screws to ground the ballasts to the frame.
Passenger Side:
Driver Side:
Since the resistors get as hot as a factory halogen bulbs I mounted them to some sheet metal and bent some tabs to hold them in the air and used 1 factory bolt near the fog lights and 1 self tapping screw which also worked as a ground for the resistors:
Passenger:
Driver:
I heated the headlights in the oven for 8 min at 250. Bent open the tabs and pried a corner with a flat screwdriver then pulled them apart. They separated fairly easily:
Pull the stock halogen bulb shields out with pliers. Mine were stuck in there pretty good so I had to wiggle them out. The projectors fit right into the factory 9007 hole without any modification:
I drilled a small hole through the reflector where the factory bulb shield came out of for the high beam wires and installed the adapter plug:
Before installing on the truck take your time to adjust the bulb position before clamping it down. The first time I installed the headlights my passenger side seemed a lot dimmer than my driver side. I noticed the bulb was pointing too high above the cut off. After adjusting the 3 bulb mount screws I got the hot spot right on the cut off line and it dramatically improved the brightness of the low beams.
Here is the finished product with the Mini Gatling shroud that came with the projectors. I wish I got a larger shroud!:
Here is an output shot with my iPhone. The parking lot was leaning toward the passenger side.
So after a weekend of tinkering I am very happy with the results!! Low beams are very bright and have a nice distracting blue cut off line that you tend to stare at for the first few days lol. High beams are very impressive! I really needed better high beams as I drive on dark roads a lot and it is seriously a night and day difference between these HID's and Projectors vs stock halogens.
I hope this helps others attempting this on their Ram Trucks!!
Dave
Last edited by davelee04; Feb 11, 2013 at 09:46 PM.

Champion
Joined: Aug 2006
Posts: 4,489
Likes: 4
From: New Jersey
First off, THAT IS AWESOME! Great Job!
Do you mind if I ask you how much this costed you all said and done?
Also how did you "mount" the projectors to the headlight? Did you need to use any type of adhesive?
Do you mind if I ask you how much this costed you all said and done?
Also how did you "mount" the projectors to the headlight? Did you need to use any type of adhesive?
Hall Of Fame

Joined: Mar 2009
Posts: 19,168
Likes: 23
From: South GA
Awesome work. Why didnt you paint them to match the truck though or add halos rings?
Here is a set I did for a guy with Morimotos
http://sdrv.ms/XvfFmh
@ Izero, Morimotos fit through the headlight bulb housing with a little sanding out of the opening. It makes nasty dust BTW.
As for a bit of insight, you shouldnt have needed a second harness for the pass side. A single Bixenon harness will connect both the drivers side and pass side. If you have true CANBUS ballasts, you would not need the load resistors to trick the PCM Into thinking you have filament type bulbs in place of the HIDs. Load resistors and caps combined are not needed either.
Not being rude but you should have hung out with us more and read our stickied HID thread as we could have saved you a lot of money and used less pieces to accomplish the same
But in the end, you got it done....kudos
Thread Starter
|
Registered User
Joined: Feb 2012
Posts: 12
Likes: 0
From: Victoria, BC
Mini H1 BiXenon Projectors v5: $100
55w 6000k Digital HID Kit: $135
02-05 Dodge Ram Relay w resistors/capacitor: $45
Projector High beam adapter: $15
Total: $295 + shipping
The latest version 5 of the Morimoto Mini H1 projectors have a threaded end with a lock nut. Once you separate the headlights you slip on a silicone washer, slide it through the factory bulb hole ( I did not need to sand or modify the factory hole), slip on the H4 adapter that comes with the projector as a washer, then the lock nut. Once you tighten the lock nut and adjust the rotation some people place adhesive on the threads so it never backs off but I chose not to. They seem very snug so unless they start to move on me I'd rather not cover them with adhesive.
weedahoe,
I like the look of the factory headlights on the truck. I wanted to be able to return the truck to stock if needed as well. If I did this again I would probably buy a second set of headlights to retrofit/paint and keep the factory ones stock as backup.
I agree some providers have CANBUS ballasts that eliminate the need for the resistors. Most bixenon relays that I saw only had a single input and left one side unplugged but I have read about ones with dual inputs. At the end of the day I wanted a high quality kit and Retro-Solutions is one of the best that I have found. They may be more expensive than others but I am happy with what I received. They have great customer service and a lifetime warranty plus the kit worked without any modification!
Hall Of Fame
Joined: Mar 2009
Posts: 19,168
Likes: 23
From: South GA
By if lifetime warranty you mean you have to take out the part you suspect defective and ship back, wait for it to get there, wait for it to be tested, wait for a new replacement piece to be shipped and delivered, then yes, you have a lifetime warranty. In the meantime, you have no headlights unless you put everything back to stock 
My point, think ahead and buy new bulbs ($15) and a spare ballast ($15) off ebay just in case
My point, think ahead and buy new bulbs ($15) and a spare ballast ($15) off ebay just in case
3rd Gen Ram Moderator
Joined: Jul 2005
Posts: 1,596
Likes: 16
From: C�diz, Spain
Very cool! I prefer the stock headlight look on the '02-'05 3rd gen trucks, as well. I have been interested in a brighter HID setup (lots of night driving, here, too), but didn't want to turn the front of my truck into an alien. This is a really great install and write up. Thanks!
Thread Starter
|
Registered User
Joined: Feb 2012
Posts: 12
Likes: 0
From: Victoria, BC
By if lifetime warranty you mean you have to take out the part you suspect defective and ship back, wait for it to get there, wait for it to be tested, wait for a new replacement piece to be shipped and delivered, then yes, you have a lifetime warranty. In the meantime, you have no headlights unless you put everything back to stock
My point, think ahead and buy new bulbs ($15) and a spare ballast ($15) off ebay just in case
My point, think ahead and buy new bulbs ($15) and a spare ballast ($15) off ebay just in case
Chet Ubetcha, If you are interested in the kit contact Todd at retro solutions. He is very helpful. Also check out HID Planet, that's where I did all of my research on how to install the projectors.