


9.25" Rear End Overhaul Experiences (and pattern pics)


Thread Starter
|
Amateur
Joined: Jul 2012
Posts: 36
Likes: 0
My 2004 Ram 1500 front pinion bearing failed so I just completed an overhaul (139,000 mi.). I've done plenty of engine and manual transmission overhauls during my life, but this was my first rear end. Between this forum, Pirate4x4, the factory service manual, and the Yukon instruction manual, I think I figured it out okay. The main challenge was my finding that even "official" sources of specs (published industry manuals) often differ or even contradict each other in procedures and specs. Hence, I did a lot of online study!
I decided to upgrade to an LSD while I was at it and purchased the Yukon Dura Grip differential along with the Yukon master and axle kits. I wish I could afford a new 4.56 gear set too, but had to draw the budgetary line and use my old perfectly good gears. New 4.56 gears would be very nice though, because I often abuse my 1500 by overloading it with a slide-in camper on Hellwigg helper springs.
Given that my old front pinion bearing was toast and could not even be used for setup iterations, I ordered an extra cone from Amazon and ground out the ID to make a slip-fit "setup" bearing. I could have used the old rear pinion bearing to make a setup bearing too. However, after reading several posts and overhaul instructions claiming that using the old original gears (in the original housing) should not require a pinion shim thickness change, I decided to "go for it" and simply duplicate the thickness of the original shim pack with my new shims. I also compared the new and old bearing widths in their cups with a mic and other tools and, sure enough, the new bearings measure the same "thickness" in the assembly stackup as the old ones so, in theory, my pinion distance should end up very close to what it was from the factory.
But now I've also come to realize that, by retaining the factory shim spacing, my job can only be as good as the factory setup, at best. If the factory pinion spacing wasn't perfect, then neither will be my identical spacing! I also learned that the backlash setting does affect the depth of the tooth patters (spacing between flank and face) somewhat. (When moving the side adjusters, patterns don't just move along the heel/toe direction, though that's the primary effect.) I had to compromise between flank/face and drive heel/toe pattern spacing, because I only tweaked the easy adjustment (the side adjusters) and didn't swap pinion shims in and out.
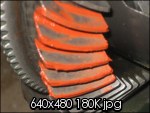
Here are my patterns with 0.006" backlash. They are a bit deeper (toward the flank) than I'd like and people have posted that deep patterns make noise:


Though I did not take any photos, I also varied the backlash from 0.005 (the factory service manual published min.) to 0.010 (the Yukon published max.). At 0.010, I get patterns that are nearly centered between flank and face, but the drive patterns move significantly to the heel (outside) too. The Yukon Installation Instructions for a used gear set says to "Pay little attention to the drive side. This is true for most used gear sets, although both the coast and drive sides should be considered in some instances."
Not knowing what instances they are (not actually) referring to, I decided to consider the drive side pattern as well as the coast and run 0.006 backlash, figuring that I could easily increase the backlash, if the gears made noise, by simply pulling the axles and using my homemade adjuster tool to readjust the carrier for maximum backlash.
The thing is--the rear end has never been quieter! I've driven it up at freeway speeds and also made slow figure-8s to check for LSD noise too. No gear noise. No clutch noise.
Of course I now wish I'd used my setup bearings and temporarily installed the carrier to check the patterns, but I don't really want to bang out the front pinion bearing with a mallet (justifying buying a new one) and re-do the pinion spacing shims now.
Other notes:
1. I torqued my side adjusters to 150 ft*lbs plus, like the Yukon instructions recommend. I torqued back and forth, left and right in stages to the 150 ft*lbs limit of my wrench and then torqued the adjusters to just budge one more time--so probably at 170 or so. I found that even torquing one side of the bearing caps to 10 ft-*lbs, per the factory service manual, kept the bearings from moving and left the backlash unchanged after torque adjustments so I went with finger tight on the caps while torquing the adjusters, as areinike describes in his posts here.
2. It didn't matter much where I measured that backlash on the ring gear. The maximum variation was under 0.001.
3. I averaged the pinion torque min/max specs from the Yukon instructions and factory manual and ended up with 26 in*lbs with the oil seal installed (but no carrier). I used a short hose on my cheap HF 1/2" impact and the torque came up pretty fast and nearly all at once, but I did have to hit it a bunch of times until it started up increase.
What would experienced others here do?
1. Completely disassemble the rear end to reduce pinion shim thickness to enable perfect patterns (hopefully).
2. Only pull the axles and increase the backlash to the Yukon max. of 0.010 (which I know will center the patterns between flank and face pretty well, but at the expense of pushing the drive pattern somewhat (to or barely off the heel / outer end of the ring gear).
3. The rear end is quiet, functions well, and is probably setup not all that much different than how it was setup new from the factory (which lasted at respectable 139,000 mi. under frequent and excessive slide-in camper loads) so....
JUST RUN IT!
Thanks, everyone!
I decided to upgrade to an LSD while I was at it and purchased the Yukon Dura Grip differential along with the Yukon master and axle kits. I wish I could afford a new 4.56 gear set too, but had to draw the budgetary line and use my old perfectly good gears. New 4.56 gears would be very nice though, because I often abuse my 1500 by overloading it with a slide-in camper on Hellwigg helper springs.
Given that my old front pinion bearing was toast and could not even be used for setup iterations, I ordered an extra cone from Amazon and ground out the ID to make a slip-fit "setup" bearing. I could have used the old rear pinion bearing to make a setup bearing too. However, after reading several posts and overhaul instructions claiming that using the old original gears (in the original housing) should not require a pinion shim thickness change, I decided to "go for it" and simply duplicate the thickness of the original shim pack with my new shims. I also compared the new and old bearing widths in their cups with a mic and other tools and, sure enough, the new bearings measure the same "thickness" in the assembly stackup as the old ones so, in theory, my pinion distance should end up very close to what it was from the factory.
But now I've also come to realize that, by retaining the factory shim spacing, my job can only be as good as the factory setup, at best. If the factory pinion spacing wasn't perfect, then neither will be my identical spacing! I also learned that the backlash setting does affect the depth of the tooth patters (spacing between flank and face) somewhat. (When moving the side adjusters, patterns don't just move along the heel/toe direction, though that's the primary effect.) I had to compromise between flank/face and drive heel/toe pattern spacing, because I only tweaked the easy adjustment (the side adjusters) and didn't swap pinion shims in and out.
Here are my patterns with 0.006" backlash. They are a bit deeper (toward the flank) than I'd like and people have posted that deep patterns make noise:
Though I did not take any photos, I also varied the backlash from 0.005 (the factory service manual published min.) to 0.010 (the Yukon published max.). At 0.010, I get patterns that are nearly centered between flank and face, but the drive patterns move significantly to the heel (outside) too. The Yukon Installation Instructions for a used gear set says to "Pay little attention to the drive side. This is true for most used gear sets, although both the coast and drive sides should be considered in some instances."
Not knowing what instances they are (not actually) referring to, I decided to consider the drive side pattern as well as the coast and run 0.006 backlash, figuring that I could easily increase the backlash, if the gears made noise, by simply pulling the axles and using my homemade adjuster tool to readjust the carrier for maximum backlash.
The thing is--the rear end has never been quieter! I've driven it up at freeway speeds and also made slow figure-8s to check for LSD noise too. No gear noise. No clutch noise.
Of course I now wish I'd used my setup bearings and temporarily installed the carrier to check the patterns, but I don't really want to bang out the front pinion bearing with a mallet (justifying buying a new one) and re-do the pinion spacing shims now.
Other notes:
1. I torqued my side adjusters to 150 ft*lbs plus, like the Yukon instructions recommend. I torqued back and forth, left and right in stages to the 150 ft*lbs limit of my wrench and then torqued the adjusters to just budge one more time--so probably at 170 or so. I found that even torquing one side of the bearing caps to 10 ft-*lbs, per the factory service manual, kept the bearings from moving and left the backlash unchanged after torque adjustments so I went with finger tight on the caps while torquing the adjusters, as areinike describes in his posts here.
2. It didn't matter much where I measured that backlash on the ring gear. The maximum variation was under 0.001.
3. I averaged the pinion torque min/max specs from the Yukon instructions and factory manual and ended up with 26 in*lbs with the oil seal installed (but no carrier). I used a short hose on my cheap HF 1/2" impact and the torque came up pretty fast and nearly all at once, but I did have to hit it a bunch of times until it started up increase.
What would experienced others here do?
1. Completely disassemble the rear end to reduce pinion shim thickness to enable perfect patterns (hopefully).
2. Only pull the axles and increase the backlash to the Yukon max. of 0.010 (which I know will center the patterns between flank and face pretty well, but at the expense of pushing the drive pattern somewhat (to or barely off the heel / outer end of the ring gear).
3. The rear end is quiet, functions well, and is probably setup not all that much different than how it was setup new from the factory (which lasted at respectable 139,000 mi. under frequent and excessive slide-in camper loads) so....
JUST RUN IT!
Thanks, everyone!
Last edited by calinb; Nov 9, 2014 at 05:36 PM.
Professional
Joined: Jan 2010
Posts: 164
Likes: 0
From: california, Irvine
I would go with that pattern..its a bit close but, I vote to go with..I have gone over 150,000 miles and still strong with this pattern..which is worse/..
I have only done 4 of these so I'm no expert but there are others in forum that will post too soon I'm sure..
How many foot pounds did it take to get the pinion bolt to proper specs and crush the sleeve? that seems to be the hardest part for me...
one thing I have learned though is that too loose is better than too tight
on rear ends...(no pun intended)
Thread Starter
|
Amateur
Joined: Jul 2012
Posts: 36
Likes: 0
I would go with that pattern..its a bit close but, I vote to go with..I have gone over 150,000 miles and still strong with this pattern..which is worse/..

I have only done 4 of these so I'm no expert but there are others in forum that will post too soon I'm sure..
How many foot pounds did it take to get the pinion bolt to proper specs and crush the sleeve? that seems to be the hardest part for me...
one thing I have learned though is that too loose is better than too tight
on rear ends...(no pun intended)
At 26 in*lbs pinion rotating torque, I know I'm above the Yukon instruction's spec (14-19) but still in the Chrysler spec range (15-35), but a lot of builders also seem to setup for about 25. Yes--it seems that less is better for pinion torque and, where the Yukon specs and procedures vary from the Chrysler manual, I've usually found possible reasons for the differences in my readings about others' experiences in forums. An opposite example is the side adjuster torque, where Yukon recommends far higher torque than Chrysler and the word from Yukon (and Randy's) seems to be that you just about can't torque them too much.
I don't know how much torque I have on the pinion nut. I cranked past the 150 ft*lb scale on my 1/2" torque wrench (might have hit 200 or so) and the end play was still there. Rather than using a cheater on my largest breaker bar, I decided to try my cheap HF "Earthquake" impact wrench, which HF specs (read with a big bag of salt!) at 700 ft*lbs and 90 psi max. The Yukon instruction book says a 1/2" impact can be used successfully. I used a short (about 10') hose (3/8 rubber) to minimize the pressure drop and kept my compressor tank up closer 120 psi than 90. Even though the tank air pressure was above the HF max spec, I figured there's still a pretty good pressure drop before the air gets to the wrench and HF tools are disposable anyway.
Of course you know most of this but I figure I'll include info that might be of use to others. This job really isn't any more challenging than an engine or manual transmission overhaul (I've never owned an automatic) for a home mechanic who's willing to scratch his head a little, study, and make-up or improvise a few extra special tools. The only thing I had to buy was a larger impact socket for the Yukon pinion nut (it's one size larger than the OEM nut) and a 1/4" bar-style torque wrench, which I've wanted to replace or supplement my cheap little clicker 1/4" for a long time. I welded-up a side adjuster wrench using a milled/ground down 37 mm nut on one end and a coupling nut on the other end of a square box steel tube. I could not find a 36 mm nut but the oversize nut gave me an opportunity to put a very slight taper on the flats (engagement gets tighter as the tool is pushed into the adjuster). I used blue machinist dye to check and monitor the engagement of the tapered nut while torquing the side adjusters and I tweaked the faces on a grinding wheel to get good engagement at each corner.
I've only made a few short trips with the pickup so far, but it continues to sound good (it's quiet) and work. I'm inclined to run it but will check for more feedback and advice from other forum members here.
Professional
Joined: Jan 2010
Posts: 164
Likes: 0
From: california, Irvine
Wow. your brave using an impact .. cuz once that crush sleeve crushes its so easy to over tighten..and there is no going back�without a new crush sleeve. (i know there only 10 bucks but don't always have extra on hand)
I found the best way to set back lash adjustments is going through that little hole on the bell housing that the cover place hides too..
I also have the Yukon. It�s been perfect of 150,000 good choice there..posi still strong as ever..
good job on your first rear end.
I found the best way to set back lash adjustments is going through that little hole on the bell housing that the cover place hides too..
I also have the Yukon. It�s been perfect of 150,000 good choice there..posi still strong as ever..
good job on your first rear end.
Thread Starter
|
Amateur
Joined: Jul 2012
Posts: 36
Likes: 0
Wow. your brave using an impact .. cuz once that crush sleeve crushes its so easy to over tighten..and there is no going back…without a new crush sleeve. (i know there only 10 bucks but don't always have extra on hand)
I found the best way to set back lash adjustments is going through that little hole on the bell housing that the cover place hides too..
I also have the Yukon. It’s been perfect of 150,000 good choice there..posi still strong as ever..
good job on your first rear end.
I found the best way to set back lash adjustments is going through that little hole on the bell housing that the cover place hides too..
I also have the Yukon. It’s been perfect of 150,000 good choice there..posi still strong as ever..
good job on your first rear end.
Yukon provides an extra crush sleeve in the kit, but the problem is I didn't use my setup bearings so I'd have to pound the pinion out again (freeing but stressing the new front bearing). Amazon has just the Timken cone for only $9, which is probably all that would need replacing, just to be safe.
Next time, I'm just going to accept that I'll be assembling it at least twice, use the setup bearings that I made, and shoot for perfection, but hopefully that won't be for a long time. I'll let everyone know if it ends up otherwise.
I was worried about being able to get the side carrier bearing torque to 150 ft*lbs just through the little hole. Again, Chrysler and Yukon specs differ. Chrysler says 75 ft*lbs but Yukon says 150 minimum.
Thanks very much for your feedback. I'd be very happy to get 150,000 miles from this job. Good job you've done too!
Last edited by calinb; Nov 11, 2014 at 05:59 PM.

Thread Starter
|
Amateur
Joined: Jul 2012
Posts: 36
Likes: 0
I have about 125 miles on my overhauled rear end now. I've been mostly driving short trips, but I did drive about 30 mi. with a few stops while carrying my slide-in camper today. I had to get it into storage before it snows (upgraded with the Yukon LSD just in time
 ). I took it pretty easy and used my laser thermometer to read the pumpkin cover and the case up by the front pinion bearing. It didn't actually heat up any more than without the camper but then the weather has cooled off a bit now too (high 30s maybe). It seems to run about 100F at the cover (low on cover by the oil) and up to 120F on the forward case by the bearing. The diff is still nice and quiet at all times--uphill, downhill (lowish gears using engine braking), tight turns, whatever!