


AllGig Sale!

Professional
Joined: Sep 2009
Posts: 138
Likes: 0
I had to laugh! I had a real Panic moment for second earlier!!!
As seen on some of my other posts I have had a bad couple of days with my truck that ended well..
I must have programmed by ALL-GIG HS to low speed by accident when I hooked it up to my laptop!
I plugged it in and EVERYTHING went nuts, dash lights, wipers came on... idiot lights were blinking.. and no MY GIG power.....
I SCREAMED IN MY DRIVE WAY WHAT NOW!???? and a few explicit words too....
I called Nav-TV, excellent support.. the guy laughed on the phone and said simple fix... reprogrammed it with me on the phone.. ALL IS GOOD! ( no pun intended LOL) I had it programmed for low speed by accident....
The actual install of the unit took about 30 minutes... over head monitor goes in Friday. Works good.
Captain
Joined: Mar 2008
Posts: 609
Likes: 0
From: Cedar Rapids, Ia
Mine is in also. all I had to do was plug it in and button everything up. i had the factory RER, camera, bluetooth, and uconnect. Just a pionter guys, if you have the converter installed there is a screw behind the cover of the converter outlet that needs to be removed before the entire face plate comes off. Took me about an hour and I love it.
Did you get the AV cable to hook up factory installed camera? I am just wondering what wires to splice into to get my camera to switch on while driving. I haul stuff and once in a while it is nice to check things out back there.
Veteran
Joined: Oct 2005
Posts: 461
Likes: 0
From: NW Arkansas
I originally posted this information in another thread but I'll repost it here since some still have questions.
https://dodgeforum.com/forum/4th-gen...g-install.html
https://dodgeforum.com/forum/4th-gen...g-install.html
Ok, here is a quick run down on how I was able to get my camera to function both in reverse and by using the 12V camera output from the AllGig.
Supplies:
Wires - I just used what I had. We're not talking about much current here so 18 gauge is probably enough
Relay - (1) 4 Pin 30 AMP 12V Relay: http://www.autozone.com/autozone/cat...uestid=2250277
Diodes - (2) 12V Zener Diodes from Radio Shack: http://www.autozone.com/autozone/cat...uestid=2250277
References:
Diodes - http://www.the12volt.com/diodes/diodes.asp
Relays - http://www.the12volt.com/relays/relays.asp
Wiring Run Down:
The goal was to be able to power the camera in both reverse (factory style) and from the AllGig (by pressing the power button on the radio two times quickly).
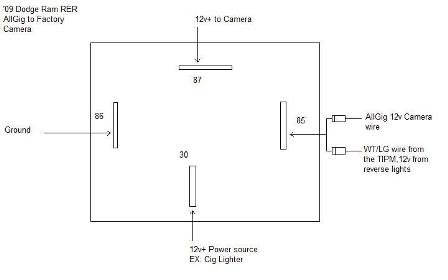
The relay has four terminals that are used (a five pin can be used but terminal 87a won't be needed).
- Terminals 85 & 86 are for the coil. One of these will be grounded and the other will act as the switch to control when to energize the circuit. More about this below.
- Terminal 30 is the 12v+ input power supply to the camera. I ran a wire from the cig ligther to it but any switched source will do. I wanted something already fused.
- Terminal 87 is the output 12v+ to the camera. This is what will turn the camera on and off. The WT/LG wire to the factory camera will go here.
Two wires will be used as the switch and will be joined at either terminal 85 or 86, whichever is not your ground; (1) the Camera 12v+ wire from the AllGig and (2) the WT/LG wire from the TIPM that powers the camera when put into reverse. Each of these wires will need to have a diode soldered in at the connection to the terminal. You want the ends of the diodes with the stripe closest to the terminal. Think of the stripe as a wall that prevents a positive signal from passing it. If it's on the input, it stops it; if it's on the output, it allows it to pass. You want the signal to be able to come from the source and reach the relay but not go from the relay back to either source.
Here is an image I threw together using MS Paint.
Supplies:
Wires - I just used what I had. We're not talking about much current here so 18 gauge is probably enough
Relay - (1) 4 Pin 30 AMP 12V Relay: http://www.autozone.com/autozone/cat...uestid=2250277
Diodes - (2) 12V Zener Diodes from Radio Shack: http://www.autozone.com/autozone/cat...uestid=2250277
References:
Diodes - http://www.the12volt.com/diodes/diodes.asp
Relays - http://www.the12volt.com/relays/relays.asp
Wiring Run Down:
The goal was to be able to power the camera in both reverse (factory style) and from the AllGig (by pressing the power button on the radio two times quickly).
The relay has four terminals that are used (a five pin can be used but terminal 87a won't be needed).
- Terminals 85 & 86 are for the coil. One of these will be grounded and the other will act as the switch to control when to energize the circuit. More about this below.
- Terminal 30 is the 12v+ input power supply to the camera. I ran a wire from the cig ligther to it but any switched source will do. I wanted something already fused.
- Terminal 87 is the output 12v+ to the camera. This is what will turn the camera on and off. The WT/LG wire to the factory camera will go here.
Two wires will be used as the switch and will be joined at either terminal 85 or 86, whichever is not your ground; (1) the Camera 12v+ wire from the AllGig and (2) the WT/LG wire from the TIPM that powers the camera when put into reverse. Each of these wires will need to have a diode soldered in at the connection to the terminal. You want the ends of the diodes with the stripe closest to the terminal. Think of the stripe as a wall that prevents a positive signal from passing it. If it's on the input, it stops it; if it's on the output, it allows it to pass. You want the signal to be able to come from the source and reach the relay but not go from the relay back to either source.
Here is an image I threw together using MS Paint.
Captain
Joined: Mar 2008
Posts: 609
Likes: 0
From: Cedar Rapids, Ia
thanks, I stumbled onto the other post. Didn't read close enough to some of your writing. What is the TIPM and is the wire already in the harness of the factory radio?
My truck came off the line with the camera already, so I am wondering if this is the same. I have REN radio as well.
Thanks again
My truck came off the line with the camera already, so I am wondering if this is the same. I have REN radio as well.
Thanks again
Veteran
Joined: Oct 2005
Posts: 461
Likes: 0
From: NW Arkansas
thanks, I stumbled onto the other post. Didn't read close enough to some of your writing. What is the TIPM and is the wire already in the harness of the factory radio?
My truck came off the line with the camera already, so I am wondering if this is the same. I have REN radio as well.
Thanks again
My truck came off the line with the camera already, so I am wondering if this is the same. I have REN radio as well.
Thanks again
PM me your email address and I'll send you the camera install document. It's about 4.5 meg.
Last edited by ran jr; Oct 22, 2009 at 10:21 AM. Reason: grammer

Thread Starter
|
Captain
Joined: Jan 2009
Posts: 505
Likes: 0
From: Dayton, OH suburbs
I installed the Mopar camera with mine. I did as the instructions suggested and routed the camera wiring along with the body harness under the truck along the drivers side. They give you a sh*t load of black zip ties and suggest you secure it as needed. The body harness goes up into the engine compartment behind the drivers side front wheel liner. Once up in the engine compartment, there is a black rubber dash panel grommet with a capped off nipple that sticks out. They instruct you to cut the cap off the nipple, feed your wire into the cab and then seal it off with RTV. I've attached the page from the instructions that show a graphic of the dash panel grommet. Hopefully this helps...

Professional
Joined: Apr 2009
Posts: 119
Likes: 0
From: Ottawa, Ontario
I don't know what I was worried about. Easy stuff. Great results. Not a great manual.
The hardest part was getting that last clip to break free on the silver rectangle around the shifter without breaking the piece!
The hardest part was getting that last clip to break free on the silver rectangle around the shifter without breaking the piece!