

What happened to my truck!??

Thread Starter
|
Champion
Joined: Jan 2009
Posts: 3,411
Likes: 1
From: Minot AFB, ND in person, the 'burgh at heart
WOAH!!!!! sorry guys!! i had kept the window open so i didnt forget about it, but then the computer had to restart and the window closed. totally forgot about it. Papers are done, and no im not depressed about them. 18 total pages between 3 papers and got A's on all of them. whew... glad thats done with. First Masters class completed.
Now for the truck...
Not sure where i left off, but the build is done lol...well sorta. The vinyl is at the shop gettin custom embroidered. The vinyl will cover the sub box probably wednesday or thursday this week and THEN i'll be done. I've also ran into some pretty major problems as far as the sound goes. It seems like the amps are getting surges of power that makes them cut into protect mode for split seconds at a time and the music cuts out. At low volumes the speakers are distorted, and anything higher than talking volume they start to cut out. I've checked all grounds, tested power currents, checked all connections. Not really sure where to go from here. Kinda upsetting. It was working perfect 2 days ago. Once I get the box wrapped and the system working again i'll be sure to take quite a few pictures and post up the completed build. Thanks for keepin up with this guys, i wont leave it abandoned anymore.

Veteran
Joined: Oct 2007
Posts: 340
Likes: 0
From: Franklin County, OH
Did you have too much power going to them? what gauge wire were you using from the battery/ what size fuse? Also do you have a cap? If not that may help the surge. The only time I have seen an amp blow was when a kid hooked up way too much power to it and was trying to power a 5000 rms sub so the amp had all this power going thru it but the fuse wasn't big enough in the amp to handle the power it was recieving or being called for from the sub. Although I imagine since you went thru all this trouble to do everything correctly you probably paired the speakers with the amps and the amp kits to the battery perfectly lol.
Professional
Joined: May 2010
Posts: 139
Likes: 0
From: Outside of Austin, Texas
Im dying here AF. I need pic of the finished product, with or without the new amp in there playing. Did you get the embroidering work and everything finished? Throw me a bone here man lol

Thread Starter
|
Champion
Joined: Jan 2009
Posts: 3,411
Likes: 1
From: Minot AFB, ND in person, the 'burgh at heart
Did you have too much power going to them? what gauge wire were you using from the battery/ what size fuse? Also do you have a cap? If not that may help the surge. The only time I have seen an amp blow was when a kid hooked up way too much power to it and was trying to power a 5000 rms sub so the amp had all this power going thru it but the fuse wasn't big enough in the amp to handle the power it was recieving or being called for from the sub. Although I imagine since you went thru all this trouble to do everything correctly you probably paired the speakers with the amps and the amp kits to the battery perfectly lol.
Custom embroidery most likely gets finished tomorrow. Sorry man... im dyin here too lol.
Thread Starter
|
Champion
Joined: Jan 2009
Posts: 3,411
Likes: 1
From: Minot AFB, ND in person, the 'burgh at heart
didnt realize I hadnt updated this page with pictures to the current status of the build. so here ya go!
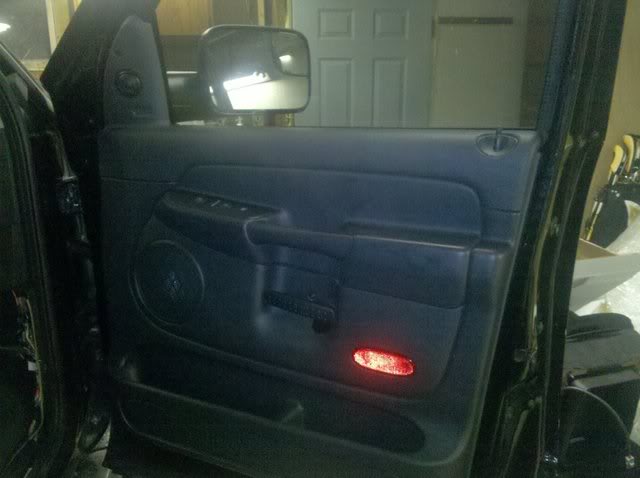
This is where I mounted the crossovers. on the back of the door panel you can see theres a big recessed spot where the armrest is. the crossover sits in that recession.

door panels on
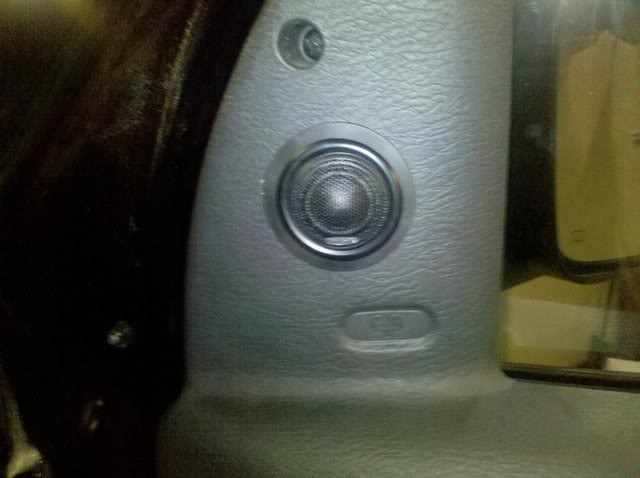
close up of the custom installed tweeters
this is the top of the sub box. i used 3/4" MDF cut to fit. i sanded the top of the lower portion (where the top meets the sides) to make sure it would be a clean seal. I added a nice thick bead of wood glue around the entire frame. Then i used expanding spray foam (like that used to fill cracks in homes) around the upper edge. I laid the top of the box on a used 1 5/8" wood screws every 9" or so. The spray foam makes contact with the side and the top and continues expansion. when dried, it creates a perfect seal with the wood glue/screws as a backup. The box is perfectly sealed. for the speaker wire, I drilled 2 small holes the same diameter as the wire. The hole was then filled in with silicone to maintain the sealed nature of the box.

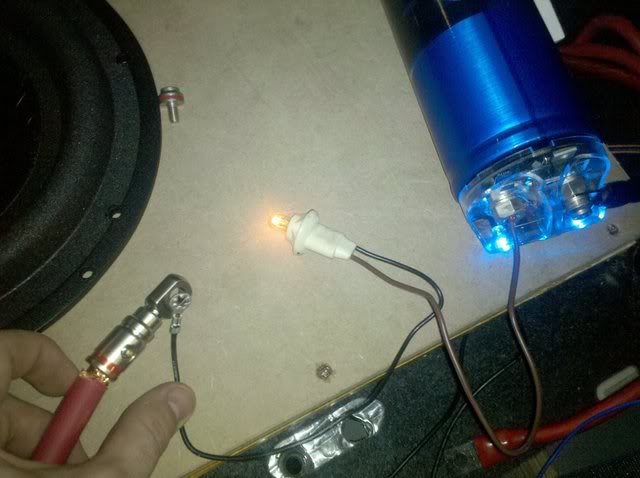
When installing the capacitor, its VERY VERY important that you charge the capacitor prior to touching it with the 12v power source. If you dont charge it first, there is a very likely chance it will literally explode. Here's how to properly charge it.
Just use a light bulb with 2 wire leads and install it between the 12v source and the + terminal of the capacitor. Hold the bulb in place until it dims and finally goes out completely. This allows the capacitor to slowly charge. It takes about 30 seconds to do this procedure. Once the bulb is out, connect the 12v source to the terminal as quick as possible.
sorry for not putting these up sooner. the interior is entirely put back together, and im just waiting on the new amp and the vinyl to cover the box.
This is where I mounted the crossovers. on the back of the door panel you can see theres a big recessed spot where the armrest is. the crossover sits in that recession.
door panels on
close up of the custom installed tweeters
this is the top of the sub box. i used 3/4" MDF cut to fit. i sanded the top of the lower portion (where the top meets the sides) to make sure it would be a clean seal. I added a nice thick bead of wood glue around the entire frame. Then i used expanding spray foam (like that used to fill cracks in homes) around the upper edge. I laid the top of the box on a used 1 5/8" wood screws every 9" or so. The spray foam makes contact with the side and the top and continues expansion. when dried, it creates a perfect seal with the wood glue/screws as a backup. The box is perfectly sealed. for the speaker wire, I drilled 2 small holes the same diameter as the wire. The hole was then filled in with silicone to maintain the sealed nature of the box.
When installing the capacitor, its VERY VERY important that you charge the capacitor prior to touching it with the 12v power source. If you dont charge it first, there is a very likely chance it will literally explode. Here's how to properly charge it.
Just use a light bulb with 2 wire leads and install it between the 12v source and the + terminal of the capacitor. Hold the bulb in place until it dims and finally goes out completely. This allows the capacitor to slowly charge. It takes about 30 seconds to do this procedure. Once the bulb is out, connect the 12v source to the terminal as quick as possible.
sorry for not putting these up sooner. the interior is entirely put back together, and im just waiting on the new amp and the vinyl to cover the box.
Thread Starter
|
Champion
Joined: Jan 2009
Posts: 3,411
Likes: 1
From: Minot AFB, ND in person, the 'burgh at heart
This is a video I did before the amp went out on me. The subs are turned down quite a bit A) because they arent screwed into place so they just rattle a lot, B) they arent broken in yet so i dont wanna slam them too hard. this is mostly just a speaker test, although you can get an idea of how powerful the subs are also.
Brad Paisley - Ticks
http://www.youtube.com/watch?v=Oopf82ht0DE
Brad Paisley - Ticks
http://www.youtube.com/watch?v=Oopf82ht0DE