

[5th Gen : 08+]: 2008 Grand Caravan coolant leak


Veteran
Joined: Apr 2010
Posts: 358
Likes: 8
Here are some aftermarket plastic "Y"s that are designed to be used for heater hoses:
1. Murray part number 84757 (available at O'Reilly Auto Parts)
2. ACDelco part number 15-31767 (available at RockAuto.com)
3. GM part number 88918449 which has been superseded by 19193809 (available at your local GM dealer)
4. Four Seasons part number 84757 (available at Summit Racing)
From the pictures I have found, they all appear to be the same.
Note, I listed the "available at" above for reference, there are many other places they can be purchased, including eBay and Amazon.

Registered User
Joined: Sep 2012
Posts: 2
Likes: 0
Bad news on plastic T. Seems the connection is so close to the exhaust manifold that the T failed within 2 weeks. It broke and was so brittle that when I took it apart I had trouble getting the heater hose off the broken pieces. This plastic T was designed for heater hose, but failed miserably. I replaced the plastic T with a metal T that I bought at lowe's from the plumbing section. It was a 3/4" metal T and has worked perfectly now for 3 weeks. I would advise replacing with a metal T to prevent future failures.

Registered User
Joined: Apr 2012
Posts: 3
Likes: 0
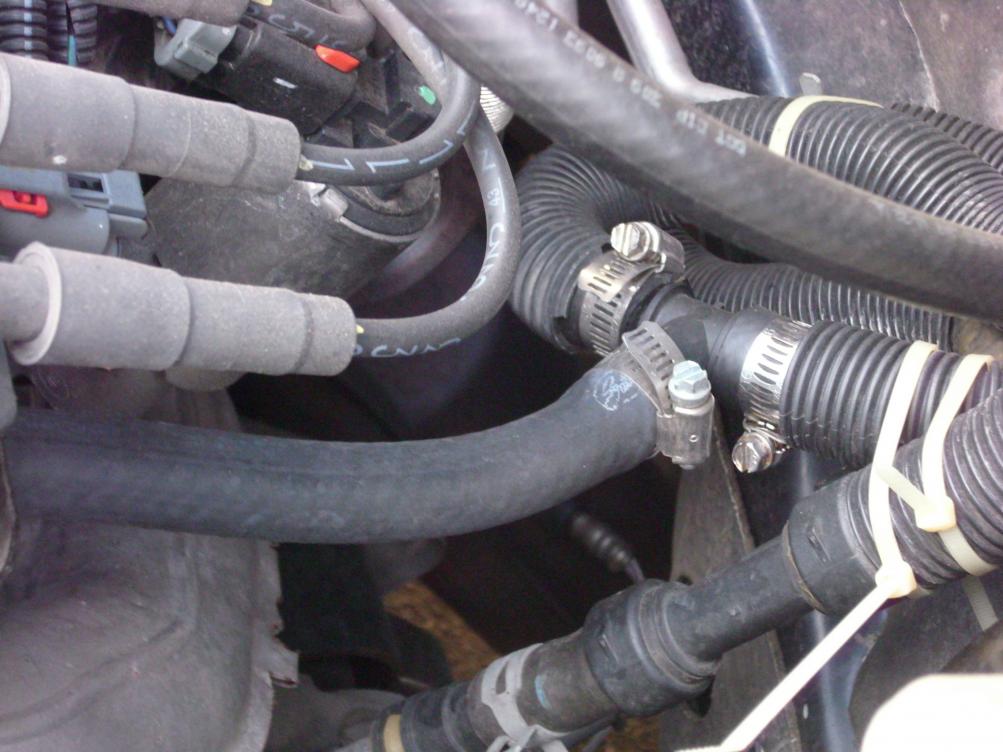
Sorry to hear that the T did not work for you. My repair is a little over a year now and no problem I added a new hose from the engine to move the T away from the heat (about 6 inches) here is a photo of my repair


Registered User
Joined: Nov 2012
Posts: 1
Likes: 0
Used the excellent instructions from alintx (thank you thank you) and the install was pretty smooth. Should've drained the anti-freeze though. Only frustration was not taking the battery out sooner too. That made it much easier for my long arms.
Unfortunately before I saw this I attempted to buy a replacement from the dealer since auto zone and o'reillys didn't have the part. Our dealer wanted $164. I walked. Thankfully found this and got the murray part at o'reillys and other goods for about $13 !!
Only question I have is long-term durability. For others that have used this Murray part, any concerns about heat with it being directly over the exhaust shield ?

Record Breaker
Joined: Dec 2010
Posts: 1,873
Likes: 8
well, If you are afraid it will break, I remember seeing similar Brass/Copper T-joint at Home Depot's plumbing dept.
I found most of the time the failure is because ppl tighten the clamp too much, and crushed the T-fitting. or using the wrong size T.
I found most of the time the failure is because ppl tighten the clamp too much, and crushed the T-fitting. or using the wrong size T.

Registered User
Joined: Apr 2012
Posts: 2
Likes: 0
Just finished the Y-connector replacement per alintx's instructions. Took me about 1 hour by myself.
I used http://www.oreillyauto.com/site/c/detail/MRY0/84757.oap.
I removed the battery first. Definitely gives more room.
I cut the highest-level hose first, to verify my coolant level was low enough, then worked my way down. This was also helpful, as it allowed the steel fitting on the engine to hold the old Y assembly in place while I was cutting the rest, and it gave me something to grab ahold of when pulling it from he engine.
Thanks for the instructions, and I hope this plastic fitting lasts longer than the other.
TurboConn

Registered User
Joined: Sep 2006
Posts: 3
Likes: 0
Easy, easy fix! Took me and a friend 15 minutes.
No need to cut the plastic clamps off. Here's are the parts you'll need to buy:
- A segment of 5/8" heater hose about 3" long. These are cheap, so buy a new one for about $2.
- The y connector mentioned above. Cost about $7.
- 3 or 4 hose clamps with an inch diameter. Don't but ones that are too small; remember 5/8" is the inner diameter of the hose; your hose itself is just under an inch in diameter. This will cost you about $4 total. You will need at least three new clamps, but you can reuse a quick clamp on one part of the hose.
Here's the process:
- Cut the hose off at all three ends of the y connector. Don't monkey around trying to cut the plastic clamps off. Cut the hose as close to the plastic clamps as possible. You'll feel the end of the old connector through the hose.
- Remove the old y connector. You might get some coolant leak, but we had hardly any.
- Unclamp the stub of a hose that used to be attached to the "bottom" of the Y connector; that is, the front of the y connector closest to the front of the car. Note that you are unclamping the part of the hose that goes into the engine. This is a quick release clamp, so use a pair of channel-lock pliers. Put the clamp to the side as you can reuse it later.
- Remove this stub of a hose from the engine block. (Technically, it's not the engine block; its probably a valve that connects to the engine block.) It may be a little hard to remove. I used a long flat-head screwdriver and pried it off the tube.
- Now cut yourself a piece of the new 5/8" heater hose that is a little longer than the stub. An inch or two longer is fine. Basically, you want this new hose to be as long as the original heater hose connecting to the "bottom" of the y.
- Clamp this new heater hose back onto the engine block or whatever it is. You can reuse the quick release clamp or put on a new clamp. I reused the clamp as it was in good shape.
You're almost there at this point!
- Slide your new clamps onto the ends of the three hoses (two original hoses towards the firewall and the new hose coming off the engine). Orient the screws so that you can easily access them when you need to do this again in the future.
- Insert the new y connector (part number 84757) into the three parts of the heater hose. The two hoses at the "top" of the y are a little bit shorter, but there's still lots of play, and you've compensated for that by making the hose at the bottom of the y a little bit longer. I don't know if it matters, but we oriented the "branch" of the y upward so that it was in the same direction as the original connector. Be sure the hoses are snug on the new y connector.
- Adjust your clamps and tighten them down.
That's it! We added a bit more coolant mixture to the radiator, checked for leaks, and were done.
Honest to goodness, this was about the easiest job I've done on a car. It's always a bit scary when you start cutting hoses and doing things different than the book, but this was not hard at all, and the fix works like a charm.
Save yourself $340 and do this job yourself. You'll be glad you did.
You my friend are a life saver. Thanks to everyone in this thread. It just helped me too.
Registered User
Joined: Sep 2006
Posts: 3
Likes: 0
FYI, since the fix, my 09 caravan has developed a much worse coolant leak in the rear of the engine now. I guess the pressure going back up with a completely sealed system now has force a different leak that now I cant find from under the hood. Anyone have this happen? The car is literally peeing coolant out the back lower part of the motor. The peeing only happens when its all warmed up and has been driving for a while. When it cools over, the leak stops. The garage floor is getting stained bad and I have to fill it up daily. Its going in to the shop next weekend if I cant find it and fix it. Help..

Registered User

Joined: Jul 2012
Posts: 3
Likes: 0
Man, that really sucks. I did the fix a little over a year ago and have not had a drip since then. My only advice would be to check under the hood when it's warm to find where the source of the leak is. May be a pin hole in one of your tubes or a bad clamp. Good luck.