

[5th Gen : 08+]: What Is This?


Thread Starter
|
Registered User
Joined: Jun 2016
Posts: 11
Likes: 0
I'm always on a limb when I talk about 5th generation vans because I have zero experience with them. That said, on any other van the fact your temp gauge is erratic and the rad fans are following suit tells me your engine coolant temp sensor or it's wiring is headed south. Not sure how the ETC light is tied in. No key dance code? Try reading it with a scanner...free at many parts stores. Course the CE light needs to be on.
I'm not a mechanic and I have no problem being proven wrong, but that is how I understand the ETC being tied.
Code is P2181 which is one of the most generic codes Dodge ever made. All it means is there is a coolant system problem, that can range anywhere from low / dirty coolant all the way up to the PCM and TIPM.
What makes it so weird is that when the problem trips, I can kill the engine - wait a few seconds - start it again, and all works again... for anywhere between a couple of minutes to several days. It's almost as if when the engine is worked hard enough to get hot (temp gauge wanting to go above half mark) the sensor shuts down. I can figure any other correlation.

Veteran
Joined: Apr 2010
Posts: 358
Likes: 8
In another thread (EGR valve P0404), it was reported that corrosion in two connectors are causing problems on the 3.3L & 3.8L vans:
Since the ECT wire runs through one of these connectors you may want take a look.
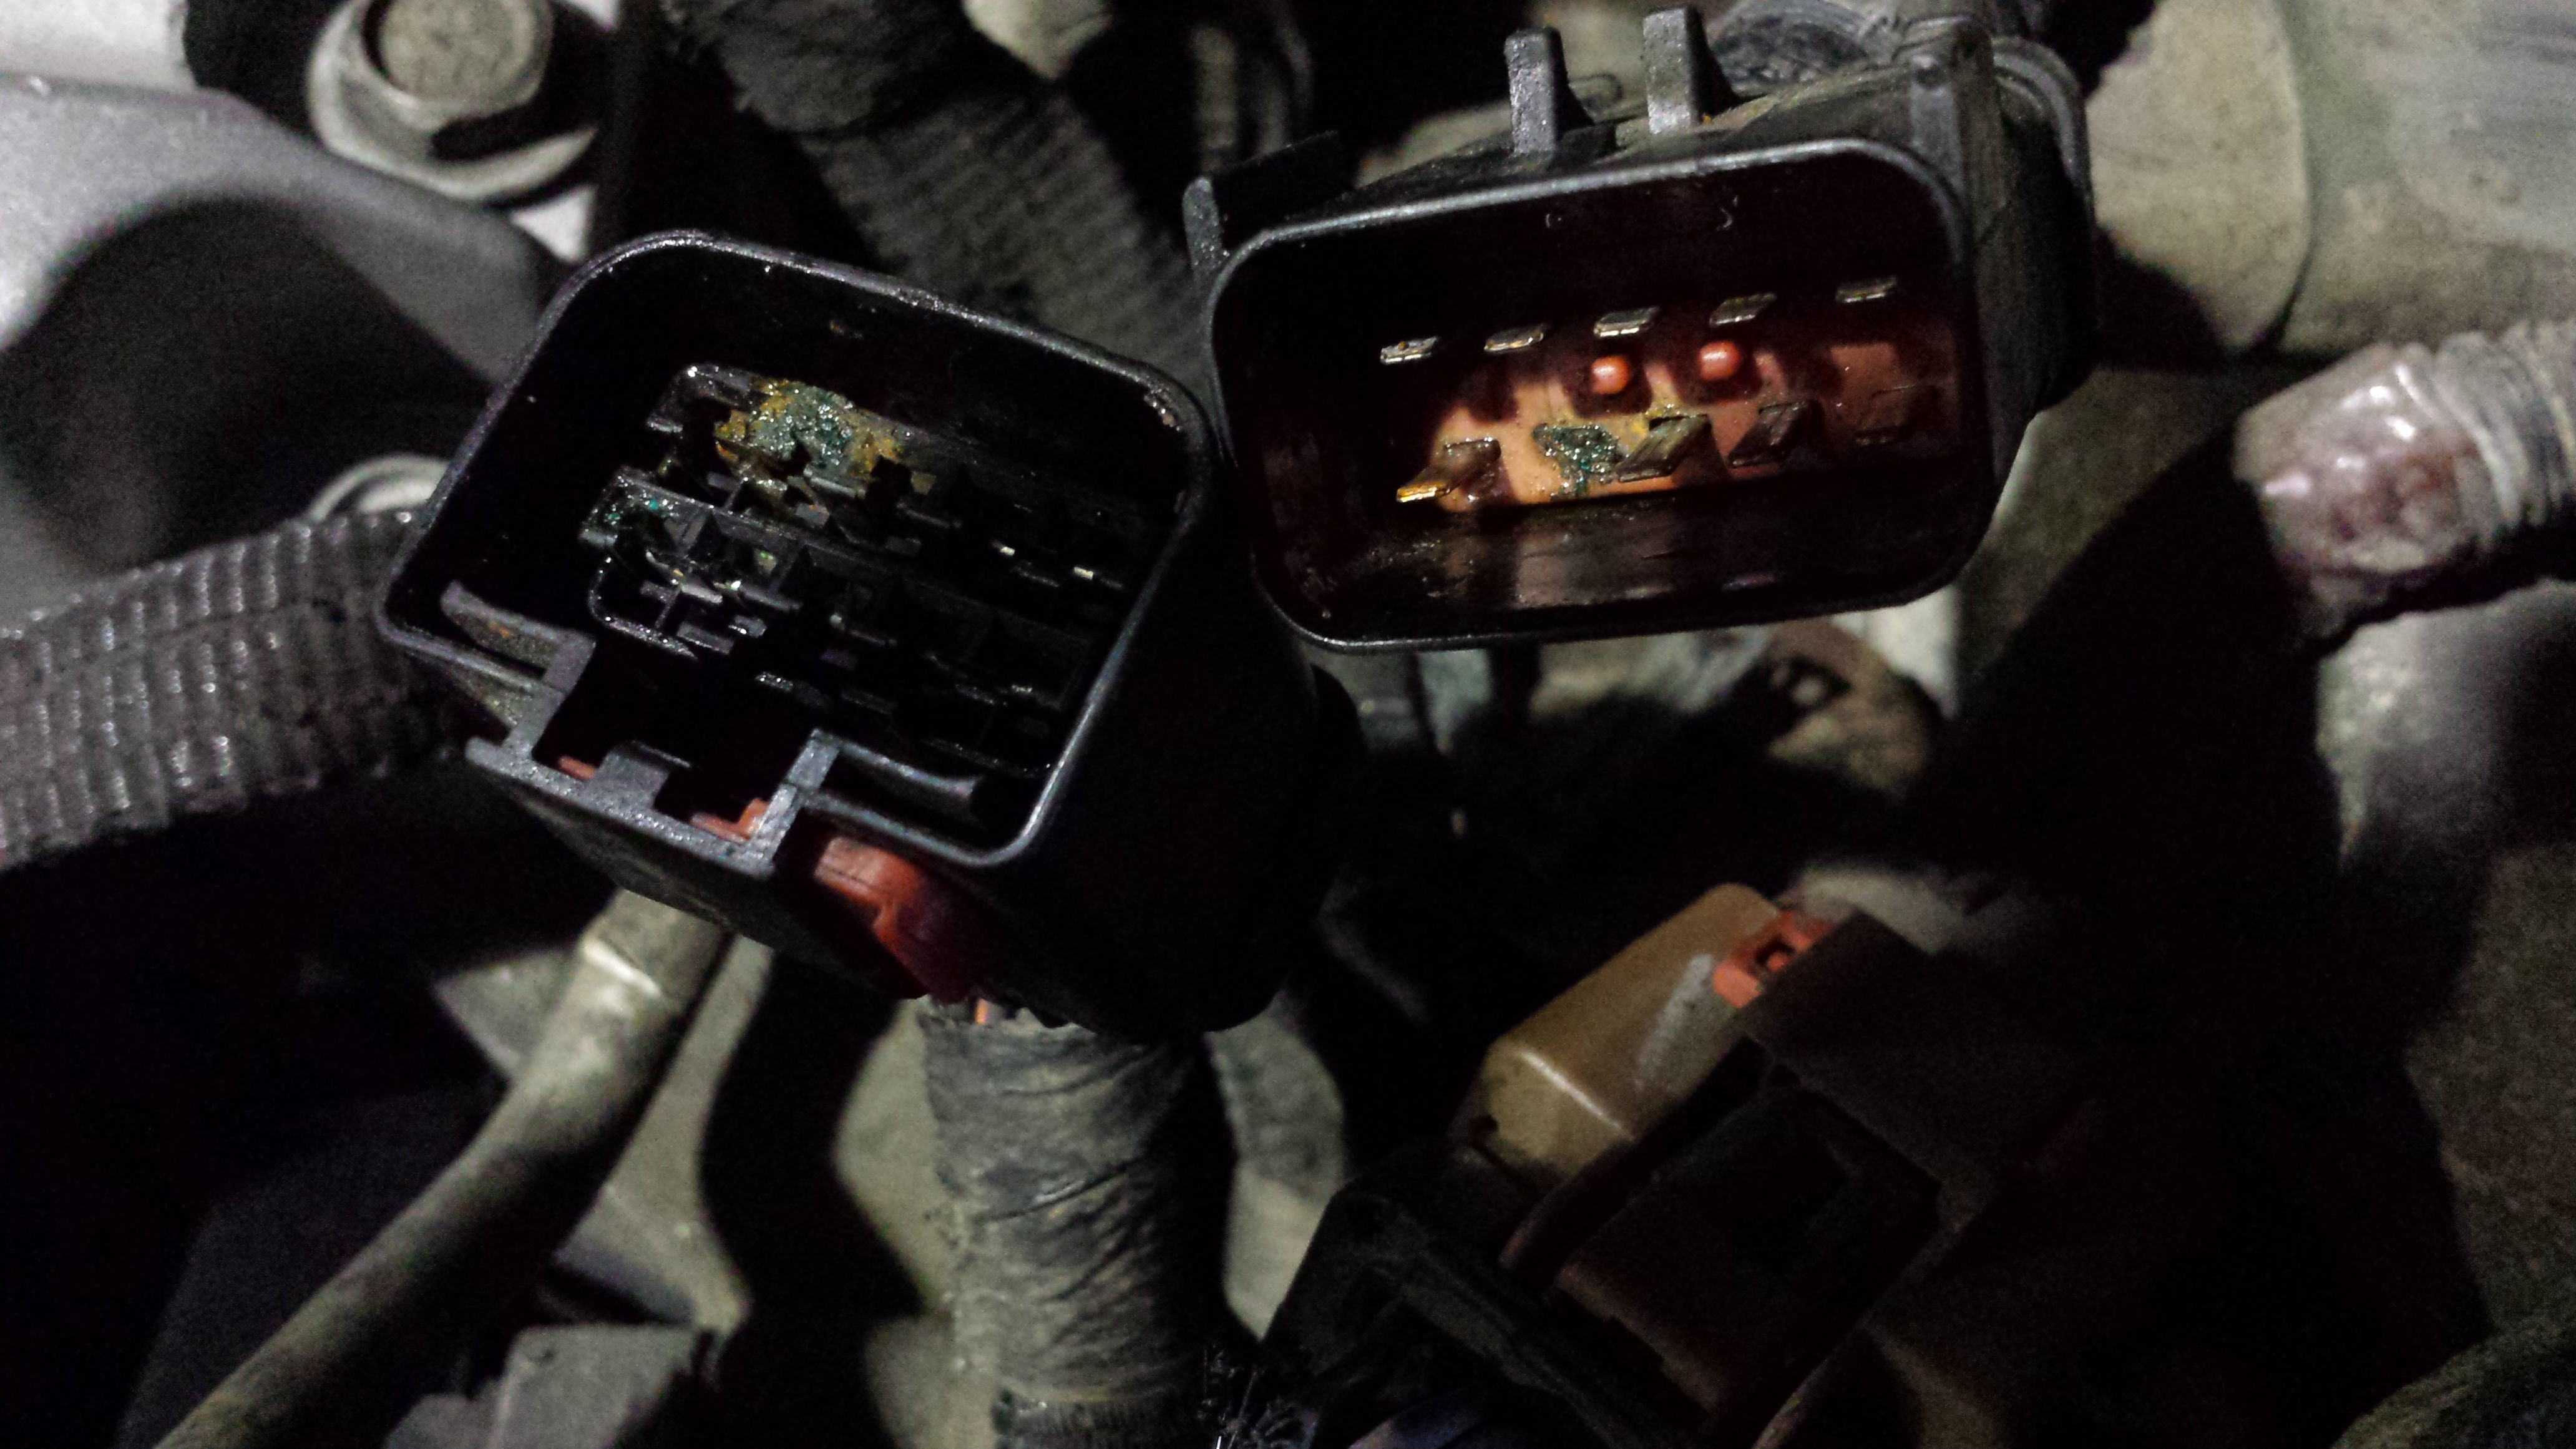
The two connectors are located just behind the alternator, both are ten pin connectors.
Here are pictures of the connectors:

Close up:

The circuits that run thru the connectors are as follows:
Black:
EGR SIGNAL
MAP SIGNAL
ECT SIGNAL
EGR CONTROL
INJECTOR 2 CONTROL
INJECTOR 4 CONTROL
COIL 1 CONTROL
COIL 2 CONTROL
COIL 3 CONTROL
GROUND
and
Brown:
FUSED ASD OUTPUT
INJECTOR 1 CONTROL
INJECTOR 3 CONTROL
INJECTOR 5 CONTROL
INJECTOR 6 CONTROL
SENSOR GROUND
5 VOLT SUPPLY
At the end of the intake on passenger side, there are 2 rectangle connectors. One brown and one black. Those are prone to get water in them and corrode like nuts. Unplug them and look for carnage. The repair kits are available, but you can just cut, add wire and splice if you want.
The two connectors are located just behind the alternator, both are ten pin connectors.
Here are pictures of the connectors:
Close up:
The circuits that run thru the connectors are as follows:
Black:
EGR SIGNAL
MAP SIGNAL
ECT SIGNAL
EGR CONTROL
INJECTOR 2 CONTROL
INJECTOR 4 CONTROL
COIL 1 CONTROL
COIL 2 CONTROL
COIL 3 CONTROL
GROUND
and
Brown:
FUSED ASD OUTPUT
INJECTOR 1 CONTROL
INJECTOR 3 CONTROL
INJECTOR 5 CONTROL
INJECTOR 6 CONTROL
SENSOR GROUND
5 VOLT SUPPLY
Thread Starter
|
Registered User
Joined: Jun 2016
Posts: 11
Likes: 0
In another thread (EGR valve P0404), it was reported that corrosion in two connectors are causing problems on the 3.3L & 3.8L vans:
Since the ECT wire runs through one of these connectors you may want take a look.
The circuits that run thru the connectors are as follows:
Black:
EGR SIGNAL
MAP SIGNAL
ECT SIGNAL
EGR CONTROL
INJECTOR 2 CONTROL
INJECTOR 4 CONTROL
COIL 1 CONTROL
COIL 2 CONTROL
COIL 3 CONTROL
GROUND
Since the ECT wire runs through one of these connectors you may want take a look.
The circuits that run thru the connectors are as follows:
Black:
EGR SIGNAL
MAP SIGNAL
ECT SIGNAL
EGR CONTROL
INJECTOR 2 CONTROL
INJECTOR 4 CONTROL
COIL 1 CONTROL
COIL 2 CONTROL
COIL 3 CONTROL
GROUND
And of course, it's behind the alternator and I taking a wild guess in thinking that means the alternator would have to come out first. It would be nice if it doesn't, but not holding my breath.
Since the ECT Sensor is very easy to replace, I will start there. I just bought the van a short while ago but the previous owner kept all the dealer service records so I've been going through them. Seems the TIPM and Thermostat has been replaced in the last 15,000 miles as well as the PCM updated to the latest version. Coolant was also flushed and filled. Seems only thing left to check is the ECT Sensor, and its wiring.
Veteran
Joined: Apr 2010
Posts: 358
Likes: 8
No need to remove the alternator. If you look just under the red oval in my first picture you can see the alternator, still in place.
Thread Starter
|
Registered User
Joined: Jun 2016
Posts: 11
Likes: 0
Indeed you are correct! I just glanced at the picture and focused more on what you wrote.. and in my head "behind" meant underneath. I will definitely take a look at the wiring first as the sensor, while easy to remove and replace, does involve playing with the fluid levels and introducing air into the system that will have to be forced out.
Site Moderator-Dodge Tech
Joined: Sep 2010
Posts: 3,724
Likes: 22
From: Nashville, Tennessee
Don't underestimate corrosion. It doesn't adhere to the theory of electrical operation hehe
 THAT"S ONE WIRE