DIY: Block heater plug front & rear mod


Thread Starter
|
Professional
Joined: Jan 2007
Posts: 227
Likes: 0
From:
I wanted to clean up the stock heater plug and add a rear plug at the same time.
Here is what I did...
Tools and supplies:
[IMG]local://upfiles/52655/23FEDED698834D1FAC959128A3E849AC.jpg[/IMG]
Here is the plug receptacle I used for the front
http://www.marinco.com/scpt/ProdPage...0Shore%20Power
I got mine on E-bay for about $18
The rear plug was a 9-pin trailer plug hook up I had with a removable pin insert. I took out the insert a tossed it.
25' extension cord 14/3 gauge wire
Additional 20" piece of 14/3 power cord wire
Female cord end with ground
First I prepped the plug for the rear, removing the pin insert
[IMG]local://upfiles/52655/42FB183F6C254733A1489998EEE1F6A1.jpg[/IMG]
Then cut the female end off the extension cord and insert the cut end into the front of the empty housing.
I soldered the ends of the cord wire to make a more solid connection with the replacement plug.
[IMG]local://upfiles/52655/0D6447CB3DE4477B8E79B80CB3AC07F2.jpg[/IMG]
The housing has a screw down hold-fast for the cord so it doesn't move when plugging in or disconnecting.
Here is the view in the housing.
[IMG]local://upfiles/52655/68BFBF1DE09B4A0E83B7D9F6E60E17F7.jpg[/IMG]
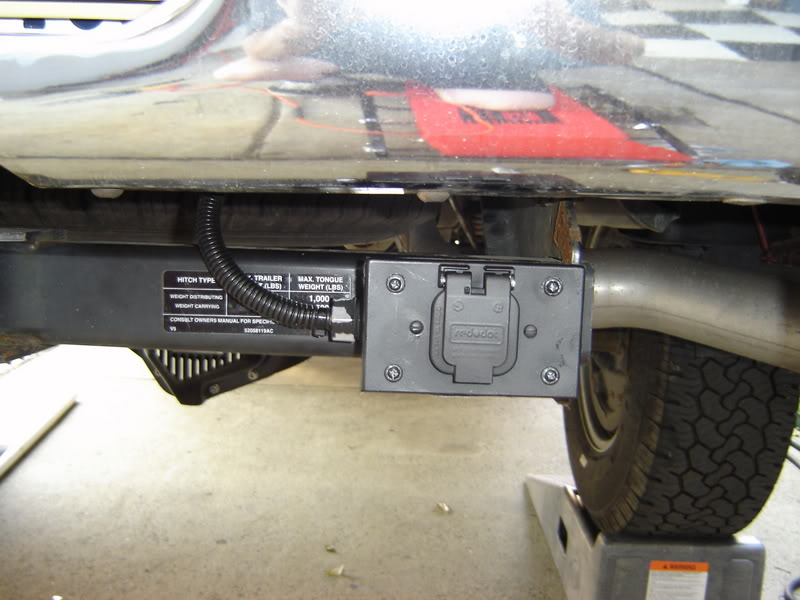
I had a spare trailer plug mounting bracket laying around to mount the rear plug to the bumper. I drilled and tapped the underside lip of the bumper and installed the whole assembly.
[IMG]local://upfiles/52655/D178B72451784D8F9D5352A829FD93FD.jpg[/IMG]
Here is what I did...
Tools and supplies:
[IMG]local://upfiles/52655/23FEDED698834D1FAC959128A3E849AC.jpg[/IMG]
Here is the plug receptacle I used for the front
http://www.marinco.com/scpt/ProdPage...0Shore%20Power
I got mine on E-bay for about $18
The rear plug was a 9-pin trailer plug hook up I had with a removable pin insert. I took out the insert a tossed it.
25' extension cord 14/3 gauge wire
Additional 20" piece of 14/3 power cord wire
Female cord end with ground
First I prepped the plug for the rear, removing the pin insert
[IMG]local://upfiles/52655/42FB183F6C254733A1489998EEE1F6A1.jpg[/IMG]
Then cut the female end off the extension cord and insert the cut end into the front of the empty housing.
I soldered the ends of the cord wire to make a more solid connection with the replacement plug.
[IMG]local://upfiles/52655/0D6447CB3DE4477B8E79B80CB3AC07F2.jpg[/IMG]
The housing has a screw down hold-fast for the cord so it doesn't move when plugging in or disconnecting.
Here is the view in the housing.
[IMG]local://upfiles/52655/68BFBF1DE09B4A0E83B7D9F6E60E17F7.jpg[/IMG]
I had a spare trailer plug mounting bracket laying around to mount the rear plug to the bumper. I drilled and tapped the underside lip of the bumper and installed the whole assembly.
[IMG]local://upfiles/52655/D178B72451784D8F9D5352A829FD93FD.jpg[/IMG]
Thread Starter
|
Professional
Joined: Jan 2007
Posts: 227
Likes: 0
From:
Now route the extension cord along the frame rail to the front of the truck. I decided to install the front plug on the drivers side in the air dam. I didn't want to cut my existing heater plug so I installed a short cord with a new female end on it. This will allow you to also tap in the cord from the rear as shown.
[IMG]local://upfiles/52655/E7CBDE85822E4C6FA672FD1C69186934.jpg[/IMG]
Secure everything with cable ties and get ready to drill your air dam. The Marinco plug uses a 1 7/8" hole.
I located mine under the driver side tow hook.
[IMG]local://upfiles/52655/BA64DAD2F25342CBA35ADFE32C2CAC15.jpg[/IMG]
[IMG]local://upfiles/52655/6F5F2C87EFE9477BA455891BB1A2F82F.jpg[/IMG]
[IMG]local://upfiles/52655/0E974FF6D8A14BFDB2A8D71442E32AF9.jpg[/IMG]
It gives a nice, clean, almost stock look to the heater plug and now it doesn't flop around and scratch my bumper any mor. Now I can plug in whether I pull in or back in
Forgot to mention, use an oxidation eliminating paste like OxiBan
http://www.foxelectricsupply.com/con...uctNo=IDE30030
to minimize corrosion
Thread Starter
|
Professional
Joined: Jan 2007
Posts: 227
Likes: 0
From:
The front plug is one used on boats to allow on board battery charging and comes with a rubber type boot that seals the wire and a gasketed door. The rear is the same as the 7-pin on the back of your truck now with the guts removed. I put the molded male end in the rear housing to keep things weather tight.
Mayfair, I thought you installed a place in the back for your plug in a while back?
Mayfair, I thought you installed a place in the back for your plug in a while back?

Thread Starter
|
Professional
Joined: Jan 2007
Posts: 227
Likes: 0
From:
I put Oxi-Ban on the wires and plug to try to minimize that
Trending Topics
Legend
Joined: Aug 2006
Posts: 8,529
Likes: 0
From: 100% Heaven Sent
ORIGINAL: bert0168
Mayfair, I thought you installed a place in the back for your plug in a while back?
Mayfair, I thought you installed a place in the back for your plug in a while back?