

need alot more help


Thread Starter
|
Professional
Joined: Oct 2011
Posts: 196
Likes: 2
Sorry I didn't check back on this.
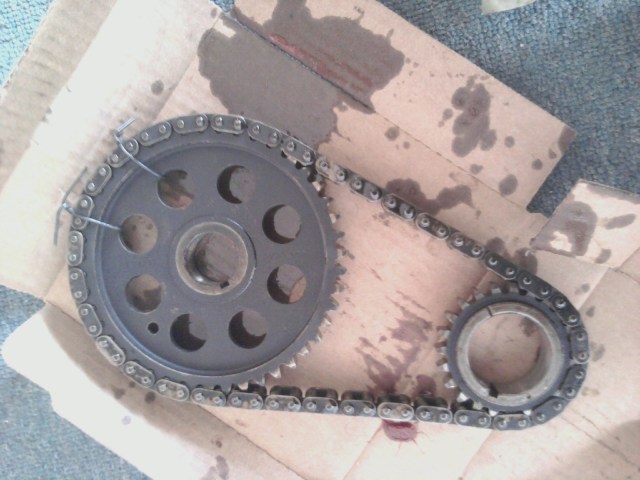
The set you have there looks like the set I got. A cloyes double roller set, I got mine from napa in a napa brand box (with cloyes instructions in the box) for $60. Cloyes is a good name brand. The repair sleeve is for the harmonic ballancer where it slips into the front seal. Many times, the seal wears a groove into the balancer and the new seal won't seal right on that groove, so you slip the repair sleeve over the ballancer and the seal now has a nice uniform surface to seal against. I got this job done in about 10 hours or so. Honestly, 2 days should be more than enough, just be meticulous and pay attention, just like any other job and it will go well.
Now A1Cardone should make a decent pump, but I don't have any personal experience. I do know they have a decent reputation from what I've heard. As for the oil pan bolts, the front 2 pan bolts go upward into the bottom of the timing case cover. You need to REMOVE them to remove the cover.
Good luck! Any more questions I'd be glad to help if I can.
1- in the gasket kit theres a sleeve with a tube of pink stuff. is that some type of glue ? any tricks to how the sleeve goes on ?
2- got all the parts i need from the local parts store but they didnt have the cloyes roller chain. they had the cloyes chain/gear set thats one step down from the roller. was called the silent chain i think. im pretty sure its the same type as what the factory one looks like but i havent popped the timing cover to be sure. do you think this type of chain will be fine for another 100k miles or would the roller chain add a significant amount of milage over the other type of chain before needing replaced again ? no place in town has the roller type. might be able to order it from napa but that will take several days. soonest i could even get to napa is monday night/tuesday morning, so they probly couldnt get that roller timing set until wednsday. was hoping to have this project done and complete some time tuesday. i hate to skimp on qaulity parts but time is of the essence right now. this is the timing set i got. you think it will be fine ? once again thnx for the help http://www.oreillyauto.com/site/c/de...0422&ppt=C0141
edit: im gonna call napa tomorow and see if i can order that roller chain set over the phone and if they could have it by monday night then i can return this other timing set for a refund. ill keep you updated
Last edited by crazyjerry; Oct 29, 2011 at 02:09 AM.
Thread Starter
|
Professional
Joined: Oct 2011
Posts: 196
Likes: 2
phoned napa and the dude said he could just order the roller timing set and have it tuesday morning and i can pay for it then so ill take this other chain back. thinking the roller type should last alot longer. hopefully anyways
Thread Starter
|
Professional
Joined: Oct 2011
Posts: 196
Likes: 2
never installed a repair sleeve. anyone offer some advice how to do it ? was no instructions in the box. appears theres some glue or something with it and looks that it may have to be installed a certain direction. thnx
Thread Starter
|
Professional
Joined: Oct 2011
Posts: 196
Likes: 2
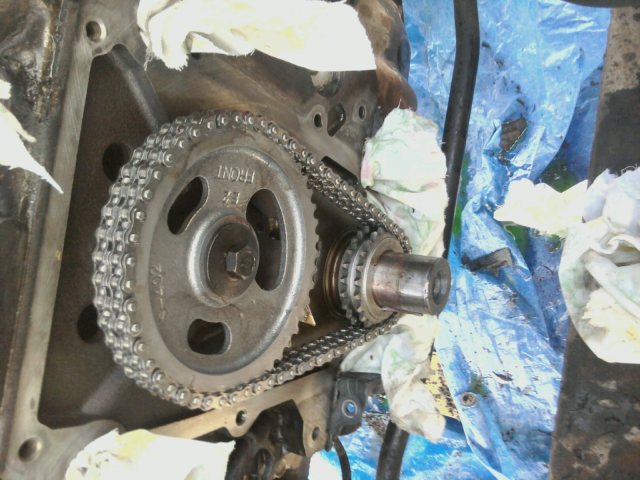
finished this up quit a while ago but forgot to update. was rattling bad so replaced the timing chain/gears, waterpump, tstat. bought a timing chain like the original but had last minute change of mind and went with the roller one. everything went good. didnt run into any probs. damper was in great shape so never did use the repair sleeve. old chain was looser than hek suprised it still ran half good. runs real good now and dont hear that damn rattle.
Thread Starter
|
Professional
Joined: Oct 2011
Posts: 196
Likes: 2
just a tip that i found that might help another new guy. timing marks dont need to be lined up like the book says. just make sure theres alittle play in both sides of the timing chain and the gears will slide right off and nothing will move. but just as a precaution before you pull the old gears off, count the number of chain links from any given point on the cam/ crank sprockets. that way if anything happens you can easy know how everything goea back together with no guessing.

Thread Starter
|
Professional
Joined: Oct 2011
Posts: 196
Likes: 2
well how i did it was put a real small amount of black rtv on the inside of the balancer where it slides on the crank so no oil can leak out past the bolt, then i slide it on the crank part way by hand then i used the balancer bolt to suck it on the rest of the way. the last 1/2" or so i hit it gently with a impact to get it all the way on the crank then torqued the bolt to final spec. if you havent pulled the balancer off yet, make a mark or something so you know when its fully on when you reinstall it because the last 1/2" or so when you put it back might get a little hard to do with a ratchet and thats why i just bumped it with a impact. otherwise the balancer might look like its all the way on but still might need to go another 1/2" or so. that was my experience anyways, yours might slide all the way on easier. and of course you want to grease the new seal and outside of the balancer before assembly. its up to you whether you use rtv on the inside of the balancer where it slides on the crank. mine appeared to have some from the factory so i put some back on to prevent a small oil leak in the future at the bolt head. maybe it wasnt needed but i did it anyways for good measure
Last edited by crazyjerry; Feb 5, 2012 at 11:14 AM.