


4.7 inline radiator fitting

Thread Starter
|
All Star
Joined: Dec 2006
Posts: 950
Likes: 0
From: MINNEAPOLIS, MN
Just a quick post for those that may be interested. This is really quite a simple installation. After the vent tube is threaded onto the fitting it is a plug and play replacement of the factory plastic fitting.
FYI: This is an update of a previous thread from a couple of years ago, just updated since the recent purchase.
BACKGROUND: For those of you with the 4.7 the fitting that the radiator cap sits in, is plastic and can be weakened over time and repeated stress of the plastic from the removal and replacement of the radiator cap. This weakening can cause stress fractures and eventually break causing coolant leaks at a possible inopportune time. With the summer in effect, I figured this is good as time as any to suggest this fairly reasonably priced replacement. For only $25.99 plus s/h it sounds reasonable and very easy for a upgrade/replacement.
CORRECTIVE ACTION: Jegs high performance Delaware, OH offers a replacement fitting for this very issue. It is reasonably priced, and easy to install. There is one fitting that you have to install. This is the vent tube fitting, and just threads into the casting. I would recommend either pipethread tape, or LOCTITE. Once that is installed and dried it goes right into the fitting and slides over the hoses.
MATERIALS: JEGS 55-53098 INLINE RADIATOR HOSE FITTING/FILLER CAST ALUMINUM
Heres the link.
http://www.jegs.com/p/JEGS/JEGS-Inli...06366/10002/-1
TIME ESTIMATE: 10-20 minutes

A pretty simple installation process with just a few quick notes.
1. Remove radiator hose from block and radiator as one piece, once removed then separate
the fittings from the hose.
2. If properly installed, the fitting should have the vent tube installed on the radiator side
offset approx 10 degrees and vent tube hose, routed inboard of the radiator hose, the
offset is to allow the vent tube more flexibility without being installed right over the
hose.
3. If you are using new hoses, I would recommend the following A. Use hose that you are
replacing as a template for where to cut the hose.
B. Although sold as a one piece hose by retailers it needs to be cut into two pieces.
C. The smaller piece will be on the block side.
D. Additionally a small amount of soap and water maybe needed since new
rubber will be tight.
4. I would recommend if the factory spring clamps are being removed, I strongly recommend replacing with the screw type adjustable hose clamps, four of at least 1 1/2 " (as this is the hoes diameter) and one of about 1/4 - 1/2" for the reservior vent tube.
5. Reinstall as one piece, installing from the radiator side first then the block.
FYI: This is an update of a previous thread from a couple of years ago, just updated since the recent purchase.
BACKGROUND: For those of you with the 4.7 the fitting that the radiator cap sits in, is plastic and can be weakened over time and repeated stress of the plastic from the removal and replacement of the radiator cap. This weakening can cause stress fractures and eventually break causing coolant leaks at a possible inopportune time. With the summer in effect, I figured this is good as time as any to suggest this fairly reasonably priced replacement. For only $25.99 plus s/h it sounds reasonable and very easy for a upgrade/replacement.
CORRECTIVE ACTION: Jegs high performance Delaware, OH offers a replacement fitting for this very issue. It is reasonably priced, and easy to install. There is one fitting that you have to install. This is the vent tube fitting, and just threads into the casting. I would recommend either pipethread tape, or LOCTITE. Once that is installed and dried it goes right into the fitting and slides over the hoses.
MATERIALS: JEGS 55-53098 INLINE RADIATOR HOSE FITTING/FILLER CAST ALUMINUM
Heres the link.
http://www.jegs.com/p/JEGS/JEGS-Inli...06366/10002/-1
TIME ESTIMATE: 10-20 minutes
A pretty simple installation process with just a few quick notes.
1. Remove radiator hose from block and radiator as one piece, once removed then separate
the fittings from the hose.
2. If properly installed, the fitting should have the vent tube installed on the radiator side
offset approx 10 degrees and vent tube hose, routed inboard of the radiator hose, the
offset is to allow the vent tube more flexibility without being installed right over the
hose.
3. If you are using new hoses, I would recommend the following A. Use hose that you are
replacing as a template for where to cut the hose.
B. Although sold as a one piece hose by retailers it needs to be cut into two pieces.
C. The smaller piece will be on the block side.
D. Additionally a small amount of soap and water maybe needed since new
rubber will be tight.
4. I would recommend if the factory spring clamps are being removed, I strongly recommend replacing with the screw type adjustable hose clamps, four of at least 1 1/2 " (as this is the hoes diameter) and one of about 1/4 - 1/2" for the reservior vent tube.
5. Reinstall as one piece, installing from the radiator side first then the block.
Last edited by hydrashocker; Jun 28, 2009 at 01:17 AM.
Champion
Joined: Jun 2006
Posts: 4,822
Likes: 4
From: Indiana
I have been wanting to swap mine center section out for the metal JEGS for quite a while. Just ordered it! I now HOPE that is the same size needed for the 5.9s. 
Before I head to Carlisle, I am swapping out all of the hoses. Just got back from 2500 miles to Florida today. No problems.
IndyD
Before I head to Carlisle, I am swapping out all of the hoses. Just got back from 2500 miles to Florida today. No problems.
IndyD
Thread Starter
|
All Star
Joined: Dec 2006
Posts: 950
Likes: 0
From: MINNEAPOLIS, MN
Hydra: Thanks, I originally had a lot more detail but then after reading it about the fifth time I figured that was way too simplified and if it has to be broken down that much maybe the owner should let a professional complete this project. For the most part there is really no way you can mess up this install, trust me I tried to see if there was a way. About the worst you can do to mess this up is install the vent tube on the wrong side, which should become painfully obvious real quick.
Indy: Easiest way to check is measure the inner diameter of the radiator hose, if that diameter is 1 1/2 inches then you should be fine. Glad to hear the FL trip went fine and safe. C-ya in Carlisle!!
MAGIC
Indy: Easiest way to check is measure the inner diameter of the radiator hose, if that diameter is 1 1/2 inches then you should be fine. Glad to hear the FL trip went fine and safe. C-ya in Carlisle!!
MAGIC
Hall Of Fame


Joined: Jun 2005
Posts: 14,228
Likes: 19
From: Riverton, UT
That neck won't work BC yours is 1 15/16" not 1 1/2"
www.rockauto has OEM/aftermarket replacement ones for yours Indy.
www.rockauto has OEM/aftermarket replacement ones for yours Indy.
Thread Starter
|
All Star
Joined: Dec 2006
Posts: 950
Likes: 0
From: MINNEAPOLIS, MN
Sorry Indy, I was hoping that the Jegs one would fit. Remember I said either Loctite or pipe thread tape? I couldn't decide so I used both. It is drying now while the engine cools then install.
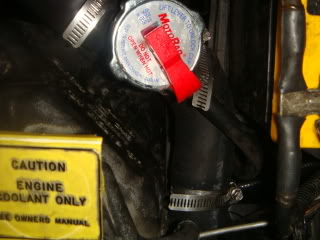
Quick backstory. The original one in the photo was sent with a casting error and the vent tube would not thread correctly, infact cross threaded, I eventually got it in but not the best. I called Jegs, they sent a no return replacement. The one drying now is the new one that I used Anti Seize and thread tape. I got this one threaded in fully seated and threaded all the way flush. It looks the same as the photo, except the vent tube nut is more flush against the neck and no threads showing. With the no return, I still have the bad one as a spare.
Also quick minor instruction amendment, references to LOCTITE were incorrect I meant to say Anti- Sieze, ( the same that you use for coolant temp sensors and spark plug threads.) Sorry!! Yes I used the anti sieze AND PIPE THREAD TAPE, call me old fashioned!!!!
MAGIC
Thread Starter
|
All Star
Joined: Dec 2006
Posts: 950
Likes: 0
From: MINNEAPOLIS, MN
Hydra, I just checked out the Rock Auto neck for the 5.9 but isnt that plastic ? I thought the idea of the replacement neck was to get a aluminum neck that was more durable?
Magic
Magic
Trending Topics
Record Breaker
Joined: Dec 2006
Posts: 1,508
Likes: 4
From: NY NY
Just got the alum one from Jeg's. Ordered it on the 22 and got it today. Gonna stop off at AZ to get both hoses, new cap and t-stat. Could I park my D in a decline to change the upper hose? Or do I leave it level? And to burp it, use the bleeder valve but park in an incline?
Record Breaker
Joined: Dec 2006
Posts: 1,508
Likes: 4
From: NY NY
If anyone's interested, here's a writeup about changing out the upper rad hose with new parts.
1. DRAIN or siphon enough coolant to lower the fluid level so it doesn't splash into your face and mouth!!! Damn it!! I can still taste and smell the coolant! At least I was wearing my goggles.
2. Do exactly what Magic said ^^.
3. Run the engine and slightly open the bleeder screw using an 8mm hex drive. Let the air out until you see coolant, then tighten until no liquid comes out. You're done. But in my case I had to add some coolant back into the res. Magic recommended 10-20 minutes... I took longer than that. I had to clean off the coolant shower...LOL... and wipe down the many engine parts as well. My three y.o was "helping" me by sticking anything long and sharp into all crevices at his eye level...LOL... Said he was "helping daddy". More like making more work for daddy...LOL... Gotta love him. But I digress.
3. Here's a few pics of the finished product. Hope this helps anyone else thinking about doing this.
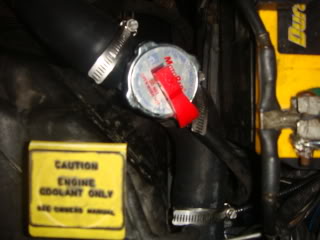
4. The connections.
Block side, that big hex screw(orange colored) in the upper left corner is the bleeder screw.
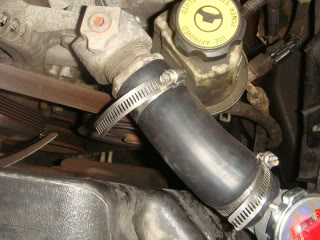
Rad side:
Footnote: I had to cut off an inch off the vent tube hose cause the fitting that came with the new rad cap fitting was smaller than stock and the old tube fitting stretched it out. I took these pics late at night after I came back, notice no wetness. Hehehe... BTW, didn't change the lower rad hose cause AZ didn't have the correct t-stat. Gonna order from Jets.
1. DRAIN or siphon enough coolant to lower the fluid level so it doesn't splash into your face and mouth!!! Damn it!! I can still taste and smell the coolant! At least I was wearing my goggles.
2. Do exactly what Magic said ^^.
3. Run the engine and slightly open the bleeder screw using an 8mm hex drive. Let the air out until you see coolant, then tighten until no liquid comes out. You're done. But in my case I had to add some coolant back into the res. Magic recommended 10-20 minutes... I took longer than that. I had to clean off the coolant shower...LOL... and wipe down the many engine parts as well. My three y.o was "helping" me by sticking anything long and sharp into all crevices at his eye level...LOL... Said he was "helping daddy". More like making more work for daddy...LOL... Gotta love him. But I digress.
3. Here's a few pics of the finished product. Hope this helps anyone else thinking about doing this.
4. The connections.
Block side, that big hex screw(orange colored) in the upper left corner is the bleeder screw.
Rad side:
Footnote: I had to cut off an inch off the vent tube hose cause the fitting that came with the new rad cap fitting was smaller than stock and the old tube fitting stretched it out. I took these pics late at night after I came back, notice no wetness. Hehehe...
BTW, didn't change the lower rad hose cause AZ didn't have the correct t-stat. Gonna order from Jets.
Last edited by Dans01Durango; Jul 26, 2009 at 01:42 AM.