DIY: Adding a overhead console w/ temperature and compass (Durango Edition)
#1
 06-12-2011, 11:55 AM

Hey Guys and Gals,
Been tinkering around the idea of adding a overhead console in my '98 for quite some time now. I had a lot of questions like can it be done? Is it going to be a PITA to do? Is it gonna be Plug and Play? Well after doing countless hours of researching I have found that it can be done in all the 1st generations, its not that much of a PITA and there is a good chance it can be plug and play if I get the right console!
Here is what I have learned so far about the different years consoles:
The '98-'00 are the same in the way they're wired and how the information is delivered to the overhead console.
The 2001 has the same foot print as the earlier three years but it runs through a BUS system and is completely different in how the information is gathered and delivered.
The 2002 is similar to the 2001 in the wiring but the foot print is completely different… The '02 is wider and only a little more than half as long though… If you have an '01, the '02 front mount points are the same but it's so much shorter than the '01 you'll need to do serious modding with the headliner to cover the hole that will be left uncovered with the '02 overhead console in place.
With that knowledge I decided to find a '98-'00 console in my local u-pull-it yard. I figured that it would be the easy and most likely Plug and Play option. I would recommend getting the console for the year truck you have but, it is possible to hard wire some of the newer consoles into the older trucks.... just a lot more hard work...... I'll be showing how to install with the factory harness and a homemade harness in my thread.
NOTE: Myself or the Dodge Forum are not responsible for any mishaps or problems while wrenching. Also we (the forum and myself) are not responsible for knuckle busters, alien abductions, fines, tantrums, whining, drinking behaviors, throwing of tools, fried electrical circuits, or other respectable conditions that may occur during this mod.. all modding is done at your OWN RISK!! This thread is intended to be used as a guide to plan your own install of a overhead console.....
with that said lets get on with the mod
NOTE: I am doing this mod on a '98 so, all of the wire colors mentioned will be common for the '98-'00 trucks however, the steps of the install should be the same on the '01-'03 trucks they just may have a few different wire colors.
Items you will need:
Overhead Console with trip computer and mounting plate
Wiring Harness from donor truck
Ambient Temp Sensor
Electrical Tape
One Terminal Ring (for the ground)
60 ft of wire (If you choose to make custom harness)
Soldering Iron with lead wire
Wire strippers/cutters
Screw drivers both Phillips and Hex Shaped
Fuse Puller
One � inch self tapping screw
Power Drill
Chalk or black marker will do
Razor Blade Knife
NOTE: First thing you need to do, before attempting the install is make sure your PCM can communicate with the mini trip computer. This is done by asking your local Mopar dealer to look up vehicle schematics. To the best of my knowledge, from countless hours of researching as long as you have either/or any of these functions: Key less entry, fog lights, or steering wheel controls you should be all set.
Install Process:
1. Make sure the negative cable on the battery is disconnected.
2. Remove the A-pillar panel (driver side)
3. Remove the Door sill panel (driver side)
4. Remove connecting panel between door sill and A-pillars.
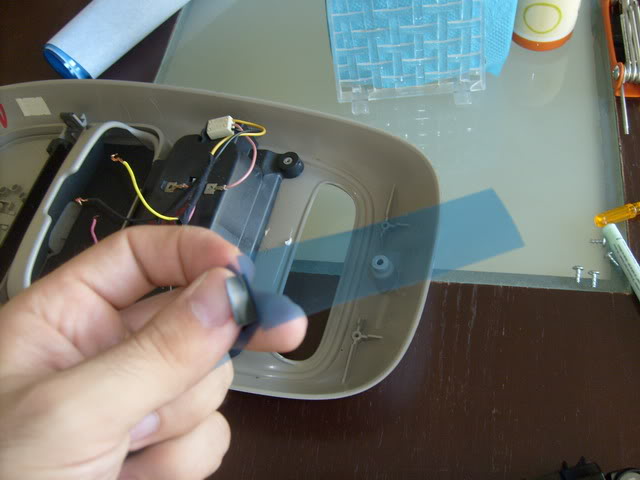
5. Remove the Light assembly, this is done by applying pressure to the front of the light assembly housing (portion facing the front window). Pull down till the housing is removed, don’t be scared to give it some force, for it will come out.
6. cut the wires about 6 inches up from the wiring harness connector. the wires are Pink (power line for the lights) , Yellow (runs the lights for when the doors are open) , and Black (is the Ground)
7. Strip the wires about a � or � inches.
8. Have a beer or beverage of your choice....
9. Prepare the headliner to be cut so it can accommodate the new console.. I cut the headliner around the console on the donor truck so I would have a template of the hole I needed in mine.. Then, I simply held the template up to my headliner and traced the hole with a black marker and carefully cut it with a razor blade.
10. Install the mounting plate on the ceiling. There should be two holes that match the holes on the front of the mounting plate.. Put them together and screw them in...
11.If you have the factory harness you are now ready to fish it though the headliner, down the A-pillar and under the dash to behind the fuse panel. I used zip ties to clean up a little and make it look more like a factory install.
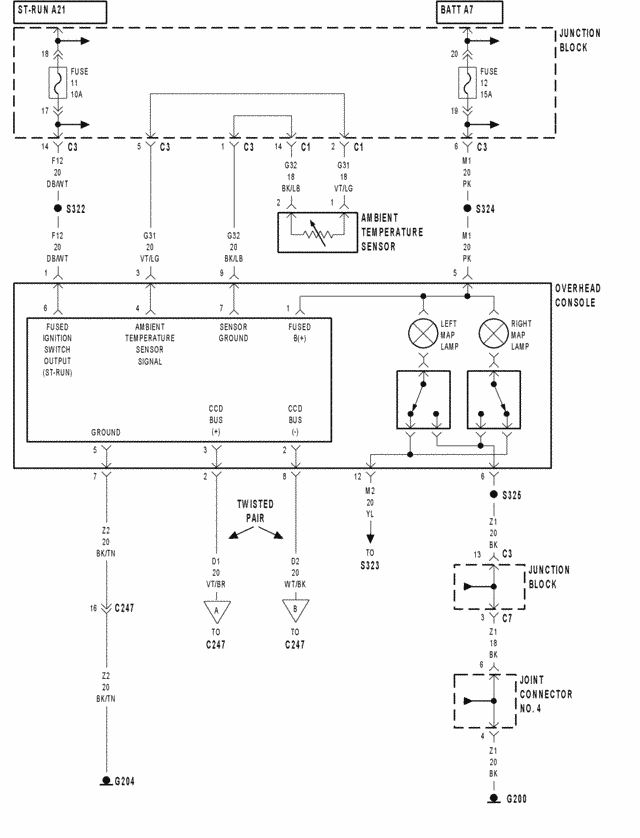
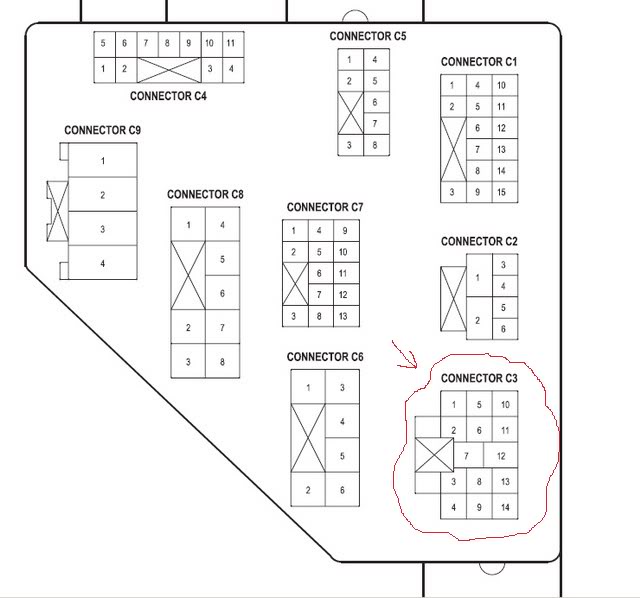
12. Behind the fuse panel you will find connector on the junction box marked C3. This is where the factory wire harness connects.
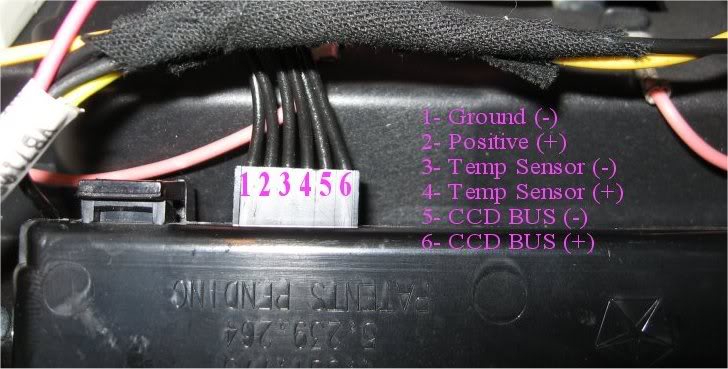
13. If you have a homemade harness you will need to prepare the wiring harness by stripping all the wires about � to � inches. The wire colors should be as followed:
Overhead Console Lights
Black (Ground for the lights)
Yellow (Power for the lights)
Pink (Power for the lights when doors are open)
Ambient Temp Sensor
Black/Light Blue (Sensor Ground)
Violet/Light Green (Sensor Signal)
Mileage and Gas Consumption
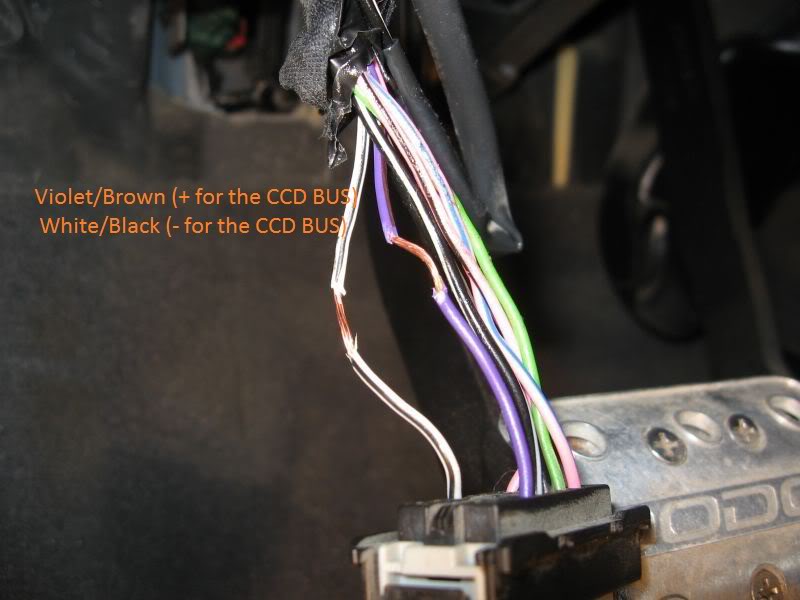
Violet/Brown (+ for the CCD BUS)
White/Black (- for the CCD BUS)
NOTE: You must twist these wires for proper readings.
Power
Black/Tan (Ground for the Trip Computer)
Blue/White (Power for the Trip Computer)
Soldering
NOTE: pre measure all wires to desired length prior to cutting and stripping. After soldering make sure to use your electrical tape and tape up the new connection(s).
Overhead Console Lights
Connect via soldering the existing light wires, them being Pink on Pink, Black on Black and Yellow on Yellow (the pre-existing wires to the new wiring harness for the overhead console). This will now give you proper light function in the overhead console.
Ambient Temp Sensor
Under the Hood on the passengers side front between air box and radiator, you will see a plug, that plug is the connector for the Ambient Temp Sensor. Put the plug though the hole next to the grill and mount the sensor next to the right headlight assembly.
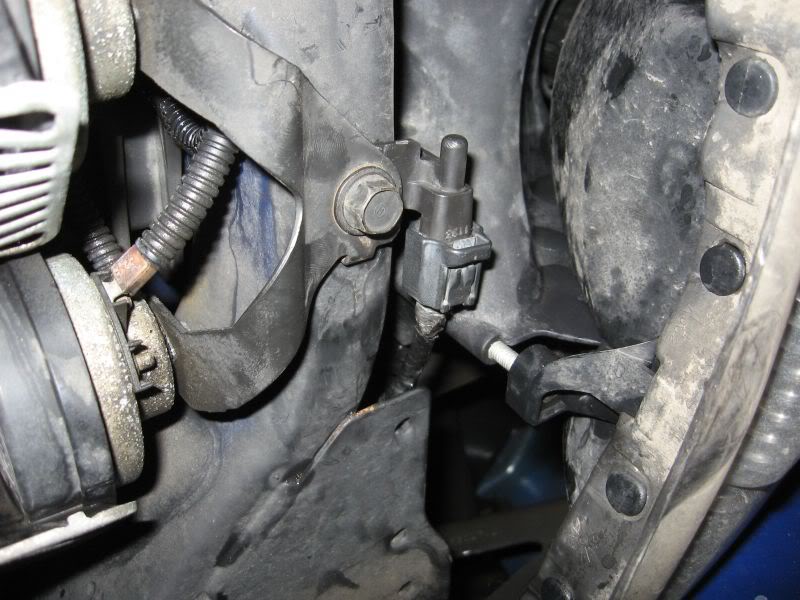
With this pic it shows the sensor is on the drivers side, it should look similar installed on the other side.
With a homemade harness you will need to prepare two 12 feet of 18g worth of wire (measured from the grill to passenger side door, up the A-pillar, to the wiring harness connections) Now solder one wire to the Black/Light Blue (Sensor Ground) and use a strip of tape on both ends to distinguish between the two sets of wires. Now solder the other wire Violet/Light Green (Sensor Signal). Afterwords, run the newly connected wires to the wiring harness of the overhead console and solder them to the corresponding wires on the harness.
Mileage and Gas Consumption
If you have a homemade harness only, measure two 12g worth of wires of the same length from the overhead console wiring harness across the headliner towards the driver side A-pillar, down the A-pillar to the diagnostic port (black 16 pin plug found under the steering wheel by the hood release lever). Again, it is very important that you twist these wires, for you will get incorrect readings if you don’t. Once again soldered the wires and taped them at the wiring harness, connect the – CCD BUS wire from your harness to the White/black (- CCD BUS) wire on the port plug and connect the + CCD BUS wire on your harness to the Violet/Brown (+ CCD BUS) wire on the port plug.
Power
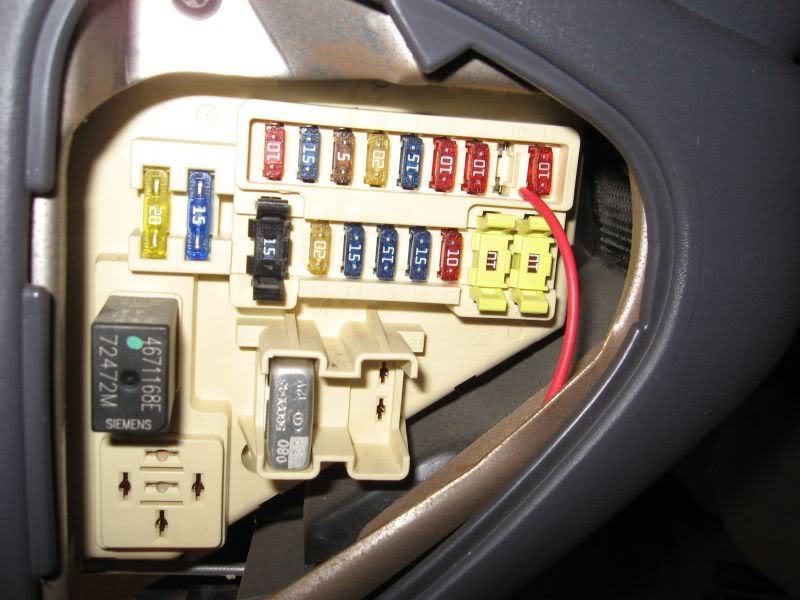
If you have a homemade harness only, measure two 18g worth of wires from the overhead console to the fuse box (found on the drive side) and cut and strip. Solder and tape one end of the wire(s) to the Black/Tan (Ground for the Trip Computer) and the other wire to the Blue/White (Power for the Trip Computer). The wire that is now the new ground, connect the terminal ring to the other end, running the wire to the fuse box, you will see a screw on the top left side of the fuse box. This is a perfect place to mount the terminal ring, at that screw to create the ground. Now the other wire, which is now your new power wire, run it to the fuse box and place it in fuse number 11 (a 10a fuse). This is the consoles power fuse block location.
Testing
(patience will be needed here)
Connect the newly wired wiring harness to the overhead console, place the console either on the dash or let it dangle for the moment.
Connect the battery
Turn the Key on
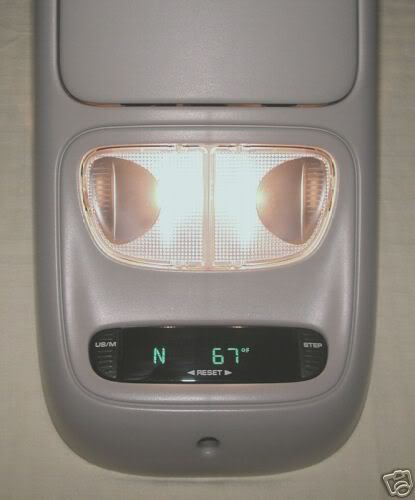
You should see the newly powered mini trip computer turn on and the lights turn on
Check to verify that the lights work, both manually turning each light on/off and checking to see if they operate with the doors open and the alarm being set.
Verify that the temp sensor is reading properly and that your mileage programs are working.
Reset and Calibrate
To Reset the mini trip computer, hold down both the Step button and the US/M button.
To Calibrate the Compass hold down US/M button followed by the Step button till you see the CAL on the temp and compass display screen. Release the buttons, do three 360 (I prefer a col-dee-sac) the CAL should disappear, which means your compass is now calibrated.
Customize Display Color (optional)
You can change the display color to match your gauges and HVAC controls by doing the following:
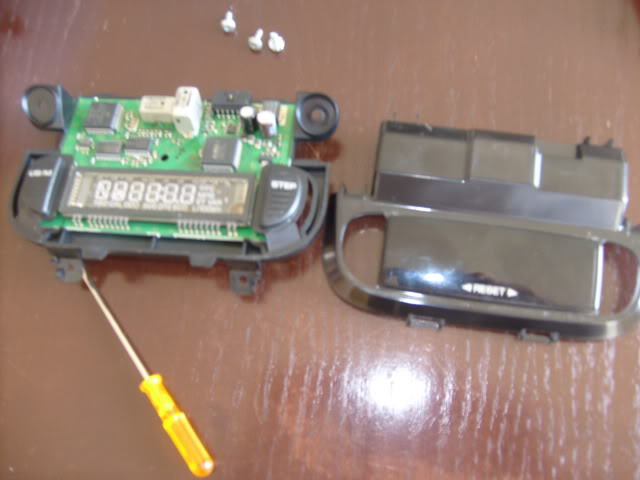
Take off the face of the display by removing 3 screws
Get yourself some kinda colored film and place it over the number display
Reassemble your display
Finish
Connect the wiring harness to the overhead console and attach the overhead console to the mounting plate.
Connect the A-pillar panel, door sill panel and the panel in between
Reconnect the negative terminal of battery
Start the truck and enjoy your newly connected overhead console
Been tinkering around the idea of adding a overhead console in my '98 for quite some time now. I had a lot of questions like can it be done? Is it going to be a PITA to do? Is it gonna be Plug and Play? Well after doing countless hours of researching I have found that it can be done in all the 1st generations, its not that much of a PITA and there is a good chance it can be plug and play if I get the right console!
Here is what I have learned so far about the different years consoles:
The '98-'00 are the same in the way they're wired and how the information is delivered to the overhead console.
The 2001 has the same foot print as the earlier three years but it runs through a BUS system and is completely different in how the information is gathered and delivered.
The 2002 is similar to the 2001 in the wiring but the foot print is completely different… The '02 is wider and only a little more than half as long though… If you have an '01, the '02 front mount points are the same but it's so much shorter than the '01 you'll need to do serious modding with the headliner to cover the hole that will be left uncovered with the '02 overhead console in place.
With that knowledge I decided to find a '98-'00 console in my local u-pull-it yard. I figured that it would be the easy and most likely Plug and Play option. I would recommend getting the console for the year truck you have but, it is possible to hard wire some of the newer consoles into the older trucks.... just a lot more hard work...... I'll be showing how to install with the factory harness and a homemade harness in my thread.
NOTE: Myself or the Dodge Forum are not responsible for any mishaps or problems while wrenching. Also we (the forum and myself) are not responsible for knuckle busters, alien abductions, fines, tantrums, whining, drinking behaviors, throwing of tools, fried electrical circuits, or other respectable conditions that may occur during this mod.. all modding is done at your OWN RISK!! This thread is intended to be used as a guide to plan your own install of a overhead console.....
with that said lets get on with the mod
NOTE: I am doing this mod on a '98 so, all of the wire colors mentioned will be common for the '98-'00 trucks however, the steps of the install should be the same on the '01-'03 trucks they just may have a few different wire colors.
Items you will need:
Overhead Console with trip computer and mounting plate
Wiring Harness from donor truck
Ambient Temp Sensor
Electrical Tape
One Terminal Ring (for the ground)
60 ft of wire (If you choose to make custom harness)
Soldering Iron with lead wire
Wire strippers/cutters
Screw drivers both Phillips and Hex Shaped
Fuse Puller
One � inch self tapping screw
Power Drill
Chalk or black marker will do
Razor Blade Knife
NOTE: First thing you need to do, before attempting the install is make sure your PCM can communicate with the mini trip computer. This is done by asking your local Mopar dealer to look up vehicle schematics. To the best of my knowledge, from countless hours of researching as long as you have either/or any of these functions: Key less entry, fog lights, or steering wheel controls you should be all set.
Install Process:
1. Make sure the negative cable on the battery is disconnected.
2. Remove the A-pillar panel (driver side)
3. Remove the Door sill panel (driver side)
4. Remove connecting panel between door sill and A-pillars.
5. Remove the Light assembly, this is done by applying pressure to the front of the light assembly housing (portion facing the front window). Pull down till the housing is removed, don’t be scared to give it some force, for it will come out.
6. cut the wires about 6 inches up from the wiring harness connector. the wires are Pink (power line for the lights) , Yellow (runs the lights for when the doors are open) , and Black (is the Ground)
7. Strip the wires about a � or � inches.
8. Have a beer or beverage of your choice....
9. Prepare the headliner to be cut so it can accommodate the new console.. I cut the headliner around the console on the donor truck so I would have a template of the hole I needed in mine.. Then, I simply held the template up to my headliner and traced the hole with a black marker and carefully cut it with a razor blade.
10. Install the mounting plate on the ceiling. There should be two holes that match the holes on the front of the mounting plate.. Put them together and screw them in...
11.If you have the factory harness you are now ready to fish it though the headliner, down the A-pillar and under the dash to behind the fuse panel. I used zip ties to clean up a little and make it look more like a factory install.
12. Behind the fuse panel you will find connector on the junction box marked C3. This is where the factory wire harness connects.
13. If you have a homemade harness you will need to prepare the wiring harness by stripping all the wires about � to � inches. The wire colors should be as followed:
Overhead Console Lights
Black (Ground for the lights)
Yellow (Power for the lights)
Pink (Power for the lights when doors are open)
Ambient Temp Sensor
Black/Light Blue (Sensor Ground)
Violet/Light Green (Sensor Signal)
Mileage and Gas Consumption
Violet/Brown (+ for the CCD BUS)
White/Black (- for the CCD BUS)
NOTE: You must twist these wires for proper readings.
Power
Black/Tan (Ground for the Trip Computer)
Blue/White (Power for the Trip Computer)
Soldering
NOTE: pre measure all wires to desired length prior to cutting and stripping. After soldering make sure to use your electrical tape and tape up the new connection(s).
Overhead Console Lights
Connect via soldering the existing light wires, them being Pink on Pink, Black on Black and Yellow on Yellow (the pre-existing wires to the new wiring harness for the overhead console). This will now give you proper light function in the overhead console.
Ambient Temp Sensor
Under the Hood on the passengers side front between air box and radiator, you will see a plug, that plug is the connector for the Ambient Temp Sensor. Put the plug though the hole next to the grill and mount the sensor next to the right headlight assembly.
With this pic it shows the sensor is on the drivers side, it should look similar installed on the other side.
With a homemade harness you will need to prepare two 12 feet of 18g worth of wire (measured from the grill to passenger side door, up the A-pillar, to the wiring harness connections) Now solder one wire to the Black/Light Blue (Sensor Ground) and use a strip of tape on both ends to distinguish between the two sets of wires. Now solder the other wire Violet/Light Green (Sensor Signal). Afterwords, run the newly connected wires to the wiring harness of the overhead console and solder them to the corresponding wires on the harness.
Mileage and Gas Consumption
If you have a homemade harness only, measure two 12g worth of wires of the same length from the overhead console wiring harness across the headliner towards the driver side A-pillar, down the A-pillar to the diagnostic port (black 16 pin plug found under the steering wheel by the hood release lever). Again, it is very important that you twist these wires, for you will get incorrect readings if you don’t. Once again soldered the wires and taped them at the wiring harness, connect the – CCD BUS wire from your harness to the White/black (- CCD BUS) wire on the port plug and connect the + CCD BUS wire on your harness to the Violet/Brown (+ CCD BUS) wire on the port plug.
Power
If you have a homemade harness only, measure two 18g worth of wires from the overhead console to the fuse box (found on the drive side) and cut and strip. Solder and tape one end of the wire(s) to the Black/Tan (Ground for the Trip Computer) and the other wire to the Blue/White (Power for the Trip Computer). The wire that is now the new ground, connect the terminal ring to the other end, running the wire to the fuse box, you will see a screw on the top left side of the fuse box. This is a perfect place to mount the terminal ring, at that screw to create the ground. Now the other wire, which is now your new power wire, run it to the fuse box and place it in fuse number 11 (a 10a fuse). This is the consoles power fuse block location.
Testing
(patience will be needed here)
Connect the newly wired wiring harness to the overhead console, place the console either on the dash or let it dangle for the moment.
Connect the battery
Turn the Key on
You should see the newly powered mini trip computer turn on and the lights turn on
Check to verify that the lights work, both manually turning each light on/off and checking to see if they operate with the doors open and the alarm being set.
Verify that the temp sensor is reading properly and that your mileage programs are working.
Reset and Calibrate
To Reset the mini trip computer, hold down both the Step button and the US/M button.
To Calibrate the Compass hold down US/M button followed by the Step button till you see the CAL on the temp and compass display screen. Release the buttons, do three 360 (I prefer a col-dee-sac) the CAL should disappear, which means your compass is now calibrated.
Customize Display Color (optional)
You can change the display color to match your gauges and HVAC controls by doing the following:
Take off the face of the display by removing 3 screws
Get yourself some kinda colored film and place it over the number display
Reassemble your display
Finish
Connect the wiring harness to the overhead console and attach the overhead console to the mounting plate.
Connect the A-pillar panel, door sill panel and the panel in between
Reconnect the negative terminal of battery
Start the truck and enjoy your newly connected overhead console
Last edited by Old_School; 06-07-2012 at 10:09 AM.
#3
06-13-2011, 02:44 AM
Champion
#4
06-13-2011, 09:45 AM
I'll get some finished pics in due time... my 2 year old decided that the digital camera needed a dip in the potty so im hoping it drys out!
#5
06-13-2011, 10:38 AM
Professional
Just a question... When I replaced my fuel pump I called a place and was asked if I had the overhead display or not, which I do. I was told there were 2 fuel pumps for these trucks, one to go with the display and one without (cheaper). I am just going by what he asked me. I ended up replacing it myself so it didn't matter and I didn't investigate any further. If this is true how would the mpg work?
Nice write up BTW!!!
Nice write up BTW!!!
#6
06-13-2011, 11:15 AM

I'll get some finished pics in due time... my 2 year old decided that the digital camera needed a dip in the potty so im hoping it drys out!
Ummm.... I hope they didn't do anything ELSE at the same time?

Can't begin to tell you the amount of stuff wife & I have fished out ot the potty!
BTW, great writeup. I already have a console but I love the idea of the colored film to change the display tint!
Bob
#7
06-13-2011, 11:18 AM
Just a question... When I replaced my fuel pump I called a place and was asked if I had the overhead display or not, which I do. I was told there were 2 fuel pumps for these trucks, one to go with the display and one without (cheaper). I am just going by what he asked me. I ended up replacing it myself so it didn't matter and I didn't investigate any further. If this is true how would the mpg work?
Nice write up BTW!!!
Nice write up BTW!!!
now for you answer,
The computer in the overhead console uses the signal (through the CCD BUS) going to the fuel gauge as one of the parts to determine the MPG. Mine DID NOT come with a overhead console and the MPG's on my console are acurate (or a acurate as it can be) so, my guess is there is 2 different brands of pumps, one costing more than the other for whatever reason and the formed up than line of BS to sell you the more expensive one...
Old_School
Trending Topics
#8
06-13-2011, 12:14 PM
Professional
#9
06-13-2011, 07:57 PM
Hall Of Fame
#10
06-14-2011, 12:43 PM
Record Breaker