


home brew CAI

Thread Starter
|
THE ULTI-MOD


Joined: Jan 2007
Posts: 19,797
Likes: 36
From: Union NJ
ok so i have been slowly (very slowly) working on getting better airflow and colder air into the truck, started out by pulling off the elbow going out the front of the factory filter box, putting in a K&N oiled drop in filter and pulling off the rubber guard in the front of the grill to let the cold air in (the box seems to be lined up pretty well with the new opening, no need for a tube to there yet, i may add one later).
after this i decided that the flexible stretchable tubing that is included stock to run from airbox to TB was the biggest issue, this should be smooth, so i decided this afternoon to do something about it, i think it turned out pretty good, you tell me.
the finished product

I am not responsible for any mishaps while you are wrenching, knuckle busting, throwing tools, kicking vehicles, stomping, whining, drinking, or possession of you or your rig by any entity....... Always consult a manual before attempting any wrenching and I advise you to stay within your skill set. If you’re expanding your skills, work on the easy stuff 1st to gain skills and the necessary scars on the hands to fall into the "working man/woman" category.
I suggest that you read ALL of this post before making any purchases or decisions on this repair, it will make sure you do it correctly
Before picture

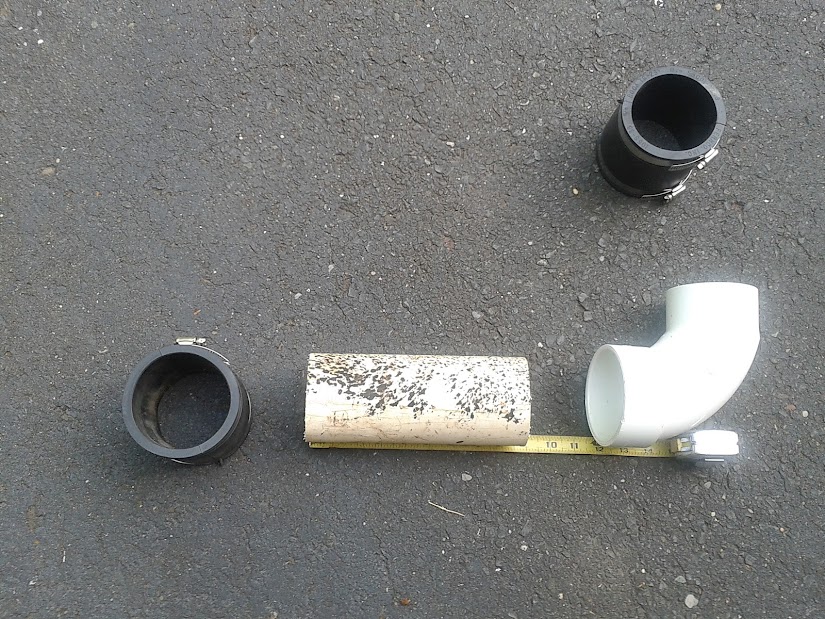
Supplies/tools needed (for working on a 4.7l engine)
1) 3in PVC pipe sch 40 about 9 inches, HD sells 2ft sections (sorry nothing smaller) for about $6 at the time of this writing ($5.99)
2) one (1) 90 deg 3inch street elbow (this means one end is a male connection and the other is female) ($3.91)
3) two (2) 3inch rubber flex couplings (sometimes referred to as repair couplings ($6.26x2=12.52)
4) 9/16 drill bit (if you have one, i didnt and made a 1/2in drill work)
5) nut drivers for the hose clamps (10mm and whichever size you need for your coupler they may change)
6) one (1) 2ft piece of flexible dryer vent ($6.98)
7) one (1) can of spray paint, i used rustoleum gloss black paint but you can choose your own color
TOTAL COST: $29.40+local tax
Step 1)
Gather supplies (add beer if you like, but this is easy)
Step 2)
cut piece of 2ft pipe down to 8.5 inches (leave it a little longer if you are unsure, you can always cut it a 2nd time if need be)

Step 3)
drill 9/16th hole into end of street elbow above where the rubber coupler will end (on the outside of the bend, near the 'male' end of the coupler)

this is for the MAF sensor which is plugged into the square box you will take off later, the sensor needs to fit snugly into this hole
Step 4)
sand both the 8.5inch length, and the street elbow, clean off and paint with your choice of paint also paint the flex line if you want at this point(drink beer while paint dries)
Step 5)
assemble, the pipe goes into the female end of the street elbow and the couplers go onto the other end of the pipe and the male end of the street elbow

(yes the pipe i used is a little dirty on the outside so sue me)
Step 6)
remove factory flex hose and elbow box (this is where you need the 10mm nut driver)
Step 7)
install:rubber flex couplers go one on the TB and one on the outlet of the factory air filter box (as pictured above), tighten all hose clamps to seal system, and install MAF sensor into hole in street elbow.
Step 8)
Take flexible ducting and install around the a/c lines (use the razor knife to slit the ducting so that you can push it around the pipes and wires as necessary)


Step 9)
clean up and enjoy (i put my K&N filter on the tube, you can choose to do this or not as you please, i thought it added a nice touch)
after this i decided that the flexible stretchable tubing that is included stock to run from airbox to TB was the biggest issue, this should be smooth, so i decided this afternoon to do something about it, i think it turned out pretty good, you tell me.
the finished product
I am not responsible for any mishaps while you are wrenching, knuckle busting, throwing tools, kicking vehicles, stomping, whining, drinking, or possession of you or your rig by any entity....... Always consult a manual before attempting any wrenching and I advise you to stay within your skill set. If you’re expanding your skills, work on the easy stuff 1st to gain skills and the necessary scars on the hands to fall into the "working man/woman" category.
I suggest that you read ALL of this post before making any purchases or decisions on this repair, it will make sure you do it correctly
Before picture
Supplies/tools needed (for working on a 4.7l engine)
1) 3in PVC pipe sch 40 about 9 inches, HD sells 2ft sections (sorry nothing smaller) for about $6 at the time of this writing ($5.99)
2) one (1) 90 deg 3inch street elbow (this means one end is a male connection and the other is female) ($3.91)
3) two (2) 3inch rubber flex couplings (sometimes referred to as repair couplings ($6.26x2=12.52)
4) 9/16 drill bit (if you have one, i didnt and made a 1/2in drill work)
5) nut drivers for the hose clamps (10mm and whichever size you need for your coupler they may change)
6) one (1) 2ft piece of flexible dryer vent ($6.98)
7) one (1) can of spray paint, i used rustoleum gloss black paint but you can choose your own color
TOTAL COST: $29.40+local tax
Step 1)
Gather supplies (add beer if you like, but this is easy)
Step 2)
cut piece of 2ft pipe down to 8.5 inches (leave it a little longer if you are unsure, you can always cut it a 2nd time if need be)
Step 3)
drill 9/16th hole into end of street elbow above where the rubber coupler will end (on the outside of the bend, near the 'male' end of the coupler)
this is for the MAF sensor which is plugged into the square box you will take off later, the sensor needs to fit snugly into this hole
Step 4)
sand both the 8.5inch length, and the street elbow, clean off and paint with your choice of paint also paint the flex line if you want at this point(drink beer while paint dries)
Step 5)
assemble, the pipe goes into the female end of the street elbow and the couplers go onto the other end of the pipe and the male end of the street elbow
(yes the pipe i used is a little dirty on the outside so sue me)
Step 6)
remove factory flex hose and elbow box (this is where you need the 10mm nut driver)
Step 7)
install:rubber flex couplers go one on the TB and one on the outlet of the factory air filter box (as pictured above), tighten all hose clamps to seal system, and install MAF sensor into hole in street elbow.
Step 8)
Take flexible ducting and install around the a/c lines (use the razor knife to slit the ducting so that you can push it around the pipes and wires as necessary)
Step 9)
clean up and enjoy (i put my K&N filter on the tube, you can choose to do this or not as you please, i thought it added a nice touch)
Last edited by shrpshtr325; Jul 10, 2012 at 10:03 PM.

Not really a CAI, just changed the air hat. What was the total cost in supplies? I was bored one day and make a CAI for my Kia, I spent about $30. $25 on an over priced filter at AZ and $5 on 10 Ft of drain pipe from Home Depot but only used about 2 Ft of it.
PS. Yours looked NICE after painting it!
PS. Yours looked NICE after painting it!
Thread Starter
|
THE ULTI-MOD
Joined: Jan 2007
Posts: 19,797
Likes: 36
From: Union NJ
thanks guys, and yes at this point its just replaced piping(but its smooth walled pipe which flows better than the flexible pipe and stock air box), although it is still sucking colder air than the stock setup (the splash guard in the front has been removed allowing cold air into that cavity)
dsolorio, this is still a work in progress, i intend at some point in the very near future to push a piece of pipe out the grill at that point it will be a true CAI.
cost so far is about $17 plus the K&N filter, iv been fortunate to have most of the stuff laying around as scrap to use for this
dsolorio, this is still a work in progress, i intend at some point in the very near future to push a piece of pipe out the grill at that point it will be a true CAI.
cost so far is about $17 plus the K&N filter, iv been fortunate to have most of the stuff laying around as scrap to use for this


Thread Starter
|
THE ULTI-MOD
Joined: Jan 2007
Posts: 19,797
Likes: 36
From: Union NJ
groggy, that is a great idea for how to channel the cold air to the box, i just purchased the K&N drop in filter so that box isnt going anywhere, but maybe an cheap garbage can could be cut to direct the air exactly where i want it, hmmm thanks for the idea.
Champion

Joined: Jan 2011
Posts: 4,099
Likes: 44
From: Pittsburgh, PA or Columbia, SC
I still need to get smooth pipes to finalize mine with. Here's what mine looks like right now, it's not pretty but it works. https://dodgeforum.com/forum/members...i-ram-air.html
