

How To: Custom 3.0L Cold-Air Intake Mod
#1
 06-04-2007 | 06:21 PM

Thread Starter
|
Professional
Joined: May 2007
Posts: 108
Likes: 0
From:
Ok so here it is, the unofficial 3.0L Do-it-yourself Cold-air intake How-to for Neons. 
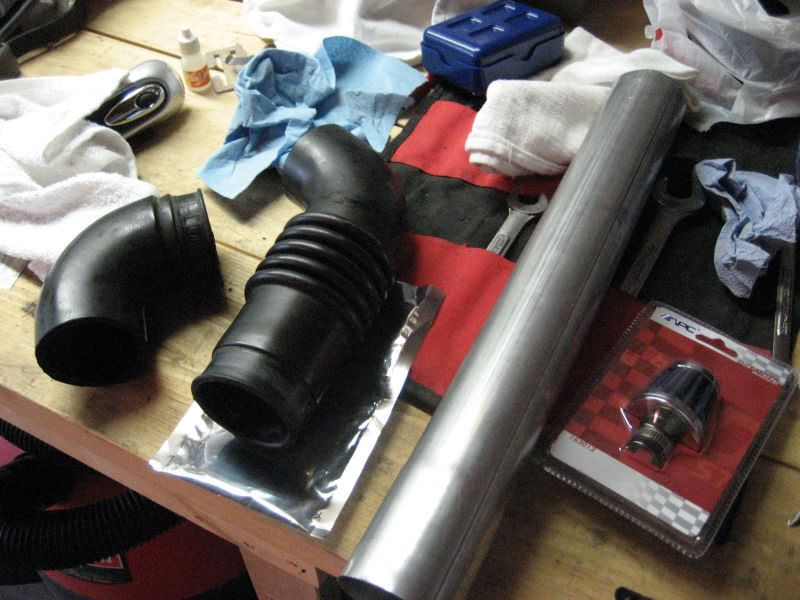
As previous posts have it, it has been proven that a cold air intake can in fact be made from a intake snorkel off of any mid-90’s Chrysler 3.0L engine (see pic below).
[IMG]local://upfiles/64110/26CE5EC5814E408BB25B8A8A58CD89A3.jpg[/IMG]
There are a few variations to this to fit your specific application, so I will elaborate. Any single radiator fan application will not require any cutting of the intake snorkel (unless of course there are clearance issues with the hood). For dual radiator fans, one cut will need to be made directly in the center of the only two bends in the snorkel (see project pictures below).
Once you have determined your application based on radiator fans, get your parts!
- 3.0L intake snorkel (junk yard, got mine for $3, avg. is like $10)
- Approx 1 ft. 2 ½” inner diameter exhaust piping with a larger tapered end (this ensures nice tight fitting, and the larger end will be explained later).
- Hose clamps (about 5 should be plenty).
- Cone filter (K&N work great! A few P/N’s: RU-3130, RX-4140, RD-0720, RC-3250)
- Small breather filter for PCV valve (Advance has APC ones for like $8 that work fine, and K&N makes them too.)
- Original intake part from box-to-throttle body (optional for a different variation).
Let’s start building!
Steps:
1. Remove all the stock intake elements. If necessary, remove battery cover and hose. Using a small hacksaw, cut away all of the front of the battery tray excluding the frame bracket, the piece that holds the battery in, and sensor. Also, remove the scoop that sits attached to the hood for clearance (this pops off).
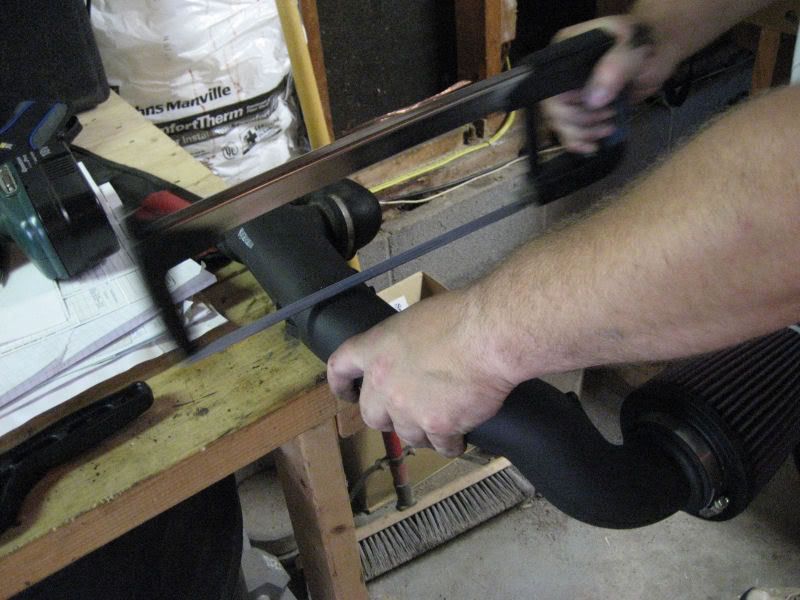
2. If required (recommended anyway), cut 3.0L snorkel at the point in between the two bends (See pictures).
3. Fit the 90-degree bend onto the throttle body snuggly, attach exhaust pipe, and use the other bend of the snorkel to determine where the pipe needs to be cut (start from non-tapered end).
4. Once pipe is cut, attach the other bend and fit down in front of battery. From there, get underneath your car! Hold the filter where you would like to place it, and determine the length of pipe needed to get it there from the snorkel. Cut your pipe, fit it, and fit filter.
5. Attach breather filter to either the PCV valve, or to the end of the stock PCV valve hose and place it anywhere. Placement matters little with this.
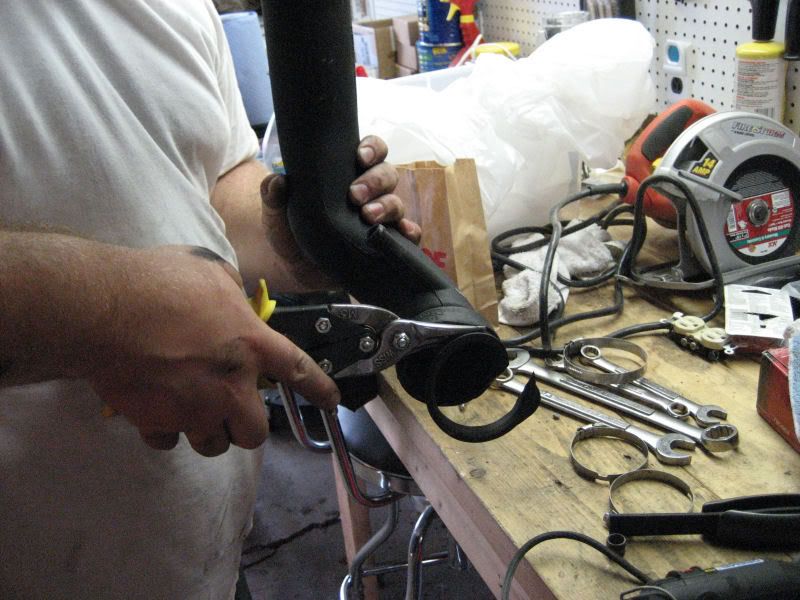
Oila! Make sure that once everything is fitted the way you want it, secure EVERYTHING with hose clamps, this ensures that nothing falls off. Double, triple, even quadruple check to make sure your filter is on tight, you wouldn’t want to lose it. **Also, you might be required to keep your hood crutch in front of the intake, no longer sitting in it’s little clip. It WILL clear the hood so no worries.** Be sure that everything said and done will clear the hood, you may be required to flatten the pipe (from the TB snorkel) some, a vice will do the trick. Also, you can attach your EGR solenoid that was attached to the intake, and secure it with zip ties to a nearby hose.
finished product should look like this:
----------------
OPTIONAL:
*Full credit given to my cousin Kyle, mechanical engineer and facilitator of the impossible.* [&:]
Ok here is the optional part to place the filter right behind the foglight (remove the light if you would like for more airflow) / in front of the wheel well. There you should find a nice little nook for your filter, assuming it isn’t the long type. I used RC-3250 for my particular application and it fits just right. Anything larger would probably not work.
This is where a major step in commitment is required, as some work will be need to be done and a piece of the original intake will need to be cut and the tapered end of the exhaust pipe be implemented!!! [X(]
1. Do all of the above steps, however, instead of fitting the filter yet, take the intake piece stated above and cut right in front of the raised pieces where the EGR solenoid was attached (see picture). This should leave you with the section from the TB to the raised pieces, and a section from there to what went to the box (attached is a resonator).
ignore the filter for a sec
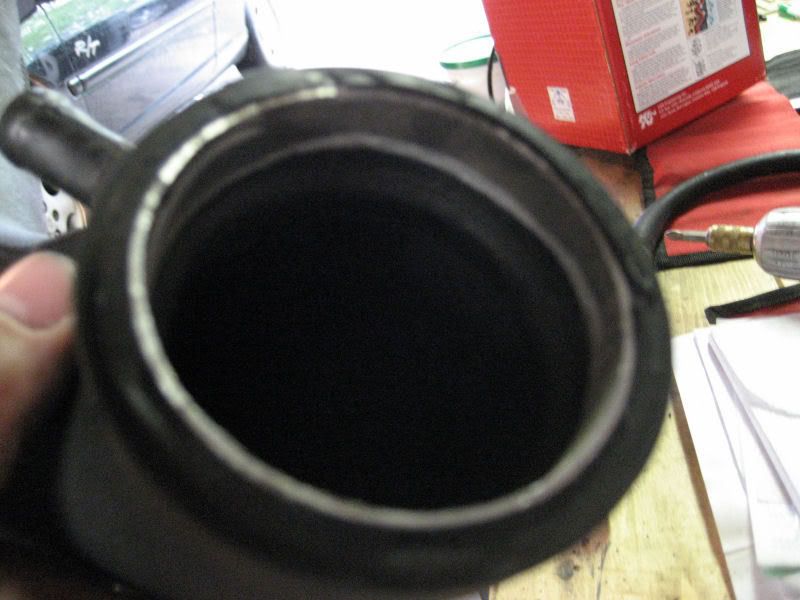
2. Now that you have the piece, sweat a bit and cut the excess rubber on the end (that was attached to the TB, BUT ONLY TO THE EXENT OF REMOVING THE PART THAT WAS DESIGNED FOR THE HOSE CLAMP. You will see what I am talking about in the picture.
3. Now you will need to cut a very small section from the exhaust tubing to insert into filter end of the pipe for rigidity (see picture). Attach your filter and it should be snug. Be sure when tightening the hose clamp that the filter doesn’t work its way off the pipe. This should not be a problem after you install the ring inside the pipe.
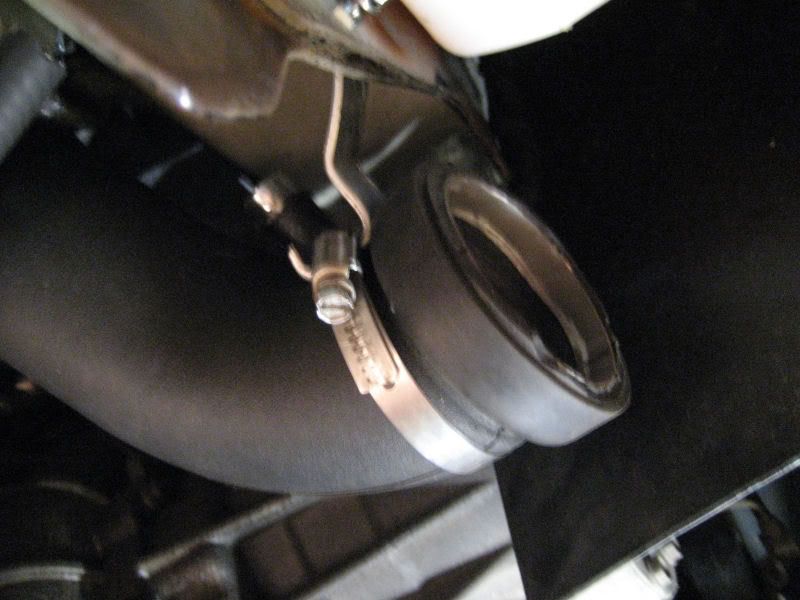
4. While you are at it, you will have to find a way to plug the PCV nipple on the pipe. My cousin used a bolt and lots of silicone (see pic). Be sure to wipe the excess and let it cure for a few hours before driving!

5. Ok, now fit the remaining bit of exhaust piping over the piece you just worked with, the piece with the filter. The tapered end should fit perfectly into the intake piece you have. If you are still not sure what I am saying about it being tapered, see the pic above with the pipe, you should notice one end is bigger. From there, place filter in the nook and look to determine with the pipe above needs to be cut to fit into the snorkel.
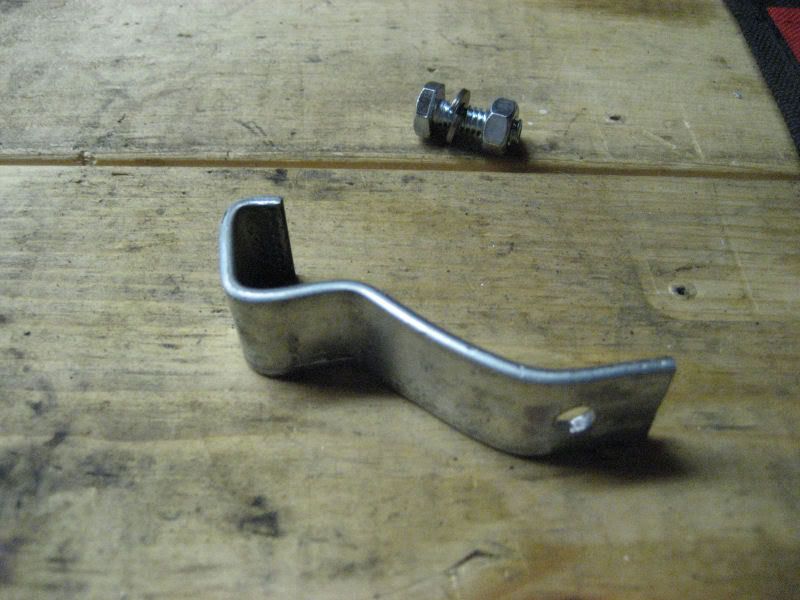
6. If you care enough, you can go ahead and fashion a bracket to secure the section close to the filter to ensure that extreme vibrations won’t jiggle the filter (or pipes) loose at all. My cousin just bent a flat piece of galvanized steel with a vice and bolted that to the wheel well plastic and from there hose clamped the pipe to the bracket. (see pics.)
This is not too bad if you understand everything I said. Just remember that you are altering an original piece of the intake, so prepare for the point of no return. The finished product is a SICK sounding intake that just let’s people know your engine wants air and is getting it. Prepare for a noticeable increase in throttle response, and a nice little gain in horsepower, especially when coupled with a larger TB (ATX TB mod for MTX owners is very beneficial.)
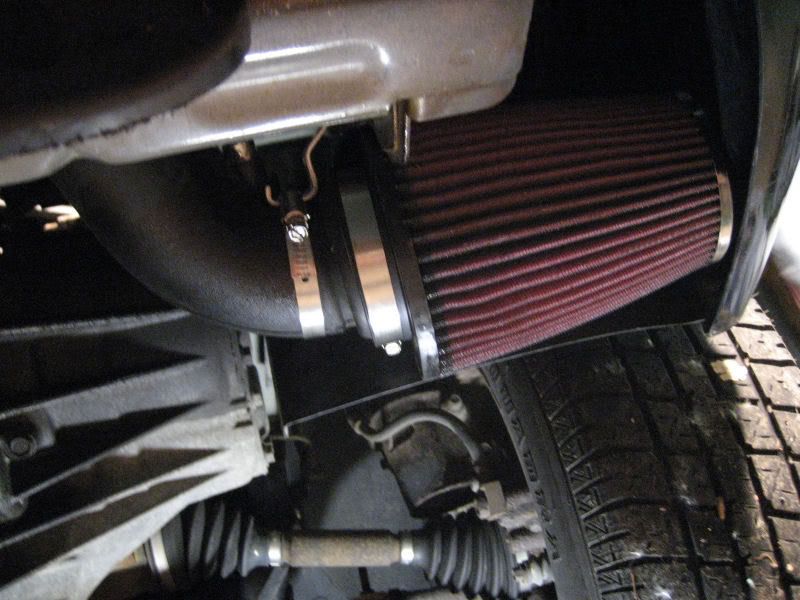
This is what you should end up with.
[IMG]local://upfiles/64110/4BE767A60EED43E6BE6532460C26A5C0.jpg[/IMG]
Any questions? Not thorough enough? Let me know, I will gladly give answers.
Hope this helps!!
-Zach
As previous posts have it, it has been proven that a cold air intake can in fact be made from a intake snorkel off of any mid-90’s Chrysler 3.0L engine (see pic below).
[IMG]local://upfiles/64110/26CE5EC5814E408BB25B8A8A58CD89A3.jpg[/IMG]
There are a few variations to this to fit your specific application, so I will elaborate. Any single radiator fan application will not require any cutting of the intake snorkel (unless of course there are clearance issues with the hood). For dual radiator fans, one cut will need to be made directly in the center of the only two bends in the snorkel (see project pictures below).
Once you have determined your application based on radiator fans, get your parts!
- 3.0L intake snorkel (junk yard, got mine for $3, avg. is like $10)
- Approx 1 ft. 2 ½” inner diameter exhaust piping with a larger tapered end (this ensures nice tight fitting, and the larger end will be explained later).
- Hose clamps (about 5 should be plenty).
- Cone filter (K&N work great! A few P/N’s: RU-3130, RX-4140, RD-0720, RC-3250)
- Small breather filter for PCV valve (Advance has APC ones for like $8 that work fine, and K&N makes them too.)
- Original intake part from box-to-throttle body (optional for a different variation).
Let’s start building!
Steps:
1. Remove all the stock intake elements. If necessary, remove battery cover and hose. Using a small hacksaw, cut away all of the front of the battery tray excluding the frame bracket, the piece that holds the battery in, and sensor. Also, remove the scoop that sits attached to the hood for clearance (this pops off).
2. If required (recommended anyway), cut 3.0L snorkel at the point in between the two bends (See pictures).
3. Fit the 90-degree bend onto the throttle body snuggly, attach exhaust pipe, and use the other bend of the snorkel to determine where the pipe needs to be cut (start from non-tapered end).
4. Once pipe is cut, attach the other bend and fit down in front of battery. From there, get underneath your car! Hold the filter where you would like to place it, and determine the length of pipe needed to get it there from the snorkel. Cut your pipe, fit it, and fit filter.
5. Attach breather filter to either the PCV valve, or to the end of the stock PCV valve hose and place it anywhere. Placement matters little with this.
Oila! Make sure that once everything is fitted the way you want it, secure EVERYTHING with hose clamps, this ensures that nothing falls off. Double, triple, even quadruple check to make sure your filter is on tight, you wouldn’t want to lose it. **Also, you might be required to keep your hood crutch in front of the intake, no longer sitting in it’s little clip. It WILL clear the hood so no worries.** Be sure that everything said and done will clear the hood, you may be required to flatten the pipe (from the TB snorkel) some, a vice will do the trick. Also, you can attach your EGR solenoid that was attached to the intake, and secure it with zip ties to a nearby hose.
finished product should look like this:
----------------
OPTIONAL:
*Full credit given to my cousin Kyle, mechanical engineer and facilitator of the impossible.* [&:]
Ok here is the optional part to place the filter right behind the foglight (remove the light if you would like for more airflow) / in front of the wheel well. There you should find a nice little nook for your filter, assuming it isn’t the long type. I used RC-3250 for my particular application and it fits just right. Anything larger would probably not work.
This is where a major step in commitment is required, as some work will be need to be done and a piece of the original intake will need to be cut and the tapered end of the exhaust pipe be implemented!!! [X(]
1. Do all of the above steps, however, instead of fitting the filter yet, take the intake piece stated above and cut right in front of the raised pieces where the EGR solenoid was attached (see picture). This should leave you with the section from the TB to the raised pieces, and a section from there to what went to the box (attached is a resonator).
ignore the filter for a sec
2. Now that you have the piece, sweat a bit and cut the excess rubber on the end (that was attached to the TB, BUT ONLY TO THE EXENT OF REMOVING THE PART THAT WAS DESIGNED FOR THE HOSE CLAMP. You will see what I am talking about in the picture.
3. Now you will need to cut a very small section from the exhaust tubing to insert into filter end of the pipe for rigidity (see picture). Attach your filter and it should be snug. Be sure when tightening the hose clamp that the filter doesn’t work its way off the pipe. This should not be a problem after you install the ring inside the pipe.
4. While you are at it, you will have to find a way to plug the PCV nipple on the pipe. My cousin used a bolt and lots of silicone (see pic). Be sure to wipe the excess and let it cure for a few hours before driving!
5. Ok, now fit the remaining bit of exhaust piping over the piece you just worked with, the piece with the filter. The tapered end should fit perfectly into the intake piece you have. If you are still not sure what I am saying about it being tapered, see the pic above with the pipe, you should notice one end is bigger. From there, place filter in the nook and look to determine with the pipe above needs to be cut to fit into the snorkel.
6. If you care enough, you can go ahead and fashion a bracket to secure the section close to the filter to ensure that extreme vibrations won’t jiggle the filter (or pipes) loose at all. My cousin just bent a flat piece of galvanized steel with a vice and bolted that to the wheel well plastic and from there hose clamped the pipe to the bracket. (see pics.)
This is not too bad if you understand everything I said. Just remember that you are altering an original piece of the intake, so prepare for the point of no return. The finished product is a SICK sounding intake that just let’s people know your engine wants air and is getting it. Prepare for a noticeable increase in throttle response, and a nice little gain in horsepower, especially when coupled with a larger TB (ATX TB mod for MTX owners is very beneficial.)
This is what you should end up with.
[IMG]local://upfiles/64110/4BE767A60EED43E6BE6532460C26A5C0.jpg[/IMG]
Any questions? Not thorough enough? Let me know, I will gladly give answers.
Hope this helps!!
-Zach
#2
06-04-2007 | 06:38 PM
Captain
Joined: Oct 2006
Posts: 557
Likes: 0
From: Harrisburg, Pa

#7
06-05-2007 | 12:40 AM

Professional
Joined: Aug 2006
Posts: 165
Likes: 0
From:
Trending Topics
#8
06-05-2007 | 02:10 AM
Thread Starter
|
Professional
Joined: May 2007
Posts: 108
Likes: 0
From:
ORIGINAL: jakedlee16
any pics of it in the engine bay?
any pics of it in the engine bay?
on another note, id like to apologize about the pictures, i have to find a reliable host for them. imageshack doesnt seem to be working either, i tried with them. tommorow, im going to host them on my geocities, hopefully that works.
-Zach

