


Am I Forgetting Anything?

USE BLUE THREADLOCKER FOR THE PLENUM BOLTS ON THE INTAKE.
I am not shouting, I am just making a bold statement.
I got mixed up with that. And by "intake" people mean the 15 bolts boilding the plenum plate to the bottom of the intake.
Don't use threadlocker for the intake bolts BUT DO THIS:
take 4 of the old intake bolts and hacksaw the tops off them. I used a cutting wheel, but use a pair of vise grips to hold them. i used my hands and one went flying off into the sunset when i lost my grip. i didn't even hear it land. Good thing I was facing the woods.
reason being is because it will ensure that you get the intake on there PERFECTLY and you do not shift the gaskets.
I put the intake gaskets on the head side then put the intake down.
ALSO, you must make sure that the front and back gaskets (the black strips that are rubber coated steel) lay flat. So BEFORE you lay down untra black to that spot, ensure they lay flat. There are 2 little tabs that go into two little holes. One of my holes was full of black RTV from when the engine was manufactured. So I had to get in there with a tiny drill bit and work it out. Sucked because i already slathered a healthy load of RTV.
That is where you don't want to be shy with the RTV. On the front and back gaskets.
--Dan
lol that is true. dont worry i am gonna take my time with this (when i get to it) and i will take pics...a lot of pics
i just was reading in the haynes book and i have to move the motor to TDC on piston 1 to remove the timing chain. i read how to get to TDC then it says to put piston 1 at BDC which is 30* before TDC...wow FML. i didn't expect to do all this. from what other people said you just remove the timing cover, remove old t. chain, and install new one. any feedback about TDC and if it is completely necessary to do for timing chain?
i just was reading in the haynes book and i have to move the motor to TDC on piston 1 to remove the timing chain. i read how to get to TDC then it says to put piston 1 at BDC which is 30* before TDC...wow FML. i didn't expect to do all this. from what other people said you just remove the timing cover, remove old t. chain, and install new one. any feedback about TDC and if it is completely necessary to do for timing chain?
well i spent about $80 on rock auto ($10 was s&h). i got
timing chain
TB gasket
By Pass Hose
Fuel Injector o rings x2
coolant temp sensor
t stat gasket
180* t stat
later on i will stop by AZ and get water pump. i didnt order the timing cover gasket set bc i still need some input on which set i should go with. i posted it on the last page. i still plan on doing the front seal just need to make sure i get it with the timing gasket but not the sleeve. also later on today i will order the plenum get up from hughes. didnt do that today bc i didnt get time to look into my TB with a light and drop a magnetic stick down there. thanks for everyone's input so far. i have learned quite a bit from all yall since ive been a member of DF. and im still gonna need yalls help until i finish these orders and get these projects fixed.
Grand Champion
Joined: Apr 2008
Posts: 7,055
Likes: 7
From: Lee County, North Carolina
I'll admit that I didn't read all of this but there's a few things to point out.
If the water pump doesn't come with a new heater pipe the it's probably a good idea to get one.
Get a felpro plenum gasket that is metal with rubber on each side. The felpro plenum gasket that looks like carbon with rubber lines on it and the metal compression gaskets are crap.
Get a felpro timing cover gasket, it's metal with rubber on each side.
The point behind TTY bolts is that they stretch and the tension is what keeps them tight, so no threadlocker and you can only use them once.
Use threadlocker on the plenum bolts because they are grade 8 bolts and don't stretch.
If the upper radiator hose isn't cracked then it shouldn't need replacing.
If the spring in the lower is deformed or corroded then you might want to replace it.
Don't move the crank or cam after removing the timing gears or you'll throw the timing off.
I've heard that mean green and purple power are both good for making the intake sparkle after you pull it and get the plenum pan off. I used a product called Misty (contains tolulene) and it worked ok, but that oil was really baked on. A brass wire brush will speed up the gunk removal on the inside of the intake.
5/50 cord is good for tying hoses and junk out of the way, being in the military I know you know what that is.
I took the plug wires off one side of the distributor cap and laid the cap off to the side to get it out of the way.
Oh yeah, I don't know if it's been mentioned, but after removing the shroud and fan, it makes it easy (and saves your back) if you crawl into the engine, step down on the sway bar, then down to the ground. Just make sure you don't have any tools in your back pocket that can ding up the radiator and go slow into the engine. I laid all the tools I needed on the cowl before I got into the engine.
Hall Of Fame
Joined: Jul 2006
Posts: 12,204
Likes: 10
From: Gainesville, Ga.
i just was reading in the haynes book and i have to move the motor to TDC on piston 1 to remove the timing chain. i read how to get to TDC then it says to put piston 1 at BDC which is 30* before TDC...wow FML. i didn't expect to do all this. from what other people said you just remove the timing cover, remove old t. chain, and install new one. any feedback about TDC and if it is completely necessary to do for timing chain?
remove spark plugs to make it easy to rotate.
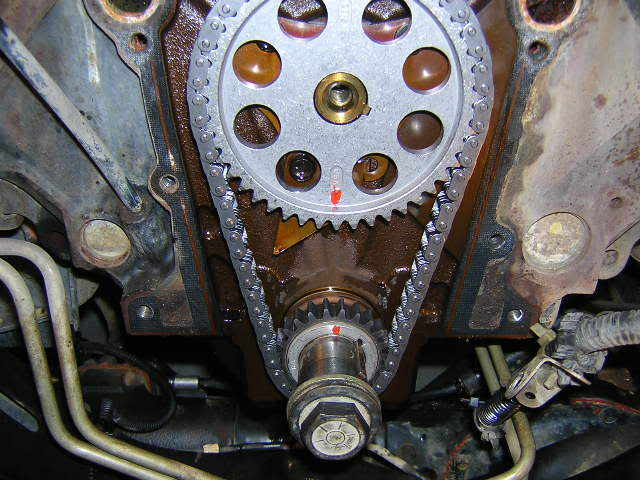
locate the timing marks on the OLD and NEW sprockets.
mark them with a dab of orange rtv.
rotate engine so they are aligned.
remove old.
do not rotate anything.
install new. (it will only fit one way due to keyways)
verify timing marks.
Last edited by dhvaughan; Jun 8, 2010 at 07:17 AM.
well the way DV puts it,the timing removal doesn't sound too much of a FML story. thanks sheriff i am looking at fel pro right now on rock auto. so i found out that the sleeve (the thin looking circular piece) goes with the harmonic balancer. haven't heard many people say they have replaced this..i am looking for a water pump heater tube now. stand by
i believe i found it. what does it mean when it says its carded?
http://www.rockauto.com/catalog/moreinfo.php?pk=589615
i believe i found it. what does it mean when it says its carded?
http://www.rockauto.com/catalog/moreinfo.php?pk=589615
it says to "jam" a screwdriver into the flywheel teeth on that DIY on pavement sucks when removing the timing cover. was this needed? or did the bolt come off just fine on the sprocket? i don't even see where to jam the screwdriver. ok yall i'm off for a morning run and then to AZ.