

where to mount
#11
 03-04-2012, 10:20 PM


Professional
Join Date: Nov 2011
Location: Canada
Posts: 189
Likes: 0
Received 0 Likes
on
0 Posts
The relay(s) will have two sides ... one high current side and one low current side.
The high current side should be close to either the power source (battery, or alternator-powered junction) or the lights themselves. This requires heavier gauge wires sufficient to carry the load used by the lights.
The further you move the relays from the power source, the larger the power supply wires from your battery to the relays needs to be.
The low current side is no problem as far as wiring size or length goes; just about any reasonable size wire will do ... this is the part that goes from your relay to a switch to operate your lamps. This means it's not an issue where you place the relays as far as wiring to your switches are concerned.
If the relays are grouped together, you only need one heavy gauge wire from your power source to the group of relays, plus a suitable ground or same sized (-) wire. This wire should be large enough to power all the lights simultaneously.
Smaller wires that might have come with your lights, as long as they are short (less than a foot) won't reduce the current capacity of the large gauge wire so you can connect all the relays to it at the same point.
Place a fuse as close to the battery or power source as possible protecting the power (+) wire. This fuse is just there to protect against an accidental short circuit, so it can be fairly large value. Even if you think a short is unlikely, it should be there to protect against sparks that can cause a fire if you're in an accident.
If you mount the relays in an area that might be used to temporarily store tools when working on the vehicle, be sure all connections can't be shorted by touching a tool to them and the vehicle body.
If your lights didn't come with sockets that the relays plug in to, use heat-shrink tubing to protect connections from shorts (or get some socket connectors).
Another option to relay sockets, if you can find it, is to get the heat shrink tubing that is dual-wall and has a waterproof sealant inside. If you can't find it, you can put a dab of sealant in the connection, then shrink the regular (single wall) tubing over the connection. The "Goop" product is safe for electrical connections. If you don't care how it looks, you could use "Goop" alone, but it will look crappy.
A heat gun works best with heatshrink; you can also try borrowing your wife/girlfriend/daughter's hair dryer. A match or lighter works but takes practice to do properly. Heat without flame is better.
Another way to seal the connections from shorts is to use a liquid electrical tape. You just paint it on with the applicator that comes in the jar. However, once you open the container, they have a tendency to harden, so the liquid may only be usable for a year or so; after that you might end up throwing it out.
It works very well, though, and might be no more expensive or less expensive than some heatshrink kits at automotive stores, even if you do end up tossing the unused portion. About $5.
Alternately you could get fancy and use an aluminum project box to mount the relays inside, which you could paint or polish, but might not be a good idea unless you're familiar with electronics.
If you can post back with the wattage rating of the lamps you're using, I can tell you what size wire to use for the power run and what size fuse to use to your relay group.
Last edited by Johnny2Bad; 03-04-2012 at 10:25 PM.
#12
03-04-2012, 11:08 PM

Join Date: Apr 2011
Location: Washington
Posts: 109
Likes: 0
Received 0 Likes
on
0 Posts
The relay(s) will have two sides ... one high current side and one low current side.
The high current side should be close to either the power source (battery, or alternator-powered junction) or the lights themselves. This requires heavier gauge wires sufficient to carry the load used by the lights.
The further you move the relays from the power source, the larger the power supply wires from your battery to the relays needs to be.
The low current side is no problem as far as wiring size or length goes; just about any reasonable size wire will do ... this is the part that goes from your relay to a switch to operate your lamps. This means it's not an issue where you place the relays as far as wiring to your switches are concerned.
If the relays are grouped together, you only need one heavy gauge wire from your power source to the group of relays, plus a suitable ground or same sized (-) wire. This wire should be large enough to power all the lights simultaneously.
Smaller wires that might have come with your lights, as long as they are short (less than a foot) won't reduce the current capacity of the large gauge wire so you can connect all the relays to it at the same point.
Place a fuse as close to the battery or power source as possible protecting the power (+) wire. This fuse is just there to protect against an accidental short circuit, so it can be fairly large value. Even if you think a short is unlikely, it should be there to protect against sparks that can cause a fire if you're in an accident.
If you mount the relays in an area that might be used to temporarily store tools when working on the vehicle, be sure all connections can't be shorted by touching a tool to them and the vehicle body.
If your lights didn't come with sockets that the relays plug in to, use heat-shrink tubing to protect connections from shorts (or get some socket connectors).
Another option to relay sockets, if you can find it, is to get the heat shrink tubing that is dual-wall and has a waterproof sealant inside. If you can't find it, you can put a dab of sealant in the connection, then shrink the regular (single wall) tubing over the connection. The "Goop" product is safe for electrical connections. If you don't care how it looks, you could use "Goop" alone, but it will look crappy.
A heat gun works best with heatshrink; you can also try borrowing your wife/girlfriend/daughter's hair dryer. A match or lighter works but takes practice to do properly. Heat without flame is better.
Another way to seal the connections from shorts is to use a liquid electrical tape. You just paint it on with the applicator that comes in the jar. However, once you open the container, they have a tendency to harden, so the liquid may only be usable for a year or so; after that you might end up throwing it out.
It works very well, though, and might be no more expensive or less expensive than some heatshrink kits at automotive stores, even if you do end up tossing the unused portion. About $5.
Alternately you could get fancy and use an aluminum project box to mount the relays inside, which you could paint or polish, but might not be a good idea unless you're familiar with electronics.
If you can post back with the wattage rating of the lamps you're using, I can tell you what size wire to use for the power run and what size fuse to use to your relay group.
The high current side should be close to either the power source (battery, or alternator-powered junction) or the lights themselves. This requires heavier gauge wires sufficient to carry the load used by the lights.
The further you move the relays from the power source, the larger the power supply wires from your battery to the relays needs to be.
The low current side is no problem as far as wiring size or length goes; just about any reasonable size wire will do ... this is the part that goes from your relay to a switch to operate your lamps. This means it's not an issue where you place the relays as far as wiring to your switches are concerned.
If the relays are grouped together, you only need one heavy gauge wire from your power source to the group of relays, plus a suitable ground or same sized (-) wire. This wire should be large enough to power all the lights simultaneously.
Smaller wires that might have come with your lights, as long as they are short (less than a foot) won't reduce the current capacity of the large gauge wire so you can connect all the relays to it at the same point.
Place a fuse as close to the battery or power source as possible protecting the power (+) wire. This fuse is just there to protect against an accidental short circuit, so it can be fairly large value. Even if you think a short is unlikely, it should be there to protect against sparks that can cause a fire if you're in an accident.
If you mount the relays in an area that might be used to temporarily store tools when working on the vehicle, be sure all connections can't be shorted by touching a tool to them and the vehicle body.
If your lights didn't come with sockets that the relays plug in to, use heat-shrink tubing to protect connections from shorts (or get some socket connectors).
Another option to relay sockets, if you can find it, is to get the heat shrink tubing that is dual-wall and has a waterproof sealant inside. If you can't find it, you can put a dab of sealant in the connection, then shrink the regular (single wall) tubing over the connection. The "Goop" product is safe for electrical connections. If you don't care how it looks, you could use "Goop" alone, but it will look crappy.
A heat gun works best with heatshrink; you can also try borrowing your wife/girlfriend/daughter's hair dryer. A match or lighter works but takes practice to do properly. Heat without flame is better.
Another way to seal the connections from shorts is to use a liquid electrical tape. You just paint it on with the applicator that comes in the jar. However, once you open the container, they have a tendency to harden, so the liquid may only be usable for a year or so; after that you might end up throwing it out.
It works very well, though, and might be no more expensive or less expensive than some heatshrink kits at automotive stores, even if you do end up tossing the unused portion. About $5.
Alternately you could get fancy and use an aluminum project box to mount the relays inside, which you could paint or polish, but might not be a good idea unless you're familiar with electronics.
If you can post back with the wattage rating of the lamps you're using, I can tell you what size wire to use for the power run and what size fuse to use to your relay group.
#13
03-05-2012, 06:52 AM
Professional
Join Date: Nov 2011
Location: Canada
Posts: 189
Likes: 0
Received 0 Likes
on
0 Posts
You don't say which lights you have (assuming they're from kchilites) ... I saw some there that are 130 watts per lamp. There's probably others that might be maybe 50 watts/lamp.
Find out what the wattage ratings are for the lamps you have installed. Add the watts for each lamp together. Reply with that figure.
For example if you have 4 lamps on your front light bar and they are 50 watts each then that would be 50 + 50 + 50 + 50 = 200 watts. If you had four more 50 watt lamps on the headache rack that would be 4x 50 watts, total 200 watts. All 8 lamps = 400 watts. And so on.
I looked at one wiring diagram for one set of lamps ... it looked OK. Only thing I would personally change is to run the terminal 85 (-) power wire directly to the battery, not to ground. However, as long as you make sure there is a good ground to bare metal, it's OK if you do it as the wiring diagram suggests. The only reason I would do it differently is that bad grounds can cause problems, plus you are asking for a lot of current to run these lamps.
On the relays, terminal 30 is the (+) high power line and terminal 85 is the (-) high power line. These are the ones carrying all the power to the lamps and must be properly sized.
Terminal 86 is the low current switch terminal. The wire gauge here is not critical, provided it's at least 18 ga you are probably fine. That wire goes from the relay to the interior of your vehicle and the switch to turn the lamp off or on. The other two wires at the switch are similar.
You should think about under what conditions you will be running the lamps. It would be best if you only intend to run them with the engine running or key in the ignition turned to accessory. That way you can choose a switched power source for your dash switch wiring that will only work with the ignition in the on or acc position. Usually there is a fuse at the interior fuse box marked "acc" or "accessory". You should get the power for your switch(es) from that fuse. Just like with the relays, find a good bare metal point to attach the ground wire for the interior switch(es).
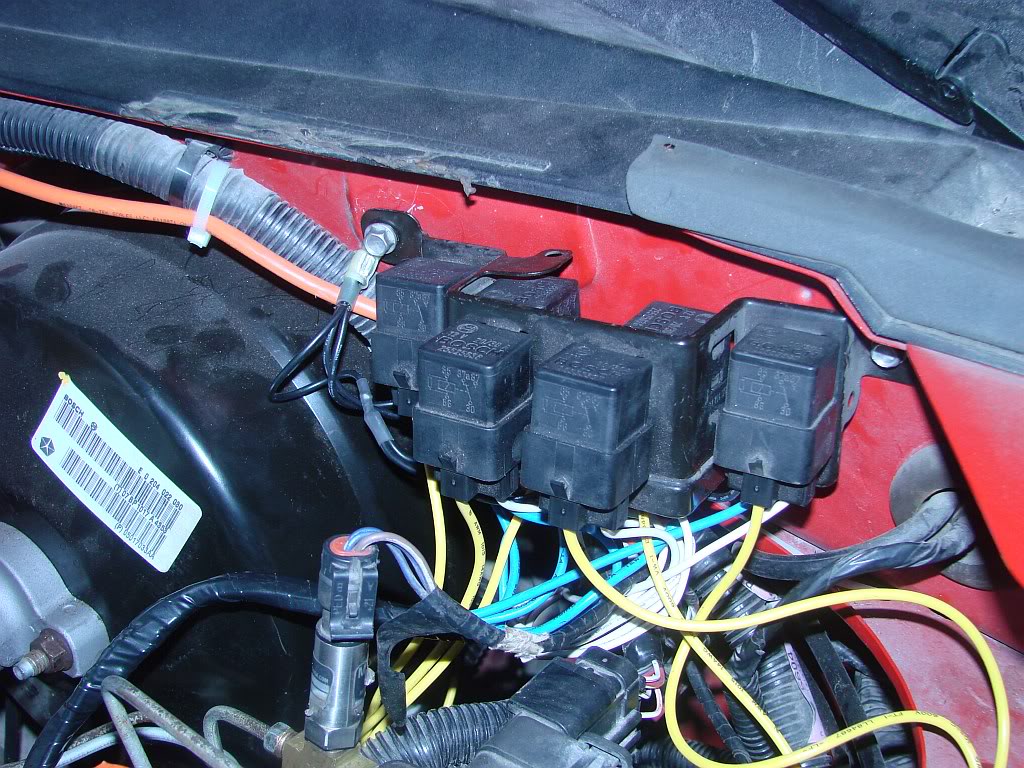
If you were to put all the relays for all your lights in one central location ... someone suggested the passenger side underhood wheel fender ... then you should run two large gauge wires from the battery to this area (or one large gauge wire if you plan to use a good ground near the relays).
In order to know what size those wires should be, we need to know the total wattage of all your lamps.
You could then connect the terminal 30 wires for all the relays to the (+) wire from the battery and all the terminal 85 wires for all the relays to the (-) wire from the battery (or to a good ground).
Place a fuse as close to the battery as possible in the (+) wire you uses to connect all the terminal 30 relay wires.
Again, we need to know the total wattage of all your lamps to size this fuse.
When you are working on the wiring disconnect the vehicle's battery ground cable from the battery post. As a precaution I like to place the battery ground cable's battery post connector in a plastic bag while I'm working on the electrical system and secure it with tape or an elastic band, etc because often it takes a set and wants to stay near or pop back toward the battery negative post.
Some of your lamps go quite a way from the under-hood relay location, especially the ones to the back bumper. Depending on the wattage of those lamps, you might need to up the wire size from the relay to those lamps. If you know the gauge of the wires included in the kit (connected to the 87 terminals of the relay) tell us what that is.
Find out what the wattage ratings are for the lamps you have installed. Add the watts for each lamp together. Reply with that figure.
For example if you have 4 lamps on your front light bar and they are 50 watts each then that would be 50 + 50 + 50 + 50 = 200 watts. If you had four more 50 watt lamps on the headache rack that would be 4x 50 watts, total 200 watts. All 8 lamps = 400 watts. And so on.
I looked at one wiring diagram for one set of lamps ... it looked OK. Only thing I would personally change is to run the terminal 85 (-) power wire directly to the battery, not to ground. However, as long as you make sure there is a good ground to bare metal, it's OK if you do it as the wiring diagram suggests. The only reason I would do it differently is that bad grounds can cause problems, plus you are asking for a lot of current to run these lamps.
On the relays, terminal 30 is the (+) high power line and terminal 85 is the (-) high power line. These are the ones carrying all the power to the lamps and must be properly sized.
Terminal 86 is the low current switch terminal. The wire gauge here is not critical, provided it's at least 18 ga you are probably fine. That wire goes from the relay to the interior of your vehicle and the switch to turn the lamp off or on. The other two wires at the switch are similar.
You should think about under what conditions you will be running the lamps. It would be best if you only intend to run them with the engine running or key in the ignition turned to accessory. That way you can choose a switched power source for your dash switch wiring that will only work with the ignition in the on or acc position. Usually there is a fuse at the interior fuse box marked "acc" or "accessory". You should get the power for your switch(es) from that fuse. Just like with the relays, find a good bare metal point to attach the ground wire for the interior switch(es).
If you were to put all the relays for all your lights in one central location ... someone suggested the passenger side underhood wheel fender ... then you should run two large gauge wires from the battery to this area (or one large gauge wire if you plan to use a good ground near the relays).
In order to know what size those wires should be, we need to know the total wattage of all your lamps.
You could then connect the terminal 30 wires for all the relays to the (+) wire from the battery and all the terminal 85 wires for all the relays to the (-) wire from the battery (or to a good ground).
Place a fuse as close to the battery as possible in the (+) wire you uses to connect all the terminal 30 relay wires.
Again, we need to know the total wattage of all your lamps to size this fuse.
When you are working on the wiring disconnect the vehicle's battery ground cable from the battery post. As a precaution I like to place the battery ground cable's battery post connector in a plastic bag while I'm working on the electrical system and secure it with tape or an elastic band, etc because often it takes a set and wants to stay near or pop back toward the battery negative post.
Some of your lamps go quite a way from the under-hood relay location, especially the ones to the back bumper. Depending on the wattage of those lamps, you might need to up the wire size from the relay to those lamps. If you know the gauge of the wires included in the kit (connected to the 87 terminals of the relay) tell us what that is.
Last edited by Johnny2Bad; 03-05-2012 at 07:41 AM.
#14
03-05-2012, 04:33 PM
Join Date: Apr 2011
Location: Washington
Posts: 109
Likes: 0
Received 0 Likes
on
0 Posts
You don't say which lights you have (assuming they're from kchilites) ... I saw some there that are 130 watts per lamp. There's probably others that might be maybe 50 watts/lamp.
Find out what the wattage ratings are for the lamps you have installed. Add the watts for each lamp together. Reply with that figure.
For example if you have 4 lamps on your front light bar and they are 50 watts each then that would be 50 + 50 + 50 + 50 = 200 watts. If you had four more 50 watt lamps on the headache rack that would be 4x 50 watts, total 200 watts. All 8 lamps = 400 watts. And so on.
I looked at one wiring diagram for one set of lamps ... it looked OK. Only thing I would personally change is to run the terminal 85 (-) power wire directly to the battery, not to ground. However, as long as you make sure there is a good ground to bare metal, it's OK if you do it as the wiring diagram suggests. The only reason I would do it differently is that bad grounds can cause problems, plus you are asking for a lot of current to run these lamps.
On the relays, terminal 30 is the (+) high power line and terminal 85 is the (-) high power line. These are the ones carrying all the power to the lamps and must be properly sized.
Terminal 86 is the low current switch terminal. The wire gauge here is not critical, provided it's at least 18 ga you are probably fine. That wire goes from the relay to the interior of your vehicle and the switch to turn the lamp off or on. The other two wires at the switch are similar.
You should think about under what conditions you will be running the lamps. It would be best if you only intend to run them with the engine running or key in the ignition turned to accessory. That way you can choose a switched power source for your dash switch wiring that will only work with the ignition in the on or acc position. Usually there is a fuse at the interior fuse box marked "acc" or "accessory". You should get the power for your switch(es) from that fuse. Just like with the relays, find a good bare metal point to attach the ground wire for the interior switch(es).
If you were to put all the relays for all your lights in one central location ... someone suggested the passenger side underhood wheel fender ... then you should run two large gauge wires from the battery to this area (or one large gauge wire if you plan to use a good ground near the relays).
In order to know what size those wires should be, we need to know the total wattage of all your lamps.
You could then connect the terminal 30 wires for all the relays to the (+) wire from the battery and all the terminal 85 wires for all the relays to the (-) wire from the battery (or to a good ground).
Place a fuse as close to the battery as possible in the (+) wire you uses to connect all the terminal 30 relay wires.
Again, we need to know the total wattage of all your lamps to size this fuse.
When you are working on the wiring disconnect the vehicle's battery ground cable from the battery post. As a precaution I like to place the battery ground cable's battery post connector in a plastic bag while I'm working on the electrical system and secure it with tape or an elastic band, etc because often it takes a set and wants to stay near or pop back toward the battery negative post.
Some of your lamps go quite a way from the under-hood relay location, especially the ones to the back bumper. Depending on the wattage of those lamps, you might need to up the wire size from the relay to those lamps. If you know the gauge of the wires included in the kit (connected to the 87 terminals of the relay) tell us what that is.
(which at the moment only the 2 middle ones are hooked up)
now on my headache rack i will have 5 kc lights that are 130 watts X 5=650
(none are hooked up at the moment)
then on my back bumper im not sure the watts for these lights or how to check. but they are your standard tractor lighting you can find at any truck stop
then two on my headache rack facing backwards a friend gave them to me ages ago they are bright as can be but i know nothing about them...
(my dad wired the 4 lights in that face backwards but come to find out he claims i dont need a relay the switch gets very hot and i have been told he used the wrong size wiring so that gets to be another project i tackle while doing this.) so for now those lights very rarely ever get used and if they do its for a couple minutes at the most.
speaking of toggle switches getting hot. my ram came with stock fog lights im assuming. the switch is located next to the overdrive switch near the crappy drink holder, within a half hour of using those that switch gets hot as well any ideas?
#16
03-05-2012, 05:28 PM
Join Date: Apr 2011
Location: Washington
Posts: 109
Likes: 0
Received 0 Likes
on
0 Posts

#17
03-05-2012, 09:55 PM
 should be able to find one without too much trouble. It's actually a REALLY good idea..... time for a trip to the yard for me as well.
#19
03-05-2012, 10:08 PM
Join Date: Apr 2011
Location: Washington
Posts: 109
Likes: 0
Received 0 Likes
on
0 Posts
hmmm sounds like a trip for tomorrow if its not raining. this may be a stupid question, and im sorry if it is. But how would i go about hooking this up. i understand the mounting part. but do i need to run a power wire to each relay then to the battery or?
#20
03-06-2012, 02:55 AM
Join Date: Apr 2011
Location: Washington
Posts: 109
Likes: 0
Received 0 Likes
on
0 Posts
i did not want to create a new thrread just for these two questions. i hope thats alright?
any way my question is my factory fog light switch gets really warm when my fog lights are on. Any ideas on why this may be?
my second question is since I cant afford L.E.D lighting for my offroad lights would this make a difference if i swapped the bulbs out for these
http://www.4wheelparts.com/Lighting-...840&t_pl=10172
on this page they have 35 and 55 watt bulbs, my kc lights as of right now are 130 watts. would changing the bulbs if its alright to do help?