


Changing transfer case: Question

Champion
Joined: Sep 2011
Posts: 3,891
Likes: 8
From: NorCal
Not a dumb question.
The driveshaft has a slip yoke on the transfer case side. This is why you can't take it out.
Instead, take bolts out at the pinion side. Sometimes need a deadblow hammer to smack it off so have something or someone under to catch it. Now you can slide the yoke out of the tcase and remove it completely.
Thread Starter
|
Rookie
Joined: Apr 2010
Posts: 64
Likes: 2
From: Waterloo, IA
I ran into another problem a couple of the nuts that hold transfer case to transmission are rounded, I can't get a 14 mm wrench or socket on them. This was not me, someone before me must of rounded them. What would be the best way to get them off?
Thanks
Thanks

Thread Starter
|
Rookie
Joined: Apr 2010
Posts: 64
Likes: 2
From: Waterloo, IA
I am going to try this tomorrow. A Irwin/5 pcs. Bolt-Grip base extractor set, local parts store have them in stock, seen lots of good reviews on amazon and youtube.
One way or another I am getting this transfer case out. Putting another one in maybe another story. But will try anything once.
One way or another I am getting this transfer case out. Putting another one in maybe another story. But will try anything once.
Hall Of Fame
Joined: Jul 2006
Posts: 12,204
Likes: 10
From: Gainesville, Ga.
try not to damage the studs in the tcase if you intend to reinstall.
an old thread here, with a link to sheriff's.
https://dodgeforum.com/forum/2nd-gen...31-np231d.html
an old thread here, with a link to sheriff's.
https://dodgeforum.com/forum/2nd-gen...31-np231d.html
Thread Starter
|
Rookie
Joined: Apr 2010
Posts: 64
Likes: 2
From: Waterloo, IA
Thanks dhvaughan,
Its funny that you mention your's and sheriff's diy. That is what I have been using this whole time. A great write up by both of you. I would never of attempted this if not for those two post. Cant say it enough, much appreciated to the both of you.
I was planning on just taking this one out and putting in one from a junk yard, but I have been reading a lot on rebuilding it. Right now funds are pretty tight and spending $300 for one at the junk yard is going to hurt bad enough. It would be nice if it was just a bad shifting fork. Don't know yet what I will end up doing, but for now much reading and learning.
Trending Topics
Champion
Joined: Sep 2011
Posts: 3,891
Likes: 8
From: NorCal
Something that could help you out more is getting more access to those bolts and the top of the tcase. I thought I recall people getting wrenches that have a curve in them. Obviously that isn't help anymore b/c the nuts are stripped, which is most likely how it happened.
You could lift the body of the cab up a good few inches. This will give you more room for hands and even get your head closer if need be. I'm only suggesting this b/c I think you may be in for a battle on those stripped nuts. Hopefully they are not really that tight since installed improperly and also could be contributors to your tcase problem, if proved out.
There are 4-6 total body mounts. They just have long bolts up through them. You'll already have tcase linkage detached, then the only thing will be tranny related. If you have an automatic, you can detach the linkage near the frame rail on driver side. Just inside the wheel well at the front of the door area. A vertical shaft enters a clamp that has a set screw and spring. Warning, it can be a biznitch to get back together.
Other item to look for is 1 or 2 at most ground wires in the engine bay. One for sure up on the firewall to unscrew. Put blue tape or something on it to remind yourself.
Anyways, you just carefully have some 2x4s for each body mount location. You loosen all bolts out. Lift one entire side at a time with a floor jack being very careful. Pull bolt when ready to slide in a spacer.
Just a thought.
You could lift the body of the cab up a good few inches. This will give you more room for hands and even get your head closer if need be.
I'm only suggesting this b/c I think you may be in for a battle on those stripped nuts. Hopefully they are not really that tight since installed improperly and also could be contributors to your tcase problem, if proved out.There are 4-6 total body mounts. They just have long bolts up through them. You'll already have tcase linkage detached, then the only thing will be tranny related. If you have an automatic, you can detach the linkage near the frame rail on driver side. Just inside the wheel well at the front of the door area. A vertical shaft enters a clamp that has a set screw and spring. Warning, it can be a biznitch to get back together.
Other item to look for is 1 or 2 at most ground wires in the engine bay. One for sure up on the firewall to unscrew. Put blue tape or something on it to remind yourself.
Anyways, you just carefully have some 2x4s for each body mount location. You loosen all bolts out. Lift one entire side at a time with a floor jack being very careful. Pull bolt when ready to slide in a spacer.
Just a thought.
Champion


Joined: Oct 2009
Posts: 4,717
Likes: 10
From: N/A
First go find a few cheap 14mm offshore made junk wrenches, they are not as well built as some and might just fit your rounded off nutz. Next which ones are giving you a hard time? If it's the top nutz, support the back of the xcase just a bit that will take some load of the nutz. If its the bottom ones, support the trany, remove that stupid plate and the rubber tranny mount so you have more room to work. Its all self aligning so don't worry about that noise.
Edit; You just jack up the trany until you can roll the trany mount out, then remove that plate, then lower the trany back down if you need to. It can go up and down about 2" without any issues, no more than that though.
Bottle jack, 2x12 piece of wood and a rag supporting the auto trany.
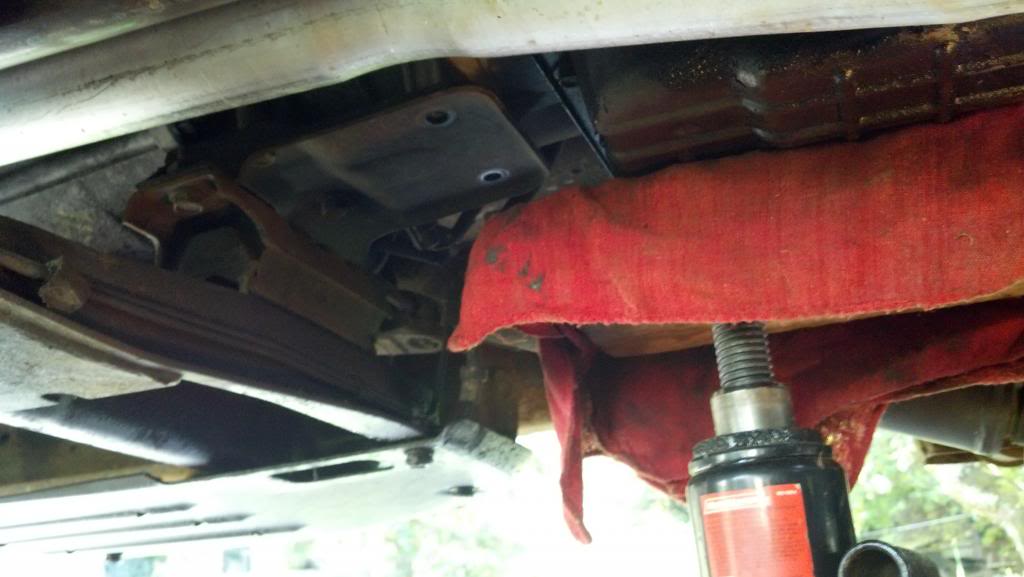
Not the best pix but it shows how much extra room you have to work without the trany plate and support in the way.

Last edited by merc225hp; Nov 8, 2013 at 02:30 PM.
Thread Starter
|
Rookie
Joined: Apr 2010
Posts: 64
Likes: 2
From: Waterloo, IA
The nut that is giving me the most problem is the top most nut on driver side. I got a better angle to look at it and it is not so much rounded, only the outer part of nut. I can't get a wrench on the nut all the way. I am going to try and spray it down good with pb blaster and might try to get a file to smooth the end of the nut. Most of the nut looks good, just can't get on it.