


Check valve delete just isn't supposed to be... (for me at least)


Thread Starter
|
Champion
Joined: Apr 2007
Posts: 2,570
Likes: 0
Well lets just say I have had the worst luck thus far with the check valve delete.
Attempt #1 - I happened to get a hold of a stock section of trans hose (includes stock quick disconnect and hose) and planned to use that, along with the 3/8 flare and barb fittings. Assembled it, everything looks good. Start the truck and run in neutral. Sweet... no leaks. I drive 3hrs back up to school, pop the hood... and there is a tiny bit of weeping. Take it for a spin later in the week... it gets exponentially worse. I suspected the stock section of hose I got from bluebeast2 had to be split internally because after multiple thorough cleanings before assembly, I could still wipe trans fluid from the end of the hose for hours later. Let the hose sit... bend it around a bit, and the threads would turn red again on the end of the hose. Also when I joined the two fittings together I used teflon tape which I was later instructed by dodgeboy7 that this was incorrect. (purpl uses teflon tape, aim does not). None the less I decided to scrap the whole thing and do it like the diy.
Attempt #2 - Picked up all new fittings, lines, etc as laid out in the diy by aim. Assemble everything and installed a couple hours ago. Started it up and checked for leaks... good to go. Drive home 5 minutes and pull in the driveway... pop the hood with truck running in neutral... I watch it drip from the 3/8 flare to 3/8 barb fitting it looks like. FML!
Attempt #3 - .... Im gonna try to re-tighten the fittings tomorrow and see what happens If that fails I guess ill pick up two more fittings and another section of hose. If that fails... back to the stock setup.
Attempt #1 - I happened to get a hold of a stock section of trans hose (includes stock quick disconnect and hose) and planned to use that, along with the 3/8 flare and barb fittings. Assembled it, everything looks good. Start the truck and run in neutral. Sweet... no leaks. I drive 3hrs back up to school, pop the hood... and there is a tiny bit of weeping. Take it for a spin later in the week... it gets exponentially worse. I suspected the stock section of hose I got from bluebeast2 had to be split internally because after multiple thorough cleanings before assembly, I could still wipe trans fluid from the end of the hose for hours later. Let the hose sit... bend it around a bit, and the threads would turn red again on the end of the hose. Also when I joined the two fittings together I used teflon tape which I was later instructed by dodgeboy7 that this was incorrect. (purpl uses teflon tape, aim does not). None the less I decided to scrap the whole thing and do it like the diy.
Attempt #2 - Picked up all new fittings, lines, etc as laid out in the diy by aim. Assemble everything and installed a couple hours ago. Started it up and checked for leaks... good to go. Drive home 5 minutes and pull in the driveway... pop the hood with truck running in neutral... I watch it drip from the 3/8 flare to 3/8 barb fitting it looks like. FML!
Attempt #3 - .... Im gonna try to re-tighten the fittings tomorrow and see what happens
If that fails I guess ill pick up two more fittings and another section of hose. If that fails... back to the stock setup.
Record Breaker
Joined: Feb 2009
Posts: 1,140
Likes: 3
From: Fredericksburg, VA
make sure the hose you get is rated for a high psi. kinda weird about the fluid weep. i'll have to see when i do this myself and see if i get the same results...do you have a complete list of all the fittings w/ part numbers? i plan on going to the store to pick some up and just wondering where you got yours. i know aim had some part numbers on his diy but not all. and purpl had some from lowes, but i dont think i have a lowes around here.
Thread Starter
|
Champion
Joined: Apr 2007
Posts: 2,570
Likes: 0
I got the quick connect from napa, and the rest of the fittings at lowes. I asked for trans line at napa and they gave me some flimsy stuff lol, but like I said it seems to be good. It just looks like the two fittings are leaking at the flare fitting side. Maybe I will get new hose and 2 new fittings and give it one more shot. Guess we'll see what happens tomorrow.
Legend
Joined: Jul 2007
Posts: 7,843
Likes: 13
From: DFW, Texas
If you are leaking between two fittings, try some oil resistant RTV in the threads and let it set up. I've even heard of folks using locktite to make a thread seal, but I wouldn't use that that the joint that goes to the trans line plumbing in the truck.
If you're leaking at the hose clamps, tighten them down with a socket, just be careful not to overdo it. And get the HD hose rated for 400 PSI, it's got a wire mesh in it that keeps it from expanding.
If you're leaking at the hose clamps, tighten them down with a socket, just be careful not to overdo it. And get the HD hose rated for 400 PSI, it's got a wire mesh in it that keeps it from expanding.
Hall Of Fame
Joined: Jul 2006
Posts: 12,204
Likes: 10
From: Gainesville, Ga.
just as a simple alternative.... if you use a tubing cutter and cut off all the fittings and flares and throw them away. and then just slip the 3/8 ID transmission hose over the 3/8 hard lines at the frame and cooler, and double clamp it.... it'll work fine and not leak.

I got the quick connect from napa, and the rest of the fittings at lowes. I asked for trans line at napa and they gave me some flimsy stuff lol, but like I said it seems to be good. It just looks like the two fittings are leaking at the flare fitting side. Maybe I will get new hose and 2 new fittings and give it one more shot. Guess we'll see what happens tomorrow.
In order to provide a leak proof seal, the appropriate sealer rated for both the fluid and psi and HEAT is what you need to seek out. Permatex is one place I would start looking. I would not under any condition use any type of RTV types of sealants as they are not intended for threaded fitting applications.
The reason why it kept weeping is that it wasn't sealed properly. And, those cheap fittings from Lowes are just that- cheap. The end flares are sometimes not formed properly thus not seating 100% in diameter. Take the fitting apart and clean it with brake cleaner. Then, under good lighting, note the impression left at the flare. Chances are, it's 50% contact to 70% contact thus leaving a gap on one side. This is where the problem usually lies- in the flare interface. You will note a discoloration in the impression. It usually forms a line around the fitting on a good fitting. When it is taken apart, you will visually see a shiny line all the way around the entire diameter of the fitting and, you will not be required to "crank" on it. It will seal very well without having to apply lots of force. Too much force and you ruin the fitting. It may end up cracking depending what material it's made out of- brass, steel or Al.
I advise you to go to a real connector place. Look for a place that sells aircraft fittings and hoses. Those lines will not corrode, have high psi ratings, handle thermal loads and the ends will not leak.
Then, you can use Permatex high temp thread sealant. The joint should be cleaned exceedingly well. Then, you clean the fittings using brake cleaner. Apply the sealant across and around the threads and leave the first one to two threads dry- no sealant should be applied to the starting threads.
Very Important: Cure Schedule. In order to provide you with years of leak free service, the sealant must dry for a min time of 24 hours. I let mine cure for the full cure schedule (72 hours) before putting the vehicle back into service.
If that is not followed, I can absolutely guarantee it will leak after running it. This happens because of the heat softens the uncured sealant and, the fluid begins to push through. The fluid displaces the sealant out of the threads and it begins to seep through first. Then it begins to weep to finally failing catastrophically. This is when the fluid sprays out from the fitting.
You can order those fittings from G&J aircraft. They are great over there and their fittings are of good quality. Never had one fail yet. They are out here in So Cal. I have used these guys for all my SS lines and fittings. They specialize in SS-braided hose for many types of applications as well as custom brake lines. Give them a call and get some good fittings and lines that won't leak on you and are rated for automotive applications.
G&J Aircraft and Competition
Mon-Fri 8:30 until 5:00 PST
1115 S. Sultana
Ontario, Ca 91761
909.986.6534
FX: 909.984.5516
Contact: George Fishback Jr.
Last edited by cmckenna; Dec 12, 2009 at 11:00 AM. Reason: typo
Thread Starter
|
Champion
Joined: Apr 2007
Posts: 2,570
Likes: 0
I rechecked the fittings and... yep, where the flare fitting and the barb fitting connect is where the drips are comming from. I am about 95% sure it is comming from there. I did attempt to re-tighten these fittings to see if that would help and it did not. Still the same "dripping" problem now. I also picked up new fittings but have not installed them, as well as another section of hose. Btw Aim, I rechecked the hose and it is good for 400 PSI and probably is the same stuff you got from napa, but mine is not wire mesh like you described. Mines says Gates on the outside, its 3/8's, and 400PSI but it has the threads in the hose. To me the hose seems flimsy but I guess it really isnt.
Thanks cmckenna for the info and will try that if my my neighbors solution fails. My neighbor randomly stopped in at my house today and we were talking about his new ram charger he bought and is fixing up etc. Anyway I was telling how much of a pita this check valve delete was for me, and I showed him what I was working with. He's like... theres a place up the road that would probably make that line for you with compression fittings for a fair price. He gave me the name of the place so ill have to check it out when it is open on monday. If I have them make me a custom line (which I am leaning towards depending on price), pic's will follow when I have the oportunity to steal my brothers camera. I am to the point now where I would feel more comfortable doing it that way so I don't have to think all of the time... geeze i wonder if that line is still leaking or when its gonna start leaking again etc. Thats why I tried to keep it simple with the first line attempt with only two lowes fittings. Now im up to 5 fittings... Anyway lets just hope they can help me out, or else im throwing the stock line back in.
Thanks for the support guys. Oh and dhvaughan, thanks for the suggestion, but i'd like to keep everything uncut if possible on the truck. However, if I end up messing up the flare fitting nut somehow, I probably will take you up on that suggestion.
Trending Topics
Champion


Joined: Jul 2005
Posts: 2,966
Likes: 3
From: Greeneville, TN
Let me just mention the piece he got from me was off the tranny cooler I got from the junkyard. It was not the stock piece off of my truck that I offered him. I'm actually trying to get pieces to hook up all my coolers. I need a barb fitting and the double female. Hope to get them tomorrow so I can finish that mess
Thread Starter
|
Champion
Joined: Apr 2007
Posts: 2,570
Likes: 0
Alrighty I guess it is time for an update, and that is success.... finally. I got the custom hose made today, used some high temp thread sealer just incase... and shes finally good to go.
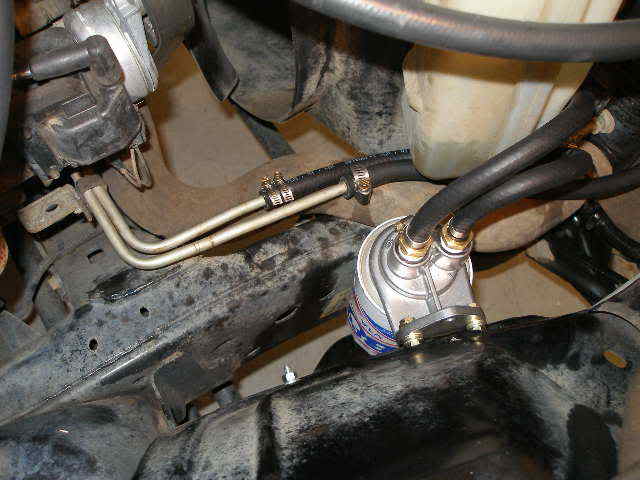
Here is a pic of the leaky 2nd attempt check valve delete

Here is the mess from the leaky line

Here is the line removed (thanks Aim for the harbor freight tip for the quick disconnect in your diy. The price was great, and it works great)

Here is a compairson between the stock check valve line, my faulty attempt at the delete, and the third line is my overkill custom line. The line still needs to use the napa fitting so that is why it is shorter than the rest in the picture

Desctruction of the old line, and removal of the napa fitting

Finally all assembled and ready to install. I also used a touch of thread sealer pictured

Final thoughts... I wish I would have just done this from the get go. While definately overkill, it worked the first time and is more than ill ever need. I also don't have to worry about this thing failing. 400 psi napa line to 4000 psi hydraulic line. (insert tim allen grunt here) Lol... Anyway as I look back I think if I would have used some of the thread sealer on the lowes fittings... I doubt I would have had any problem on my first, or second attempt. As the saying goes... third times a charm.
Here is a pic of the leaky 2nd attempt check valve delete
Here is the mess from the leaky line
Here is the line removed (thanks Aim for the harbor freight tip for the quick disconnect in your diy. The price was great, and it works great)
Here is a compairson between the stock check valve line, my faulty attempt at the delete, and the third line is my overkill custom line. The line still needs to use the napa fitting so that is why it is shorter than the rest in the picture
Desctruction of the old line, and removal of the napa fitting
Finally all assembled and ready to install. I also used a touch of thread sealer pictured
Final thoughts... I wish I would have just done this from the get go. While definately overkill, it worked the first time and is more than ill ever need. I also don't have to worry about this thing failing. 400 psi napa line to 4000 psi hydraulic line. (insert tim allen grunt here) Lol... Anyway as I look back I think if I would have used some of the thread sealer on the lowes fittings... I doubt I would have had any problem on my first, or second attempt. As the saying goes... third times a charm.
Last edited by pcfixerpro; Dec 14, 2009 at 06:36 PM.