


adding oem entertainment system


Rookie
Joined: Apr 2012
Posts: 58
Likes: 0
Dual headrest DVD, Backseat TV and
MyGigLockpick CHR550 installation.
MyGigLockpick CHR550 installation.

I have 2012 Dodge Durango Citadel with all the toys except the stock rear Display. My Durango has the 730n RHR. I can play DVD on the radio screen but only while park. I wasted weeks researching and buying part from Mopar hoping that I could install the stock rear display. I recently saw a forum post were I person was able to dothis to a 2011 dodge van. As any 3rd Gen Durango owner is aware, the service manual is not yet available online. You can get the partial service manual from alldatadiy.com but as I found out after I made the purchased, the service manual available does not have any of the electrical wiring system listed. It has plenty of useful information like the removal of the headrest, which later came in handy during this mod, but the very important diagrams like the radio wiring color codes and harness part numbers are not available.
I contacted the Mopar store and was given 3 part numbers. The headphone, remote and rear display. Atthe time I thought that the rear display was going to include all the necessary parts. After spending approx. $700.00 I discover that the display was just that, a display. I did not come with the bezel or plastic case that wraps around the display and the rear climate control unit. I also discovered that the all important harness was not included. I once again contacted the Mopar guys and after a long description I ordered what I thought will be the cover or bezel for the DVD display. I also tried to get the harness from them but was told that they could not find a part number for it. They even used a VIN number from a Durango that had the complete VES system from factory and could not find the part number for the harness. I proceeded to order the bezel, hoping that Icould find the harness part number from my local dealership. I contacted 7 area dealerships. Three of them told me that they could not find it and four told me that they did not make it for my car. How ridiculous is that? A week later I received the bezel but as soon as I saw the box I knew it was the wrong one.The Mopar guy sold me the same bezel that came with my Durango. The one that cover the two **** rear climate control. Let’s not forget that they charged me $60.00 dollar shipping for the first order and $16.00 shipping for the wrong bezel. After about a week or researched I found a part number for a harnessthat I believe was going to work but was told by the another Mopar store that Iwould not be able to return it because it was an electrical part. The harness was going to be $180. Just for the fact that I haven’t found the correct display cover I decided to give up on my quest to keep my Durango stock.
I decided to return all the parts that I got from Mopar and go with aftermarket system. I went to two separate radio installation shops in my area. The first one was going to charge $50 dollars an hour and the second $80 to install an overhead DVD. They also told me that it could take up to 6 hrs to do the installation. The DVD was also listed at around $1200 and that was for the 10” model. I’ve done installations to other vehicles so I decided to do the installation myself. After another week or researched I located the parts that I need it for my mod.
The one thing that Idon’t like about the new cars is the active restrain headrest. Due to this innovation in technology, installing DVD inside the headrest was not an option.I once saw a post about a behind the headrest system so I decided to look them up. When I saw the post I thought that they were bulky, but now that my system is up and running I completely change my mind.
Parts #1
Dual behind the headrest DVD.
The online stores havetwo dual DVD kits. One from Rosen and the other from Advent/Audiovox.
Rosen $1299.00
Advent $1319.00
I decided to go with the Advent system because IMO they looked better. After an extended 3 yrs warranty, game package (game Controls and Control module) and shipping. The grand totalwas $1459.92
Part # 2
Mygig Lockpick system CHR550 - $349.00
http://www.coastaletech.com/CHR550.htm
I found the CHR550 Lockpick system on this forum for $259.00
Just search for the following:
Lockpick CHR550 Group Buy
I found the CHR550 Lockpick system on this forum for $259.00
Just search for the following:
Lockpick CHR550 Group Buy
Part # 3
Sirius Backseat TV system.
This one was tricky toget. I don’t know why the price change so much. I got mine from Amazon a week ago for $24.99 with free shipping. That’s right $24.99. It is now listed for $42.99. The same item was $240.00 dollars at one my favorite stores, newegg.com and I believe it was listed at Sirius at around $80.00.
Total part thus far,over $1800.00. Now you can imagine why I decided to do the installation myself. An additional $300 to $500 for installation was out of the question.
Ok, let’s get started.
Last edited by Blue659; Mar 15, 2013 at 06:16 PM.
Rookie
Joined: Apr 2012
Posts: 58
Likes: 0
Installation

Disclaimer: As we all know, when working on any electrical system in your vehicle you should disconnect the battery to prevent damaging some of the electrical components. Because my installation required for me to turn the car on and off a few times and to move my power seats several times to access specific location I did my installation without disconnecting the battery. This is just a guide to my installation to help others with their installations. Do so at your own risk. Iam not responsible for any damages cause from following my guide.
I did this in two days but, it all can be done in a single day. Just take your time and do it right.The reason why I did my installation in two day was because I received the lockpick system and backseat TV on the same day. The DVD kit arrived a weeklater.
The lockpick system.
The new CHR550 is bigger than the previous models so it simply won’t fit behind the radio. I decided to put mine to the right of the radio right next to the glove box. To do this you will have to remove the glove box.
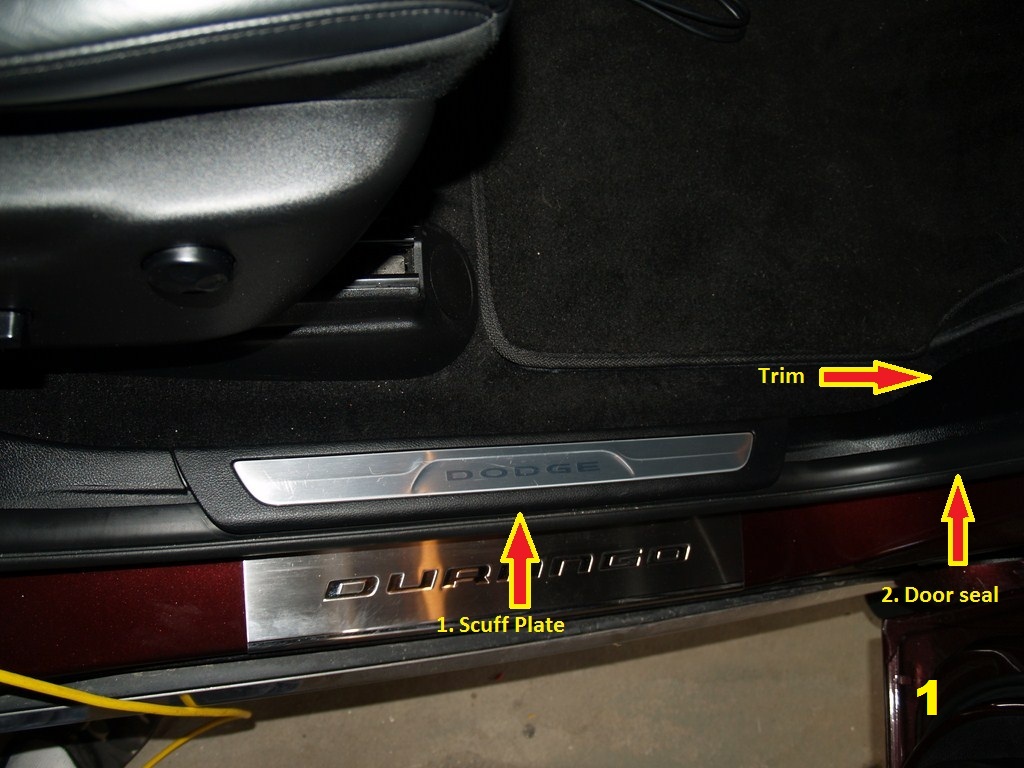
1. Remove scuff plate –Just pull straight up
2. Pull the door seal off just enough to remove the cowl trim (2 Clips)
1
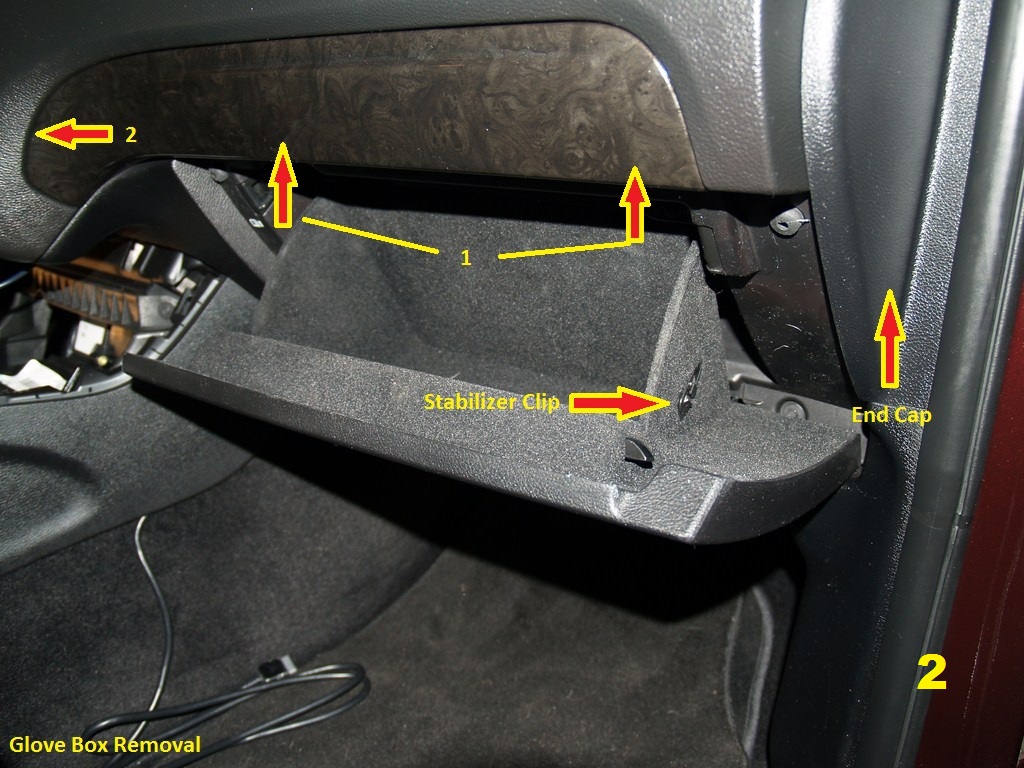
1. Glove Box removal
2. Open Glove box
3. Remove the string from the stabilizer clip. Thestring is spring loaded but don’t worry. Once detached you’ll be able tore-attach it. The string is already detached on the photo below (Pic 2).
4. Squeeze the outboard open stop tab (2-1) inwardand separate the tab from the glove box housing and allow the glove box torotate toward the carpet.
5. Drop the glove box all the way down and removeit.
6. Removed passenger side end cap. (Pull straightout)
7. Remove decorative trim piece. First pull on theright and center (1). Once the right and center are detached use a trim removaltool and very carefully pry the left corner (2). I use a butter knife. Workedlike a charm !
2

2-1
8 .Remove the cover under the glove box (Pic 3). Is attached by two plastic fasteners. Gently pull downin the area of the fasteners, insert a tool and gently pry them down. Again, Iuse a butter knife and was able to remove them without breaking them.
CAUTION. Don’t forget to detach light bulb wire .

3
10.Remove glove box housingby unscrewing six screws. Four at the bottom and two on the top hidden under the decorative trim.
CAUTION… While removing the housing don’t let it dropto the floor. There are two quick disconnect wires attach to it. Detach themand remove the housing.
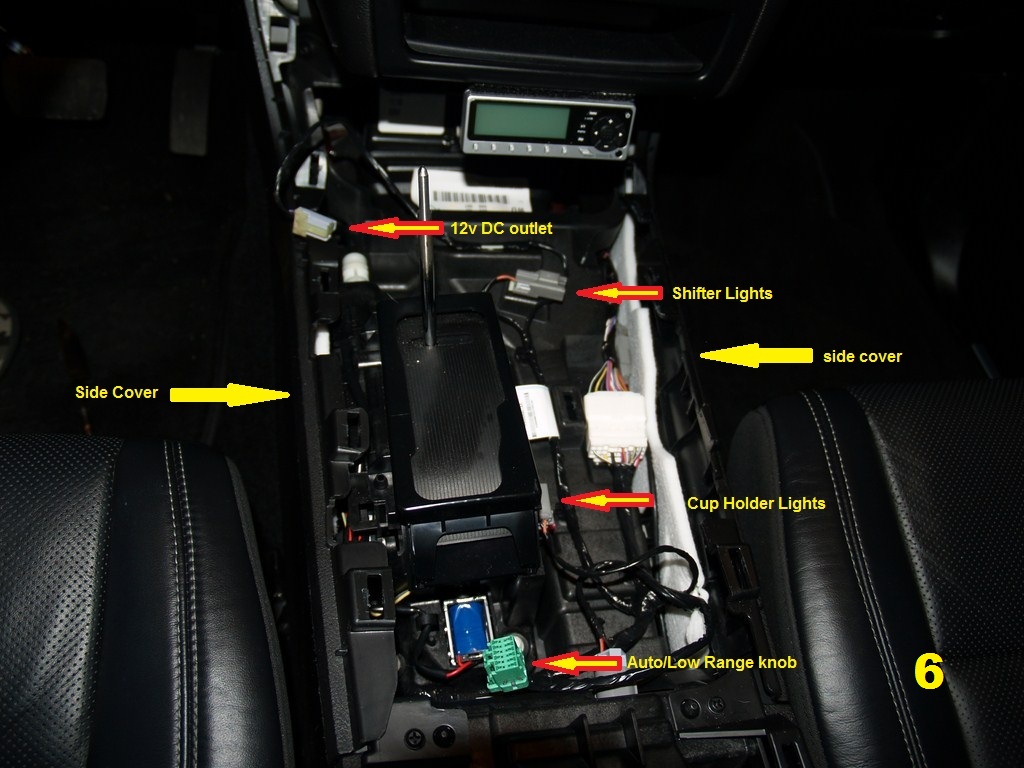
Removing the center console bezel and side trim.
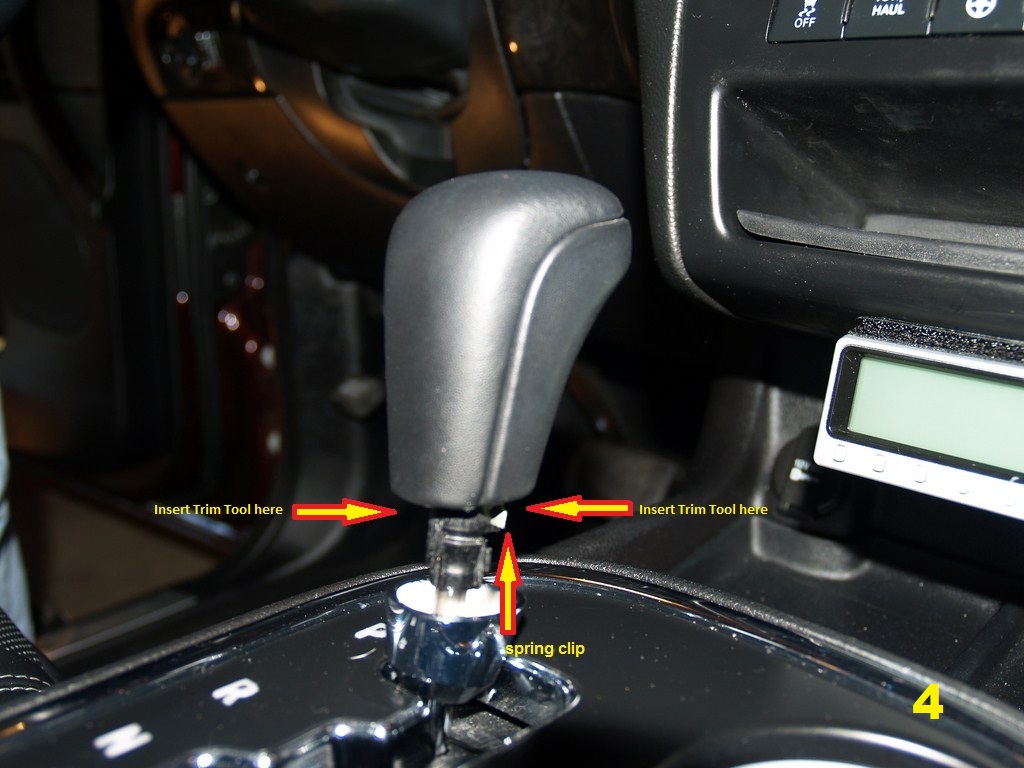
1.Using the trim removal tool or equivalent, separate the retaining ring from the **** and slide down the shifter shaft. Gently pry one side just a bit and then the other side. Keep doing this until the piece drops down.
2.Remove the yellow stamped spring clip from the **** by grabbing the exposed tab with pliers and pulling straight out.
3.Pull the **** off of the shift shaft
4
5
IMPORTANT . To removed the console bezel you must do the following
To remove the console bezel the shifter must bein the NEUTAL position. There is a way to place the car in neutral for towing purposes but I decided to do mine a different way. Below is how I removed mine.You won’t be able to remove the bezel in the Park position. I made that mistake and a small piece off chrome peeled of the trim. Not very noticeable to others but I know is there.
1. Engage the parking brake and start the car.
2. Placed the car in NEUTRAL.
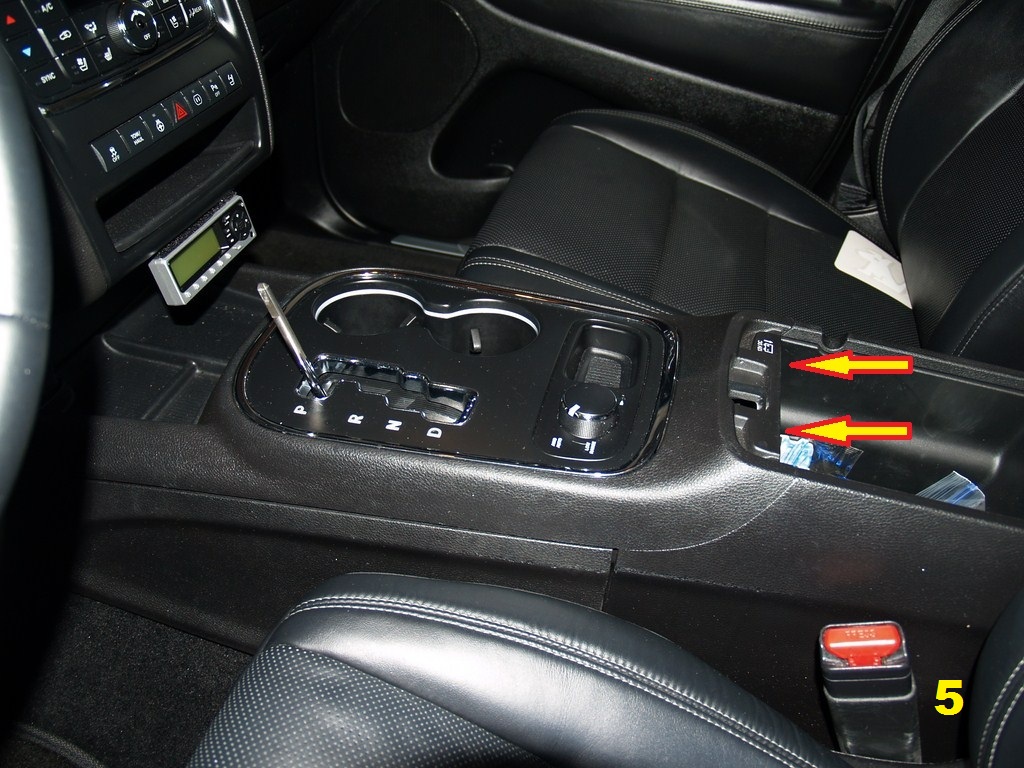
3. Grab the bezel (Arrows,Photo 5) and pull straight up.
4. Once the bezel is detached be careful not to pull up too far because there are four connections that must be disconnected.
5. After you disconnect thefour connectors, remove the bezel, placed car in park and turn it off.
6. Remove the side covers(held in place by a couple of retaining clips).
Important: When re-installing the center console bezel. The side covers or trim must be install first.
6
Last edited by Blue659; Mar 15, 2013 at 05:51 PM. Reason: typo
Rookie
Joined: Apr 2012
Posts: 58
Likes: 0
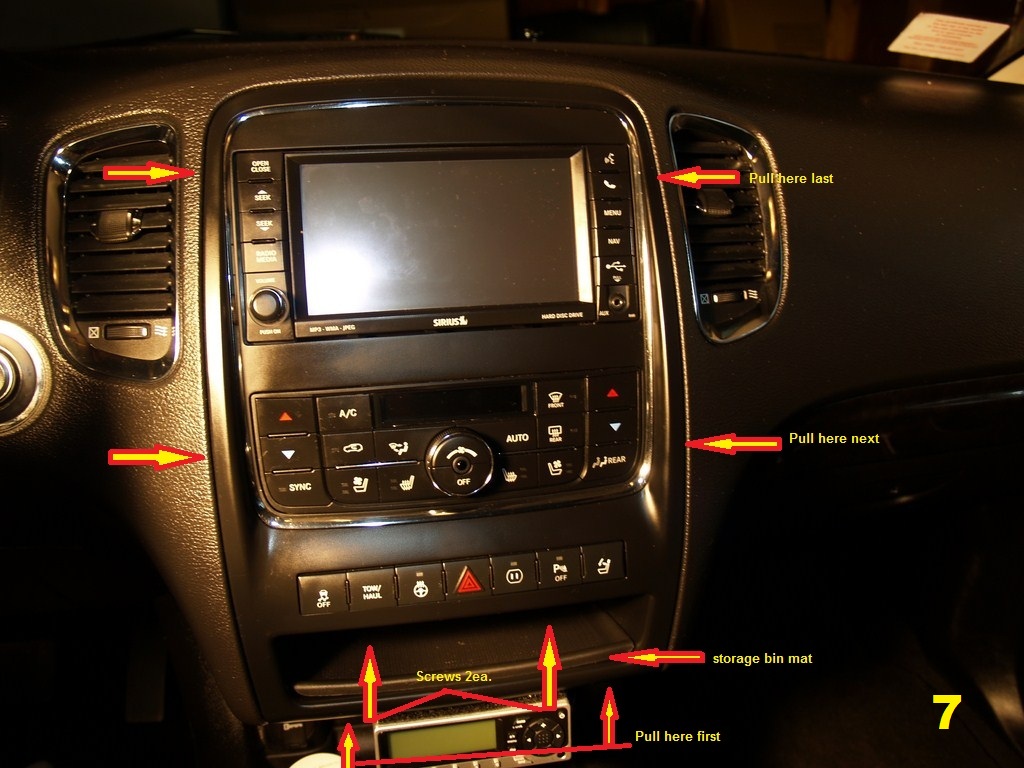
RadioRemoval
1.Remove the storage bin mat (7)
2.Remove the screws (2ea.).
3.Reach under the bezeland you should feel a small gap. With both hands pull straight out just a bitand detach the bottom of the bezel
4.Move your hand upwardand continue removing the bezel until it is free.
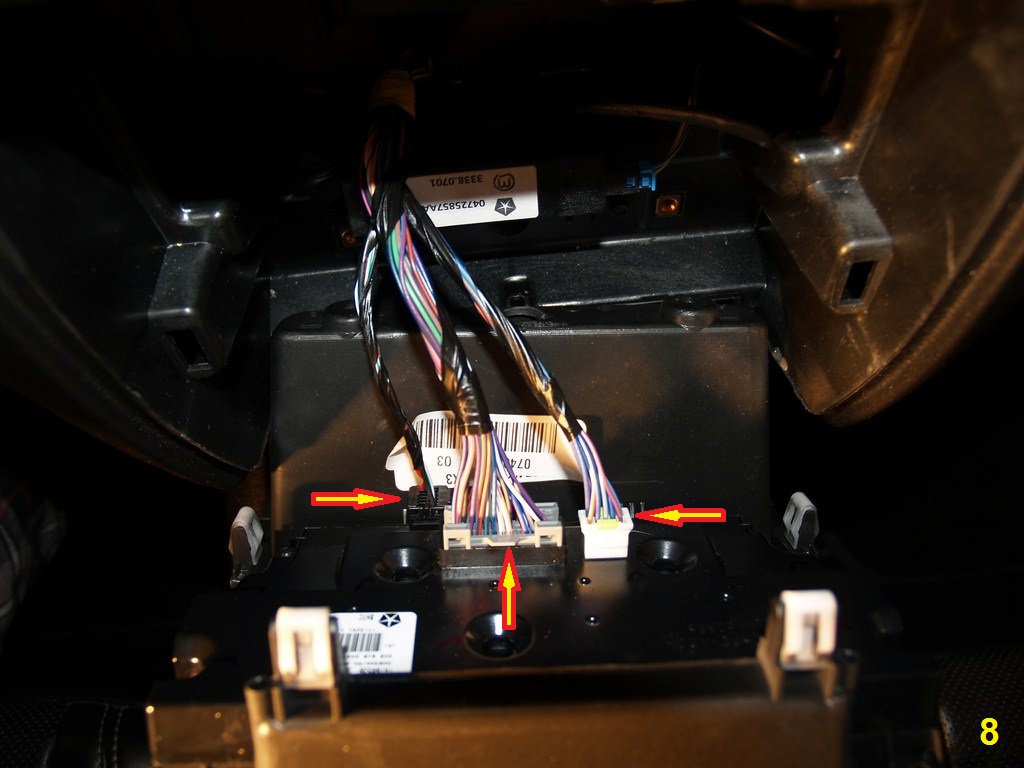
5.Look behind it anddisconnect the 3 electrical connectors. (8)
6.Remove bezel.
7
8
7.Removed the four radio screws and pull the radio out.
Installing MyGigig Lockpick CHR550
1.Before installing thelockpick system you must change the Dip switch to your vehicle specification.
2.My dip switch settingsare as follow. (2012 Dodge Durango)
a.1 � Down (Always Down)
b.2 - Up (2008-2011Durango use low speed) 2012 Durango use High speed communication
c.3 � Up (2008-2011Durango use low speed) 2012 Durango use High speed communication
d.4 � Down (Always Down)
e.5 - Up (Unblock videowhile driving) Down if you don�t want video while driving or stock setting.
f.6 � Down (My radio hasstock NAV) Up, if NAV not included
g.7 � Down (Always Down)
h.8 � Up (Always UP)
Please double check withyour particular lockpick system installation manual. The wrong setting wontdamage anything but your radio won�t turn on.
3.The lockpick harnessinclude and A/V out. The connectors are labeled A/V in but are in fact anoutput only. I did get video to the rear DVD from the front Radio DVD by usingthe A/V out on the lockpick harness . However, because the DVD interface boxhas only one A/V in I was not able to get video from the Backseat TV. For thatreason, I did not use those connectors. If you are not installing a backseat TVthis will probably work for you but it was not feasible for my installation. Iam still looking for a solution to this problem.
4.Unplug the white andbrown connectors from the back of the radio and install the brown and whiteconnectors from the lockpick system to your radio. (9)
5.Then install the stockharness to the female connectors on the lockpick system. Is pretty simple todo.
6.NOTE. In the photo (9)the lockpick harness is already installed.
7.As a precaution, Icovered the Lockpick A/V out connectors with electrical tape to preventelectrical problems.
8.In my mod, I ran theharness to the right and down towards the glove box. The lockpick harness islong enough to do this.
9.Complete connections,re-install the radio unit.
10.You should wait tore-install the radio bezel until the installations are complete and tested. Donot connect the lockpick to the harness until all the mod parts are installed.The first time that you connect the lockpick system it will take approx 30seconds to read everything and reconfigure itself to whatever is attach to itincluding the radio.
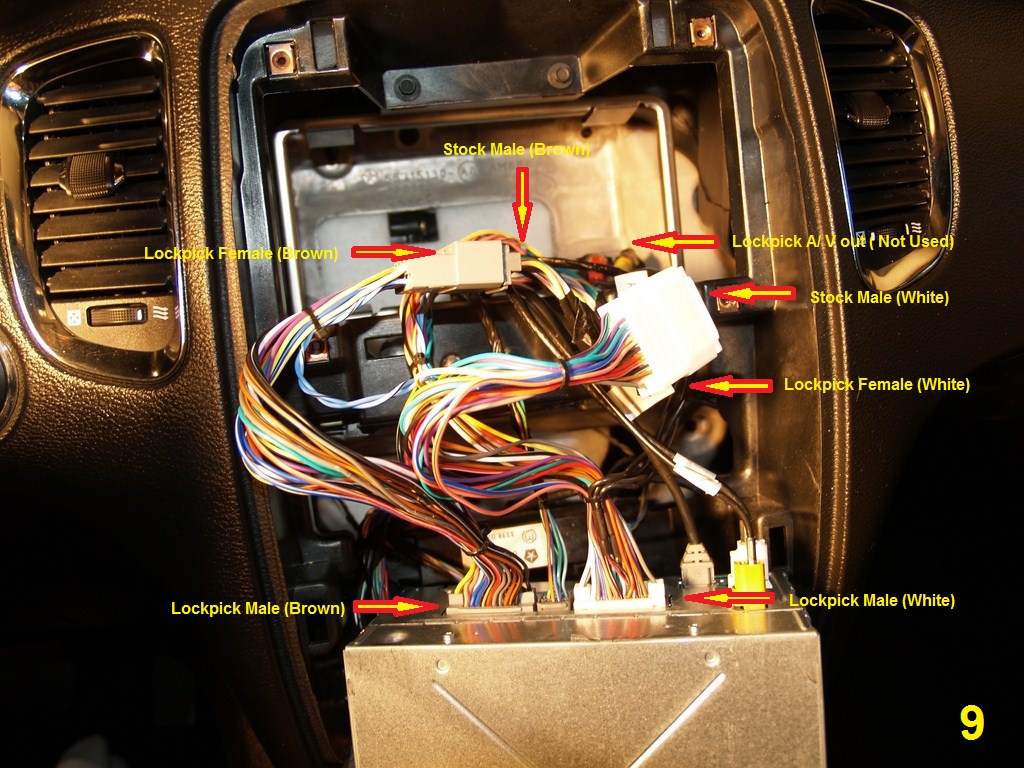
9
11.In my installation, Iplaced the lockpick system to the right, next to the glove box housing.
12.I ran two sets of A/Vcables under the dash to the driver�s side. One from the lockpick A/V out to the Headset DVD A/V in. The second fromthe lockpick A/V in to the backseat TV A/V out.
13.Some lockpick installersput the included IPod/Ipad cable from the lockpick on the center console. Idecided to place mine in the glove box where the car manual was. (10)
14.After you remove theglove box housing you will see two square holes were the manual shelves attachto the housing (10). Using a knife I made the left side hole a bit bigger andran the iPod cable to the glove box. My iPod cable is now inside the glove boxwhere the manual used to be. I just plug it in and use the steering wheelcontrols to control the iPod. You can always use the stock usb /iPod connectorinside the center console but the lockpick iPod connection has some very nicefeatures. The lockpick cable is just an extra connection that supports iPod/iPadaudio and video. According to the instructions, if you have a 3g iPad you canplay movies through the lockpick system to the rear or front displays.
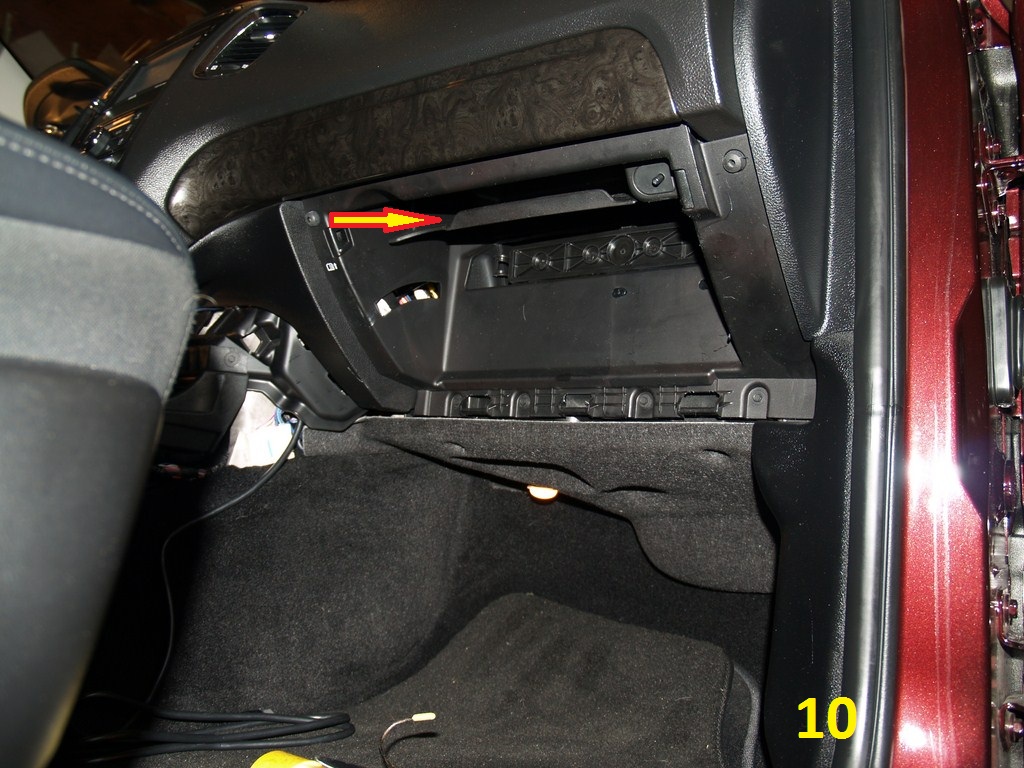
10
Last edited by Blue659; Mar 14, 2013 at 11:09 AM.
Rookie
Joined: Apr 2012
Posts: 58
Likes: 0
Backseat TV installation

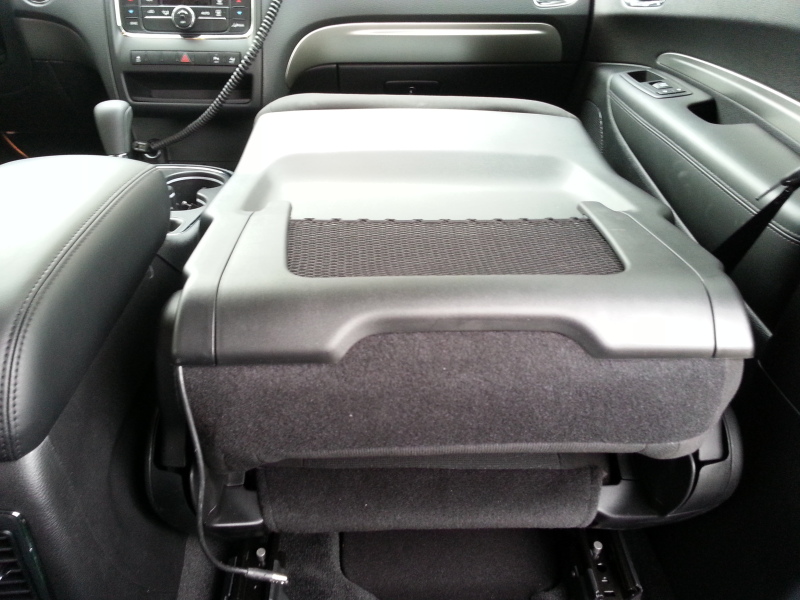
1.I installed the backseatTV in the compartment under the driver seat. (11)
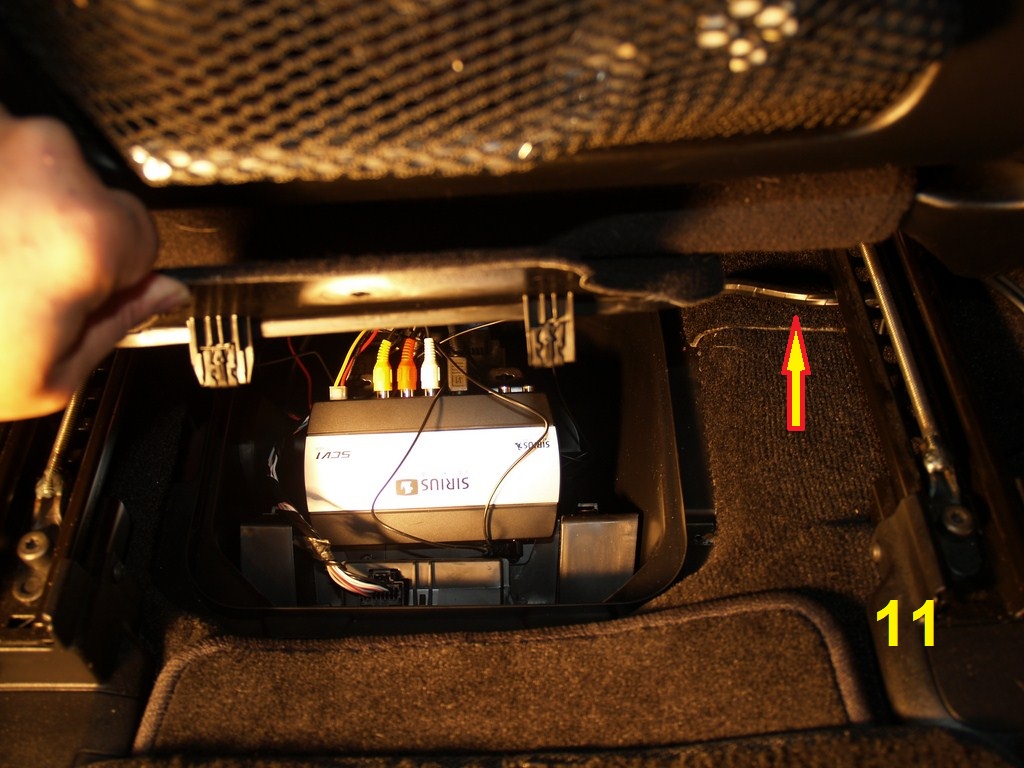
11
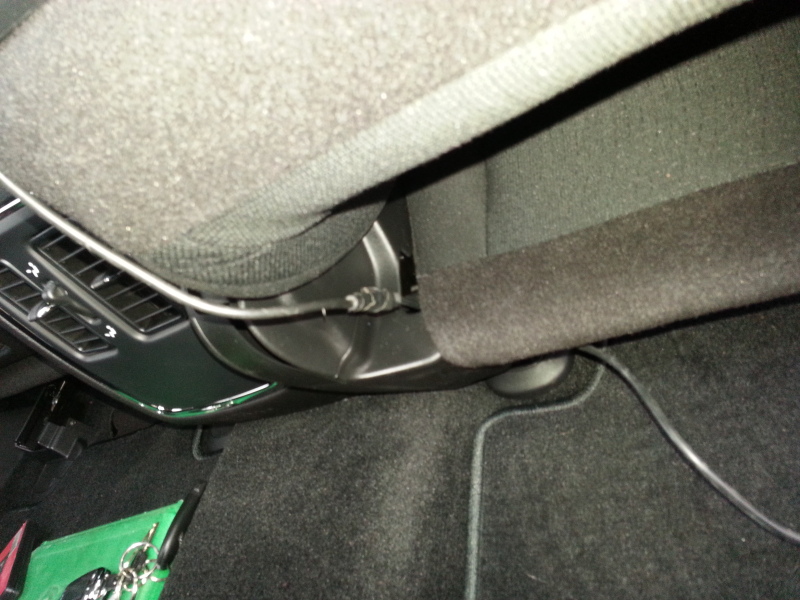
2.I wrapped the A/Vcables, power wires and control unit cable together with electrical wires tokeep everything neat and secured.
3.I ran the bundled wires to the right side of the seat. If you look about half way under the driver seat you should see where the carpet overlaps. This is the perfect spot to run thewires through towards the front of the vehicle.
4.Keep the wires as closeto the floor as possible. If you don�t it will interfere with the center console side trim piece and it will not snap into place.
5.Run all the wires underthe dashboard down to the floor.
6.There is a good sized gap between the floor and the vehicles parts. Use this to run the wires orcables across to the other side. Connect the Backseat TV to the Lockpick systemA/V input.
7.Connect the backseat TVPower wires (3 wires) to the lockpick system 12v ACC output connection (Pic12).
Note: Below is the lockpick system installation diagram. I used MS Paint and modified to include the way I did my connection to the Headrest DVD�s and theBackseat TV.

12
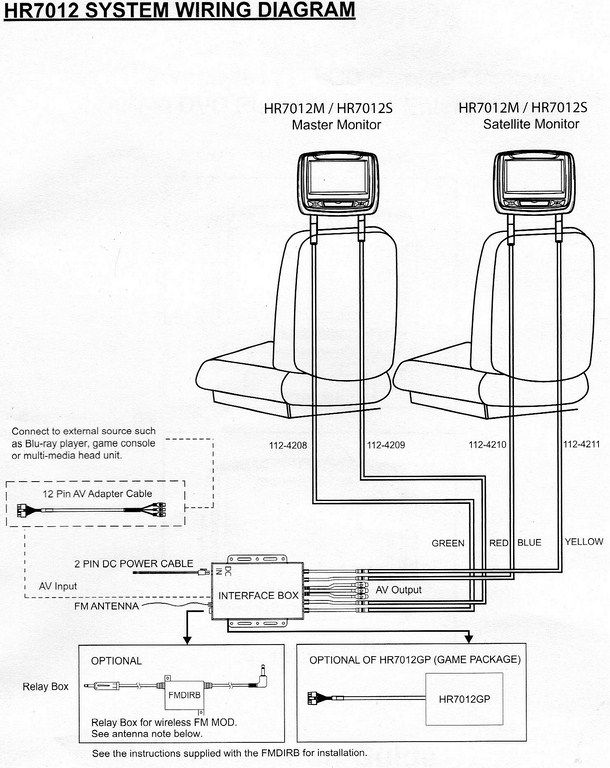
8.Move the Backseat TV control unit wire around the same locationbut instead of going all the way to the right side of the vehicle go up andcome up towards the center console bezel.
9.By connecting the Backseat TV to the lockpick system will ensurethat the units will turn on when the vehicle ignition is on or the car isrunning. The backseat TV comes with two magnetic antennas. They look similar tothe one that they use for the aftermarket Sirius radios.
10.Run the wires to the left of the storage compartment to where thecarpet overlaps. These wires are very thing so they are easy to hide.
11.Hide the wires under the vehicle trim and rear driver side door scuffplate. Keep hiding the wires under the trim and come up on the left sideof the trunk area. You won�t need to remove the rear trim just use the trimtool to create a gap as you run the wires.
12.Once you get to the top trim at the end of the headliner on thetrunk area, one wire will go towards the right rear of the car and the other tothe left.
13.Backseat TV requires the two antennas to be a minimum of 36 inchesin order to work. Is preferable to install one in the front and the second one on the rear for maximum coverage. Drilling on the roof of the car is out of thequestion so below is how I did mine.
14.I mounted the right antenna wire at the end of the roof rack.(Ride side) (13)
15.For the left antenna, I removed the left side roof rack.
16.Remove a single bolt located at the end of theroof rack under the plastic cover (13). Just open the cover and you will seethe bolt.
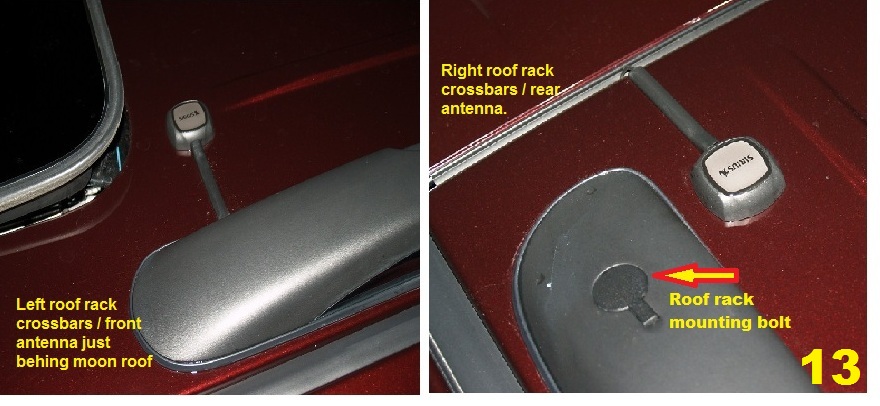
13
17.After that just slidethe roof rack forward and lift it up to remove it in one piece.
18.I ran the wire under the left side roof rack as close to the front as possible. Re-attached the roof rack and then cover the exposed antenna wire with the included plastic trim.
DVD Headrest
Included in the Kit
Included in the Kit
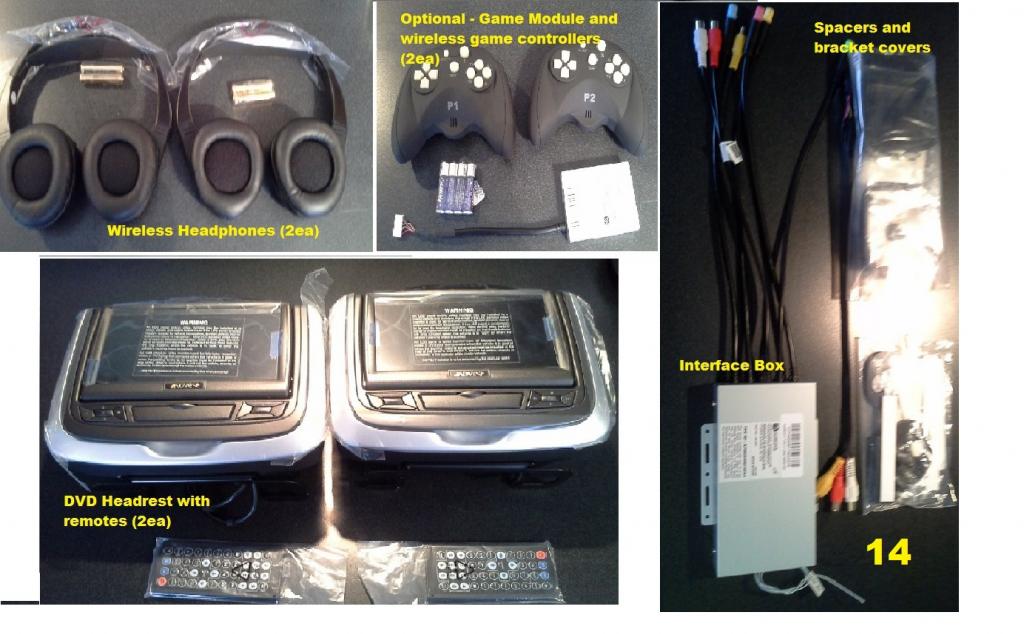
14
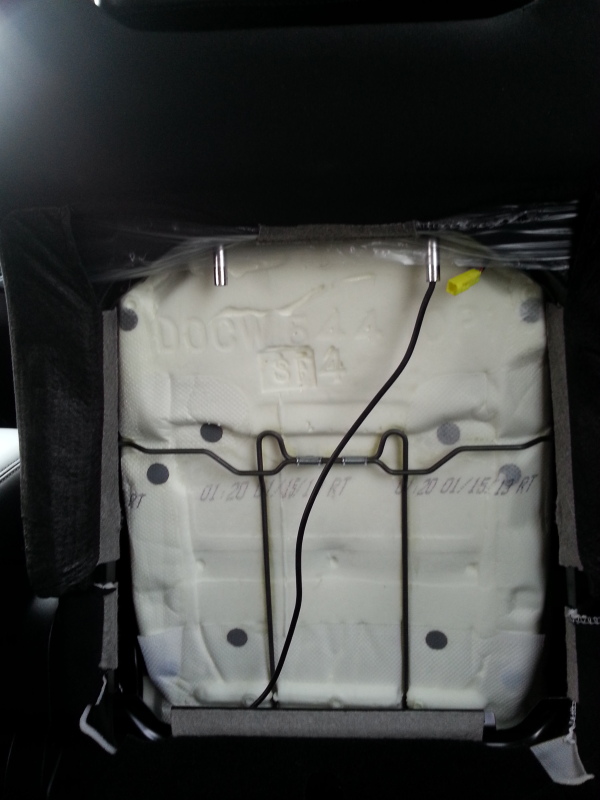
1.Remove the seat coversby pulling on the bottom of the covers to release two retaining clips. (15)
2.Slide the cover down abit and then pull back.

15
3.Disconnect the Active Head Rest wires (16).
4.Lean seats back.
5.To remove the headrest,from the rear of the seat locate a small pin hole on the right side sleeve.
6.Push the locking pinusing something small like a paper clip.
7.While holding the paperclip in push on the left side released button and slowly raised and remove the head rest. Make sure to guide the Active head rest wire inside the sleeve as you raise and remove it.
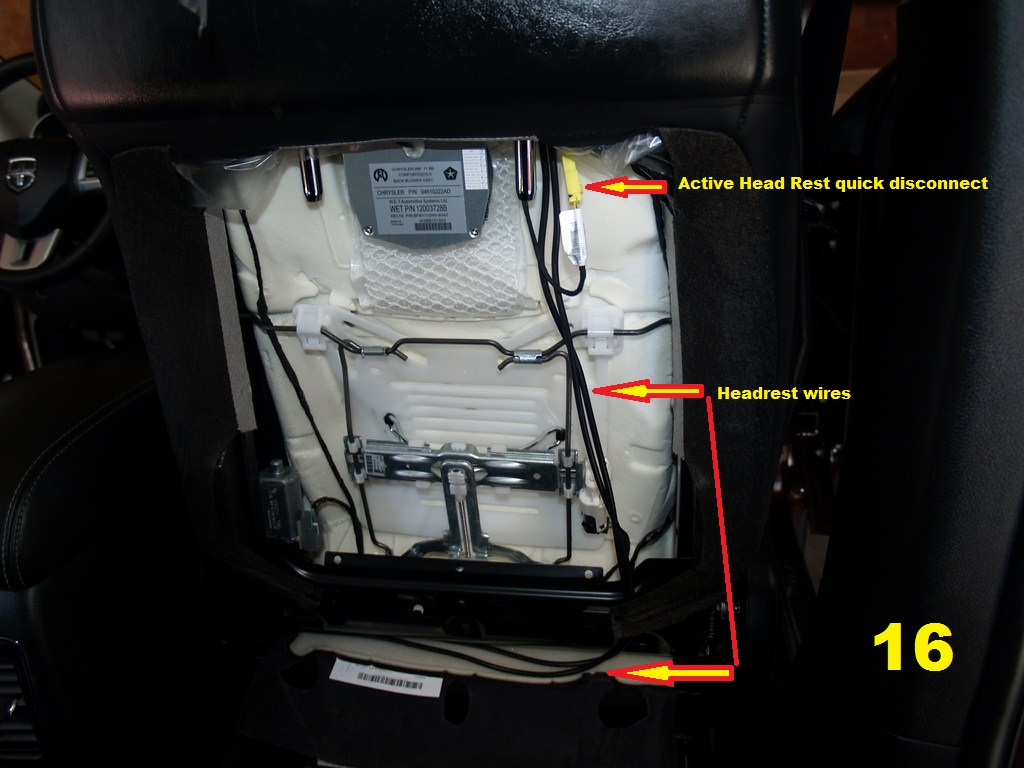
16
Headrest DVD installation.
I am sorry that I don�t have photos of these steps. I will try to explain it the best I can.
1.Placed headrest unit onthe front seat. The cables are very long so you�ll be able to run the wiresthrough the top of the seats without holding the DVD unit.
2.Driver�s seat. Insertthe trim removing tool on the front of the slave sleeve holder and stretch the leather just enough to slide both cables through. This is going to take some doing so take your time and be careful not do damage the leather or cables.
3.Once you have the cablesgoing through freely, you�ll have to pull them with one hand while holding theDVD unit with the other unless you have someone to assist you.
4.When you have about aninch left to go, place the headrest mounting bracket to the right of both themaster and slave sleeve and then slide left.
5.Next locate the spacersand double sided tape in the kit. Place the spacers between the top of the metal bracket and the headrest released button. The double sided tape wil lprevent them from moving.
6.The next part was a painto do. Locate the include bracket covers and place them over the bracket makingsure to hide the cables on the left side sleeve.
7.For my install, it took some force to accomplish this. Make sure to line them up because it is a very tight fit and is going to be nearly impossible to remove them again without damaging them.
8.If they are done right,they will not move while you re-attach the headrest.
9.Re-connect the active headrest wires. Run the wires whichever way you like. Just make sure that theyare free of obstructions.
10.Driver�s side. I ran thewires on the right side of the seat going in where the carpet overlapped. Just like I did for the backseat TV. Make sure to leave enough slack to prevent damage when the seat�s move.
11.Passenger side. I ran the wires the same way but instead of going across to the driver�s side, I ran them on the left side of the passenger seat. Once I reached the front of thecar I went under the dash and across to the left towards the driver�s side.
Note:If you get these types of DVD units they come with a detailed installation manualwith pictures.
Last edited by Blue659; Mar 14, 2013 at 11:13 AM.
Rookie
Joined: Apr 2012
Posts: 58
Likes: 0
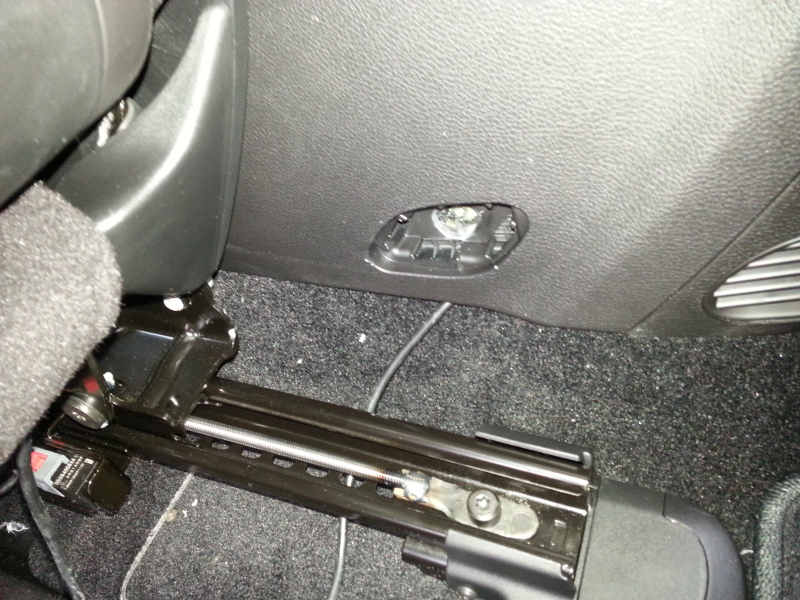
DVD interface box

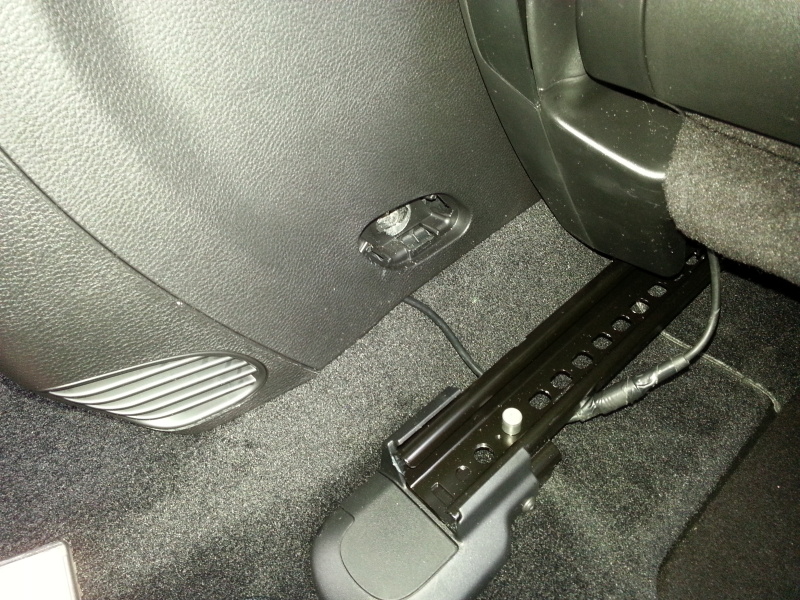
1.I placed the interface box on the driver’s side between the carpet and just to the right of the gas pedal as recomended by the instructions.
2.Connect all the fourcolor coded cables to the interface box.
3.If you order the optional gaming module. It comes with a double side tape already attach. Attach the game module to the interface box and then connect it to the interface box.
4.Connect the interface box power wires (red and black) to the unit and then run the wires under thedashboard towards the 12v outlet in the center console.
5.You will have to connectthe power wires to the 12v dc using your prefer method.
6.In my install, I spliced the wires and soldered them. I then cover the wires with plenty of electrical tape.
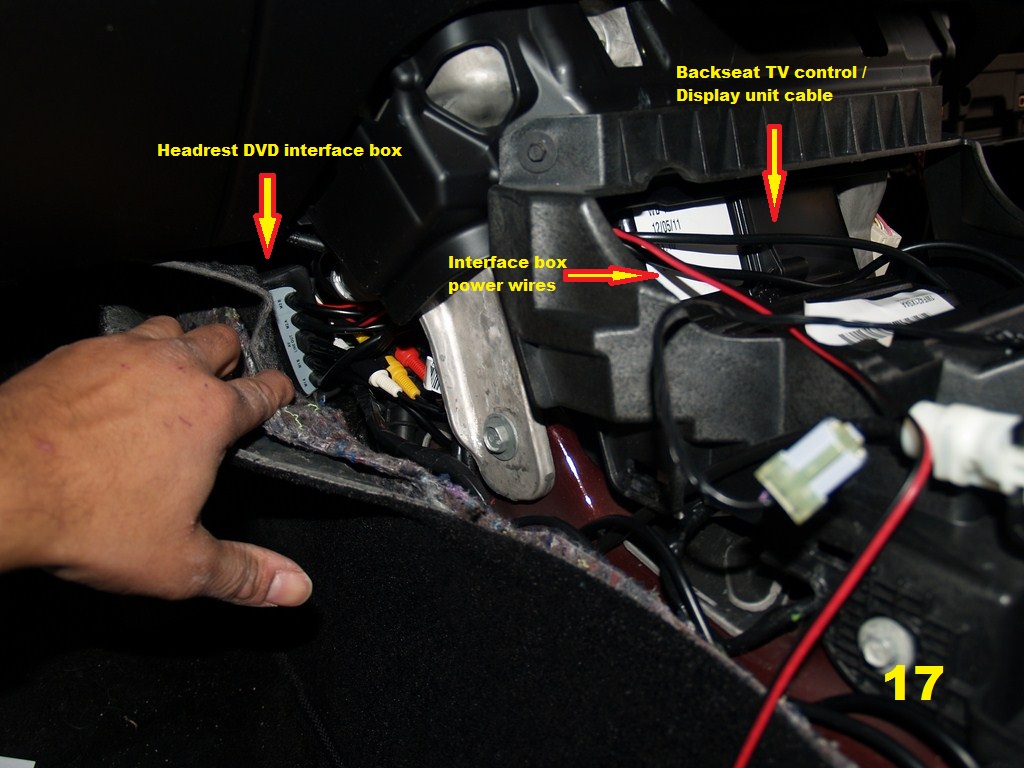
17
7.Next, test the system.
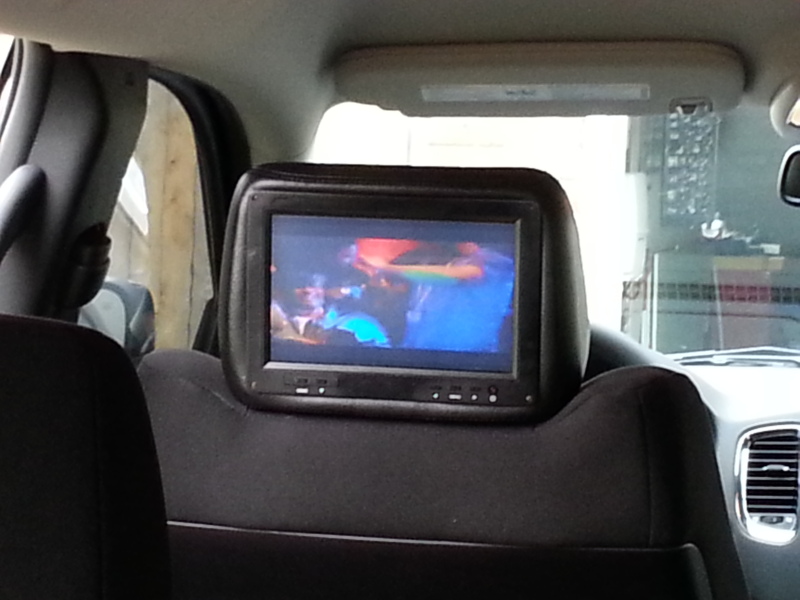
The DVD system is great. Both DVD can play separate DVD’s. Both users can then with the use of the remote watch the other side’s DVD at any time. They can also switch to the A/Vinput and watch the backseat TV. I can play the backseat TV audio through the cars speakers with the help of the lockpick system. I can also listen to myradio, iPod, or CD while my kids watch separate DVD or TV with the included wireless headphones. As with many aftermarkets DVD the headphones have to be facing the DVD for a good signal. You can avoid this by using regular hardwired headphones. Both DVD have headphones inputs as well as an additional A/V input to attach a gaming system. They also have a USB port to attach a thumb drive with MP3’s.
If both of my kids wantto watch the same DVD and listen through the car speakers, the DVD must be playing in Monitor 1. Monitor 1 has an integrated wireless transmitter to play through an FM station. You can chose from 100 different frequencies. The sound with the FM transmitter is excellent because the wireless antenna is attached to the interface box.
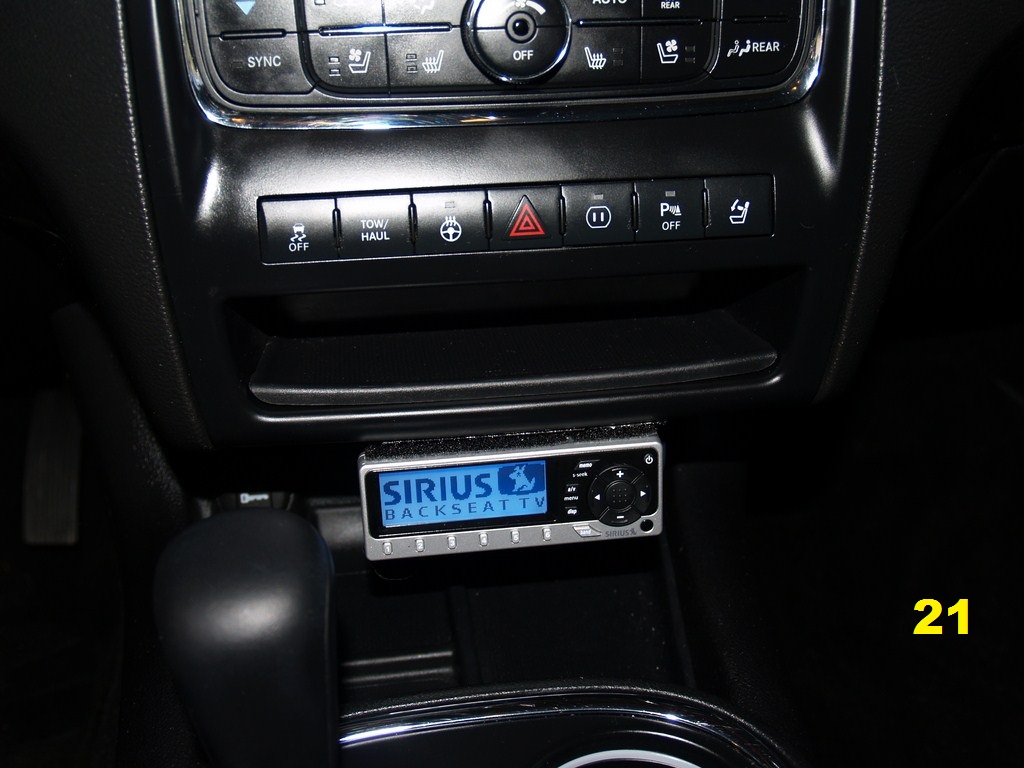
8.I installed the Backseat TV Control/Display to the bottom of the radio Bezel using Velcro.
9.I ran the cable between the center console bezel and the radio Bezel. The gap between these bezels isbig enough to allow it without damaging the cable.
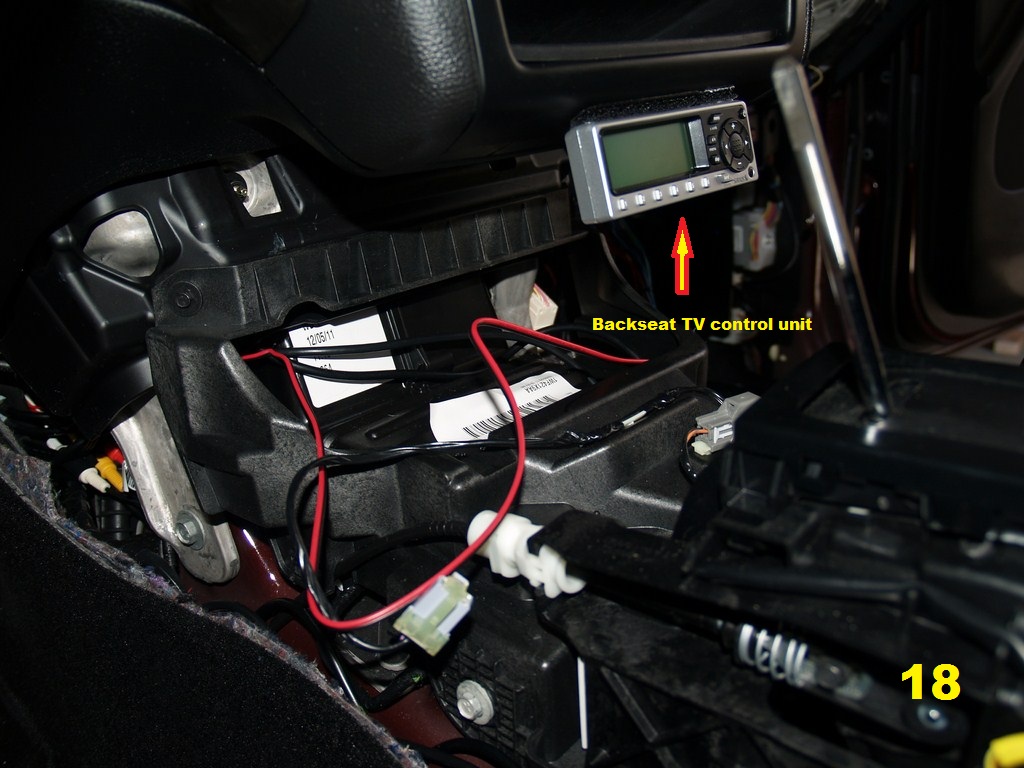
18
10.The installation looksvery professional (IMO). I am extremely happy with the results.
11.The backseat TV comes with hard wired IR receiver for the remote control. I decided not to install it because is one less things for the kids to fight over. This way I control itand avoid fights in the car. Any of you with two or more kids know what I am talking about. There are only 3 channels available (Nickelodeon, Disney Channel and Cartoon Network ) for $7.99 monthly subscription. I think that between the Backseat TV, separate DVD and the games I’ll be able to take long trips and keep my kids busy for some piece of mind. I hope this will help some of you with your installation. It was a bit expensive but it is a nice feature for any vehicle.
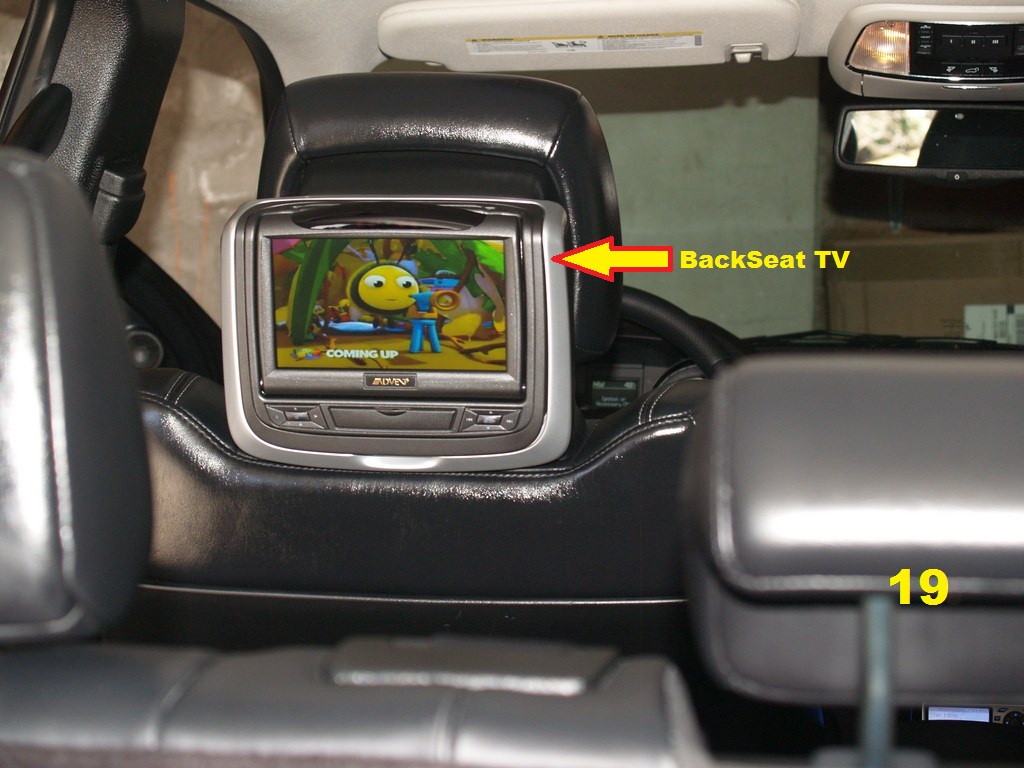
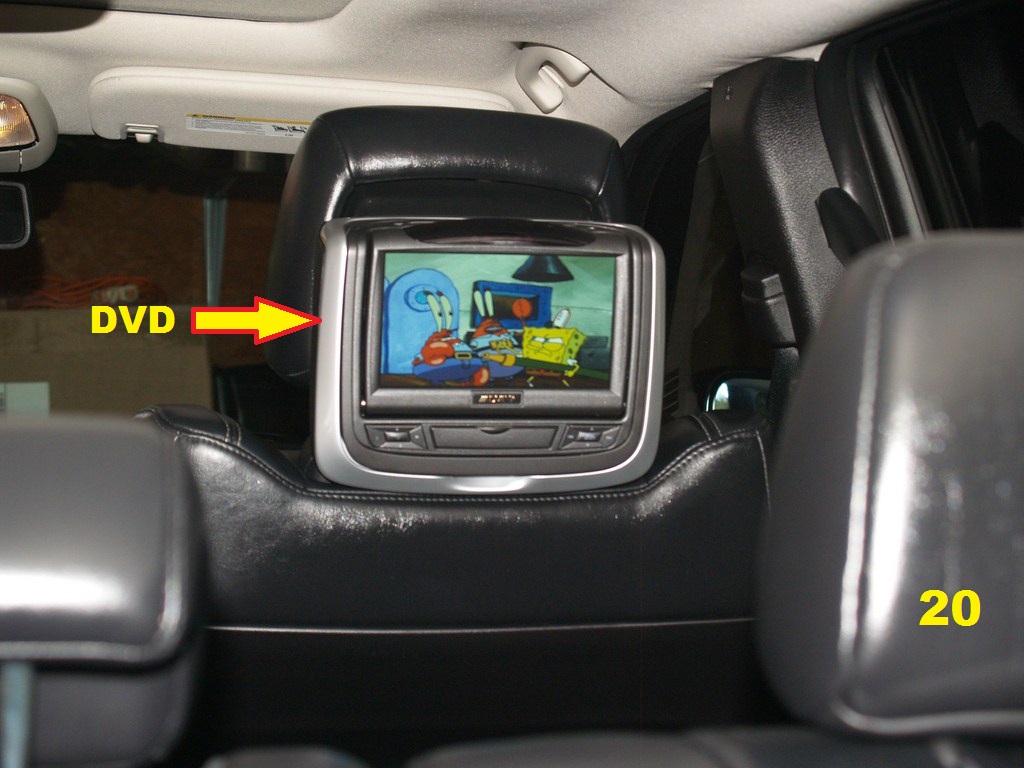
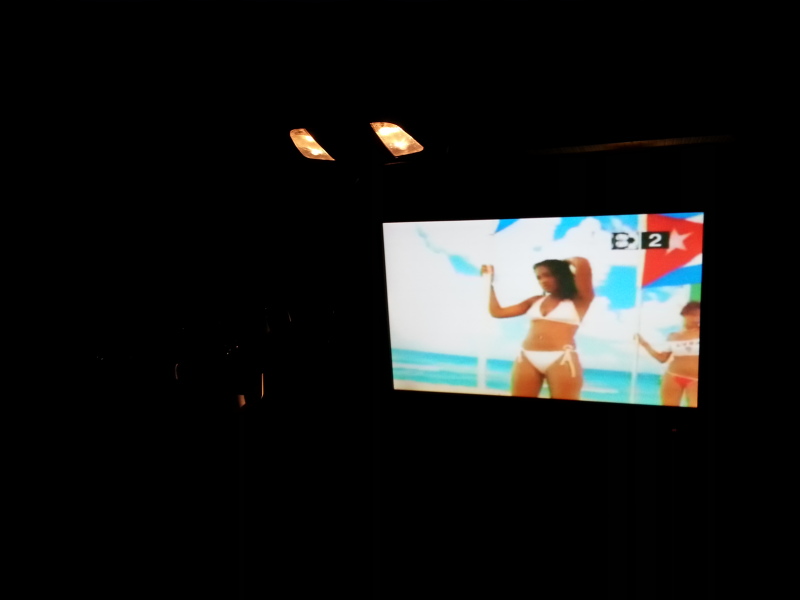
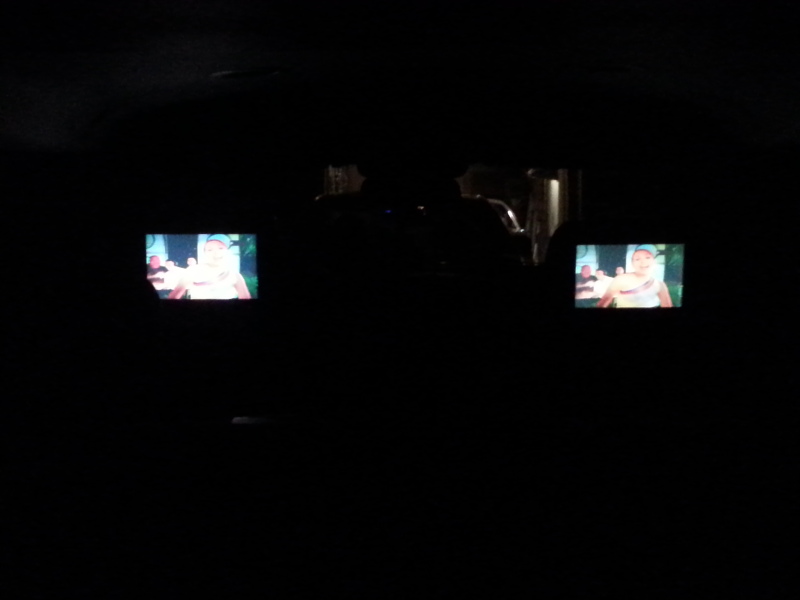
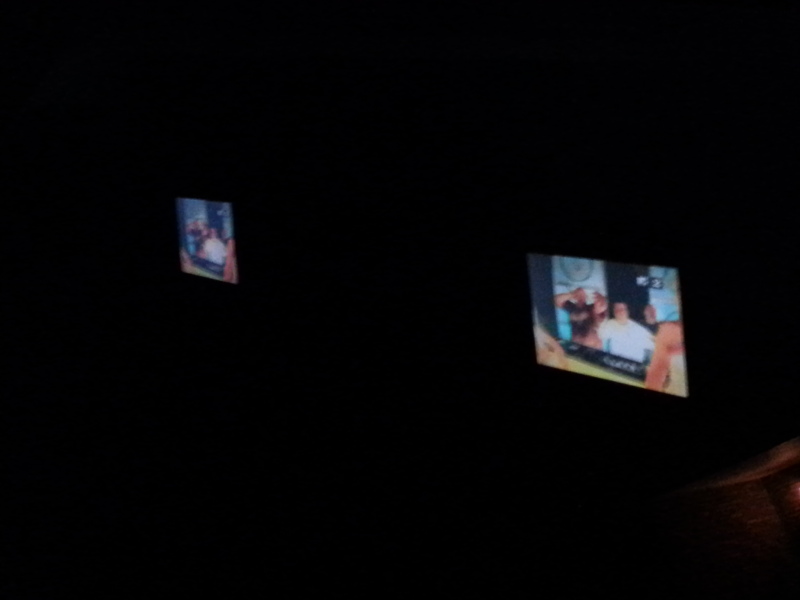
Below are some photos ofthe left DVD showing the backseat TV(left) and the right a DVD at the sametime.
Note: Please send me a private message with any mistakes and I will correct them.
Thanks !!!!
Last edited by Blue659; Mar 17, 2013 at 08:33 PM.


Veteran
Joined: Mar 2013
Posts: 256
Likes: 0
From: Long Island, NY
ok Here my set up I change my mind and did the headrest TV. I started it but had to stop since tomorrow is another day.
I followed MR. BLUE659 on how to remove the back of the seats.
I remove the back and install new headrest and ran the cable down.
Cable ran down and back cover back on
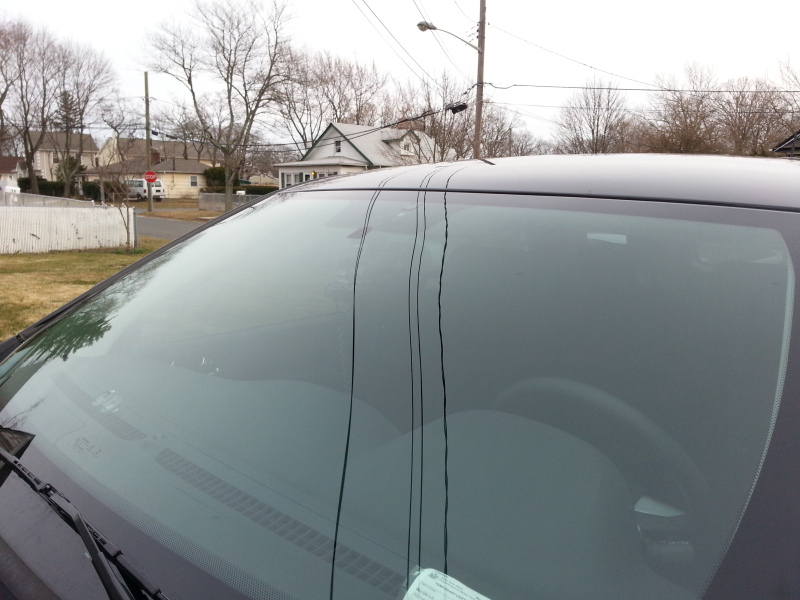
ran the cable from one side to the other

I try to do a test fit and

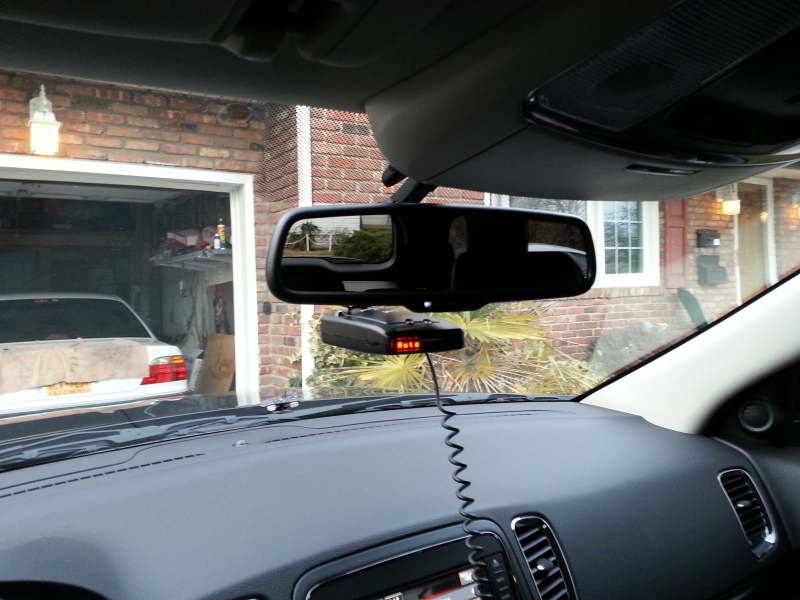
and I also install my rear view mirror radar set up.
insdie view
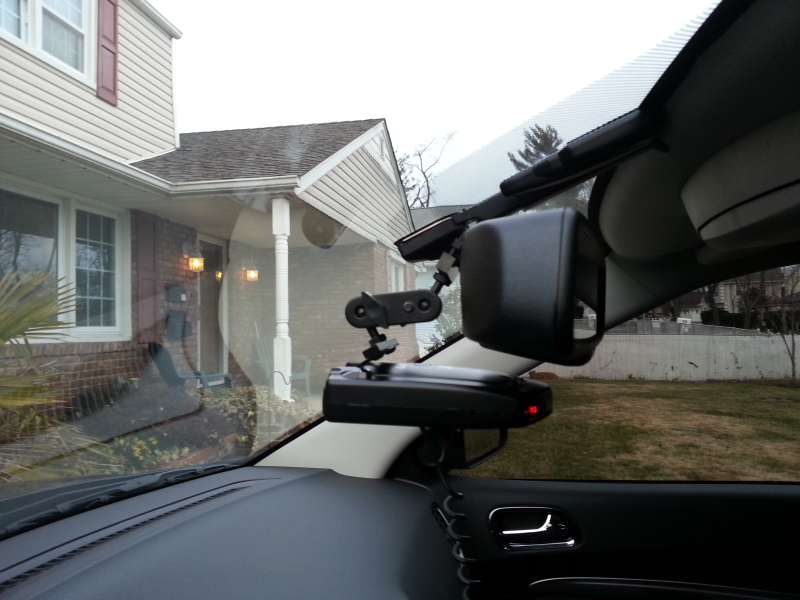
outside view
I followed MR. BLUE659 on how to remove the back of the seats.
I remove the back and install new headrest and ran the cable down.
Cable ran down and back cover back on
ran the cable from one side to the other
I try to do a test fit and
and I also install my rear view mirror radar set up.
insdie view
outside view
Last edited by franco90; Mar 17, 2013 at 10:27 PM.