


 Aug 5, 2015, 01:17 PM
Last edit by: IB Advertising
See related guides and technical advice from our community experts:
Browse all: Detailing and Cleaning
- Dodge Ram 2nd, 3rd, 4th Gen How to Clean Foggy Headlights
Step by step instructions for the do-it-yourself repairs.
Browse all: Detailing and Cleaning

How to clean headlights


Registered User
Joined: Oct 2010
Posts: 27
Likes: 0
From: Washington
This method works best!
Headlight Restoration Method
In this process you are going to sand your headlight lenses with two or three grades of fine sand paper, then re-glaze the plastic with polish to restore a clear finish.
STEP 1: Clean the headlight lenses. A bucket of soapy water works best. Clean the surrounding area, too. Dry thoroughly.
STEP 2: Use painter�s masking tape to mask around the headlight. This will help protect your car's paint finish. This only takes a couple minutes, so don�t skip this important step.
STEP 3: Wet sand each headlight. First determine the amount of damage to each lens. If your headlight lenses are scratched or if they are completely opaque, you will need to start with 600 grit sandpaper. Sand thoroughly, and then progress to 1200, then 2000 grit.
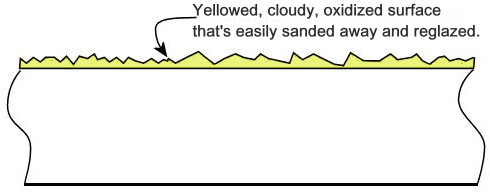
If your lenses have no scratches and are only slightly opaque, you can probably get away with using 2000 grit paper only. The first sanding step is where you will actually remove the scratched and cloudy layer of plastic. The finer grades of sandpaper are to remove the scratches left from the previous grit sandpaper.
As you sand, your sanding water will turn milky. This is the damaged layer being removed. Use plenty of water for lubrication and to keep the sandpaper clean. Keep sanding until the surface feels perfectly smooth. The drippings will become clearer as the damage is taken away. Dry thoroughly between sanding steps to check progress.
TIP: Soak your wet/dry sandpaper is water for 15-20 minutes before use. This softens the paper, making it easier to use.
TIP: Never sand with your bare hand. For best results, use a sanding block or pad to keep the paper flat. A 1� by 2� school erasure is the perfect size for headlights and spot repairs.
TIP: Sand in straight lines, never in circles, and your final buff out will be much easier.
TIP: Be sure to keep the surface wet as you sand. Soapy water works best.
STEP 4: Re-glaze headlight lenses using plastic polish on a 3� polishing pad (foam or wool). First connect the Velcro backing plate adapter to your drill.
CAUTION: If you�re using a wool pad, it should not be used at high speed. Wool pads generate a lot of heat, so use a cordless drill or the slow speed on your electric drill.
Apply several dabs of polish to the pad and begin polishing the lens. As the polish begins to dissipate, add a little more and continue polishing. Stop polishing once the lens is completely clear again. Finish with a final hand polish using a small amount of polish on a microfiber towel or applicator.
STEP 5: Wax or seal to protect. Use a good auto wax to reseal the lenses and protect from the elements.
STEP 6: Maintain monthly with a quality plastic cleaner/polish. The product I recommend most is Plexus. Use it regularly, just like a glass cleaner, and your car�s clear plastic lenses will never need restoring again!
Headlight Restoration Method
In this process you are going to sand your headlight lenses with two or three grades of fine sand paper, then re-glaze the plastic with polish to restore a clear finish.
STEP 1: Clean the headlight lenses. A bucket of soapy water works best. Clean the surrounding area, too. Dry thoroughly.
STEP 2: Use painter�s masking tape to mask around the headlight. This will help protect your car's paint finish. This only takes a couple minutes, so don�t skip this important step.
STEP 3: Wet sand each headlight. First determine the amount of damage to each lens. If your headlight lenses are scratched or if they are completely opaque, you will need to start with 600 grit sandpaper. Sand thoroughly, and then progress to 1200, then 2000 grit.
If your lenses have no scratches and are only slightly opaque, you can probably get away with using 2000 grit paper only. The first sanding step is where you will actually remove the scratched and cloudy layer of plastic. The finer grades of sandpaper are to remove the scratches left from the previous grit sandpaper.
As you sand, your sanding water will turn milky. This is the damaged layer being removed. Use plenty of water for lubrication and to keep the sandpaper clean. Keep sanding until the surface feels perfectly smooth. The drippings will become clearer as the damage is taken away. Dry thoroughly between sanding steps to check progress.
TIP: Soak your wet/dry sandpaper is water for 15-20 minutes before use. This softens the paper, making it easier to use.
TIP: Never sand with your bare hand. For best results, use a sanding block or pad to keep the paper flat. A 1� by 2� school erasure is the perfect size for headlights and spot repairs.
TIP: Sand in straight lines, never in circles, and your final buff out will be much easier.
TIP: Be sure to keep the surface wet as you sand. Soapy water works best.
STEP 4: Re-glaze headlight lenses using plastic polish on a 3� polishing pad (foam or wool). First connect the Velcro backing plate adapter to your drill.
CAUTION: If you�re using a wool pad, it should not be used at high speed. Wool pads generate a lot of heat, so use a cordless drill or the slow speed on your electric drill.
Apply several dabs of polish to the pad and begin polishing the lens. As the polish begins to dissipate, add a little more and continue polishing. Stop polishing once the lens is completely clear again. Finish with a final hand polish using a small amount of polish on a microfiber towel or applicator.
STEP 5: Wax or seal to protect. Use a good auto wax to reseal the lenses and protect from the elements.
STEP 6: Maintain monthly with a quality plastic cleaner/polish. The product I recommend most is Plexus. Use it regularly, just like a glass cleaner, and your car�s clear plastic lenses will never need restoring again!

Administrator
Joined: Jul 2007
Posts: 24,686
Likes: 21
From: South Georgia/East Florida
I bought the Meguiars kit that does basically what Austin is describing, has three separate grades of sand paper, some lubricant for wet sanding and then a polish and a sealer. It worked ok on my Grand Cherokee. It made the oxidized lights about 50% clearer. The kit was in the $25 area.
I worked on the lights of a Grand Cherokee owned by this chick I was seeing for a short time that were about as bad as mine were and used nothing but toothpaste and a rag and it came out as good or better than mine did. I got the toothpaste idea off of a guy on a Jeep specific site...
I worked on the lights of a Grand Cherokee owned by this chick I was seeing for a short time that were about as bad as mine were and used nothing but toothpaste and a rag and it came out as good or better than mine did. I got the toothpaste idea off of a guy on a Jeep specific site...


Veteran
Joined: Feb 2010
Posts: 312
Likes: 0
From: Pinawa, MB, CANADA
I bought a 3M kit for my drill that matches A14Austin's routine, I used it on some heavily oxidized lenses on a '99 3500 Ram Van (my Government vehicle) - I was somewhat impressed with the results.
That being said, if it was my own truck, I'd go ebay.
That being said, if it was my own truck, I'd go ebay.

Veteran
Joined: Feb 2010
Posts: 423
Likes: 0
From: Houston, TX
I used the 3M kit as well. It worked the best out of the other numerous head light kits I've used. I was really happy with the results but it seems after a few months they went back to being very yellowed again. I did not routinely use the plastic polish afterwards tho.
Trending Topics
Captain
Joined: Sep 2009
Posts: 538
Likes: 0
From: Southern Louisiana
Ditto. After trying several kits, I just bought a set on ebay for $95 shipped with black housings already in them, which compliments the truck better and swapped them out. When these cloud or mess up, I will just save myself the trouble and order another set.
