


Spark plug change - verdict is in - need a lil help

Thread Starter
|
Record Breaker
Joined: May 2009
Posts: 1,130
Likes: 1
From: Eastern, NC
Okay, I've seen claims from as little as an hour (in a post here today) up to 5 hours to do this job. I heard it's not so bad to it's a biotch to do. My verdict is in - it's somewhere in the middle of both of those claims. If you can do this job and do it right in an hour, I'll give you 200 bucks to do mine next time around. But I want to see an unspliced, unedited video of you doing it in that amount of time first. Sorry, you gotta prove that before I'll believe it. Now, I'm talking non-pro's here with ordinary tools.
Anyway, I digress. I spent 2.5 hours and got 12 plugs changed. You can probably guess which 4 didn't get done. The 2 cylinders farthest back on the driver's side. I need some advice, guys, on getting those suckers changed. And, no I'm not interested in removing the brake booster from the firewall. I've got a proper plug socket, a 3/8" socket wrench, a 1/2" socket wrench with a 1/2" to 3/8" adapter, a u-joint, a 6" extension, and a 3" extension. I've got a 10mm socket and a 10mm wrench open on one end and closed on the other. Any magical voodoo tips on doing these two cylinders or am I going to have to try and do it by feel, especially on the back one? I'm tempted to call the shadetree wrench down the street and get him to do it but I figure if he can do it, I should be able to.
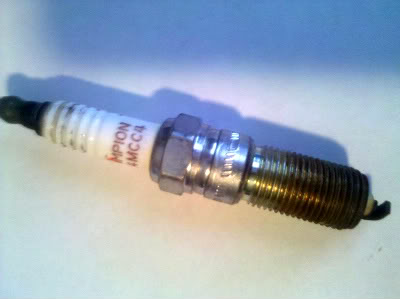
66.5k on the original plugs. They all pretty much looked the same when I pulled them. Like the pic below. I replaced them with the OEM champ copper cores.
Anyway, I digress. I spent 2.5 hours and got 12 plugs changed. You can probably guess which 4 didn't get done. The 2 cylinders farthest back on the driver's side. I need some advice, guys, on getting those suckers changed. And, no I'm not interested in removing the brake booster from the firewall. I've got a proper plug socket, a 3/8" socket wrench, a 1/2" socket wrench with a 1/2" to 3/8" adapter, a u-joint, a 6" extension, and a 3" extension. I've got a 10mm socket and a 10mm wrench open on one end and closed on the other. Any magical voodoo tips on doing these two cylinders or am I going to have to try and do it by feel, especially on the back one? I'm tempted to call the shadetree wrench down the street and get him to do it but I figure if he can do it, I should be able to.
66.5k on the original plugs. They all pretty much looked the same when I pulled them. Like the pic below. I replaced them with the OEM champ copper cores.
Record Breaker
Joined: Nov 2008
Posts: 2,273
Likes: 1
From: Pierce County, Wa
Yea I just did mine too. I did the those two first! lol, I wanted to get all the cursing done before the wife got home. Did you get the boots off and coil packs off? What I did with those plugs is drop the spark plug socket down first. Then a 3" extension and I was using a 1/2" drive with a 1/2" to 3/8" adapter which gave me the clearance to clear the 10mm bolt studs for the coil packs. I then removed the tools in reverse order. You'll need to get both hands in there to do it when removing so the plug doesnt fall back in. My knees are still sore from kneeling on that crossmember all day long.
Thread Starter
|
Record Breaker
Joined: May 2009
Posts: 1,130
Likes: 1
From: Eastern, NC
So far, getting the plugs out or threading the new ones back in hasn't been an issue. If/when the plug didn't come up with the socket, I just dipped the plug boot back down in there and pulled the plug out. Putting them back in, I just dropped them in the hole and started turning easy at first to make sure it threaded properly but none seemed to want to cross up on me. The biggest issue I've had was getting the plug socket lodged down too far over the plug such that the extension won't grab it enough to pull it out but that's just a little trial and error to get it out.
I was going to do those two first but I couldn't figure out the right combination of tools to get things to fit so I moved on to everything else. The passenger side was fairly quick and simple except for a couple of clearance issues that took some thought and trial and error to get around. I just removed the air box cover and hose and moved it off to the side and had access to all 4 cylinders.
I'm not going anywhere tonight and I've had enough for today from all the kneeling and awkward arm bending and scraping. But I'll give those other 2 another shot tomorrow when I get time.
Does it help or is it a must to unplug and move the coil packs to get better access? I tried doing that on the rear passenger side coil but the plug didn't want to come off of the coil pack and I didn't want to force it.
Grand Champion
Joined: Dec 2008
Posts: 6,556
Likes: 1
From: TX
Trending Topics
Record Breaker
Joined: Nov 2008
Posts: 2,273
Likes: 1
From: Pierce County, Wa
pfft, I wouldnt worry about being 8k over. My truck was 100k over due and it ran fine. The plugs all looked like this. Not the best, but, I'm not a believer in having them changed every 30k anymore.


I don't understand???
I do mine in around an 1.5 hours
I'm using a 3/8" swivel head plug socket, the std 3-4" extension, and a 3/8 rachet.
For the coil packs, a 1/4"drive ratchet,with short extension and 10mm std socket.
If you put some light silicone grease on the inside rubber boot of the plug socket, it comes off easier. Put the new plug into the socket before you drop it in the hole, without the ratchet on it, it will drop right in, and there is enough of the extension above the valve cover that you can wind it down with you fingers to the seat, then another 1/4-3/8 turn and your done. The biggest problem I have, is the extension sometimes pulls out of the plug socket. These few tools are available at sears. I don't care much for CRAPSMAN tools anymore, but they do work, with a little swearing
All Star
Joined: Dec 2008
Posts: 982
Likes: 0
From: Lynchburg, VA
Im dreading this too. But after having the airbox off the 'Rango today, I think it'll be manageable, not as tight in there as I had thought. Maybe Im just being naive about it, but I think I have the proper tools, starting with the swivel-head plug sockets, as mentioned above. They've saved my azz on that 5.2 in my GC....
Good luck Greg, you can get it buddy, don't pay someone else just outta frustration. Like you said, if the shadetree wrencher can get it, so can you
Good luck Greg, you can get it buddy, don't pay someone else just outta frustration. Like you said, if the shadetree wrencher can get it, so can you