

2011 Mineral Gray Durango Crew V6

Thread Starter
|
Professional
Joined: Jul 2012
Posts: 146
Likes: 1
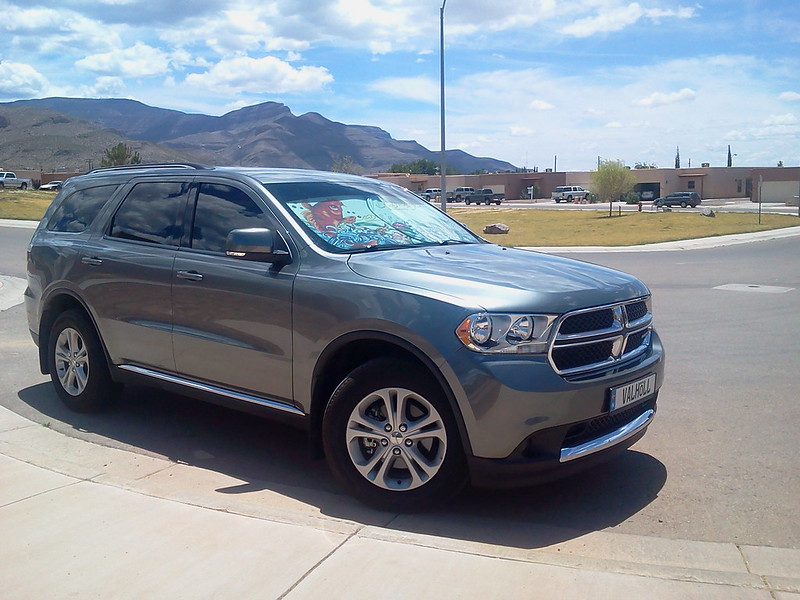
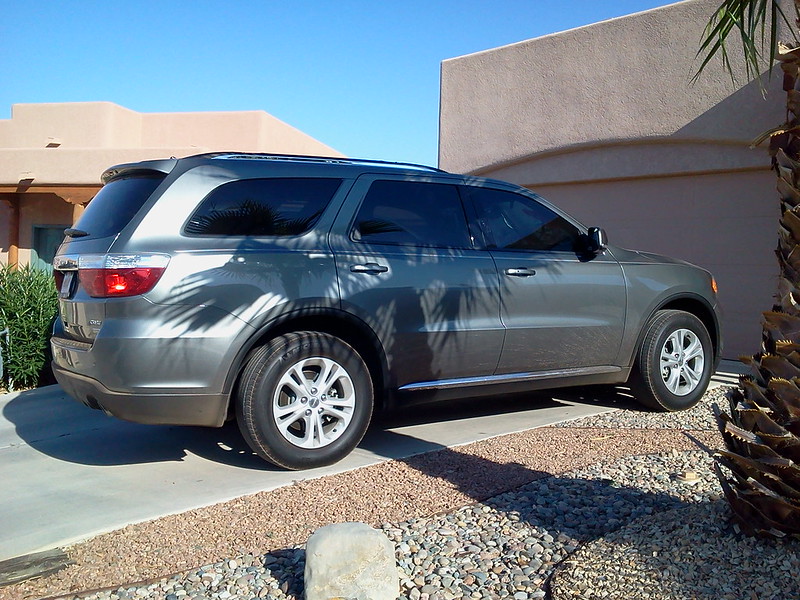
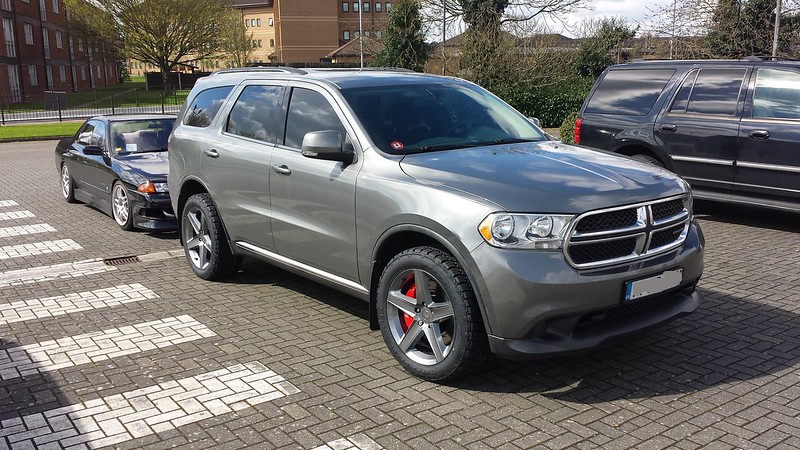
I'm finally going to get around to listing my 2011 Durango and everything I've done to it. Here it is how I got it in 2012:
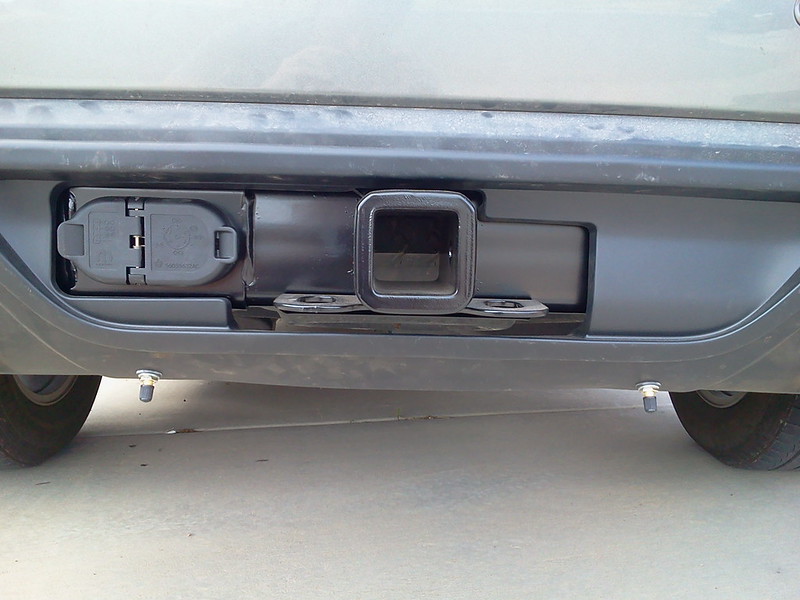
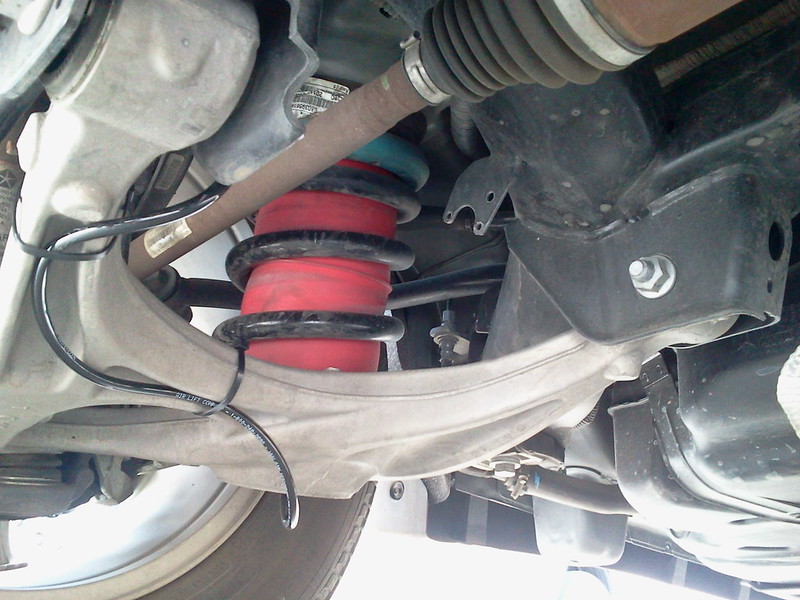
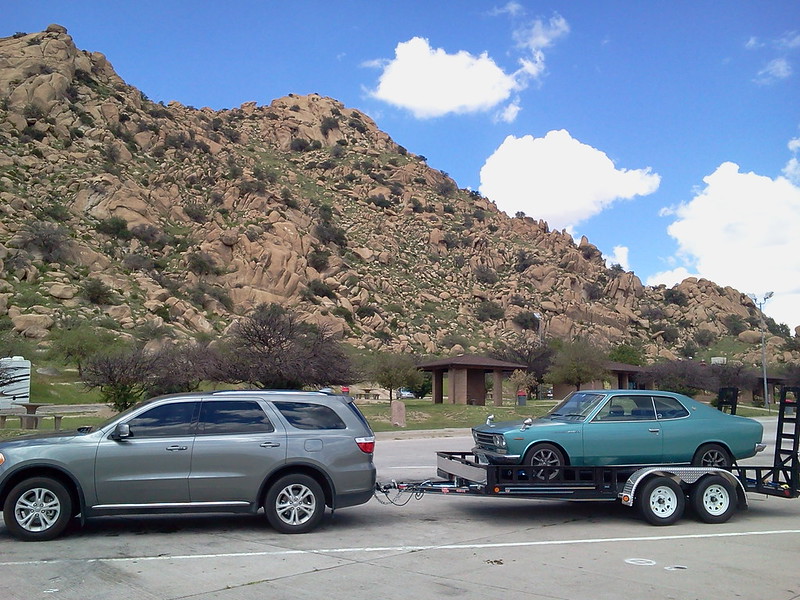
I promptly starting modifying this. I bought it with the intent of towing my project car and while it wasn't originally equipped with the towing package, being in the southwest desert it had the cooling portion of the tow package. So I immediately got the factory tow hitch and wire harness installed. I also added the rear spring air helper kit, which wasn't enough and ended up adding the rear self leveling tow package shocks:
Finally it was ready to tow and made a round trip from New Mexico to L.A. and Las Vegas with the project car: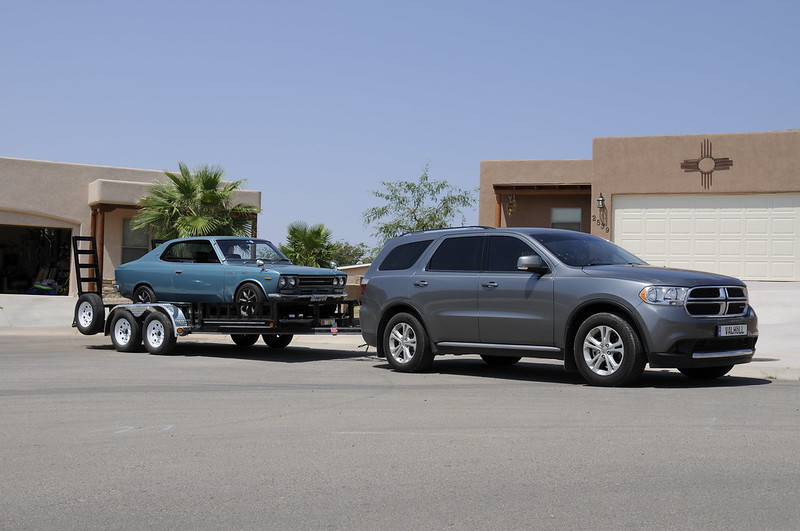
Here's the Durango next to the off-road toy I had as well:

One of the things I did not like was the ugly chrome on the bottom of the front fascia. Always seemed out of place. But I liked the Heat and R/T model's more aggressive front lip. So I ordered just the front lip and replaced that:
The original:

Much better:
I have since gone on to add the front tow hooks:

After all this, I have moved to the United Kingdom. I've lived here before and one thing I new would be a factory was taking the Durango trough roundabouts. While it handles great, roundabouts wear the crap out of tires (on the left part of the tire) and the Durango still didn't handle like I would have preferred. From the previous vehicles I've had, I learned how great a front strut tower brace is for both handling and helping mitigate the tire wear on the front left tire. So I found the Arrington brace for the D and threw that on. At the same time I wanted to make the throttle response a little better and decided to get the Injen intake and fastman ported throttle body (forgive the dirty/dusty condition, hard to keep an engine bay clean in the desert):

Both mods were well worth the upgrade. I completely enjoy how the D's handling is now and the throttle response is perfect.
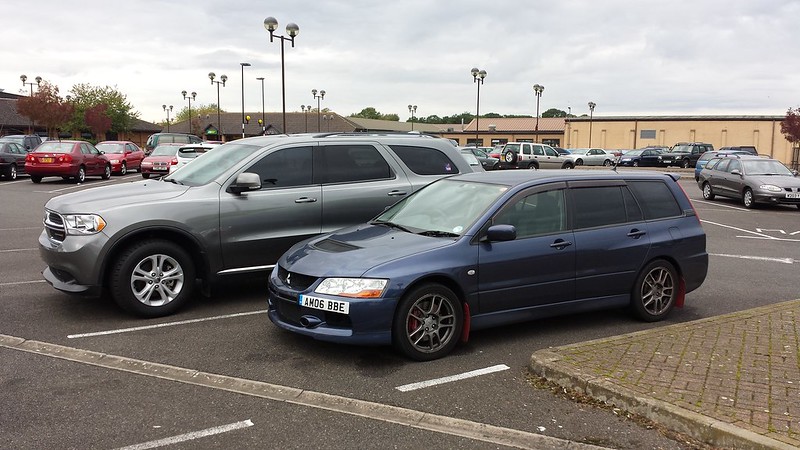
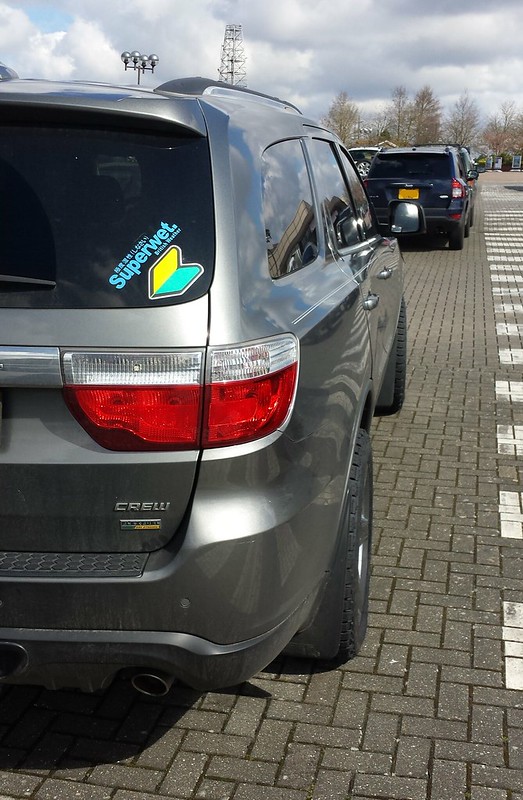
Here is the Durango after arriving in the UK with the Evo Wagon I had gotten while waiting for the Durango and family to arrive:
Next on the list of things to do is the Jeep SRT brake upgrade. I have not liked how the brakes feel when initially braking. It almost feels like they aren't going to work at times. The brakes have been solid and when applying more pressure they have never failed or felt like that past the initial part of braking. Plus having used this for towing and will continue to I would like the best brakes I can get. So I have the brake hardware all in route now. Brembo calipers, EBC USR slotted rotors, EBC Yellowstuff pads and braided steel brake lines.
I promptly starting modifying this. I bought it with the intent of towing my project car and while it wasn't originally equipped with the towing package, being in the southwest desert it had the cooling portion of the tow package. So I immediately got the factory tow hitch and wire harness installed. I also added the rear spring air helper kit, which wasn't enough and ended up adding the rear self leveling tow package shocks:
Finally it was ready to tow and made a round trip from New Mexico to L.A. and Las Vegas with the project car:
Here's the Durango next to the off-road toy I had as well:
One of the things I did not like was the ugly chrome on the bottom of the front fascia. Always seemed out of place. But I liked the Heat and R/T model's more aggressive front lip. So I ordered just the front lip and replaced that:
The original:
Much better:
I have since gone on to add the front tow hooks:
After all this, I have moved to the United Kingdom. I've lived here before and one thing I new would be a factory was taking the Durango trough roundabouts. While it handles great, roundabouts wear the crap out of tires (on the left part of the tire) and the Durango still didn't handle like I would have preferred. From the previous vehicles I've had, I learned how great a front strut tower brace is for both handling and helping mitigate the tire wear on the front left tire. So I found the Arrington brace for the D and threw that on. At the same time I wanted to make the throttle response a little better and decided to get the Injen intake and fastman ported throttle body (forgive the dirty/dusty condition, hard to keep an engine bay clean in the desert):
Both mods were well worth the upgrade. I completely enjoy how the D's handling is now and the throttle response is perfect.
Here is the Durango after arriving in the UK with the Evo Wagon I had gotten while waiting for the Durango and family to arrive:
Next on the list of things to do is the Jeep SRT brake upgrade. I have not liked how the brakes feel when initially braking. It almost feels like they aren't going to work at times. The brakes have been solid and when applying more pressure they have never failed or felt like that past the initial part of braking. Plus having used this for towing and will continue to I would like the best brakes I can get. So I have the brake hardware all in route now. Brembo calipers, EBC USR slotted rotors, EBC Yellowstuff pads and braided steel brake lines.
Thread Starter
|
Professional
Joined: Jul 2012
Posts: 146
Likes: 1
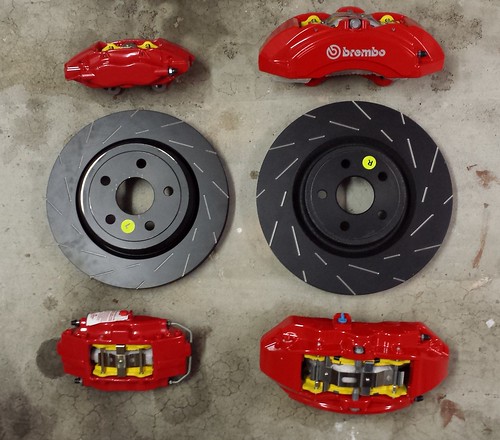
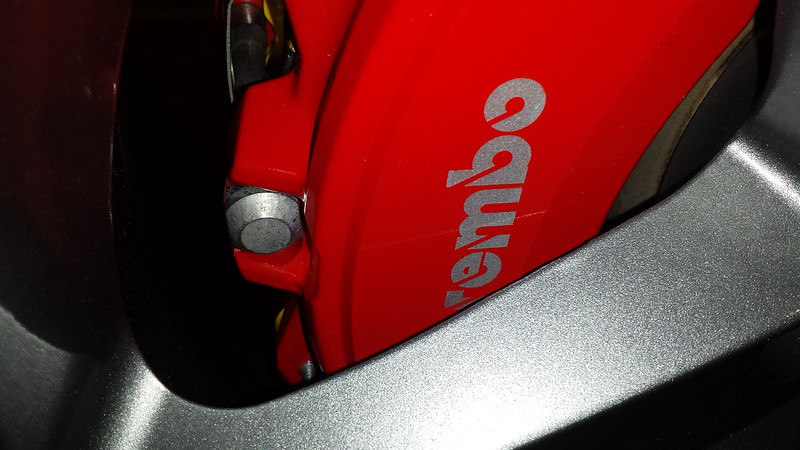
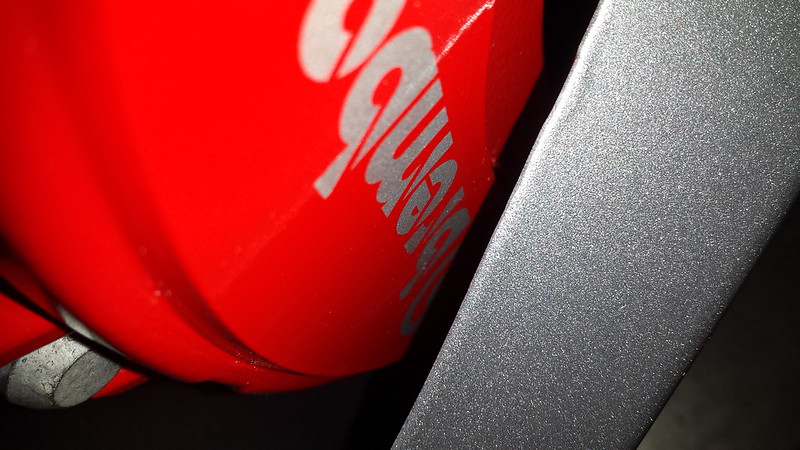
Parts are starting to show up for the brake conversion. The the calipers, pads and rotors have arrived:
Assembled the calipers with EBC Yellowstuff pads:

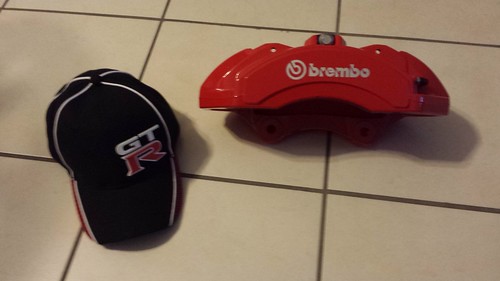
I had to include this picture of a front caliper with a hat for a frame of reference in size...
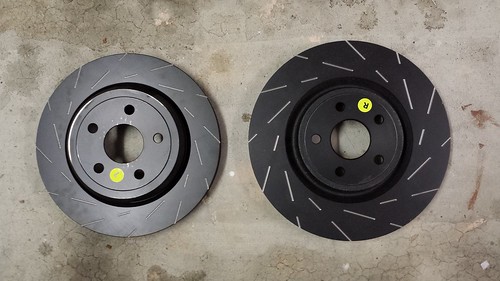
Also the EBC USR slotted rotors look great:
Just trying to figure out if I'm going to go with the 20x10" rims or the 20x9". I would like the 20x10, but the tire options are very limited with that one.
Assembled the calipers with EBC Yellowstuff pads:
I had to include this picture of a front caliper with a hat for a frame of reference in size...
Also the EBC USR slotted rotors look great:
Just trying to figure out if I'm going to go with the 20x10" rims or the 20x9". I would like the 20x10, but the tire options are very limited with that one.
Last edited by Norge; Nov 20, 2015 at 05:22 PM.
Thread Starter
|
Professional
Joined: Jul 2012
Posts: 146
Likes: 1
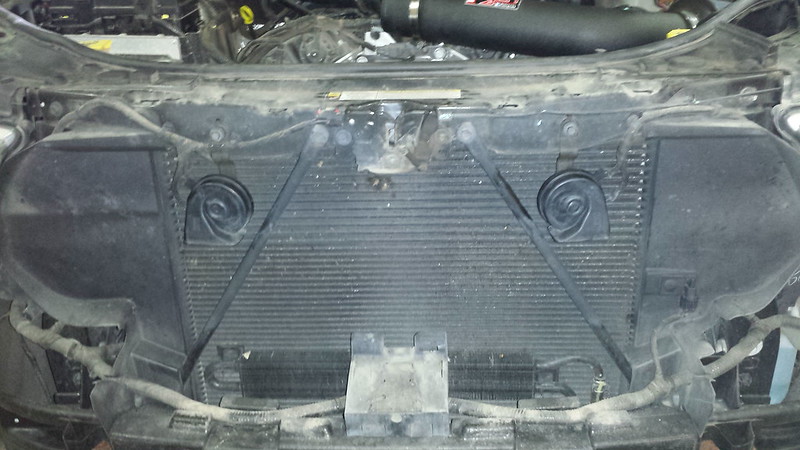
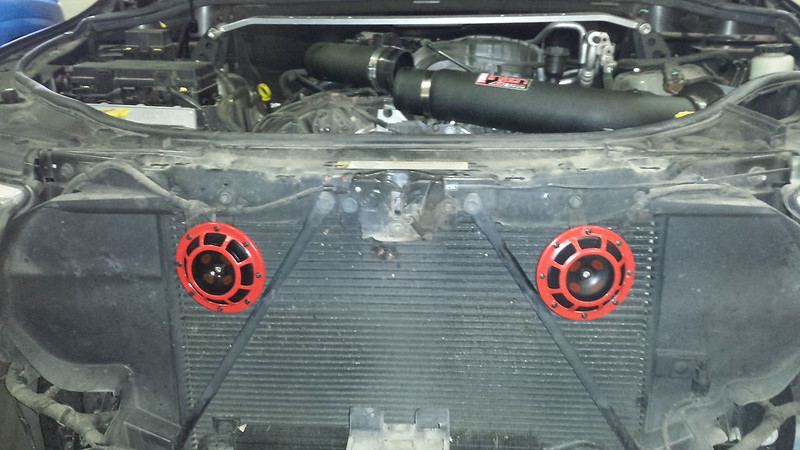
I'm still awaiting the wheels and tires to finish the brake upgrade. In the meantime I've had a pair of Hella horns that I finally got around to doing. I dislike that accessing it requires the front bumper to be removed before the grill can be. Here's the old vs new:

Thread Starter
|
Professional
Joined: Jul 2012
Posts: 146
Likes: 1
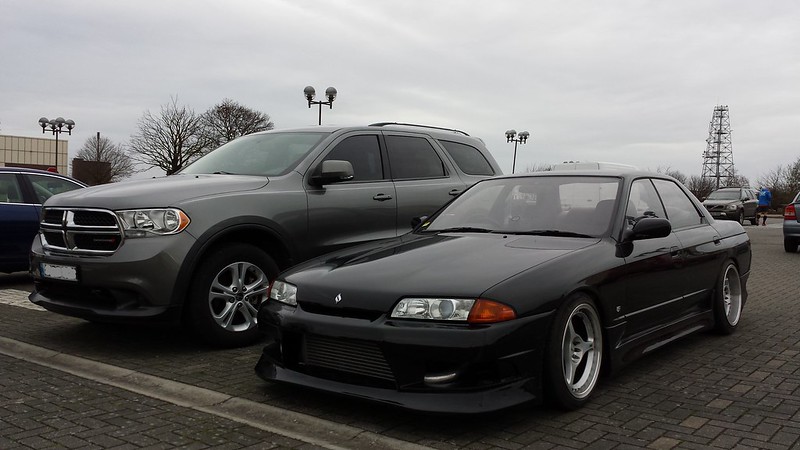
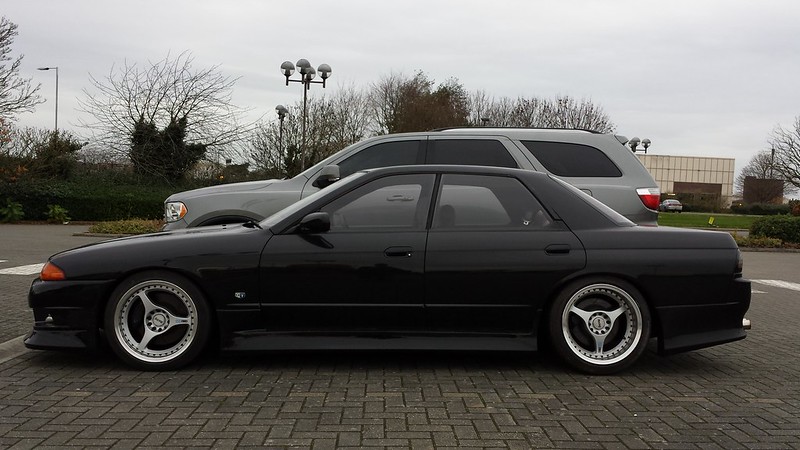
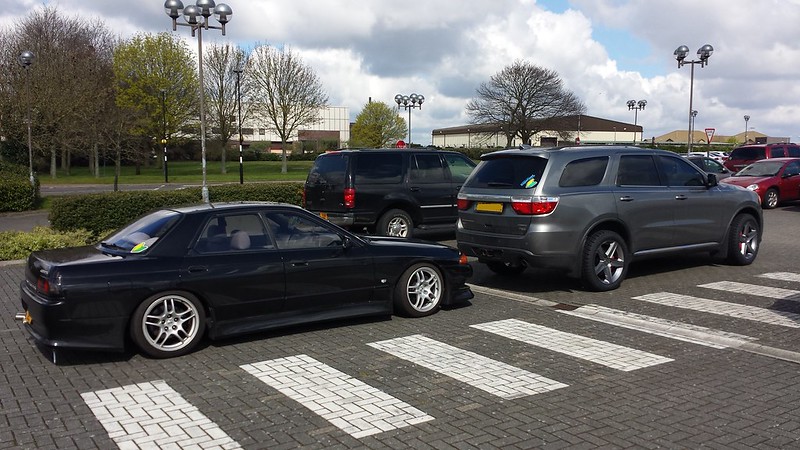
One of the things that happened back in December was that the other car, a 1991 Skyline had arrived and delayed getting the wheels and tires for the Durango. This was how the Skyline initially was (the wheels were quick to be replaced):

Thread Starter
|
Professional
Joined: Jul 2012
Posts: 146
Likes: 1
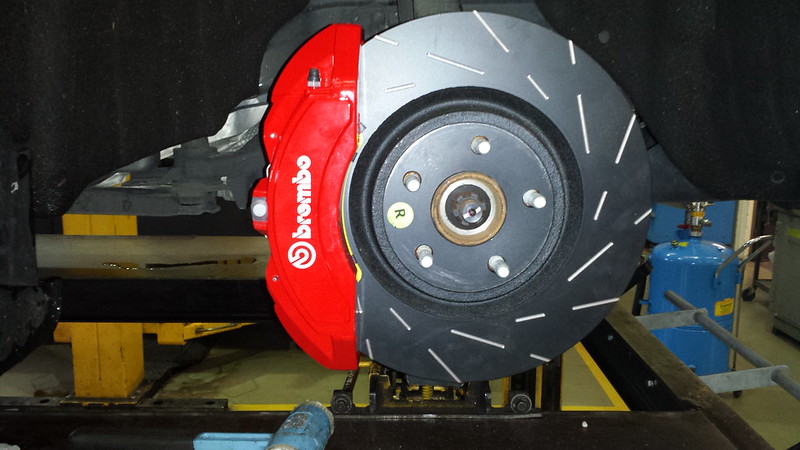
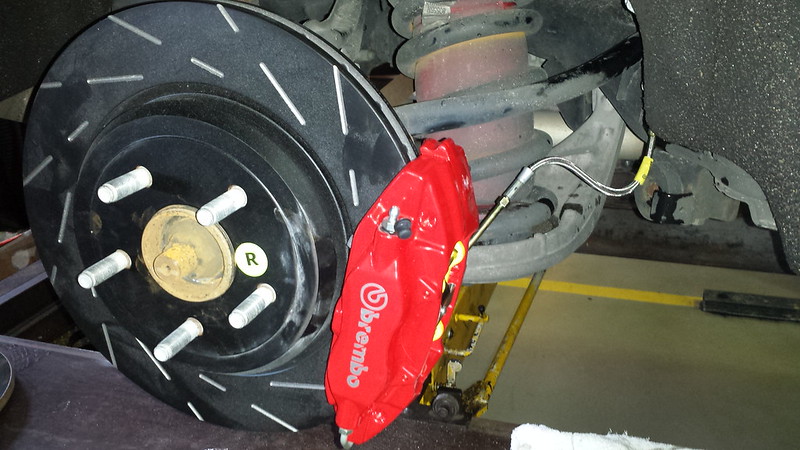
After impatiently waiting I finally got around to being able to get the tires (when with Nitto Terra Grappler G2) and wheels needed for the brake upgrade to be installed. I know it's been posted a few times on here about the Jeep SRT brake upgrade to the D. I followed suit, I got the Competition Gray Jeep SRT 20x9 replicas from Factory Reproductions. I mocked up the new front wheel, rotor and brake caliper/pads to verify the wheel would clear. No issues, has about 1/4" of clearance:
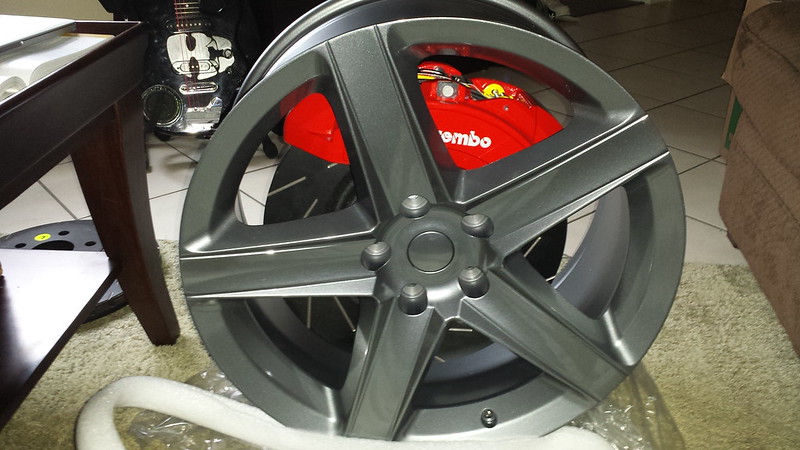
So I got the Durango on the lift and started the switch. After installing the rotor and caliper I test fitted the clearance again before pulling the old TPS out from the original rim. Again, no issues, clearance was great:
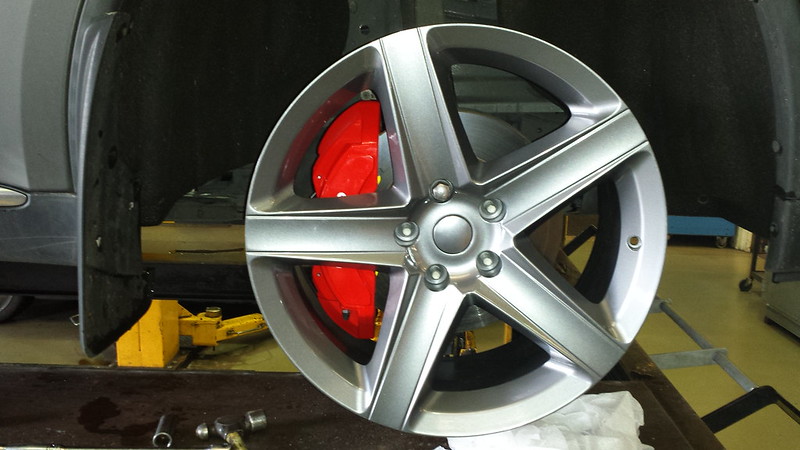
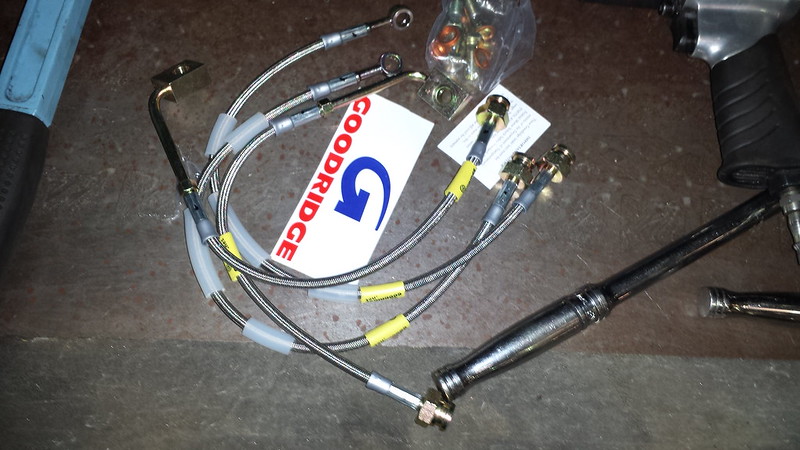
For the brakes, other than the SRT Brembo caliper, I went with the EBC USR slotted rotors, EBC Yellowstuff pads and the goodridge Jeep SRT brake line kit:
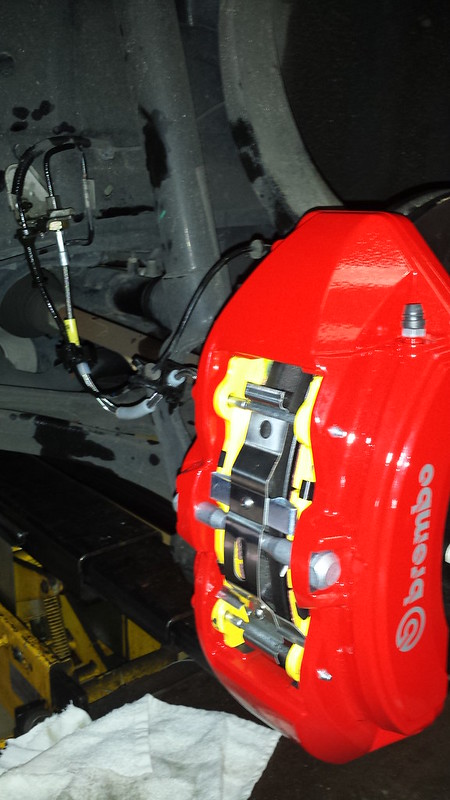
Got the fronts on and bled with no issue. Here's the halfway progress:
Time to do the same to the rear:
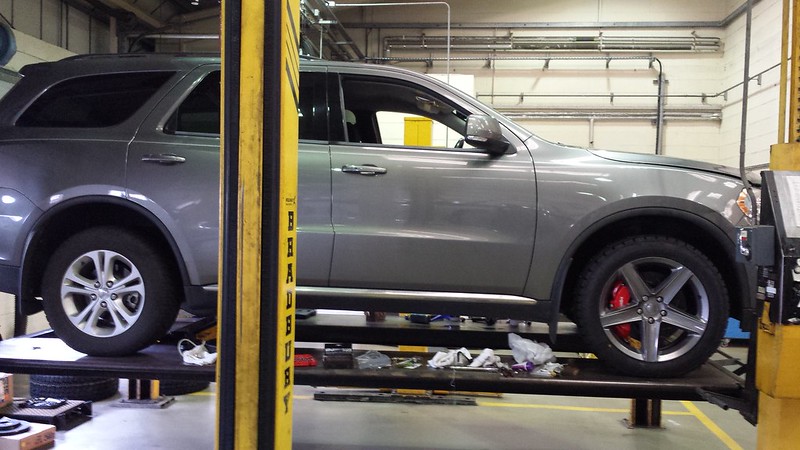
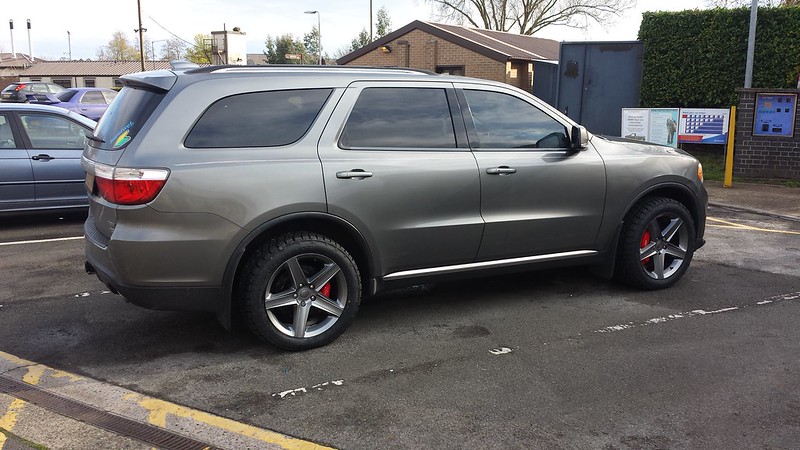
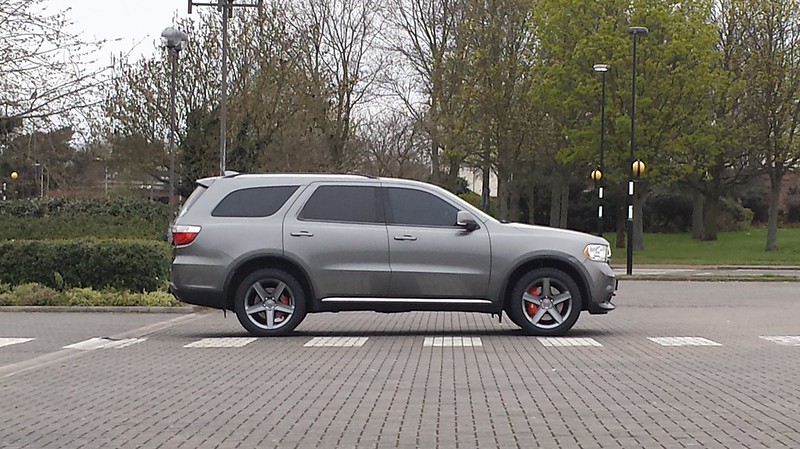
And then all done. Really like the new stance as well:
Still breaking them in of course, so I'll have to wait to give an impression after that time period. I was very curious on weight difference of the upgrade, something previous forum discussions hadn't touched on. So I took weights of things as I went along and here's the results:
WHEEL & TIRE:
Old wheel/tire inflated: 67 lbs
New wheel/tire inflated: 77 lbs
FRONT BRAKES:
old - one caliper with pads: 19.5 lbs
old - one rotor disc: 24 lbs
new - one Brembo caliper with pads: 16 lbs
new - one EBC rotor: 32 lbs
REAR BRAKES:
old - one caliper with pads: 8.6 lbs
old - one rotor disc: 17 lbs
new - one Brembo caliper with pads: 6.5 lbs
new - one EBC rotor: 23.5 lbs
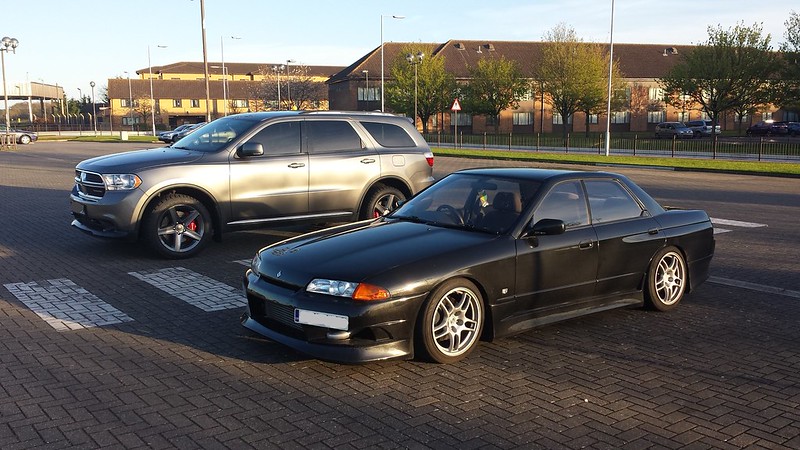
So the old brakes, wheels and tires weighted 406.2 lbs and the new weighed 464 lbs, so a difference of 57.8 lbs heavier. Not bad at all. Of course, time to end the update with some more eye candy... it's the two toys together:
So I got the Durango on the lift and started the switch. After installing the rotor and caliper I test fitted the clearance again before pulling the old TPS out from the original rim. Again, no issues, clearance was great:
For the brakes, other than the SRT Brembo caliper, I went with the EBC USR slotted rotors, EBC Yellowstuff pads and the goodridge Jeep SRT brake line kit:
Got the fronts on and bled with no issue. Here's the halfway progress:
Time to do the same to the rear:
And then all done. Really like the new stance as well:
Still breaking them in of course, so I'll have to wait to give an impression after that time period. I was very curious on weight difference of the upgrade, something previous forum discussions hadn't touched on. So I took weights of things as I went along and here's the results:
WHEEL & TIRE:
Old wheel/tire inflated: 67 lbs
New wheel/tire inflated: 77 lbs
FRONT BRAKES:
old - one caliper with pads: 19.5 lbs
old - one rotor disc: 24 lbs
new - one Brembo caliper with pads: 16 lbs
new - one EBC rotor: 32 lbs
REAR BRAKES:
old - one caliper with pads: 8.6 lbs
old - one rotor disc: 17 lbs
new - one Brembo caliper with pads: 6.5 lbs
new - one EBC rotor: 23.5 lbs
So the old brakes, wheels and tires weighted 406.2 lbs and the new weighed 464 lbs, so a difference of 57.8 lbs heavier. Not bad at all. Of course, time to end the update with some more eye candy... it's the two toys together:
Last edited by Norge; Apr 24, 2016 at 01:11 AM.
Thread Starter
|
Professional
Joined: Jul 2012
Posts: 146
Likes: 1
The brakes have been broken in, they have definitely been loud as they have, and are getting much better. The brakes I have could take 700-1000 miles to get past the screeching part. When I did the 200 mile bed in (braking hard from 60 to 10 mph 5x)... WOW! This thing stops better than some of the sports cars I've driven! And with the Yellowstuff pads... there was no brake fade, in fact the grip was better for the last 3 braking than the first 2. Definitely a very worthwhile upgrade, especially since my wife ended up having to use them when someone pulled out right in front of her... she thinks if the old brakes were on it she would have hit.
In other news...
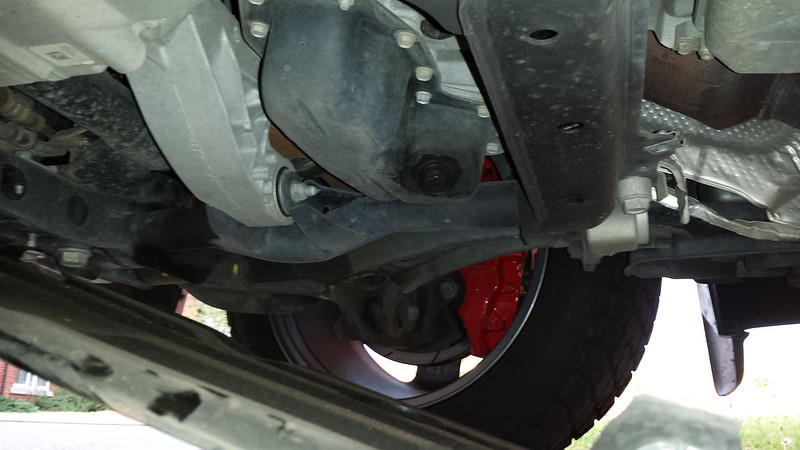
One thing I have always disliked are potentially exposed underside parts on a vehicle. Especially oil and transmission pans. So one of the upgrades the D got a couple years back was an axle/oil pan skid plate. This is one of the parts of the skid plate group package that can be bought on its own, part number 82211995. I never posted pictures so here it is installed:
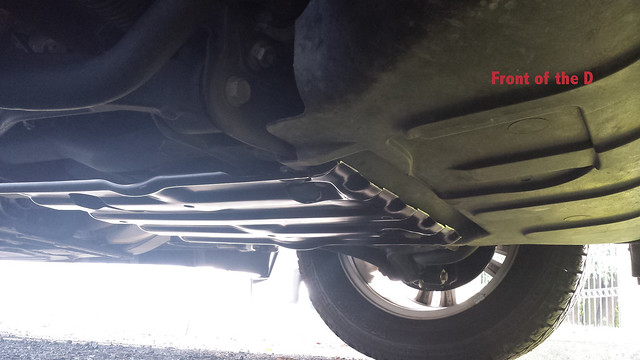
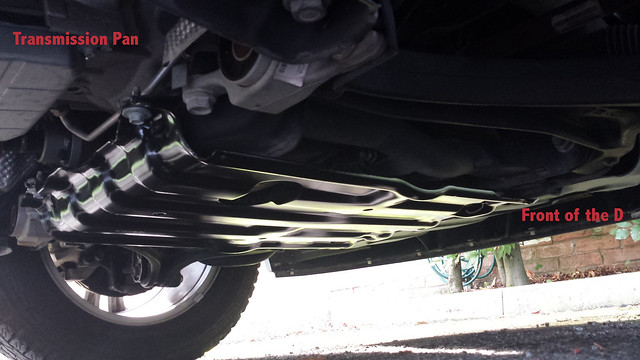
I've liked the piece of mind having it, and pretty sure it was useful one day following a storm when I ended up having to straddle over a tree lim. The part I haven't liked is that the transmission oil pan has no protection as you can see in the picture. While it does sit up a bit, I still don't like that it could be exposed to bouncing debris. I've checked the skid plate group, and there is no skid plate available for it from MOPAR and the parts list has no stock cover for any of the Durangos. I looked at the underside of a co-workers Jeep Grand Cherokee that has a skid plate option added, and noticed that there's a cover of some sort for his transmission pan. After digging, I found that the Jeep Grand Cherokee has this cover as part of the normal OEM parts and it looks like the mounting/dimensions are the same so I should be able to just bolt it on to the Durango. I've ordered one (part # 05182517AB) with the hardware needed and will post info regarding its fitment once it shows.
In other news...
One thing I have always disliked are potentially exposed underside parts on a vehicle. Especially oil and transmission pans. So one of the upgrades the D got a couple years back was an axle/oil pan skid plate. This is one of the parts of the skid plate group package that can be bought on its own, part number 82211995. I never posted pictures so here it is installed:
I've liked the piece of mind having it, and pretty sure it was useful one day following a storm when I ended up having to straddle over a tree lim. The part I haven't liked is that the transmission oil pan has no protection as you can see in the picture. While it does sit up a bit, I still don't like that it could be exposed to bouncing debris. I've checked the skid plate group, and there is no skid plate available for it from MOPAR and the parts list has no stock cover for any of the Durangos. I looked at the underside of a co-workers Jeep Grand Cherokee that has a skid plate option added, and noticed that there's a cover of some sort for his transmission pan. After digging, I found that the Jeep Grand Cherokee has this cover as part of the normal OEM parts and it looks like the mounting/dimensions are the same so I should be able to just bolt it on to the Durango. I've ordered one (part # 05182517AB) with the hardware needed and will post info regarding its fitment once it shows.
Thread Starter
|
Professional
Joined: Jul 2012
Posts: 146
Likes: 1
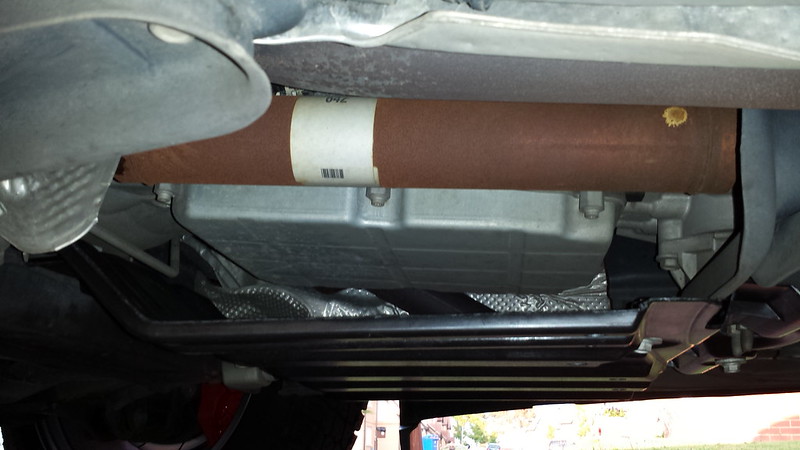
The transmission belly pan showed up! It's a plastic type like the very front underbody protection, but it should work for my intension of protecting the transmission pan from potential road debris.
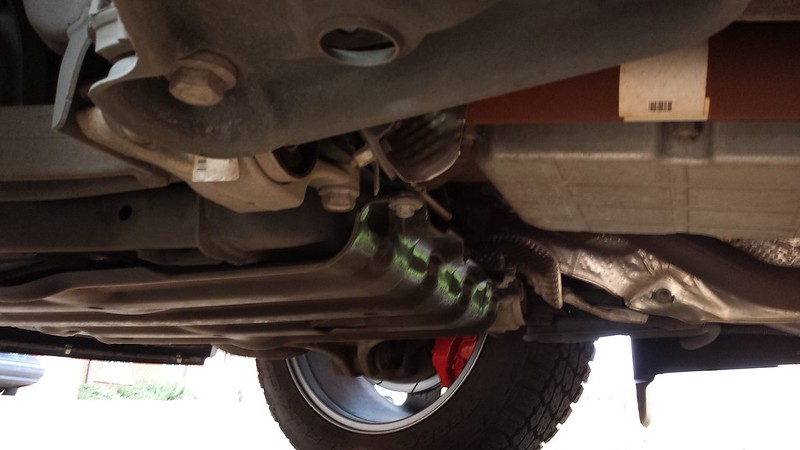
Heres the transmission pan, seems pretty exposed for what looks like an aluminum pan:
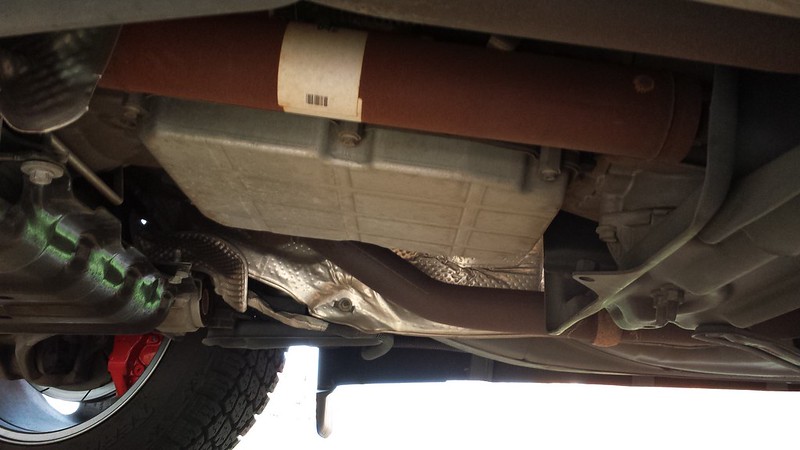
The metal front axle/oil pan skid plate covers this transmission belly pan cover, so it needed to come down:
Here's the front axle/oil pan skid plate with the rear of it dropped to install the belly pan cover:
 [/url]
With it lowered you can see how the oil pan sits in the front axle area a bit exposed:
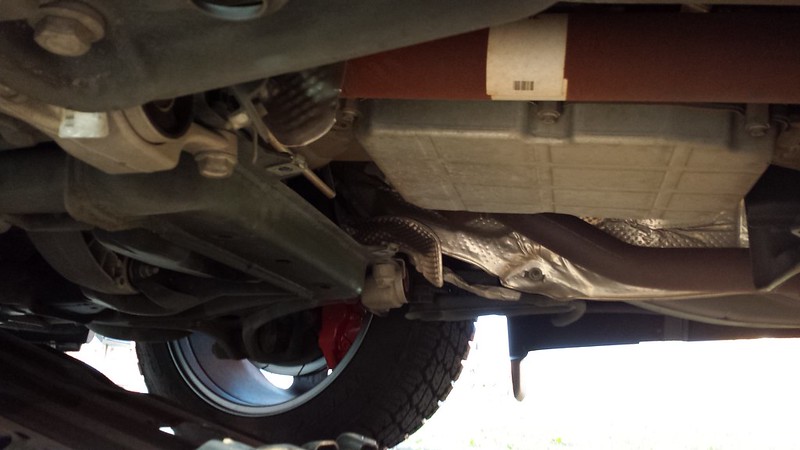
Time to install the transmission belly pan cover, here it is:

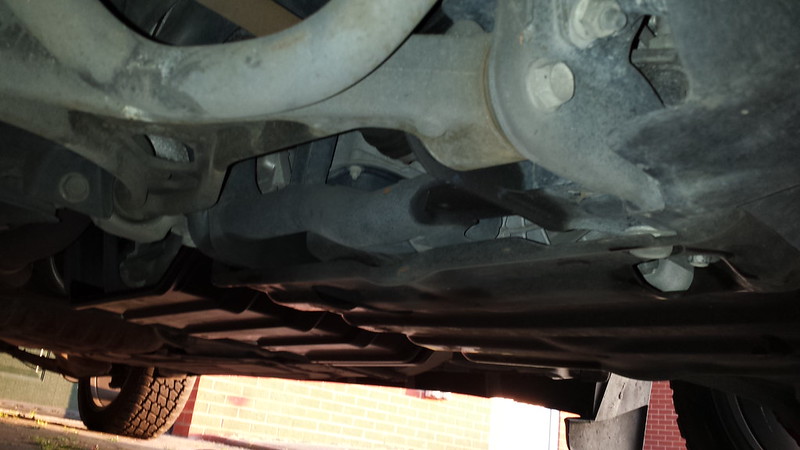
Here it is installed, looking at it from the side:
And with the front axle/oil pan skid plate and transmission belly pan cover from the side:
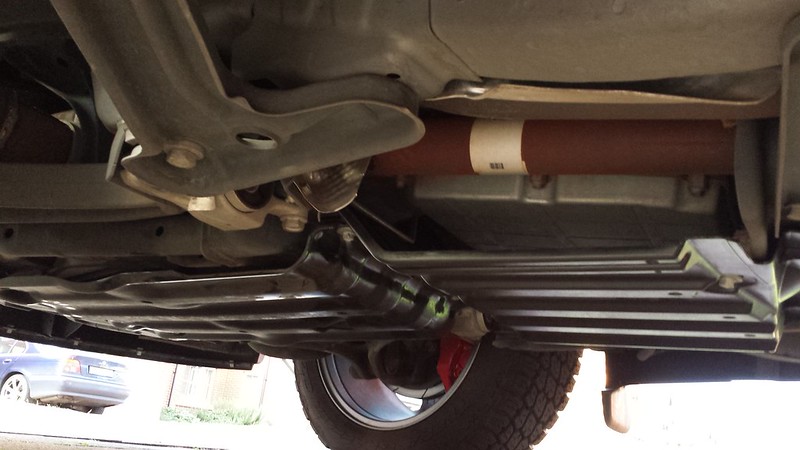
Below are the two covers looking at them from just inside the front tire. You can see that they will do exactly what is needed from them, protecting the pans from any road debris:
Heres the transmission pan, seems pretty exposed for what looks like an aluminum pan:
The metal front axle/oil pan skid plate covers this transmission belly pan cover, so it needed to come down:
Here's the front axle/oil pan skid plate with the rear of it dropped to install the belly pan cover:
[/url]With it lowered you can see how the oil pan sits in the front axle area a bit exposed:
Time to install the transmission belly pan cover, here it is:
Here it is installed, looking at it from the side:
And with the front axle/oil pan skid plate and transmission belly pan cover from the side:
Below are the two covers looking at them from just inside the front tire. You can see that they will do exactly what is needed from them, protecting the pans from any road debris:
Trending Topics
Thread Starter
|
Professional
Joined: Jul 2012
Posts: 146
Likes: 1
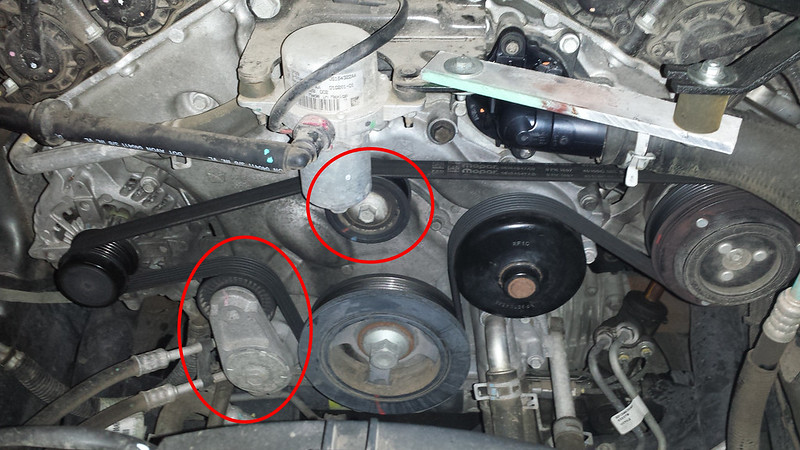
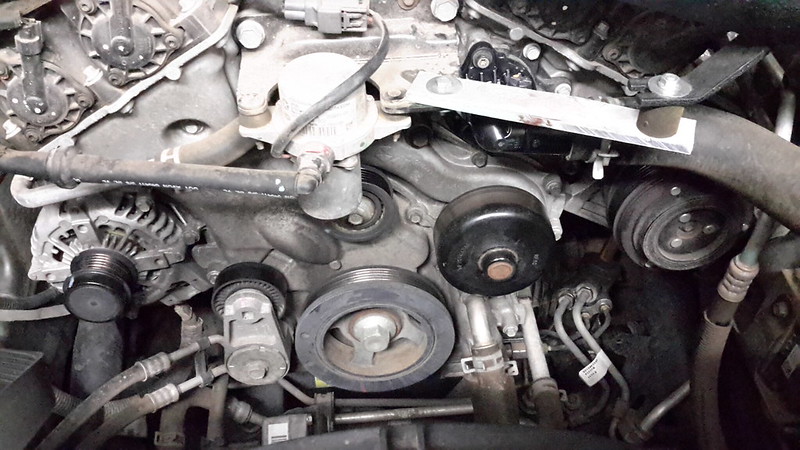
I've had a check engine light that would randomly come up for the coolant temp (P0128), so swapped out the thermostat. A week and a half later this whine started, when I took off the serpentine belt the idler puller doesn't rotate smoothly, you can feel it clicking. Also, the power steering pulley showed signs of slipping from the belt, so got a new belt and belt tensioner to hopefully resolve that issue. While checking it out the hood lift strut kept giving out and ordered one of those. Then the next day after swapping in some LEDs I had my wife start it to make sure the reverse lights were working and it got another check engine light! Got mad thinking it was the P0128 again, but it was a P0455 (Evaporative Emission System Leak Detected [large leak]). Took the gas cap off and looks like the seal on it is crap, so ordered a new cap. After thinking about it, it's probably the evap purge solenoid, so getting one also.
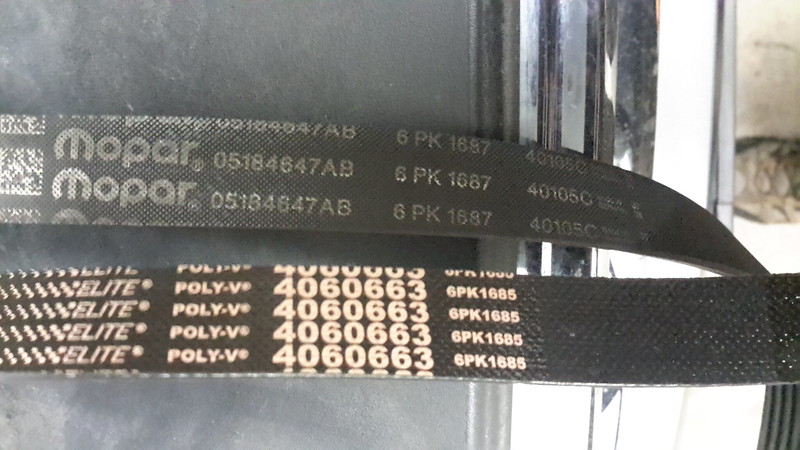
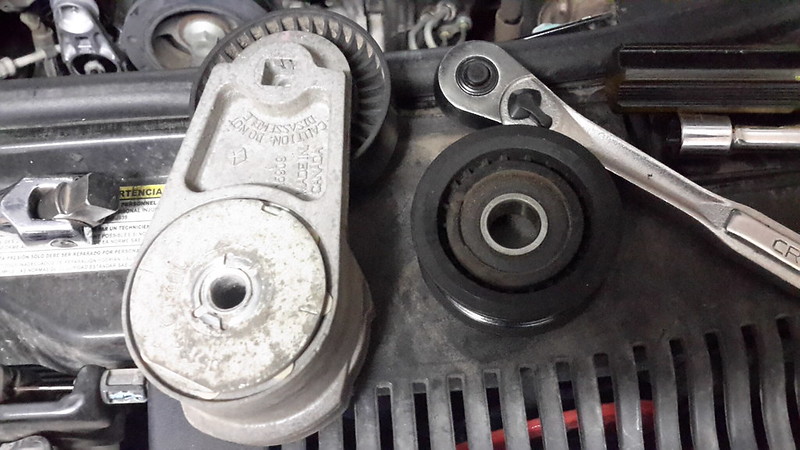
Got the idler puller and belt tensioner along with a belt last week. The belt was Dayco, but the back side of it was really slick so didn't even want to try it since that's what drives the water pump pulley. Ordered a Continental Elite Poly-V belt that has the grip texture on the rear side of the belt. Put them all on today and the whine's gone. Also get the hood prop swapped out so it doesn't fall on me again.


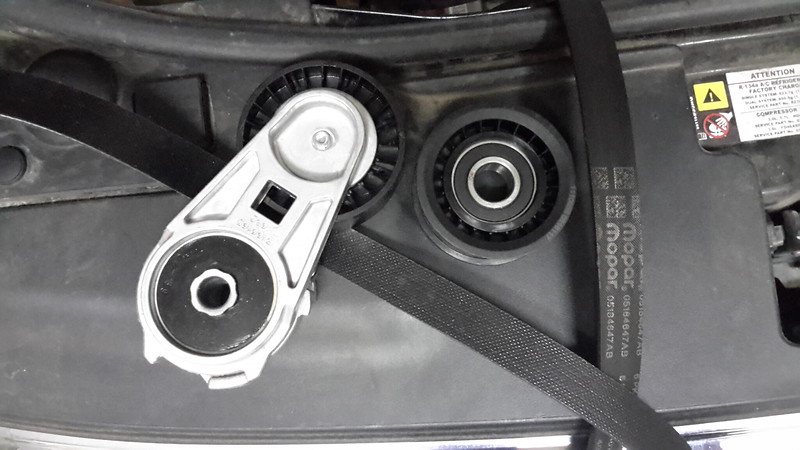
Got the idler puller and belt tensioner along with a belt last week. The belt was Dayco, but the back side of it was really slick so didn't even want to try it since that's what drives the water pump pulley. Ordered a Continental Elite Poly-V belt that has the grip texture on the rear side of the belt. Put them all on today and the whine's gone. Also get the hood prop swapped out so it doesn't fall on me again.
Thread Starter
|
Professional
Joined: Jul 2012
Posts: 146
Likes: 1
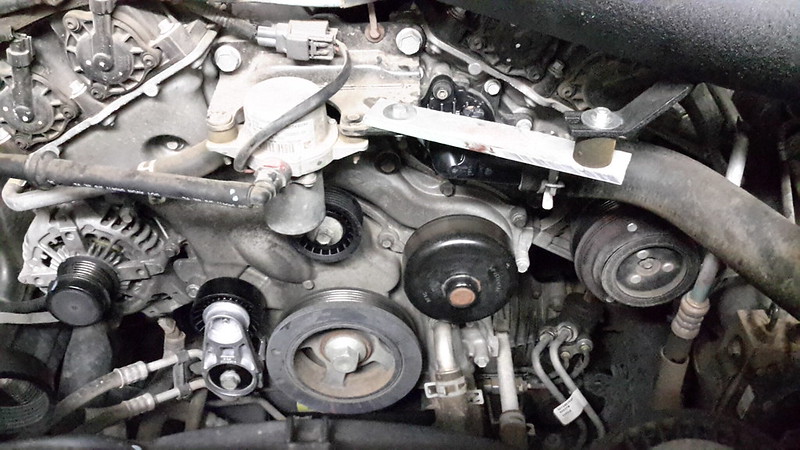
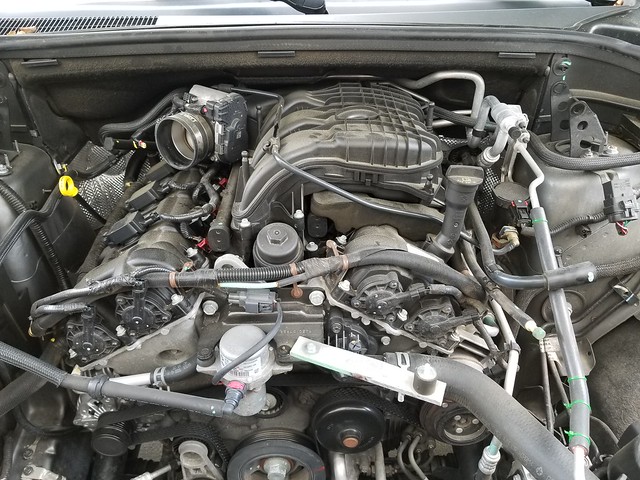
My D has gone over 100,000 miles this month, so it's time to change out the spark plugs. To get to the passenger side bank is easy, just need to pull off the intake from the throttle body. To get to the driver's side bank... I can't use the right words to express it in this public forum... You have to take off the intake plenum... something that should be easy but because of the engineers who designed this is one of the most difficult I've ever dealt with (and my hands now have the scars to prove it). First was pulling off strut brace and the Injen intake and easy access to the passenger side bank:
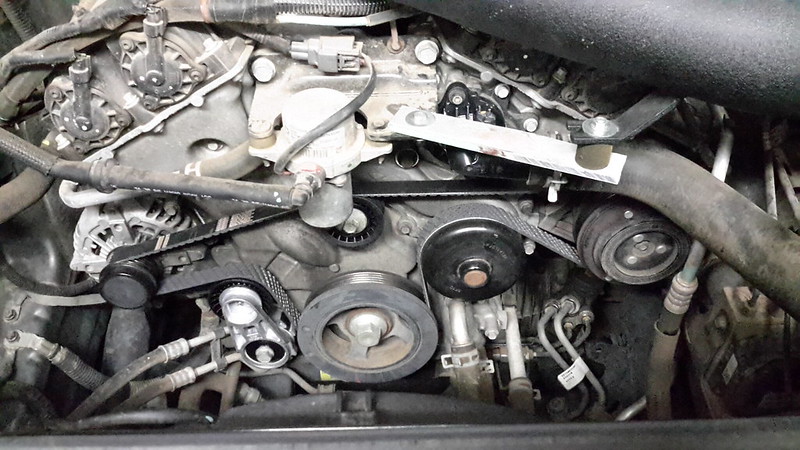
Again, to get to the driver's side bank... patience, something to break out of frustration, or whatever you need to get you through it. I ended up taking off the throttle body to get a little more access. The actual mount bolts for the plenum to the intake manifold are easy. There are also 4 mount studs on the plenum that hold it in place by brackets, the nuts are easy to get off these... the brackets are not. There are two brackets on the driver's side bank, the front one is held by a stud that is easy to access and loosen. The back one is not easy, it has a locking retainer that holds an AC line mount bracket over the nut for the stud, and I could never get the AC line bracket to move to get access to the stud. Here's the tops of these brackets and the plenum mounts (the rear bracket can't be seen, just part of the nut and the stud on the plenum):
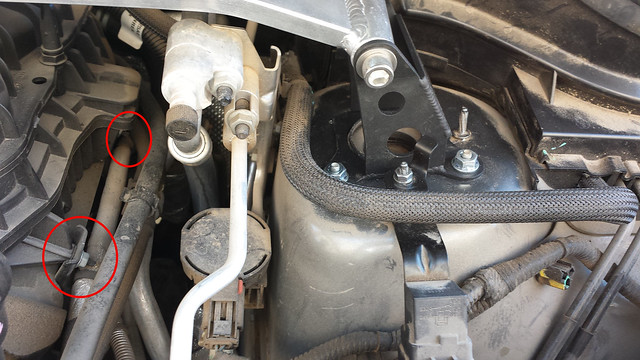
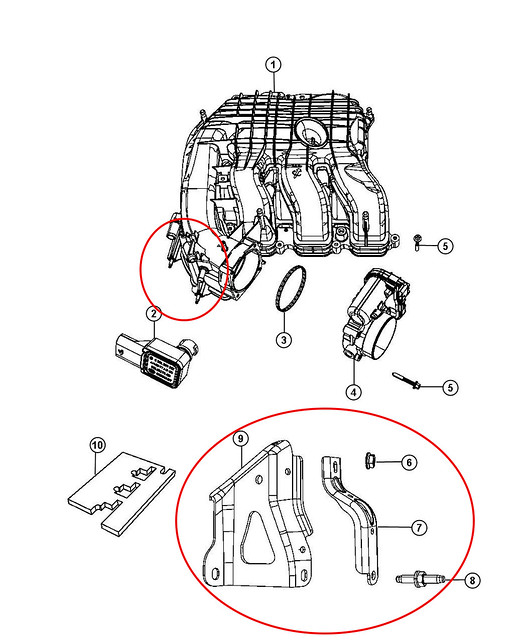
After giving up on the rear driver's side bracket, I went to work on the bracket that holds the plenum near the throttle body. It was also extremely difficult to access with little to no hand room on the back side of the valve cover by the firewall. But I get it just loose enough to twist the plenum a tiny bit and pry it out of the brackets. Here's the drawing of the plenum with the mounts by the throttle body circled and the two types of brackets (there are two of the #7) and the stud that holds them on (#8):
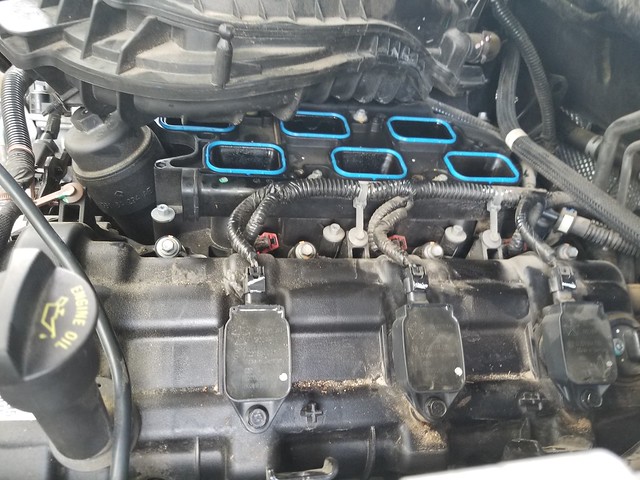
With the plenum finally off, there is access to the driver's side bank plugs and I also replaced the seals:
Here's 100,300+ miles on the original Champion plugs:
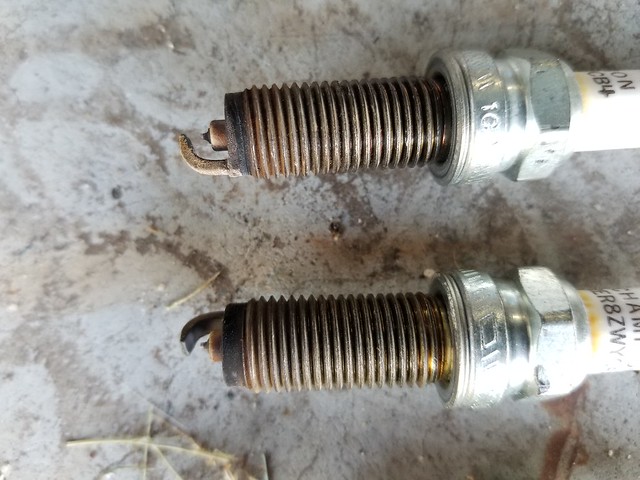
I've been a fan of NGK for many years since my first Skyline, so I installed the #9723 Laser Iridium (SILZKR7B11) plugs. Next was the REALLY hard part, putting the plenum back on! Luckily the plugs are for 100,000 miles, because I never want to take that plenum back off!
Again, to get to the driver's side bank... patience, something to break out of frustration, or whatever you need to get you through it. I ended up taking off the throttle body to get a little more access. The actual mount bolts for the plenum to the intake manifold are easy. There are also 4 mount studs on the plenum that hold it in place by brackets, the nuts are easy to get off these... the brackets are not. There are two brackets on the driver's side bank, the front one is held by a stud that is easy to access and loosen. The back one is not easy, it has a locking retainer that holds an AC line mount bracket over the nut for the stud, and I could never get the AC line bracket to move to get access to the stud. Here's the tops of these brackets and the plenum mounts (the rear bracket can't be seen, just part of the nut and the stud on the plenum):
After giving up on the rear driver's side bracket, I went to work on the bracket that holds the plenum near the throttle body. It was also extremely difficult to access with little to no hand room on the back side of the valve cover by the firewall. But I get it just loose enough to twist the plenum a tiny bit and pry it out of the brackets. Here's the drawing of the plenum with the mounts by the throttle body circled and the two types of brackets (there are two of the #7) and the stud that holds them on (#8):
With the plenum finally off, there is access to the driver's side bank plugs and I also replaced the seals:
Here's 100,300+ miles on the original Champion plugs:
I've been a fan of NGK for many years since my first Skyline, so I installed the #9723 Laser Iridium (SILZKR7B11) plugs. Next was the REALLY hard part, putting the plenum back on! Luckily the plugs are for 100,000 miles, because I never want to take that plenum back off!
Thread Starter
|
Professional
Joined: Jul 2012
Posts: 146
Likes: 1
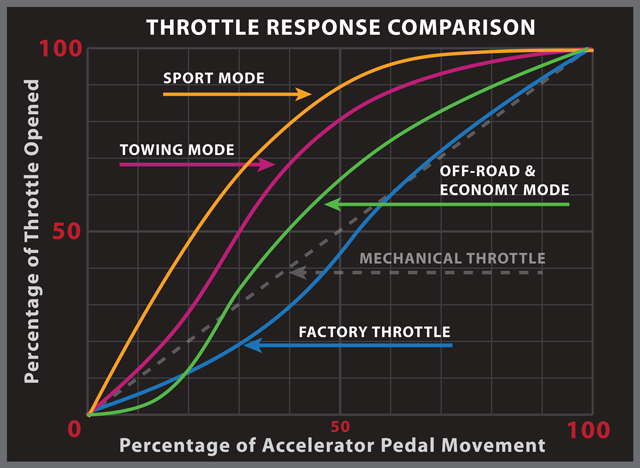
Today I've installed the Pedal Commander. The throttle lag has always driven me nuts on vehicles with electronic throttles, the D is definitely one of these. The last time I looked into devices to fix the was back in 2009 for the '08 RAV4 I owned. Back then Blitz Racing made one for the Japanese RAV4 and I thought of getting it, but back then it cost around $750-800 so I never took the leap. Recently I heard of Pedal Commander making them for the D and the price is more reasonable now. Of course the issue isn't the throttle, it's the programming for the response. However, even looking at Pedal Commander's site, their illustrations don't show the actual cause of the issue well. The issue is the throttle curve that's programmed. Here's a couple illustrations from a couple other brands that show some typical factory throttle curves pretty well:

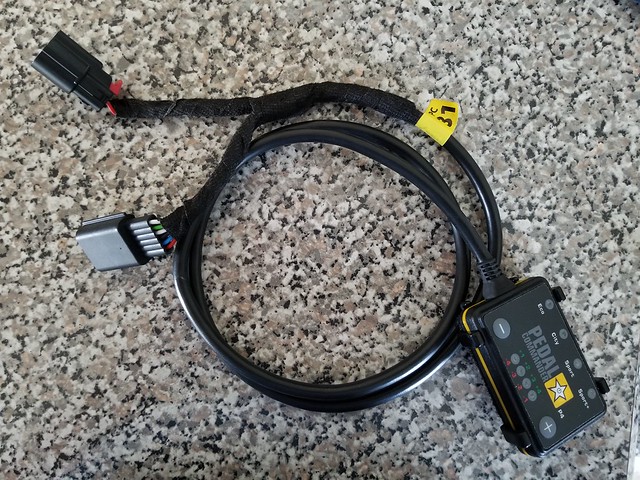
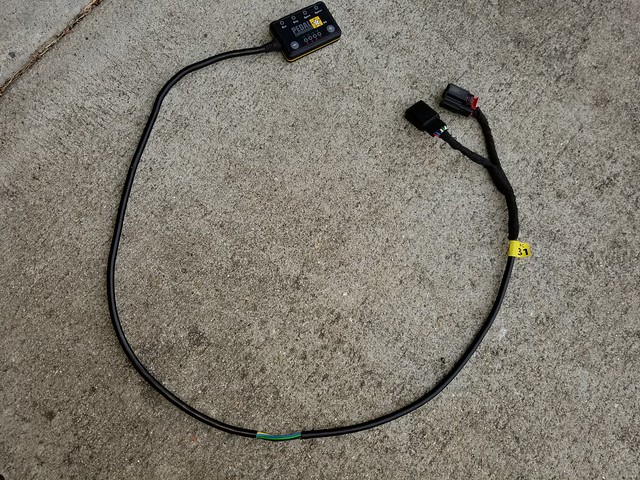
After finding out about the Pedal Commander, and waiting patiently for a used one to come available since I don't want the new Bluetooth versions nor the $300ish price tag, I got my hands on a used one and installed it:
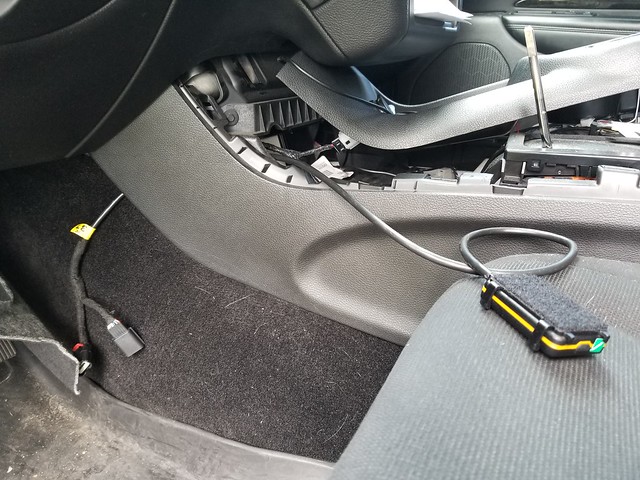
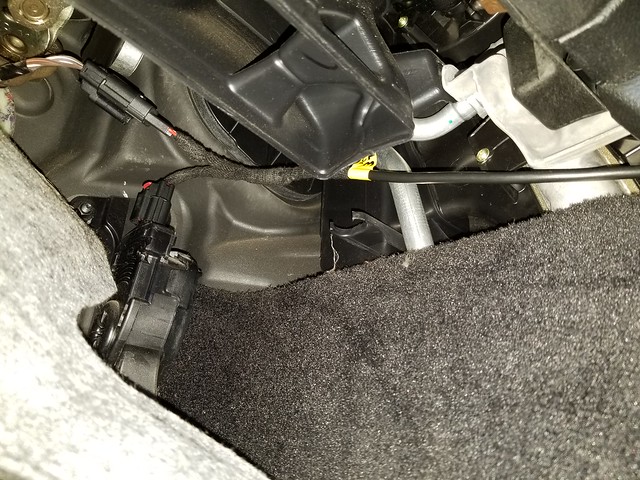

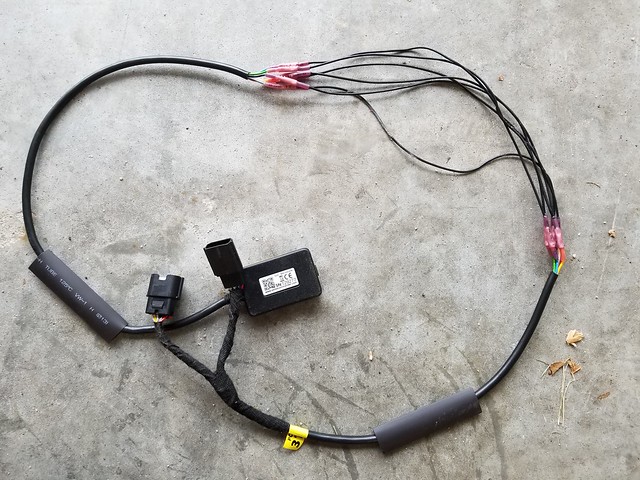
It was super easy to install. Since I wanted it in the center console, I wish the original cord was about 10 inches longer. Like I mentioned, I don't want Bluetooth because I don't plan on messing with other than to turn on or off depending on who's driving and I don't want an extra app on my phone either due to that. One test drive and I love this thing, finally it feels like a normal throttle! I set it at City +1 and it feels just like a mechanical throttle. But in terms of having it out in the open, that got on my nerves and it escalated pretty quickly... leading into me adding 12" of wire and getting it installed inside the console. First was splicing in the additional wiring and protecting it:
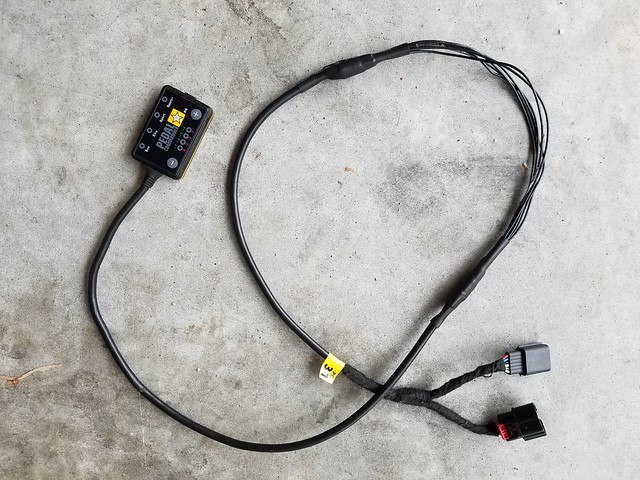
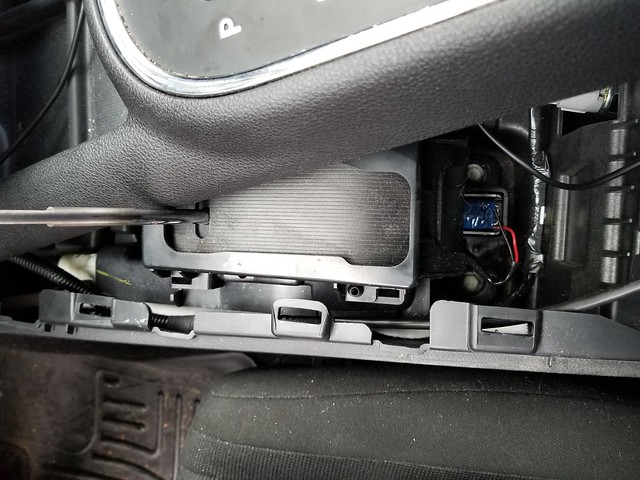
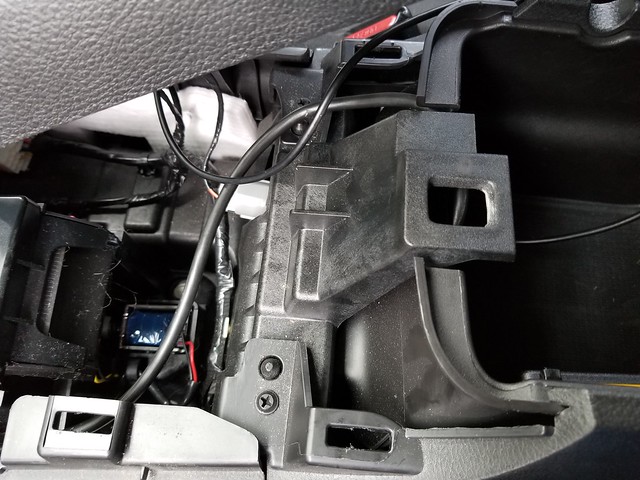
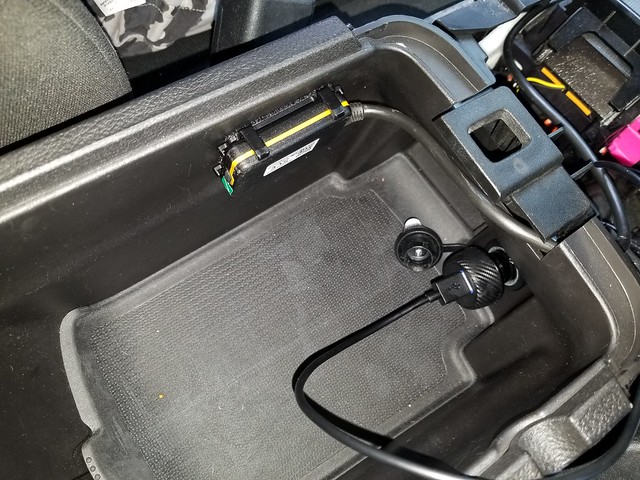
Next was getting it routing and installed:
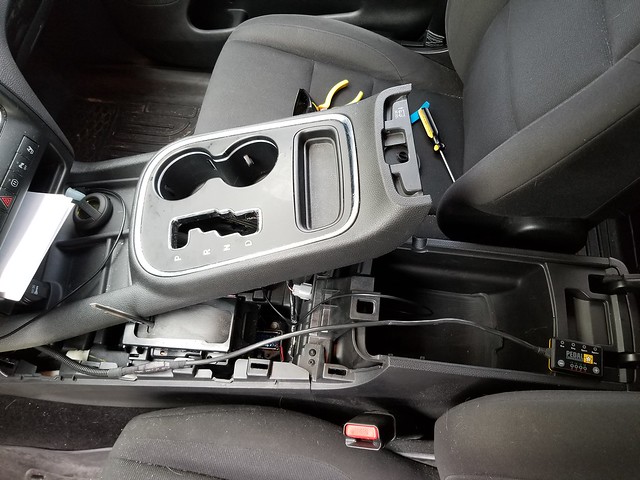
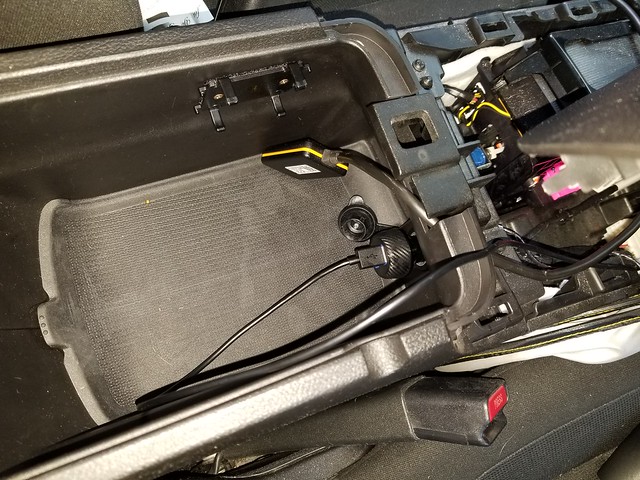

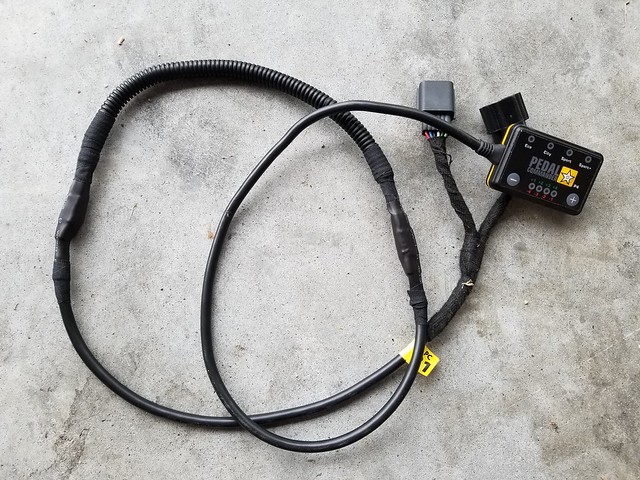
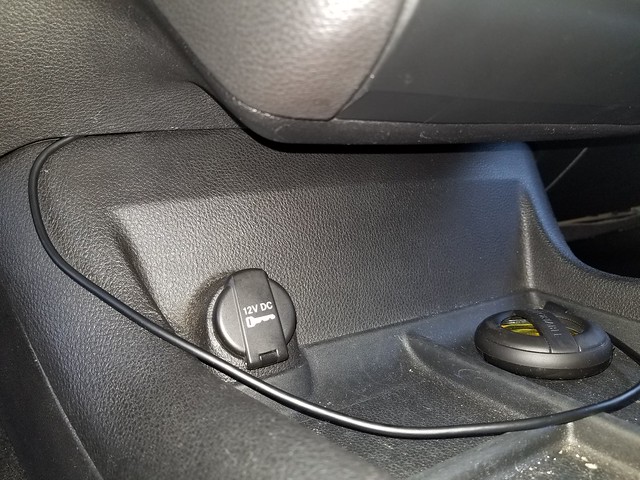
In case anyone wonders about the USB cord, this runs up to the front tray on the console and easily attaches to a phone there or on the phone mount I have next to the radio:
After finding out about the Pedal Commander, and waiting patiently for a used one to come available since I don't want the new Bluetooth versions nor the $300ish price tag, I got my hands on a used one and installed it:
It was super easy to install. Since I wanted it in the center console, I wish the original cord was about 10 inches longer. Like I mentioned, I don't want Bluetooth because I don't plan on messing with other than to turn on or off depending on who's driving and I don't want an extra app on my phone either due to that. One test drive and I love this thing, finally it feels like a normal throttle! I set it at City +1 and it feels just like a mechanical throttle. But in terms of having it out in the open, that got on my nerves and it escalated pretty quickly... leading into me adding 12" of wire and getting it installed inside the console. First was splicing in the additional wiring and protecting it:
Next was getting it routing and installed:
In case anyone wonders about the USB cord, this runs up to the front tray on the console and easily attaches to a phone there or on the phone mount I have next to the radio: