
The Victim Build Thread -- Featuring frame replacement
#1
 01-26-2014, 08:30 PM

Current Status 7/28/16 - On the homestretch, down to bodywork and painting!
Hello everyone. By now, a lot of you have probably seen the prequel to this build thread, but if you haven't, this is the link..
The main reason for this build thread is to chronicle the entire process for the frame replacement on my 1993 Dakota V6 5-speed. The rear half of the frame is completely rotted. I picked up a very nice and clean frame to replace it. It did need welding work because the guy I bought it from cut two crossmembers.
In addition, I have a 318 V8 sitting on an engine stand right now. I haven't touched it and I have no idea what it needs. Supposedly it was running when it was pulled out. If the stars align, the V8 will be replacing the V6. However, the truck itself will take priority over the V8 with respect to time and money, so there is a fair chance that the V6 will be put back in.
Please feel free to ask any questions you have. I will be taking a lot of pictures and taking notes, all of which I'm very willing to share. I will not be posting all of the pictures, but you may view all of the pictures I take here:
Dodge Dakota Pictures
I am making a list of all of the parts that are going into this truck and lists of mods, to hopefully aid others in finding some of those elusive replacement parts. I'm only going to post parts after I've installed them and I'm sure they work. Unless otherwise noted, almost all parts were purchased from Rockauto.com, Amazon, or eBay, in order of most used.
Accessories, Currently Uncategorized & Paint
Body
Interior
Suspension/Steering
Fuel
Brakes
Summary of U-joints: 8.25" rear end is a Dodge 7290 series joint, rear driveshaft is 1330 series, AX-15 yoke is a Dodge 7260 series, The rearmost joints (either side of the CV) on the front driveshaft are 1310 series, and the front joint on the front driveshaft is a 1330 series. The front differential requires a 7260 series. Therefore, only the joints either side of the front driveshaft aren't combination u-joints. Therefore, for a full overhaul with new straps you will need one 7260 strap kit and one 7290 strap kit.
Look up dennysdriveshaft.com to find elusive combination u-joints!!
Exhaust -
Shoes -
Oh, by the way; I named my truck "The Victim" for two reasons. First, it has been through a lot and is ready to break in half. Second, anything I touch should be considered a victim.
I hope you enjoy the log.
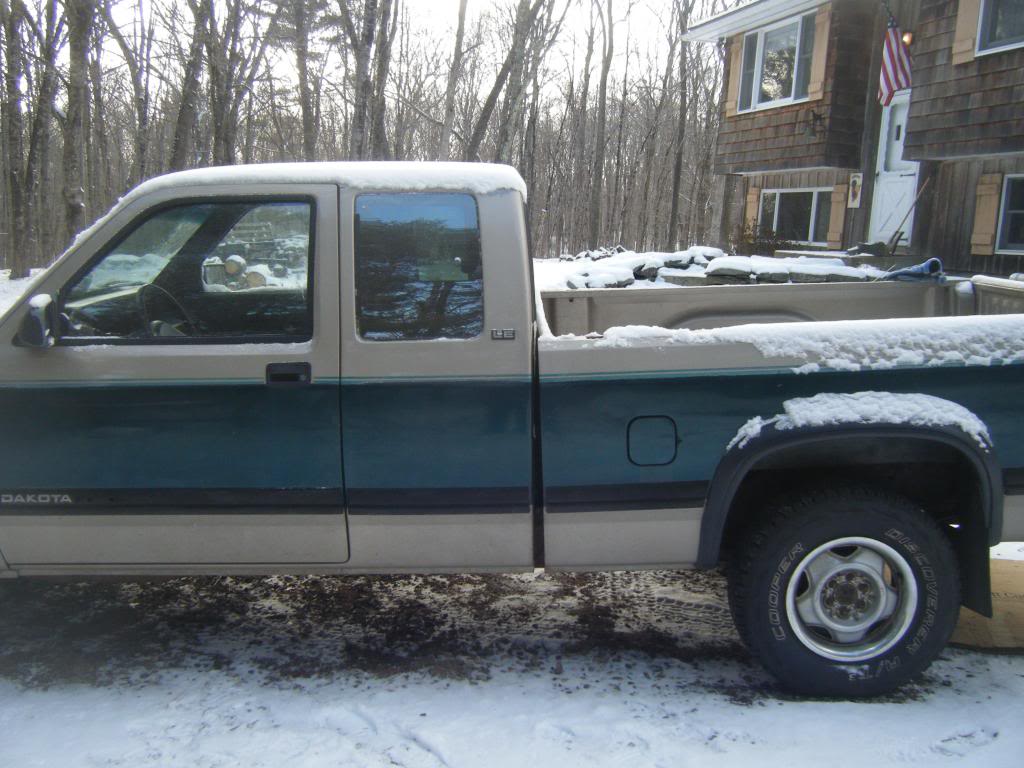
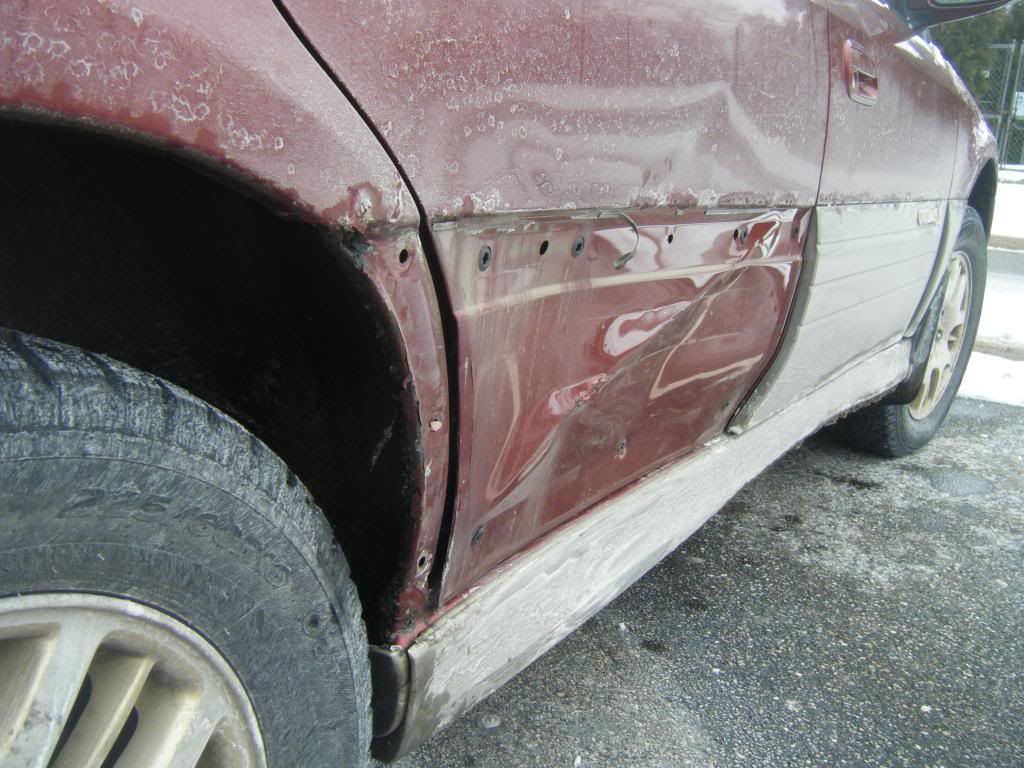
Initial Exterior
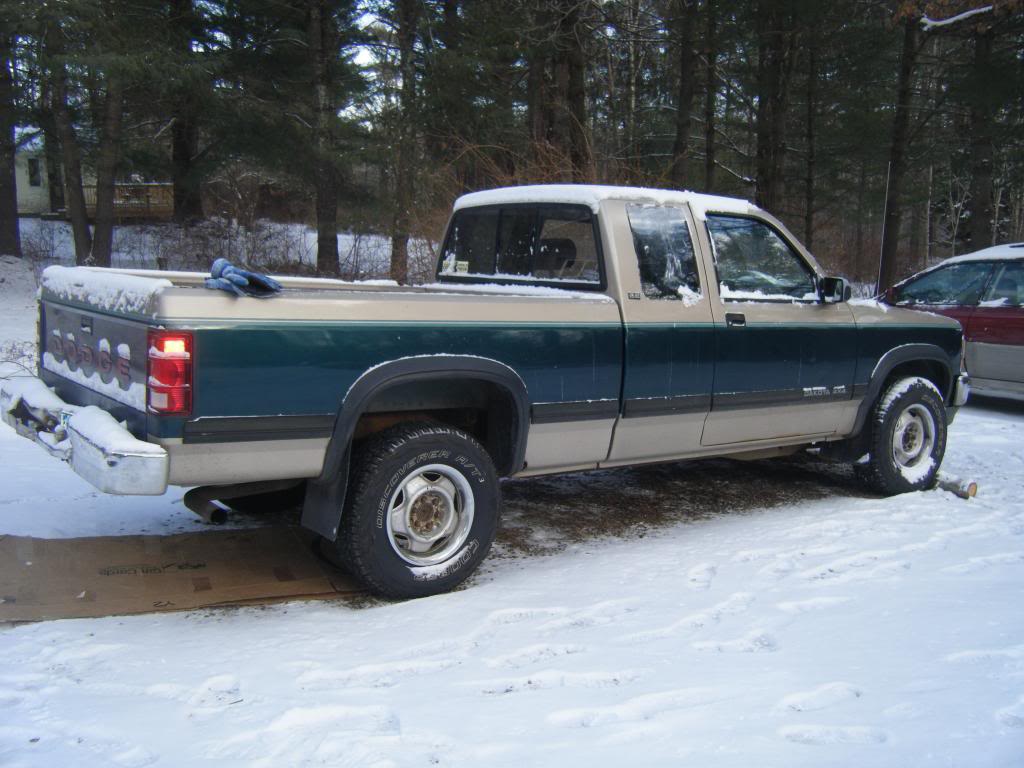
Does something look a little wrong here?
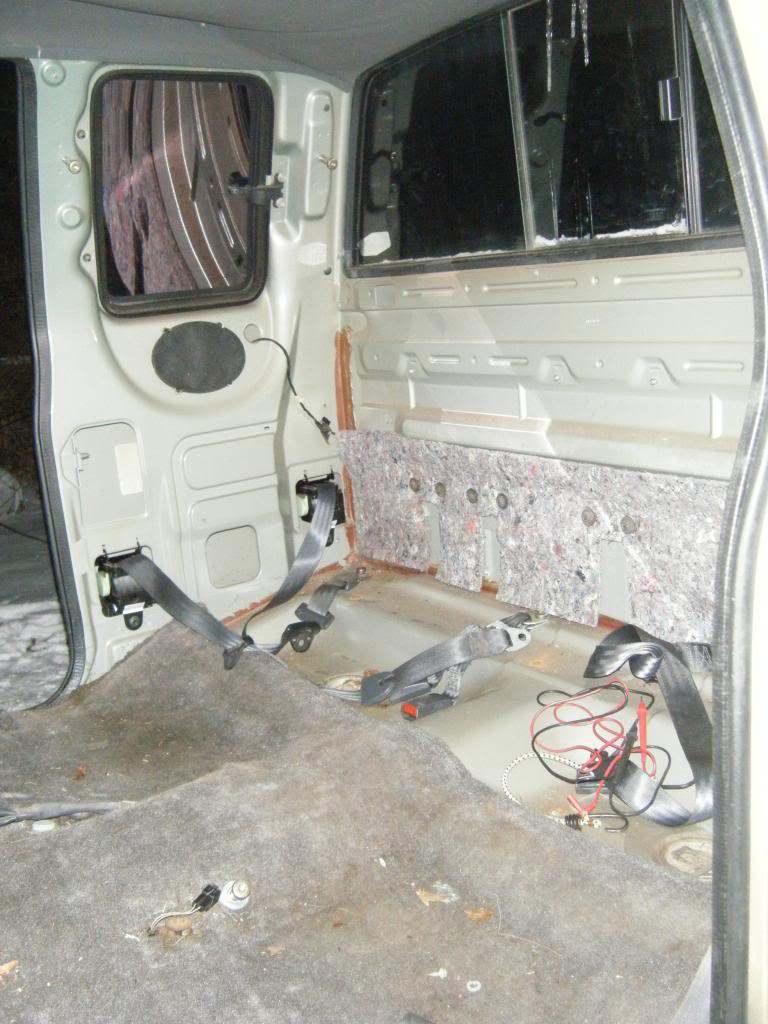
Today, 1/26/14, I got the bed off and stripped out part of the cab interior.
It was a little chilly out.

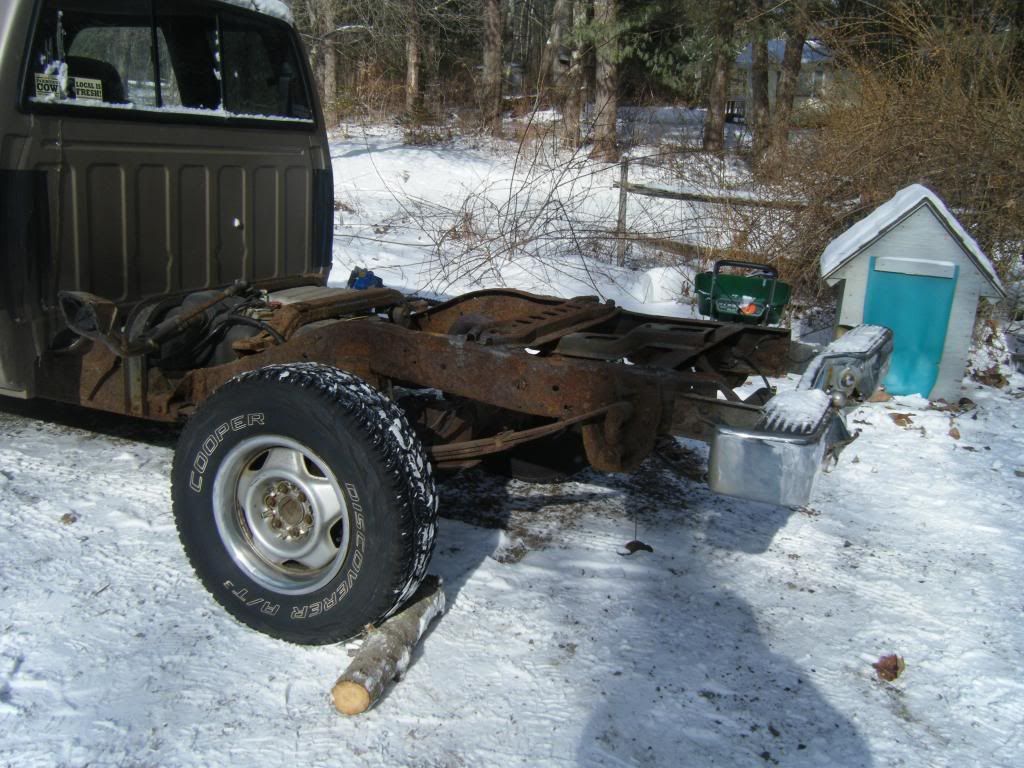
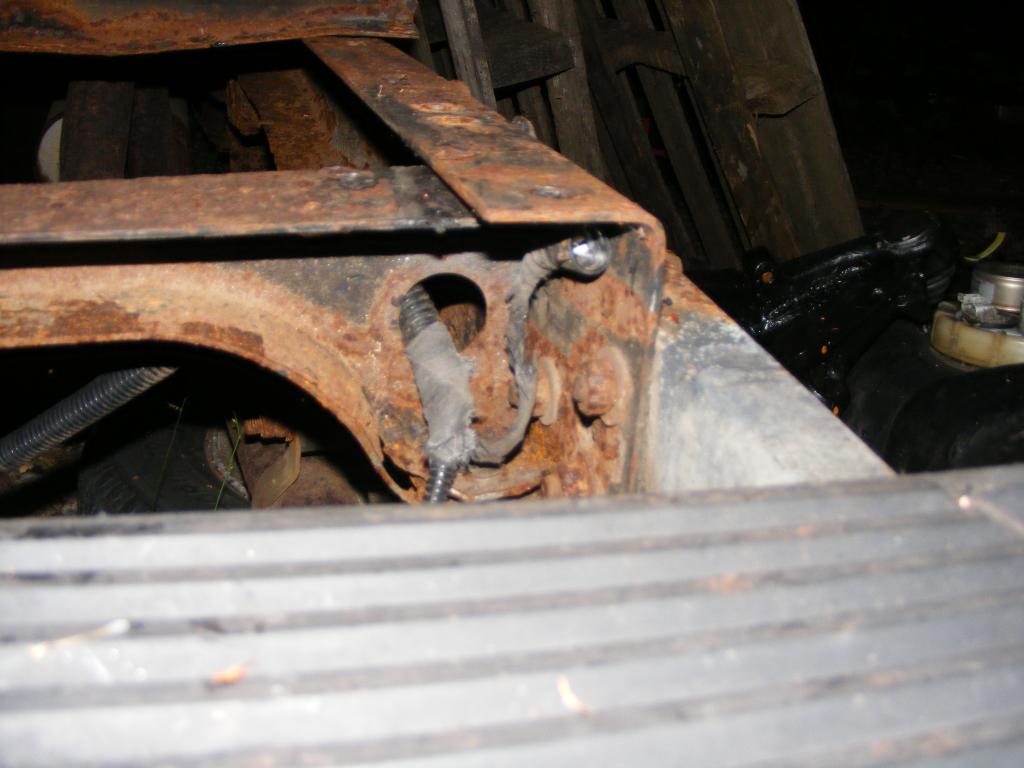
The worst rot is behind the front leaf spring hanger. I am convinced that if the hanger rivets weren't there, the frame would break in half.

More unrelated fun. Today I got into my first accident. Guy made a right on red and smashed my Subaru's door in. Bah, I don't give a ****. He was super apologetic, probably about 70 years old, driving a POS Hyundai and I believe he was a veteran. He didn't need any extra stress so I let it go.
Stay tuned...I will post pictures of the new frame soon.
Hello everyone. By now, a lot of you have probably seen the prequel to this build thread, but if you haven't, this is the link..
The main reason for this build thread is to chronicle the entire process for the frame replacement on my 1993 Dakota V6 5-speed. The rear half of the frame is completely rotted. I picked up a very nice and clean frame to replace it. It did need welding work because the guy I bought it from cut two crossmembers.
In addition, I have a 318 V8 sitting on an engine stand right now. I haven't touched it and I have no idea what it needs. Supposedly it was running when it was pulled out.
Please feel free to ask any questions you have. I will be taking a lot of pictures and taking notes, all of which I'm very willing to share. I will not be posting all of the pictures, but you may view all of the pictures I take here:
Dodge Dakota Pictures
I am making a list of all of the parts that are going into this truck and lists of mods, to hopefully aid others in finding some of those elusive replacement parts. I'm only going to post parts after I've installed them and I'm sure they work. Unless otherwise noted, almost all parts were purchased from Rockauto.com, Amazon, or eBay, in order of most used.
Accessories, Currently Uncategorized & Paint
- Trailer Hitch - Curt Manufacturing 13280
- Tailgate Support Cable - Dorman 38521
- Windshield - Replaced by JN Philips Auto Glass for $170. Took them half an hour.
- Windshield Wiper Motor - Mediocre replacement from Autozone. Stops working every once in a while, not investigated yet.
- Blower fan resistor block - Replacement from Autozone. Works perfect.
- Southern Polyurethanes Epoxy Primer 1:1, Black, 1 gallon - used for frame and nearly everything else
- VHT Caliper Paint, Silver, 1 can
- Eastwood's Internal Frame Coating, 2 cans
- Eureka Fluid Film Corrosion Preventative - used after paint on every chassis part and under the cab, 1 gallon + 1 spray can
- Chassis Saver for Cab Floors
- Monstaliner Bedliner for Cab Floors
Body
- OEM replacement left fender-Part # 4741673 CH1240113 From eBay
- Rear bumper - Fey 63000: worked with stock mounts! Just needed a couple holes drilled.
- Bed wheel arches rebuilt using cut up pieces of an '97 Dak right fender in addition to new sheet metal purchased from Eastwoods.
- Homemade body mounts from circles cut out of A/T tire tread, galvanized dock washers, and stainless bolts (M12x1.75x90), split lock M12 washers, and large M12 washers. The hardware was purchased from mrmetric.com with the exception of the galvanized dock washers which were purchased from a marine supply store. Each mount is composed of two thicknesses of half worn A/T tread on the top and one thickness on the bottom to somewhat replicate the cushioning of the original mount.
Interior
- Beltline Weatherstrip Outer - From precisionrestorationparts.com
SKU: WFP 3110 87 - Beltline Weatherstrip Inner - From precisionrestorationparts.com
SKU: WFP 3111 87 - Headliner - Made from specialized headliner fabric obtained from Jo-Ann's Fabric Store
Suspension/Steering
- Ball joint (upper; threaded) - Moog K778
- Ball joint (lower; pressed-in) - Moog K7155
- Control arm bushings (upper) - Moog K7084
- Control arm bushings (lower) - Adapted from Energy Suspension 5.3139G (see HERE or search "How to: Dakota Gen 1 4x4 Lower Control Arm Bushings" to find RobertMC's excellent write-up)
- Idler Arm - Moog K7169
- Pitman Arm - Moog K7156
- Tie Rod End Outer - Moog ES3098RL
- Tie Rod End Inner - Moog ES3099RL
- Tie Rod End Adjusting Sleeve - Moog ES2080S
- Shock Absorber (front) - KYB KG5469
- Shock Absorber (rear) - KYB KG5471
- U-bolts (leaf spring) - 9/16" x 2 1/2" x 8 3/4" Square U-bolts kit from autoandtrucksprings.com BT5-0086S
- U-bolt saddle plate (sits on top of leaf pack) - Could only find HERE (ATS Springs "Dodge Upper U-Bolt Saddle Plate, fits 2-1/2" Wide Dodge Rear Leaf Spring")
- Leaf Spring Bushings - Energy Suspension 5.2107G
- Leaf Spring Shackle - From SDtrucksprings.com part # M1745: Dodge Shackle for 1/2" Spring bolts and 2.5" wide spring
- Upper Control Arm Bumpstop - Energy Suspension 9.9103
- Lower Control Arm Bumpstop - Belltech 4923 (***NOT A DIRECT FIT, REQUIRES DRILLING)
- Stabilizer Bar Bushing Front to Control Arm - Moog K7357
- Stabilizer Bar Bushing Front to Frame - Moog K7355
- Power Steering Pressure Hose - Edelmann 71816
- Power Steering Return Hose - Edelmann 80421
- Torsion Bars cranked to approximately level the front of the truck.
- EGR Transducer - Dorman 911201
- Serpentine Belt Tensioner Pulley - Gates 38016
- Serpentine Belt Idler Pulley - Dorman 419-605
- Radiator - Spectra B1709
- Heater Core - Spectra 94604
Fuel
- Fuel Filler Neck Seal - Dorman 577500
- Fuel Filler Neck for '87-'96 Dakota - From fillernecksupply.com APDTY 688045
- Frame Mounted Inline Fuel Filter - Wix 33318
- All Hardlines are coated steel Poly-Armour Lines
- Nylon Lines are used from the tank to the frame and then from the frame to the fuel rails (part of the Dorman Nylon Fuel Line Repair Kit)
Brakes
- Front Parking Brake Cable - Bendix C1543
- Intermediate Parking Brake Cable - Bendix C1879
- Rear Parking Brake Cable - Raybestos BC93625
- Rear Brake Shoes (9") - Centric 11105380
- Rear Drums (9") - Centric 12367022
- Rear Drum Hardware Kit (9") - Centric 11863012
- Rear Right Drum Self Adjuster Kit (9") - Carlson H2527
- Rear Left Drum Self Adjuster Kit (9") - Carlson H2526
- Rear Wheel Cylinders (9") - Centric 13467012
- Front Brake Rotors - Bendix PRT1577
- Front Brake Pads - Centric 10405290
- Rear Center Hydraulic Hose - Dorman H38636
- Front Right Hydraulic Hose -Dorman H38892
- Front Left Hydraulic Hose - Dorman H38893
- All Hard Lines Are SUR&R Nickel-Copper lines custom cut, bent, and flared.
- Throwout Bearing - Timken 614093
- Clutch Fork Pivot Ball -
- Wheel Bearing - Raybestos 713109 and Timken 513109 (same part, but just the Timken was replaced right after I got the truck, no issues with either so far)
- Clutch Master/Slave Assembly - Dorman CC649036
- Flywheel for V8 swap (as of yet not completed) - Standard Flywheels 3410 Flywheels
- Flywheel bolts for V8 flywheel (as of yet not completed) - ARP 240-2801 7/16" Bolt
Summary of U-joints: 8.25" rear end is a Dodge 7290 series joint, rear driveshaft is 1330 series, AX-15 yoke is a Dodge 7260 series, The rearmost joints (either side of the CV) on the front driveshaft are 1310 series, and the front joint on the front driveshaft is a 1330 series. The front differential requires a 7260 series. Therefore, only the joints either side of the front driveshaft aren't combination u-joints. Therefore, for a full overhaul with new straps you will need one 7260 strap kit and one 7290 strap kit.
Look up dennysdriveshaft.com to find elusive combination u-joints!!
- U-Joint (front driveshaft @ CV joint/transfer case (x2) - Spicer 5-1310-1X (1310 joint)
- U-Joint (rear driveshaft @ transmission) - Neapco 11-14887 (7260 to 1330 conversion joint)
- U-Joint (rear driveshaft @ rear axle) - Spicer 5-7437X - (7290 to 1330 conversion joint)
- U-Joint strap (front differential) - Neapco 1-0023 (7260)
- U-Joint strap (rear differential) - Neapco 1-0018 (7290)
- Rear axle seal/bearing (repair style) - Timken TRP1559TV
- Front axle seal (bearing not replaced) - Timken 8660S
- Rear Differential Cover (8.25") - Spectre 6093 (Oh my chrome...)
- Front Differential Cover (7.25") - Ordered a used one off eBay which I believe came from a rear axle, but fits the front just fine.
- Transmission Mounting Isolators - Westar em-2667
- Transmission Mounting Isolators - Westar em-2668
Exhaust -
- Cat-back - Dynomax Super Turbo Exhaust Systems 17443
- Catalytic Converter - Walker 15043
- Header to Y-pipe bolts/nuts - Dorman 03125
- Exhaust clamps as necessary (you will need both 3" and 2 3/4" clamps to refit the whole exhaust)
Shoes -
- Spring-Fall - OEM Alloys with 235/75R15 Cooper Discoverer AT3
- Winter - OEM Steelies with 205/75R15 Firestone Winterforce
- Lug Nuts - AccuWheel LNA-12000Z60 1/2"-20 Open End Bulge Lug Nuts (open end or shallow closed end required to fit hub caps on stock 15" alloy wheels)
Oh, by the way; I named my truck "The Victim" for two reasons. First, it has been through a lot and is ready to break in half. Second, anything I touch should be considered a victim.
I hope you enjoy the log.
Initial Exterior

Does something look a little wrong here?

Today, 1/26/14, I got the bed off and stripped out part of the cab interior.
It was a little chilly out.


The worst rot is behind the front leaf spring hanger. I am convinced that if the hanger rivets weren't there, the frame would break in half.


More unrelated fun. Today I got into my first accident. Guy made a right on red and smashed my Subaru's door in. Bah, I don't give a ****. He was super apologetic, probably about 70 years old, driving a POS Hyundai and I believe he was a veteran. He didn't need any extra stress so I let it go.

Stay tuned...I will post pictures of the new frame soon.
Last edited by tbugden; 12-31-2016 at 01:26 AM.
#3
01-29-2014, 11:01 PM
#4
01-29-2014, 11:48 PM

Good luck with the build !
That spot on these frame seems to be the worst.
The frame has little drain channels but they get clogged up so the dirt/salt/junk just sits in that leaf spring hanger and it rots to death.
If they had designed it with that mount inverted it wouldn't be nearly the problem.
Some people have inverted them to do a lift, I believe.
As for the full time student + project thing...
I can somewhat relate.
My nephew is in the final stages of putting a 03 WRX drivetrain in a 00 forester with all the fun that entails. He's also a full time student. It's a wonder he can stay awake some days.
You working outside for the whole thing ? Brrrrr.
#5
02-14-2014, 12:13 AM
Okay, so I have been continuing the tear-down, but there's not enough progress to note really. I do have a nice 5-day weekend to work on this...except...the weather is atrocious. I'm fine with the cold, but the precipitation...
Tomorrow, if the roads are good enough, I plan on heading to Jo-Ann's and getting some headliner vinyl (the headliner is falling down) and some fleece (for an upcoming audio project) and whatever else I can think of that I might need. I have to work on something!
Tomorrow, if the roads are good enough, I plan on heading to Jo-Ann's and getting some headliner vinyl (the headliner is falling down) and some fleece (for an upcoming audio project) and whatever else I can think of that I might need. I have to work on something!
#6
02-14-2014, 09:01 AM

Since you have the truck in pieces and are putting a lot of effort into this project, it would be a good time to consider treating the rust prone areas with some inhibitor. On the body, I've found that the seams and body mount areas are usually the worst. Depending on what level of rusting you encounter, you can make a choice of how you deal with it. If it's only surface, you can clean & treat the area & repaint, if it's not much rust, but getting a good start, you can pacify it (there are various products that will work for this - many contain phosphoric acid that converts iron oxide to iron phosphate), if it's sort of medium, I'd use pacifier in seams first and then a rust paint like POR15 or Rust Bullet - both of these products worked really well for me. POR15 has a product line of other stuff to help with metal preparation and rust pacification - you can get similar products elsewhere, but it's handy to have them all in one place. Finally, if the rust is really bad in areas, I'd recommend cutting them out and putting in a patch. If the area isn't under any stress, you can use a panel bond adhesive and then smooth things out with body fill & finally paint. If the areas does deal with some level of stress, I'd recommend welding the patch. Use a good quality body fill where you need it.
As for a tube type frame (if it's channel, disregard most of the following), years ago, I prepared some frames by treating the inside with POR15 and then using the same stuff on the outside. Treating the inside is important since this is where a lot of muck and other stuff settles and holds moisture - a lot of frames have really poor drainage. What I did at the time was to pressure wash the inside of the frame first, then I taped over all the holes and one end, then I poured about a half quart of grey POR15 (I used grey so I could see the coverage easier - with black it's hard to see inside the frame) into the untaped end, taped it shut and sloshed the paint back and forth for a while & dumped out any residue (almost none remained). I let this dry and did the outside in black.
These days, if it's not bad, I tend to use the rust inhibiting oil sprays (in Canada we have Krown that uses a product called T-40 (other undercoating companies have their own products) that I've had good luck with & it's easy to apply with a cheap undercoating gun & small compressor). Once the vehicle is all painted, then I use this same oil as a final undercoat so it penetrates into any cracks and crevices that I may have overlooked.
#7
02-14-2014, 10:52 PM

I put a new frame on my truck and man it was a sumbitch. I broke in half twice while i was driving, once in the back and once the front control arm braket rotted off. and the wheel nearly came off. I welded a patch the first time it broke on the back, but the second time I said it wasnt worth fixing it again, i was pissd cuz i didnt think i got my moneys worth out of that frame, it shouldn't have rotted that bad. I repainted it blue when i was done, i posted some pics on this forum a while ago. Good luck. By the way, shove a screwdriver in the 2 front body mount bolt baskets because the baskets will break and ul be stuck, happened to me. Theres a procedure in the service man for removing the cab tells u all the stuff to disconect makes it a lot quicker.
Trending Topics
#8
02-15-2014, 08:43 AM
I put a new frame on my truck and man it was a sumbitch. I broke in half twice while i was driving, once in the back and once the front control arm braket rotted off. and the wheel nearly came off. I welded a patch the first time it broke on the back, but the second time I said it wasnt worth fixing it again, i was pissd cuz i didnt think i got my moneys worth out of that frame, it shouldn't have rotted that bad. I repainted it blue when i was done, i posted some pics on this forum a while ago. Good luck. By the way, shove a screwdriver in the 2 front body mount bolt baskets because the baskets will break and ul be stuck, happened to me. Theres a procedure in the service man for removing the cab tells u all the stuff to disconect makes it a lot quicker.
#9
09-22-2014, 10:16 PM
Believe it or not, this project did not end in a dead end. It has taken a lot longer than expected (and it's still not done), but I guess that's to be expected, isn't it? 
I have almost 200 pictures detailing the project so far, all of which can be viewed in my Photobucket, HERE. A lot of the pictures are self explanatory, some are confusing, and most don't make any sense at all to you or I, but if you have any questions please let me know.
Where my frame rotted out, or, Where you should check your frame
I think it's prudent to reiterate just how bad the old frame is. It was toast 5 years ago, at least. Some of the especially rotted areas which other owners should keep an eye on include:
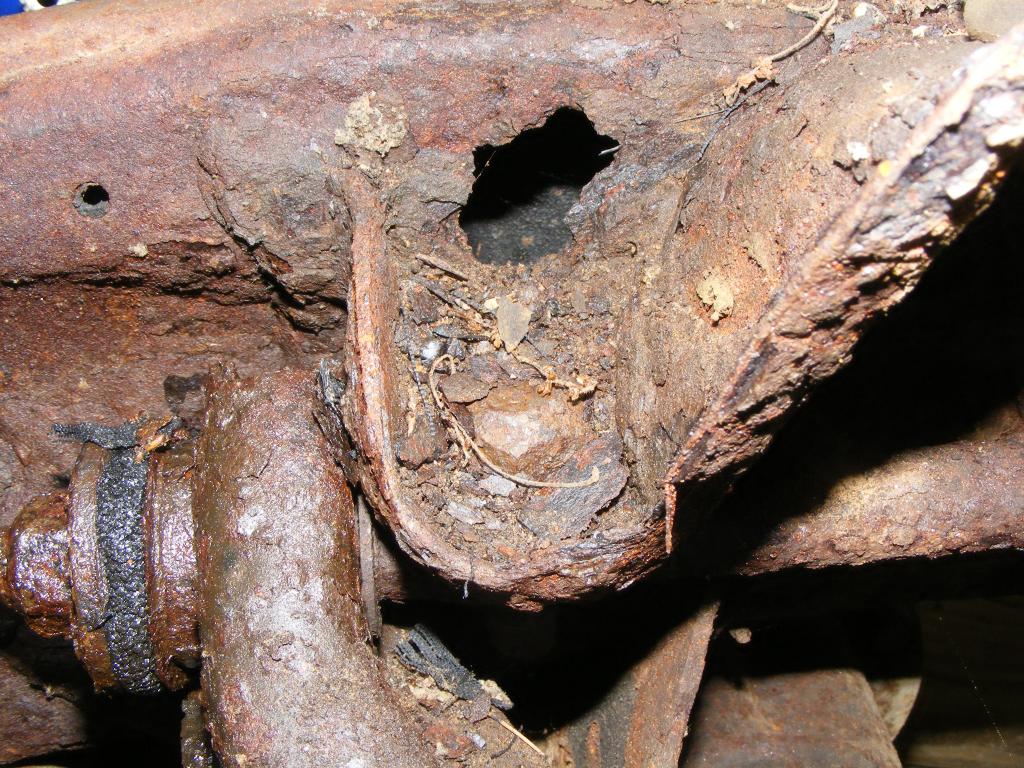
1) behind the front leaf spring hangers
Perhaps the most dangerous rust because it puts the truck at risk of breaking in half. Which would be bad.

2) entire rear half of the frame.
Really, the rear half of the frame (cab back) seems like it's from a truck that's a decade older than the front half. I'm talking about frame rails, not the suspension mounts, which are **** front and rear (see point 3).
3) behind upper control arm mounts.
There are drain passages to keep water from being trapped on top of the mounts. The drain passages would work very well if we lived in a world with no dirt, but because they are tiny passages, even small grained sand can clog up the passages. Once clogged, the top of the control arm mount and adjacent frame become a great science experiment.
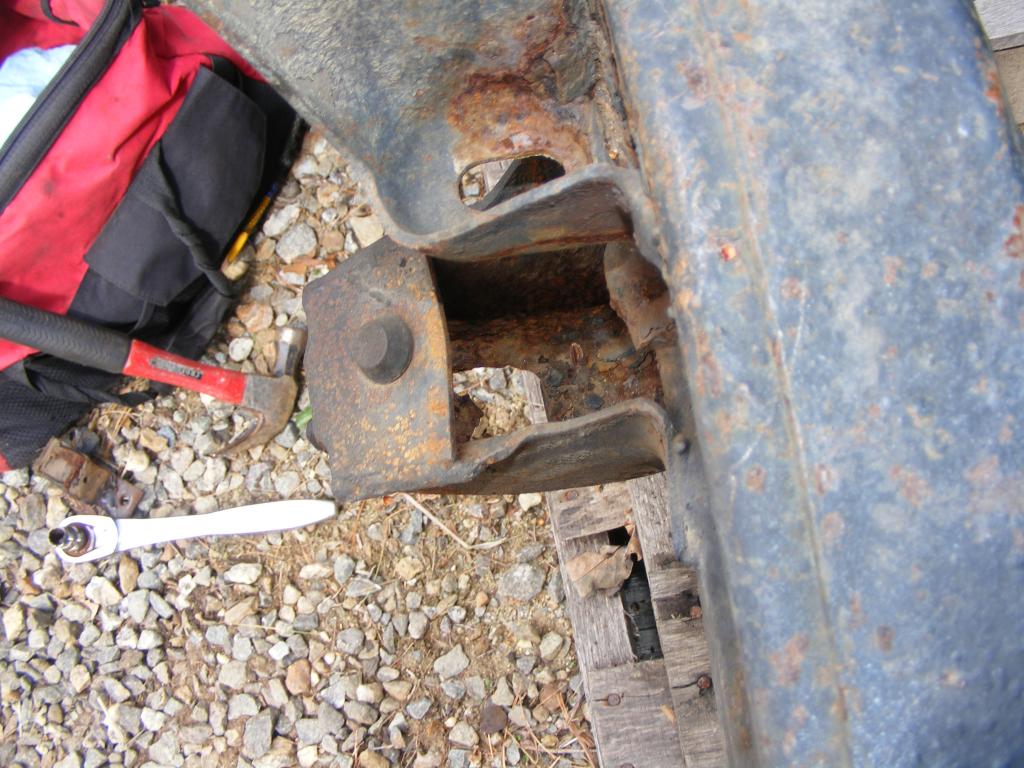
4) lower control arm bumpstop mounts.
On my old frame, the bottoms of the bumpstop mounts were completely gone. One of the bumpstops was gone; the other was pushed up inside what was left of its mount. Even on my new frame, which is 98.7% rust free, the driver's side bumpstop mount was rusted out. Here is a picture of the new frame's bumpstop mount rust. I cut out the bad portion and welded in a new piece (details to follow).
5) transmission crossmember. Mine was quite rusty but I think still structurally sound. I definitely want a new one though.
I took some videos to help illustrate the old frame.
More to come.
I have almost 200 pictures detailing the project so far, all of which can be viewed in my Photobucket, HERE. A lot of the pictures are self explanatory, some are confusing, and most don't make any sense at all to you or I, but if you have any questions please let me know.
Where my frame rotted out, or, Where you should check your frame
I think it's prudent to reiterate just how bad the old frame is. It was toast 5 years ago, at least. Some of the especially rotted areas which other owners should keep an eye on include:
1) behind the front leaf spring hangers
Perhaps the most dangerous rust because it puts the truck at risk of breaking in half.
2) entire rear half of the frame.
Really, the rear half of the frame (cab back) seems like it's from a truck that's a decade older than the front half. I'm talking about frame rails, not the suspension mounts, which are **** front and rear (see point 3).

3) behind upper control arm mounts.
There are drain passages to keep water from being trapped on top of the mounts. The drain passages would work very well if we lived in a world with no dirt, but because they are tiny passages, even small grained sand can clog up the passages. Once clogged, the top of the control arm mount and adjacent frame become a great science experiment.

4) lower control arm bumpstop mounts.
On my old frame, the bottoms of the bumpstop mounts were completely gone. One of the bumpstops was gone; the other was pushed up inside what was left of its mount. Even on my new frame, which is 98.7% rust free, the driver's side bumpstop mount was rusted out. Here is a picture of the new frame's bumpstop mount rust. I cut out the bad portion and welded in a new piece (details to follow).

5) transmission crossmember. Mine was quite rusty but I think still structurally sound. I definitely want a new one though.
I took some videos to help illustrate the old frame.
More to come.
Last edited by tbugden; 01-04-2015 at 09:12 PM.
#10
09-22-2014, 10:35 PM

