

The Victim Build Thread -- Featuring frame replacement


Thread Starter
|
All Star
Joined: Apr 2013
Posts: 941
Likes: 22
From: Connecticut
Alright, I finally got some okay pictures of the bumpstop setup I've done. As mentioned before, the old bumpstops were rotted to nothing and no OEM replacements are available, so this was MY solution. I'm sure there are better ways to do it. Also, let me make it clear that I do not know how well these bumpstops will actually work because the truck isn't...well it isn't a truck yet. But I don't think bumpstops are really a make or break component seeing as I was driving the truck with no bumpstops before and it really didn't seem that bad.
Bumpstops
Let's start easy. The upper bumpstops for the upper control arm are the bullet style bumpstops found on many Dodges (and other makes, I believe). They are readily available through Rockauto.com and other parts suppliers. I ordered Energy Suspension polyurethane ones , Energy Suspension part # 9.9103. They bolt right into the existing hole and are a perfect fit. I don't think the material of the upper bumpstops really matter so much, just so long as they are there.
Okay, now the hard part. Lower control arm bumpstops. No one makes them anymore. I ordered a bumpstop from Energy Suspension to test it (part # 9.9101), but these polyurethane ones are WAY too hard. No good at all for this application. After scouring the internet, I found these from Belltech (part # 4923):
http://www.belltech.com/products/bel...top-kit-1.html
This is where I bought them:
http://www.ebay.com/itm/151420242492?_trksid=p2059210.m2749.l2649&ssPageName=STRK%3AMEBIDX%3AIT
They are 2" tall, which is a little taller than the stock bumpstops (I don't have the dimensions of the OEM stops in front of me but I'll update this post with that information), and made of a soft foam material. I guess they're a direct fit for many Chevy/GMC/Cadillac trucks with torsion bar front suspension. I'm guessing (hoping) that they'll be fine on my Dakota, but I'm not really to concerned.
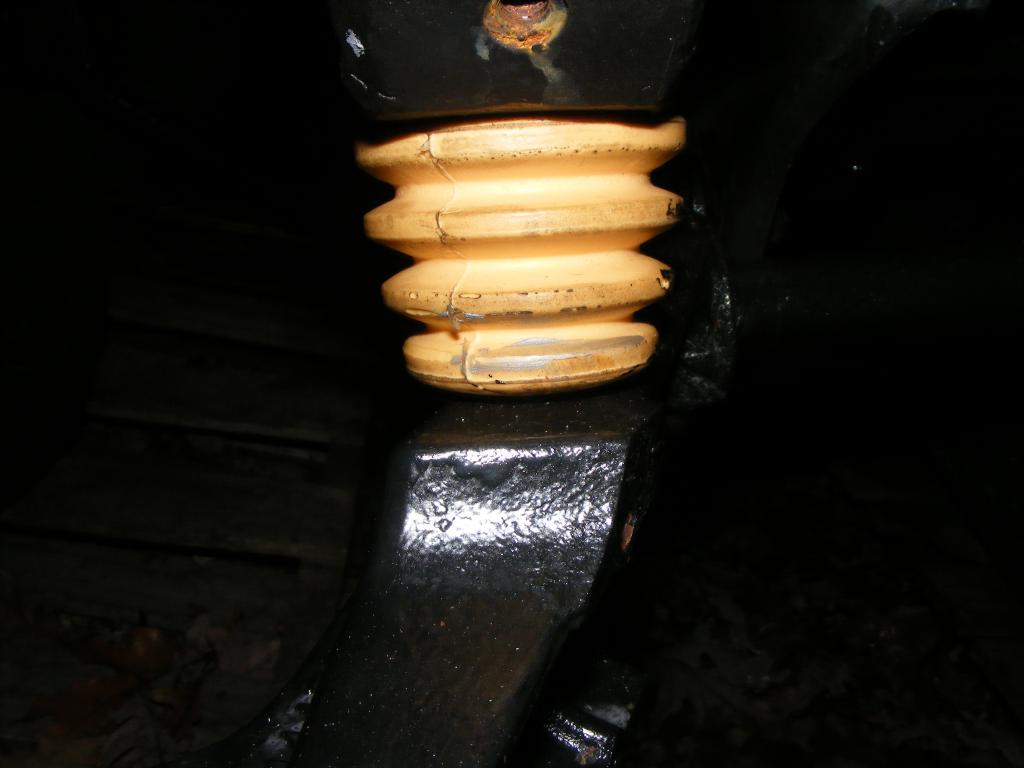
The lower bumpstops extend beyond the bumpstop mount slightly, but I'm not too concerned with this. I don't believe it will affect performance at all. If you're worried about them looking like they COULD be factory, you may not want to use these. The discerning eye could tell that they're not supposed to be there.
I installed them by simply drilling a hole in the bumpstop mount and installing the upper nylon locknut. I kind of eye-balled where I wanted them by moving the lower control arm up and down and lining up the bumpstop and contact "pad" on the control arm. Not very scientific...but hey, what do you expect from a guy who bought a rotted out 1993 Dakota?
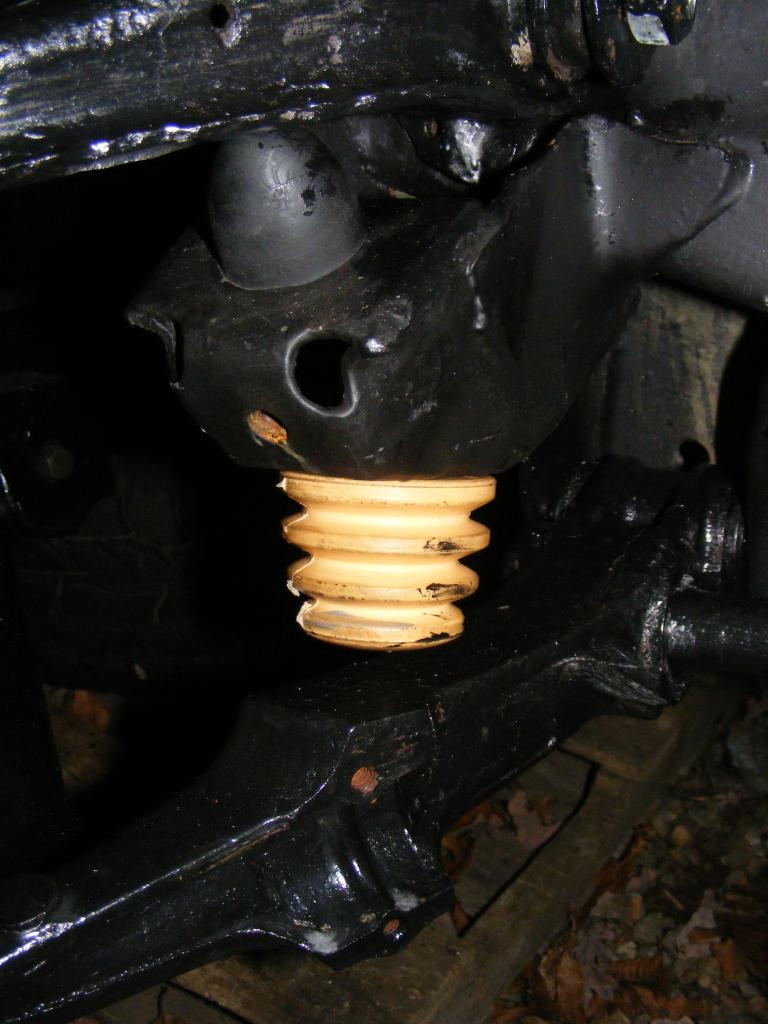
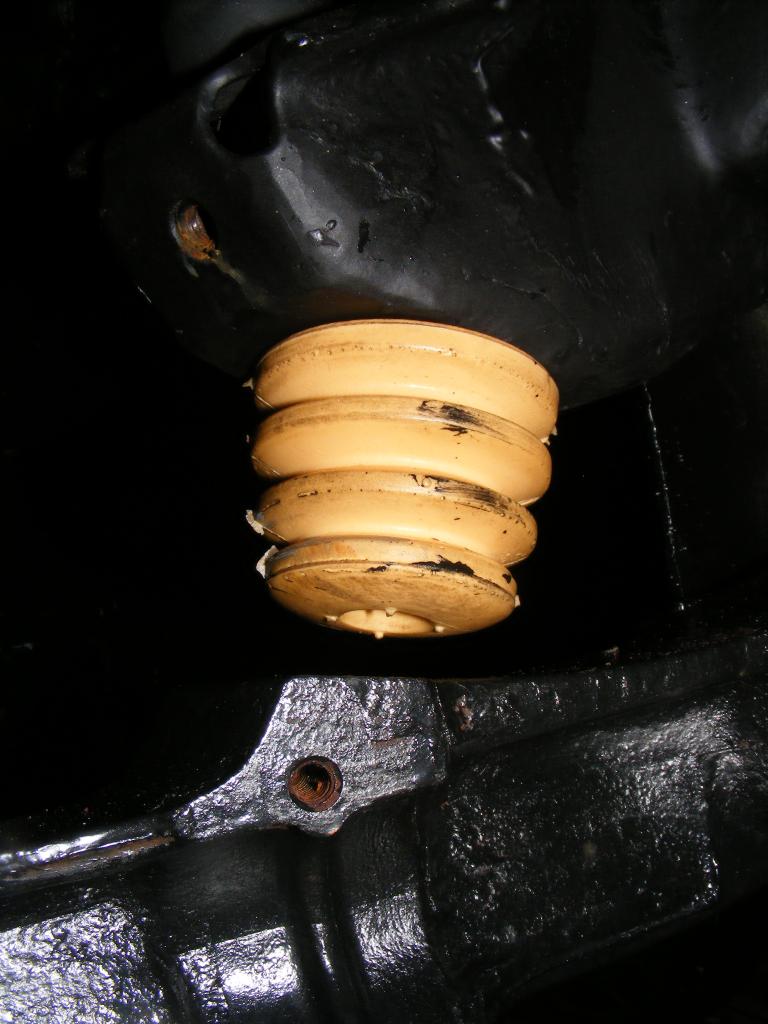
Notice in this picture that the bumpstop hits pretty damn square on the LCA contact pad. This is good enough. For me.
Bumpstops
Let's start easy. The upper bumpstops for the upper control arm are the bullet style bumpstops found on many Dodges (and other makes, I believe). They are readily available through Rockauto.com and other parts suppliers. I ordered Energy Suspension polyurethane ones , Energy Suspension part # 9.9103. They bolt right into the existing hole and are a perfect fit. I don't think the material of the upper bumpstops really matter so much, just so long as they are there.
Okay, now the hard part. Lower control arm bumpstops. No one makes them anymore. I ordered a bumpstop from Energy Suspension to test it (part # 9.9101), but these polyurethane ones are WAY too hard. No good at all for this application. After scouring the internet, I found these from Belltech (part # 4923):
http://www.belltech.com/products/bel...top-kit-1.html
This is where I bought them:
http://www.ebay.com/itm/151420242492?_trksid=p2059210.m2749.l2649&ssPageName=STRK%3AMEBIDX%3AIT
They are 2" tall, which is a little taller than the stock bumpstops (I don't have the dimensions of the OEM stops in front of me but I'll update this post with that information), and made of a soft foam material. I guess they're a direct fit for many Chevy/GMC/Cadillac trucks with torsion bar front suspension. I'm guessing (hoping) that they'll be fine on my Dakota, but I'm not really to concerned.
The lower bumpstops extend beyond the bumpstop mount slightly, but I'm not too concerned with this. I don't believe it will affect performance at all. If you're worried about them looking like they COULD be factory, you may not want to use these. The discerning eye could tell that they're not supposed to be there.
I installed them by simply drilling a hole in the bumpstop mount and installing the upper nylon locknut. I kind of eye-balled where I wanted them by moving the lower control arm up and down and lining up the bumpstop and contact "pad" on the control arm. Not very scientific...but hey, what do you expect from a guy who bought a rotted out 1993 Dakota?


Notice in this picture that the bumpstop hits pretty damn square on the LCA contact pad. This is good enough. For me.

Last edited by tbugden; Oct 18, 2014 at 10:55 PM.

Record Breaker


Joined: Jan 2014
Posts: 1,852
Likes: 109
From: Va
Looks good. The orig. was a triangle shaped thing and had a bracket that came out the side, turned 45 degrees and bolted on to the hole shown in your last picture.
FWIW I replaced everything in the front of mine, new upper bump stops, ball joints, control arm bushings, sway bar bushings, but left those out. Seems fine, but then I am not offroading the truck. I may try what you did. Thanks for the post with pictures.
FWIW I replaced everything in the front of mine, new upper bump stops, ball joints, control arm bushings, sway bar bushings, but left those out. Seems fine, but then I am not offroading the truck. I may try what you did. Thanks for the post with pictures.
Thread Starter
|
All Star
Joined: Apr 2013
Posts: 941
Likes: 22
From: Connecticut
Yeah I do have one of the originals but the metal base is rotted away. As you say, I don't think they're all that important for normal driving, but I felt that it was necessary that I do something for LCA bumpstops considering I had everything apart.


Thread Starter
|
All Star
Joined: Apr 2013
Posts: 941
Likes: 22
From: Connecticut
Drums yes, backing plates no. The backing plates will still work fine, but given the scope of this project, they had enough rust that I should have replaced them. Unfortunately, they seem to cost WAY too much used. I'll upgrade the brakes before I spend $90 Each on backing plates for these 9" drums.
Last edited by tbugden; Oct 23, 2014 at 04:16 PM.
Thread Starter
|
All Star
Joined: Apr 2013
Posts: 941
Likes: 22
From: Connecticut
Why You Shouldn't Ignore A Whirring Throwout Bearing
Before I started this project, when I was still driving the truck as unsafe as it was, it was having a stalling issue when the clutch was depressed. If I didn't shift quick enough or tap the gas, it wouldn't stay running. It idled perfectly in neutral; only immediately after the clutch was depressed would it stall. I figured it was some vacuum issue, but never bothered to look into it. I secretly hoped that after I was done with the rebuild, it would magically go away (even though the engine is not part of the rebuild).
As it turns out, the cause may not have been a vacuum issue at all, but a clutch issue. The throwout bearing was whirring loud ever since I got the truck, but it may have been worse than I thought.
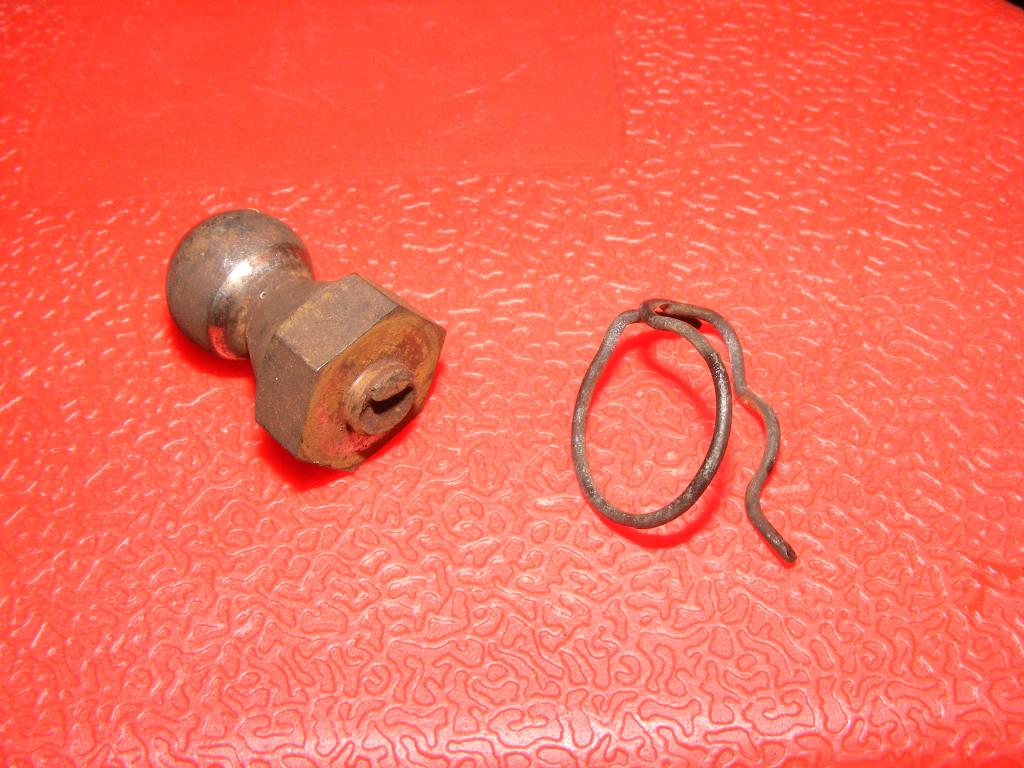
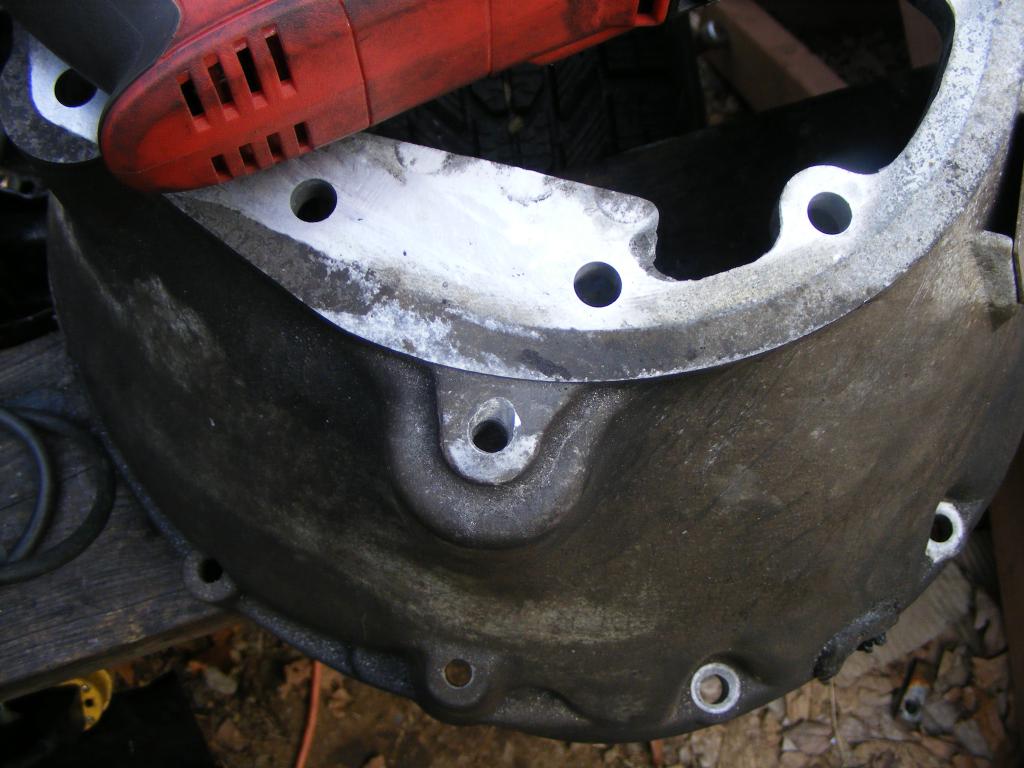
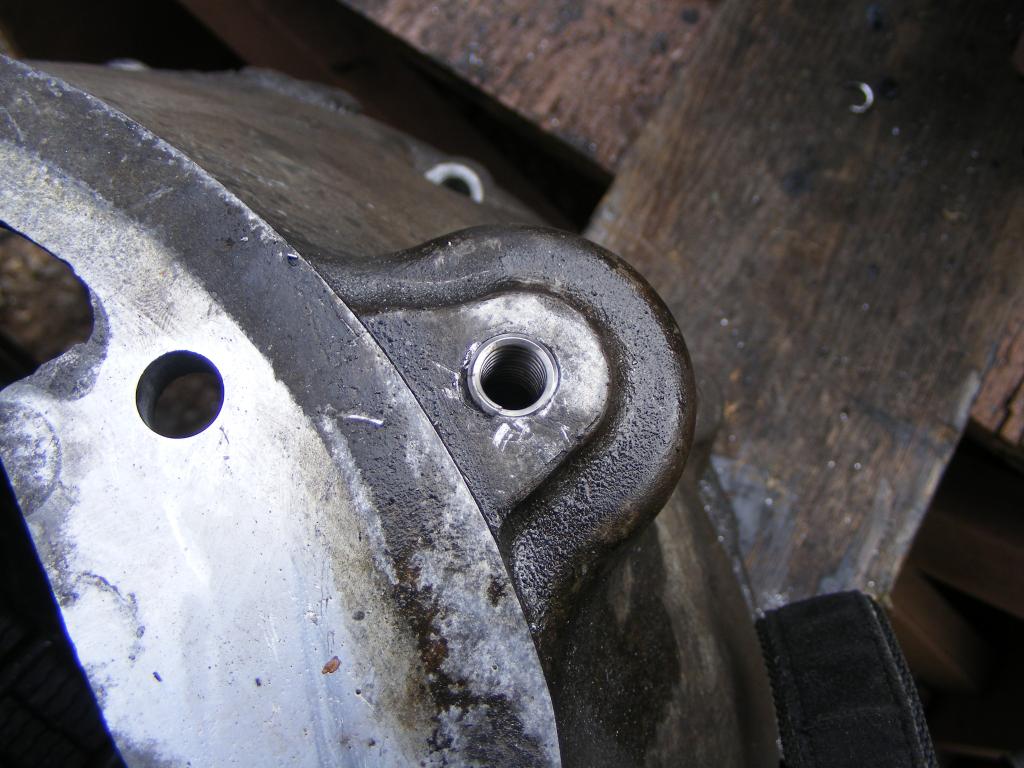
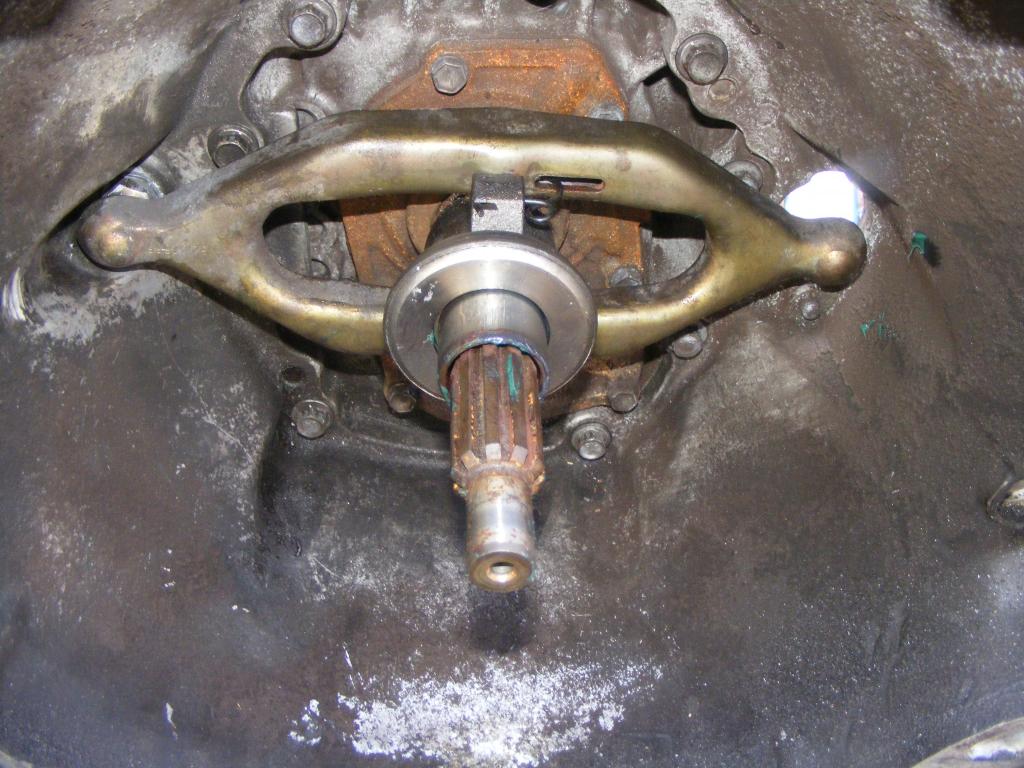
That's the condition of the throwout bearing. There was another problem though. The pivot ball on the opposite (passenger's) side of the clutch fork was broken clean off at the start of the threads. Not only that, but the aluminum surface where the pivot ball sits was actually DENTED significantly as the pivot ball washer appears to have been driven into the aluminum. It would have taken no small amount of force to do this kind of damage. The only explanation that I can think of is that the throwout bearing was actually seizing up every time the clutch was depressed, causing the clutch fork to put a lot of force on the pivot ball. First it bent and drove the washer into the aluminum, then it broke. I guess I was driving it like this.
A picture of the broken pivot ball and retainer spring.
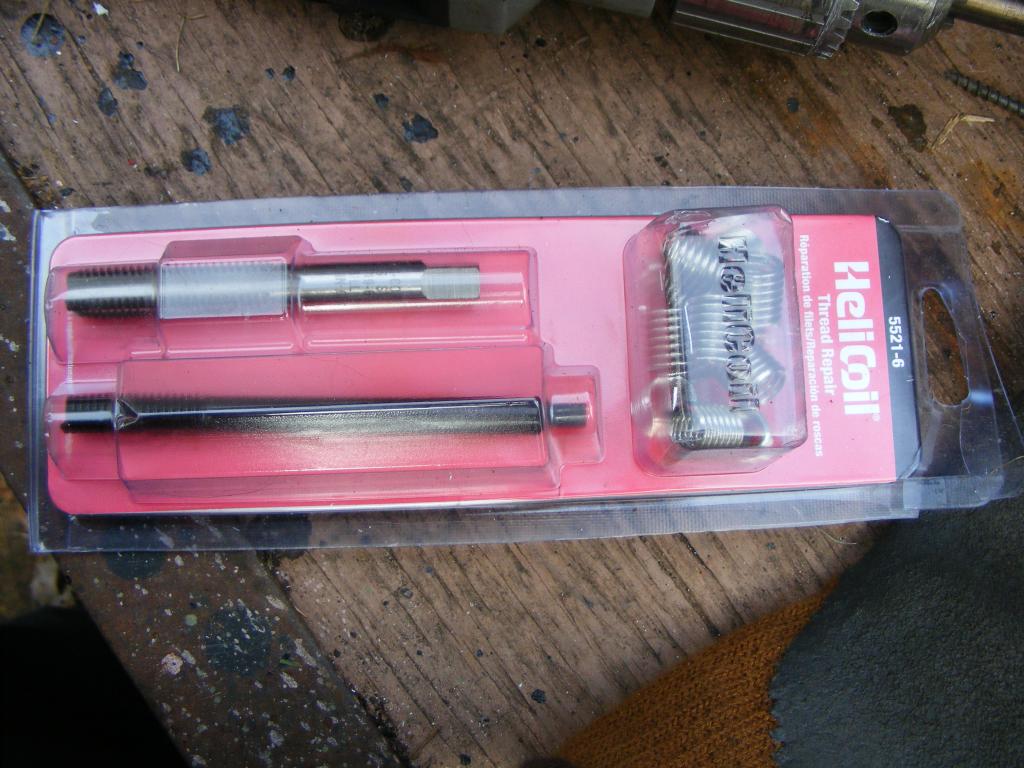
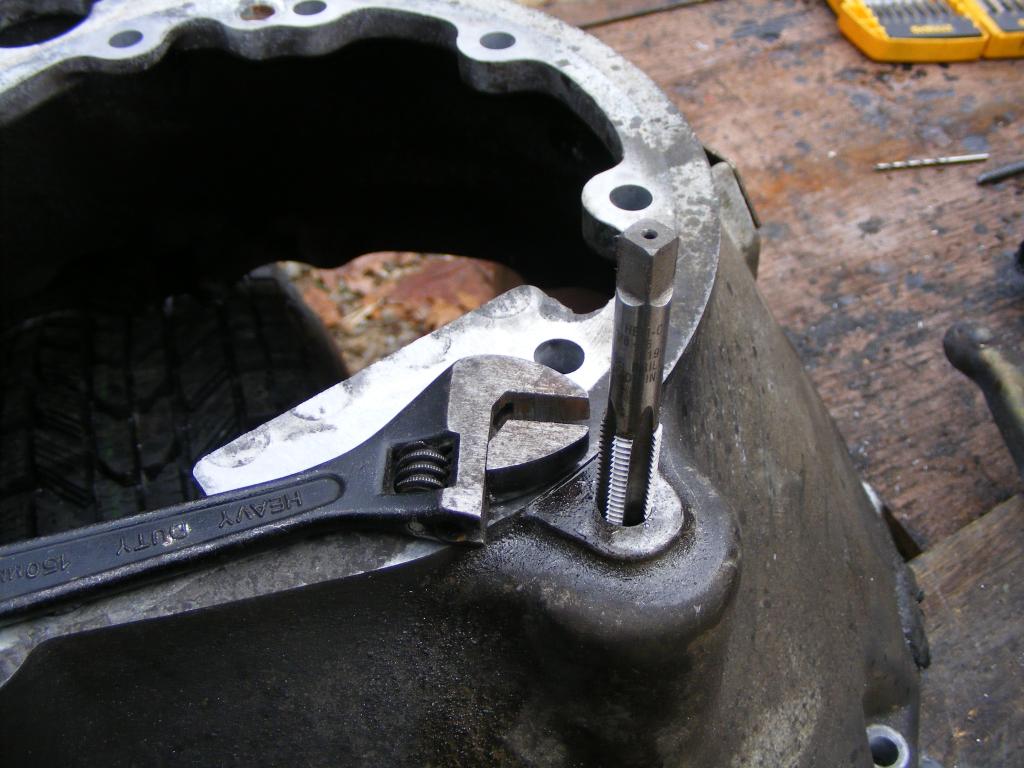
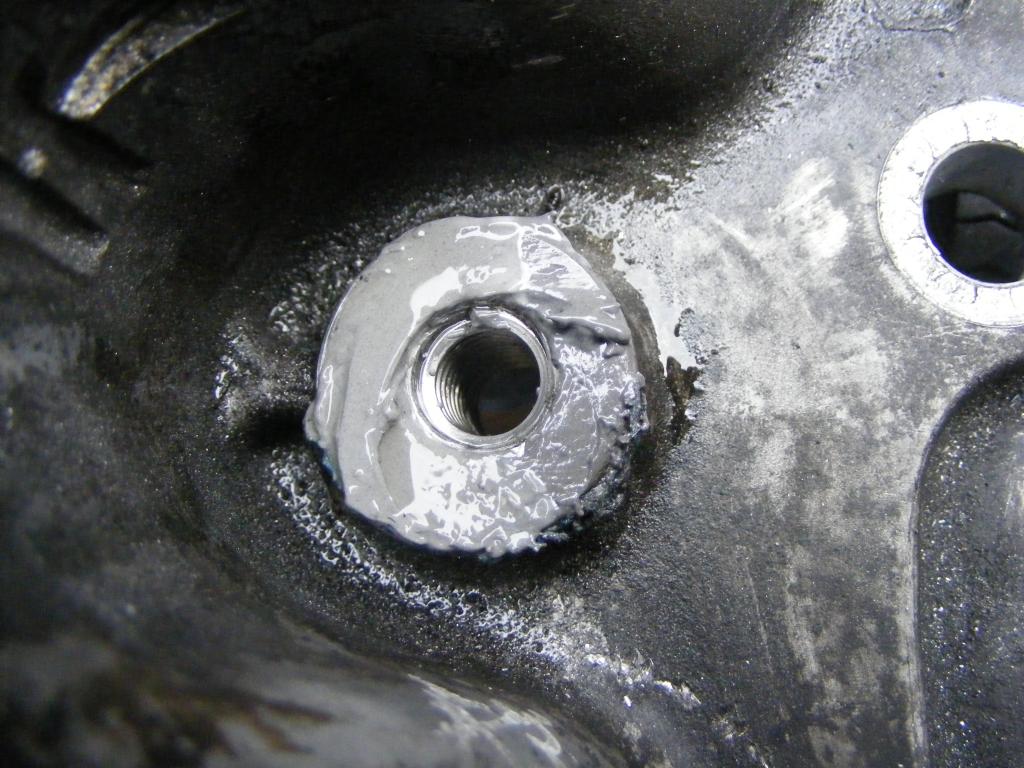
So the solution was to drill out the broken pivot ball threads, helicoil them, and install a new pivot ball. First I removed the bell housing so I could work on the thing from both sides (the pivot ball hole is threaded all the way through the bellhousing), then started drilling. This was easier said than done, probably because I first tried welding a nut to the slightly protruding threads and then I had to drill through some of my weld. I killed many drill bits in this process, but finally got it. The hole is ever so slightly crooked, but the clutch fork has plenty of side-to-side play to account for it. If I were to do it again I probably would have a machine shop do it so it was straight...who am I kidding...I'd do it the wrong way again...
The pivot ball I bought was part # 52087542 MOPAR and I bought it here: http://www.ebay.com/itm/Clutch-Fork-Pivot-MOPAR-52087542-/321604359004?vxp=mtr
The helicoil kit is a 3/8"-16.
It's much easier to tap from the back side.
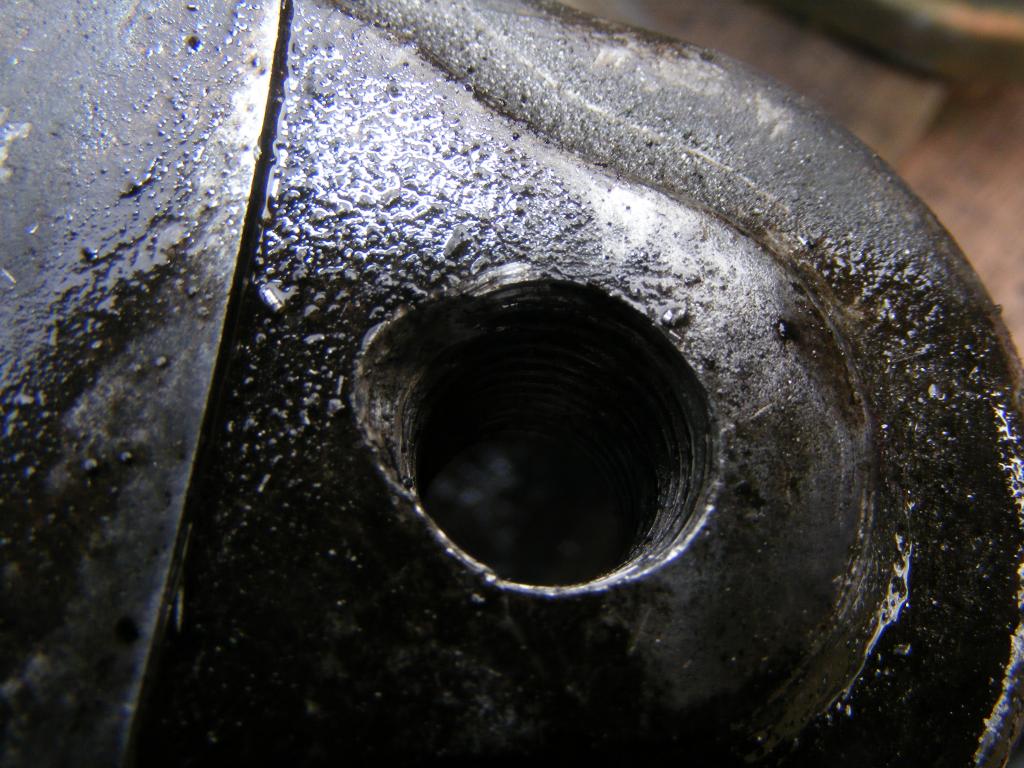
I ended up actually using two helicoils stacked so that I could get the full thread length, which worked just fine. In all likelihood it would have worked fine with one.
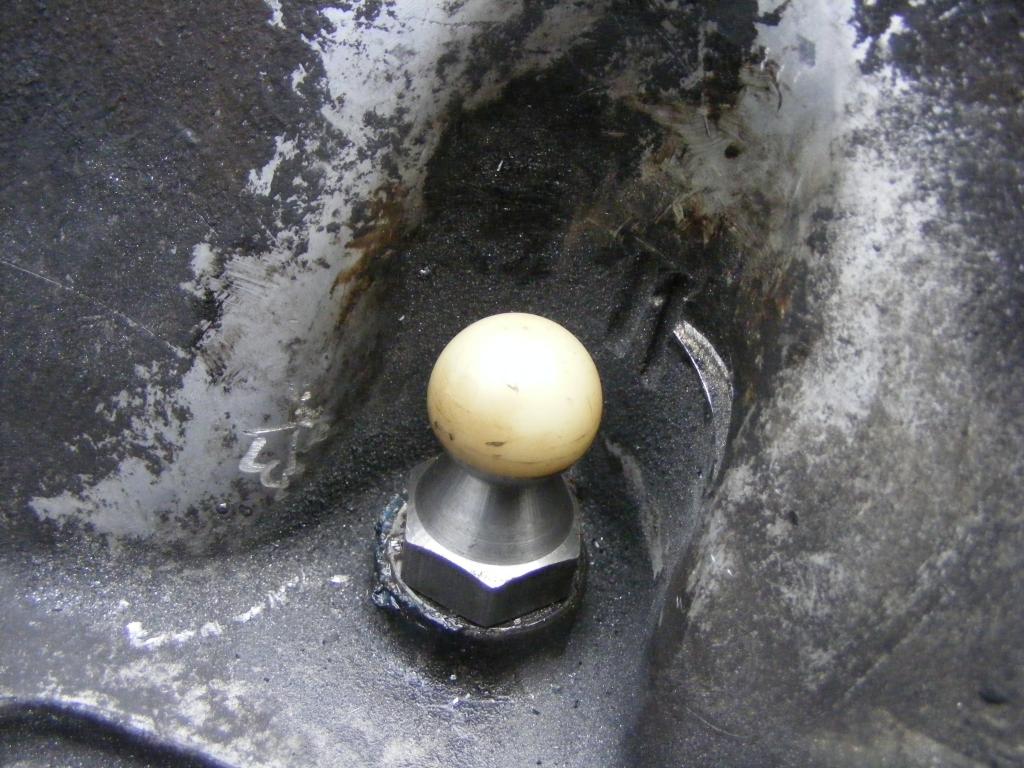
Then, I filled in the divot in the aluminum with JB Weld and used a grinder on a Dremel to smooth it down. I reused the washer because it seemed perfectly fine.
Note that the (dark gray) JB Weld is mostly on the left side...this is where the divot was.

All done...Oh yeah there is the retainer spring not pictured which was also broken. Mopar Part # 04338855. I bought that here: http://www.factorychryslerparts.com/.../04338855.html Shipping was ridiculous for such a small part...but I needed it.
Before I started this project, when I was still driving the truck as unsafe as it was, it was having a stalling issue when the clutch was depressed. If I didn't shift quick enough or tap the gas, it wouldn't stay running. It idled perfectly in neutral; only immediately after the clutch was depressed would it stall. I figured it was some vacuum issue, but never bothered to look into it. I secretly hoped that after I was done with the rebuild, it would magically go away (even though the engine is not part of the rebuild).
As it turns out, the cause may not have been a vacuum issue at all, but a clutch issue. The throwout bearing was whirring loud ever since I got the truck, but it may have been worse than I thought.
That's the condition of the throwout bearing. There was another problem though. The pivot ball on the opposite (passenger's) side of the clutch fork was broken clean off at the start of the threads. Not only that, but the aluminum surface where the pivot ball sits was actually DENTED significantly as the pivot ball washer appears to have been driven into the aluminum. It would have taken no small amount of force to do this kind of damage. The only explanation that I can think of is that the throwout bearing was actually seizing up every time the clutch was depressed, causing the clutch fork to put a lot of force on the pivot ball. First it bent and drove the washer into the aluminum, then it broke. I guess I was driving it like this.
A picture of the broken pivot ball and retainer spring.

So the solution was to drill out the broken pivot ball threads, helicoil them, and install a new pivot ball. First I removed the bell housing so I could work on the thing from both sides (the pivot ball hole is threaded all the way through the bellhousing), then started drilling. This was easier said than done, probably because I first tried welding a nut to the slightly protruding threads and then I had to drill through some of my weld. I killed many drill bits in this process, but finally got it. The hole is ever so slightly crooked, but the clutch fork has plenty of side-to-side play to account for it. If I were to do it again I probably would have a machine shop do it so it was straight...who am I kidding...I'd do it the wrong way again...

The pivot ball I bought was part # 52087542 MOPAR and I bought it here: http://www.ebay.com/itm/Clutch-Fork-Pivot-MOPAR-52087542-/321604359004?vxp=mtr
The helicoil kit is a 3/8"-16.

It's much easier to tap from the back side.


I ended up actually using two helicoils stacked so that I could get the full thread length, which worked just fine. In all likelihood it would have worked fine with one.

Then, I filled in the divot in the aluminum with JB Weld and used a grinder on a Dremel to smooth it down. I reused the washer because it seemed perfectly fine.

Note that the (dark gray) JB Weld is mostly on the left side...this is where the divot was.

All done...Oh yeah there is the retainer spring not pictured which was also broken. Mopar Part # 04338855. I bought that here: http://www.factorychryslerparts.com/.../04338855.html Shipping was ridiculous for such a small part...but I needed it.

Last edited by tbugden; Dec 15, 2014 at 05:53 PM.
Thread Starter
|
All Star
Joined: Apr 2013
Posts: 941
Likes: 22
From: Connecticut
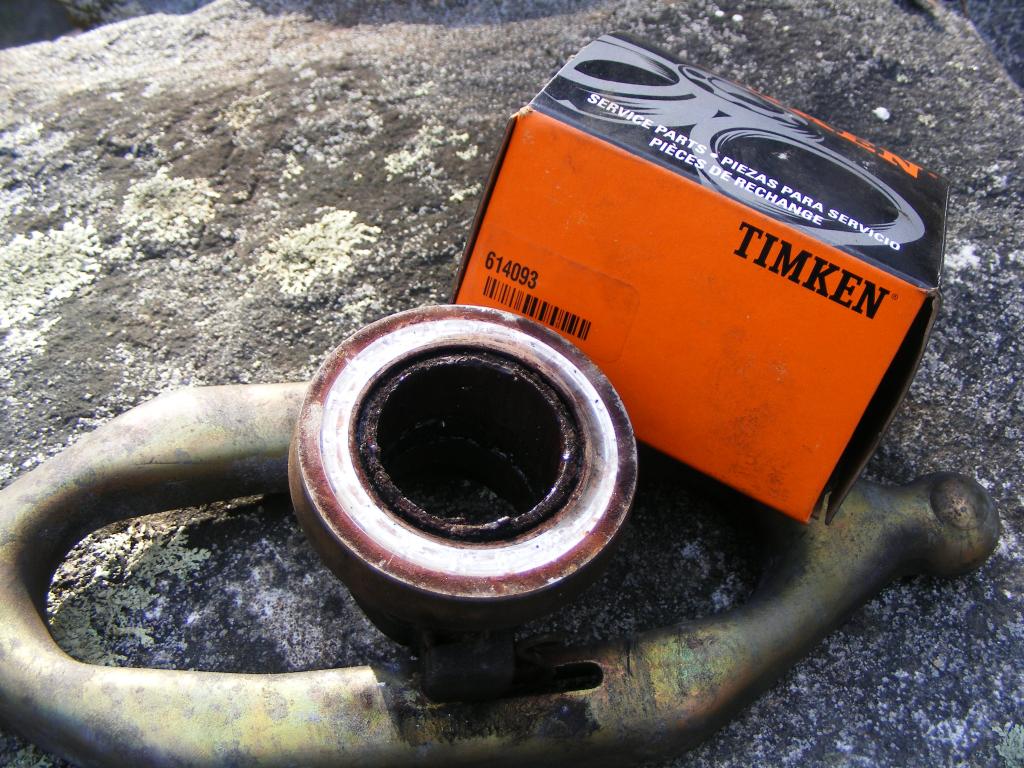
Then I replaced the throwout bearing itself with a Timken unit (part # 614093). What a beautiful difference.
Bad
Good/Bad
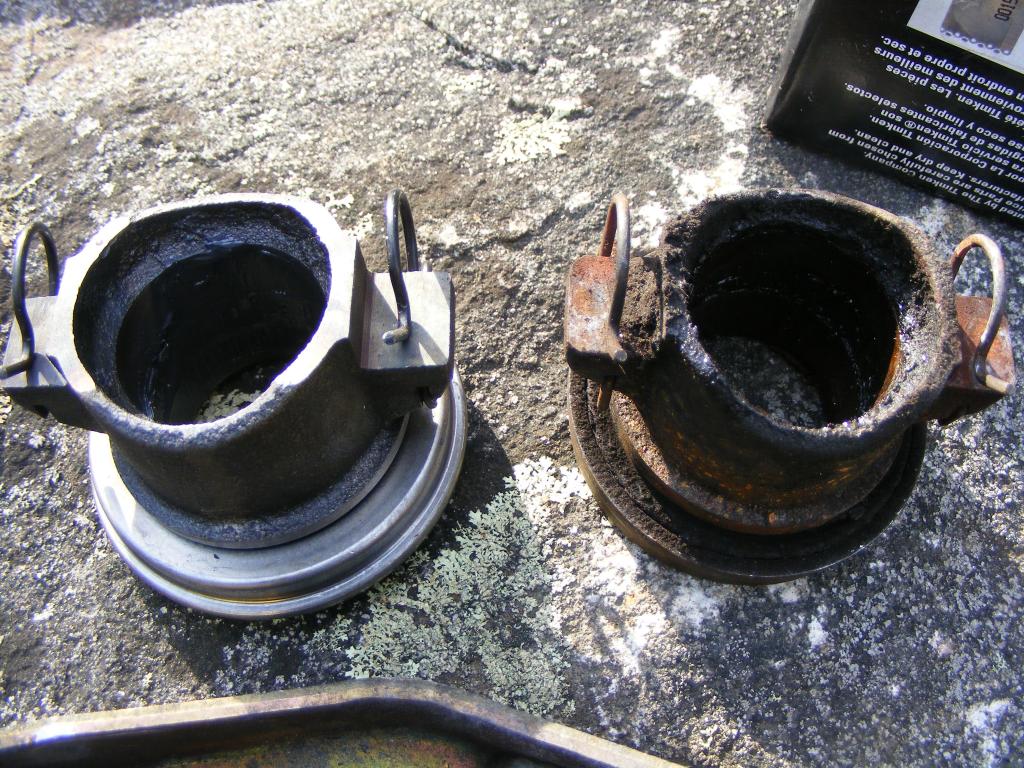
I cleaned and greased the throwout bearing slide surface well, and I used brake caliper grease on the pivot ball.
What a load off to get this thing done. I didn't immediately think about it being related to the stalling issue, but now I do expect this to solve the clutch-in stalling issue.
Bad

Good/Bad

I cleaned and greased the throwout bearing slide surface well, and I used brake caliper grease on the pivot ball.

What a load off to get this thing done. I didn't immediately think about it being related to the stalling issue, but now I do expect this to solve the clutch-in stalling issue.
Last edited by tbugden; Dec 9, 2014 at 01:18 PM.
