

'93 Dakota V6 getting a '94 Dakota V8 engine - Build Thread

Thread Starter
|
All Star
Joined: Apr 2013
Posts: 941
Likes: 22
From: Connecticut
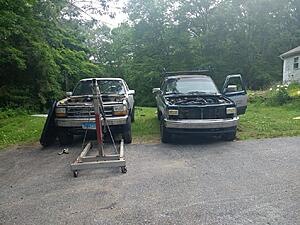
Just starting this thread to document my swap. The quick background is that I blew the V6 in my 1993 5-speed Dakota and found this '94 Dakota V8 auto running and driving (albeit not stopping very well) for $450. The idea is to do the swap as cheaply as possible as I don't have the money or time or space to have the truck sitting for too long. Therefore, my new parts list is sparse and includes: Luk clutch and new flywheel, oil pan (V8 pan is rusted and leaking), rear main seal, and new exhaust manifold bolts/studs in preparation for new headers in the future (to avoid having to deal with seized bolts while the engine is in the truck). The rest comes from the V8 donor truck. My plan is to use the V8 auto computer and harness.
Edit: This swap is now complete. It is documented in the subsequent posts but I want to summarize the work done. This is a very easy swap, and if you can swap an engine, you can sure do this conversion. It helps a great deal to have a factory service manual for both trucks. The details are:
Donor: 1994 Dakota SLT 318 42RH automatic
Recipient: 1993 Dakota LE V6 AX-15 manual
Specifics: The 1993 received the motor, PCM, and the entire engine harness from the 1994 automatic, all mated to the AX-15. Note: This information is directly useful for the trucks mentioned but is probably useful for all 1st gen Dakotas doing a similar Magnum engine swap
Summary of outcome: Everything works perfect with two very minor exceptions that have not been addressed yet. First, the maintenance required (MAINT REQD) light on the gauge cluster is on intermittently. Second, the speedometer oddly tries to go backwards when in reverse. It works perfectly in forward. Everything else electrical works perfect.
Fitment
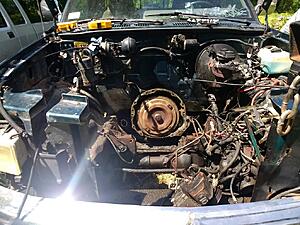
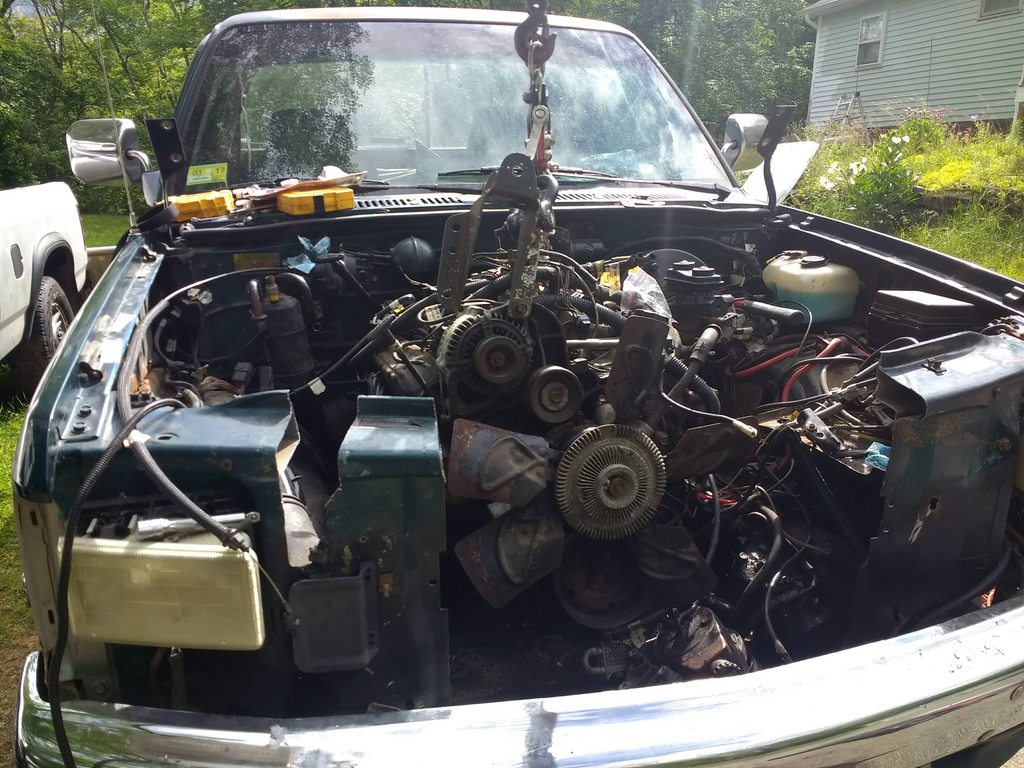
Donor on the right. edit: Note at this time I have already pulled the V6, so all the engine and related work you see hereafter is for purposes of fitting the V8.
My first step, label EVERYTHING.
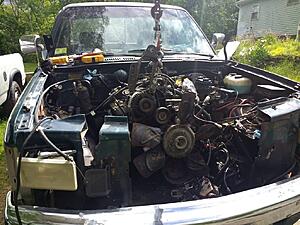
Just cut the rad core support center out so I didn't have to lift the engine so high. edit: this truck is going to scrap after I bastardize everything I want. So I don't mind cutting ****. I did a REALLY dumb thing and cut through the hood latch cable... my '93 needs a new one! Rats!
Only one exhaust stud broke, out of 12! The others spun out easy. Pretty impressive to me for a 24 year old rusty-*** truck.
Pulling the motor is pretty straightforward. Don't forget the flexplate to torque converter bolts on an auto. I spent about an hour wondering why I couldn't separate the motor from the tranny before I slapped my forehead and crawled under the truck to remove the four bolts.
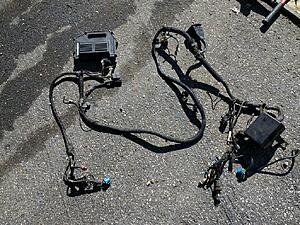
The engine bay harness out of the parts truck. Dang, I love old OBD1, this is super easy to deal with.
Edit: This swap is now complete. It is documented in the subsequent posts but I want to summarize the work done. This is a very easy swap, and if you can swap an engine, you can sure do this conversion. It helps a great deal to have a factory service manual for both trucks. The details are:
Donor: 1994 Dakota SLT 318 42RH automatic
Recipient: 1993 Dakota LE V6 AX-15 manual
Specifics: The 1993 received the motor, PCM, and the entire engine harness from the 1994 automatic, all mated to the AX-15. Note: This information is directly useful for the trucks mentioned but is probably useful for all 1st gen Dakotas doing a similar Magnum engine swap
Summary of outcome: Everything works perfect with two very minor exceptions that have not been addressed yet. First, the maintenance required (MAINT REQD) light on the gauge cluster is on intermittently. Second, the speedometer oddly tries to go backwards when in reverse. It works perfectly in forward. Everything else electrical works perfect.
Fitment
- Everything bolts up in this swap. Zero custom fabrication is required. However, some specific parts will be needed from the V8. These include:
- Fuel: In this case, the 1994 has a returnless style fuel system. You must either convert the rails to return style or convert the system to returnless. The former requires only the fuel rails (at intake); the latter requires the appropriate returnless fuel pump and a new supply line. The returnless fuel pump has a built in filter. The supply line needs no filter. Note the outlet for the fuel pump is 3/8" and the inlet for the [returnless] fuel rail is 5/16"
- Exhaust manifolds: Obviously: Also, the 1994 has smaller-diameter exhaust manifolds They will leak if you try to mate them with the '93 y-pipe. There are multiple options. The best is to find V8 exhaust manifolds from a '92 or '93 V8 Dakota. They are larger and will fit with the '93 y-pipe
- Fan shroud: shorter
- Oil pan: longer
- Upper and lower radiator hoses
- Power steering lines might be different depending on power steering pump placement. I used the ones from my V6. They are clearly not ideal but work fine
- Flywheel: the V8 flywheel has 8 notches for the crank sensor
- Clutch: same clutch for the V6 can be used, but a V8 one is suggested to better handle the extra torque
- Crank sensor: automatic and manual are different
- Throttle cable: The one for the V8 is shorter than for the V6 and has a traditional cable end. It must be swapped into the V6 truck
- Intake: the tube for the 1994 V8 has a round inlet, the 1993 V6 has a rectangular inlet. This is obviously not a major problem but worth noting
- The crank sensor connector for the automatic and manual harnesses are different. The wires are the same color; just pull the pins out and swap the connector for the manual connector
- The backup light connector for the manual has two wires, the automatic has three. The third wire (brown/yellow) is for the park/neutral safety switch on the automatic. It must be removed and grounded to the chassis where you prefer in order for the truck to start. The two other wires have the same color as the manual backup connector, just install the connectors from the manual harness so it plugs into the transmission
- The VSS (vehicle speed sensor) for the automatic has 3 wires, the manual has two. Swap the connector from the manual harness, matching wire colors (blue/black and white/orange). Leave the other orange wire hanging free and cap the end...or do whatever, I don't know what else to do for it. ***NOTE***: as previously mentioned, my speedometer reads perfectly in forward; the needle tries to go backward in reverse. I'm okay with that, figure out a solution for yourself if it bothers you.
Donor on the right. edit: Note at this time I have already pulled the V6, so all the engine and related work you see hereafter is for purposes of fitting the V8.

My first step, label EVERYTHING.

Just cut the rad core support center out so I didn't have to lift the engine so high. edit: this truck is going to scrap after I bastardize everything I want. So I don't mind cutting ****. I did a REALLY dumb thing and cut through the hood latch cable... my '93 needs a new one! Rats!
Only one exhaust stud broke, out of 12! The others spun out easy. Pretty impressive to me for a 24 year old rusty-*** truck.

Pulling the motor is pretty straightforward. Don't forget the flexplate to torque converter bolts on an auto. I spent about an hour wondering why I couldn't separate the motor from the tranny before I slapped my forehead and crawled under the truck to remove the four bolts.

The engine bay harness out of the parts truck. Dang, I love old OBD1, this is super easy to deal with.

Last edited by tbugden; Jun 26, 2018 at 10:41 PM.
Record Breaker
Joined: Aug 2013
Posts: 1,033
Likes: 1
Just starting this thread to document my swap. The quick background is that I blew the V6 in my 1993 5-speed Dakota and found this '94 Dakota V8 auto running and driving (albeit not stopping very well) for $450. The idea is to do the swap as cheaply as possible as I don't have the money or time or space to have the truck sitting for too long. Therefore, my new parts list is sparse and includes: Luk clutch and new flywheel, oil pan (V8 pan is rusted and leaking), rear main seal, and new exhaust manifold bolts/studs in preparation for new headers in the future (to avoid having to deal with seized bolts while the engine is in the truck). The rest comes from the V8 donor truck. My plan is to use the V8 auto computer and harness.
Donor on the right.

My first step, label EVERYTHING.

Just cut the rad core support center out so I didn't have to lift the engine so high.

Only one exhaust stud broke, out of 12! The others spun out easy. Pretty impressive to me for a 24 year old rusty-*** truck.

Pulling the motor is pretty straightforward. Don't forget the flexplate to torque converter bolts on an auto. I spent about an hour wondering why I couldn't separate the motor from the tranny before I slapped my forehead and crawled under the truck to remove the four bolts.

The engine harness out of the parts truck. Dang, I love old OBD1, this is super easy to deal with.

Donor on the right.
My first step, label EVERYTHING.
Just cut the rad core support center out so I didn't have to lift the engine so high.
Only one exhaust stud broke, out of 12! The others spun out easy. Pretty impressive to me for a 24 year old rusty-*** truck.
Pulling the motor is pretty straightforward. Don't forget the flexplate to torque converter bolts on an auto. I spent about an hour wondering why I couldn't separate the motor from the tranny before I slapped my forehead and crawled under the truck to remove the four bolts.
The engine harness out of the parts truck. Dang, I love old OBD1, this is super easy to deal with.
Thread Starter
|
All Star
Joined: Apr 2013
Posts: 941
Likes: 22
From: Connecticut
Oh I should clarify! The '94 is going to scrap after this because I'm pulling the engine, rear end, torsion bars and other things out. So quickest way A to B is for me, and I didn't want to have to deal with cutting the front body mount bolts which was a foregone conclusion if I had attempted to remove everything in a traditional manner. I will be happily unbolting the front from my '93 because I know every bolt I touch with come out easy, because I put them in.
Record Breaker
Joined: Aug 2013
Posts: 1,033
Likes: 1
Ah, gotcha!! My mistake too...since it was the first of two engine yanks I mistakenly thought you were yanking the V6 first to make room for the v8. I didn't even pay attention that you were yanking the V8 first.
Thread Starter
|
All Star
Joined: Apr 2013
Posts: 941
Likes: 22
From: Connecticut
I worked on the headers, swapping the fuel pump, started the rear main/oil pan replacement.
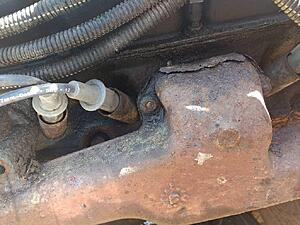
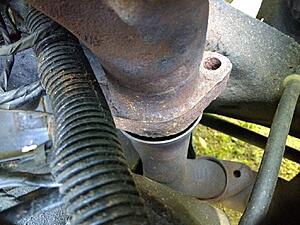
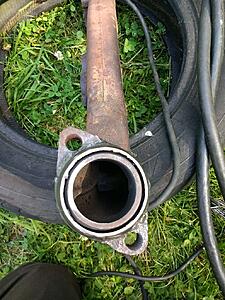
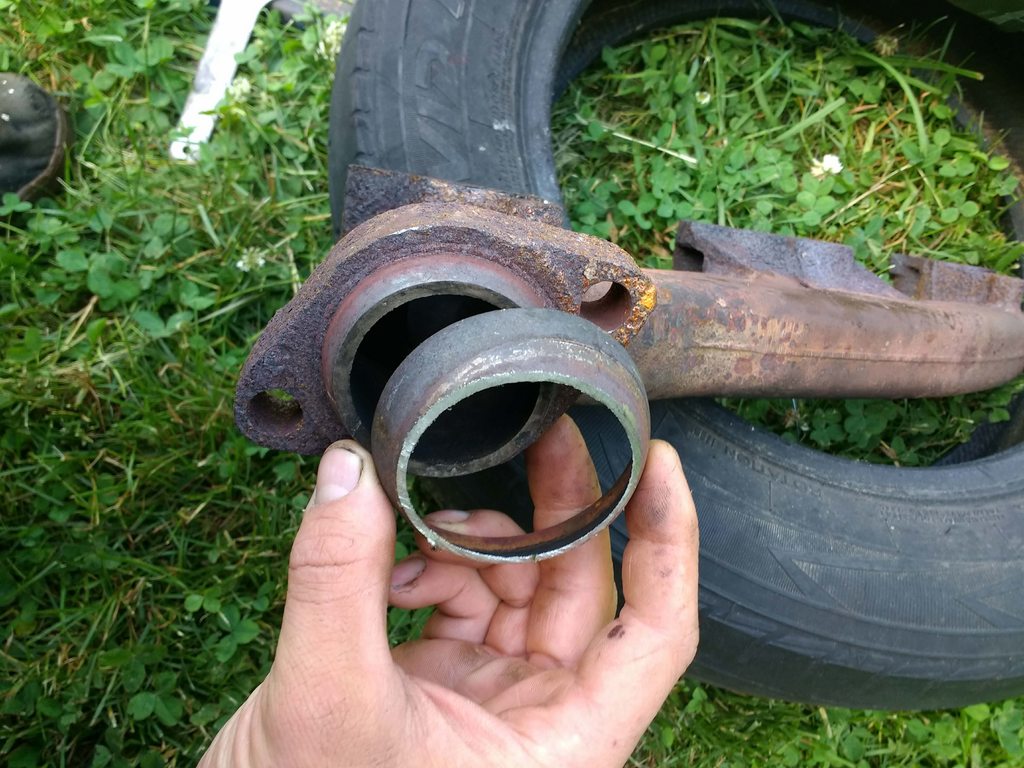
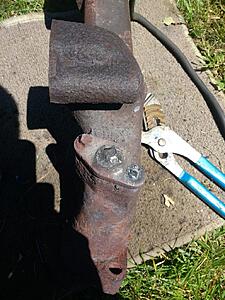
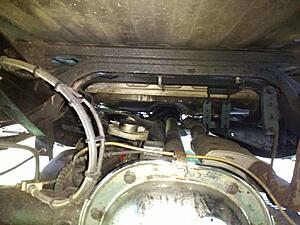
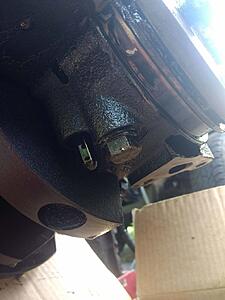
This is the ever-present problem with doing these swaps--the '92 and '93 Magnums came with larger diameter y-pipes and then for '94 they downsized them. I couldn't tell you why, but it's one of those dumb things. You can see the very large gap here. Yeah, this will probably leak...
I am working on a very limited budget so I decided to make the '94 headers (smaller) work with my '93 y pipe (larger). I was fortunate to have some cut off sections of another larger diameter y-pipe, so what I did was just weld on the tapered section of that y-pipe over the '94 header exit to get rid of that gap. Pointless? Meh, to each his own. Janky? Meh, it'll work and not leak.

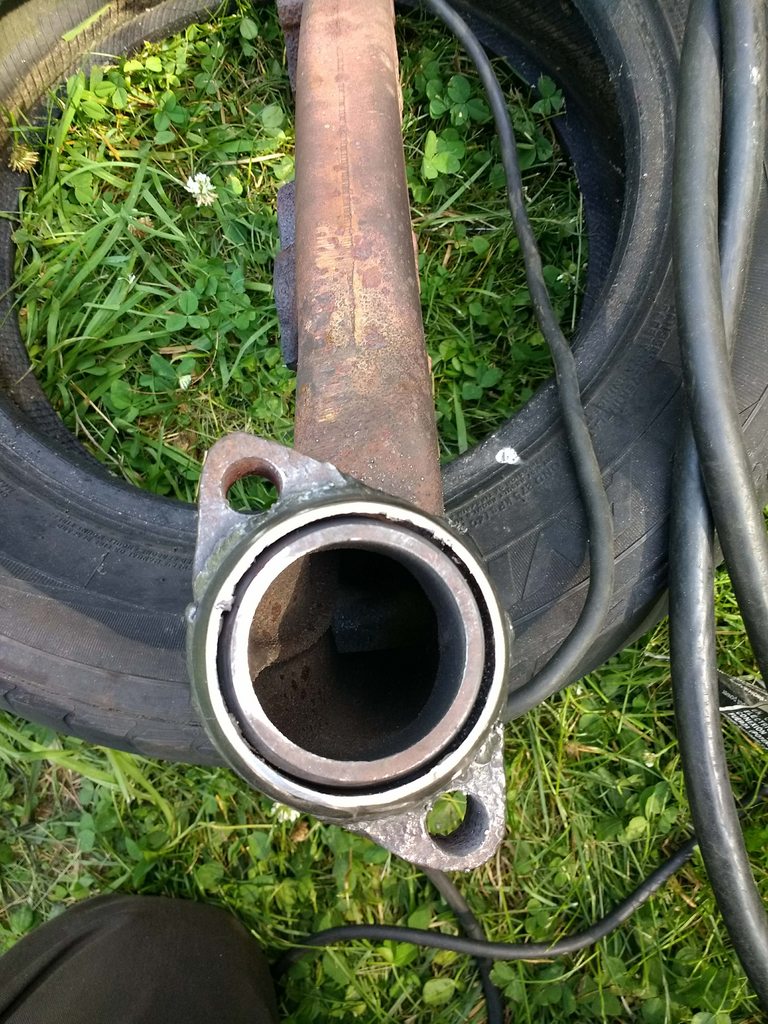
Not my greatest welds but it'll do.
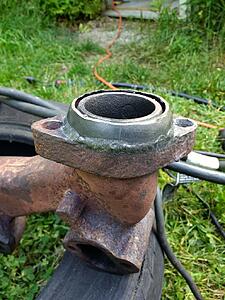
The end result (this pic is before welding but it doesn't matter)
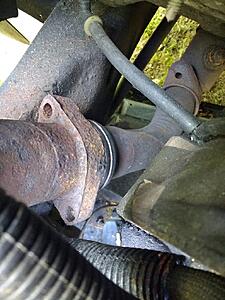
Then the bolts all installed.

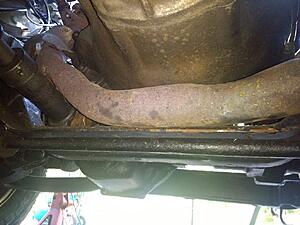
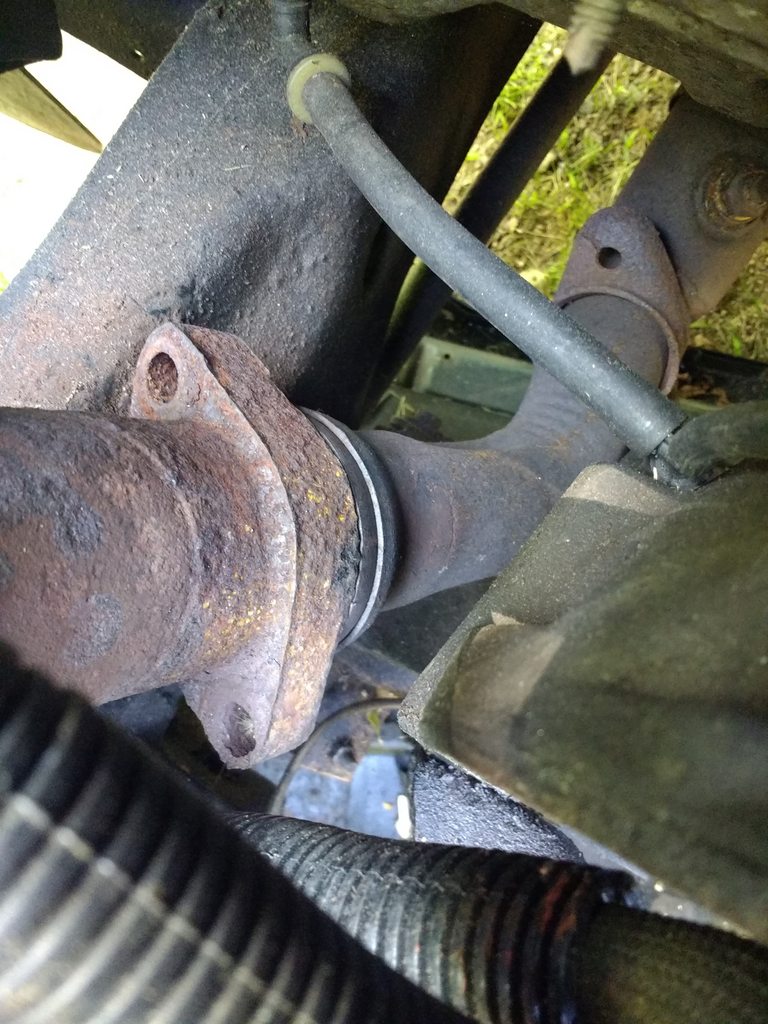
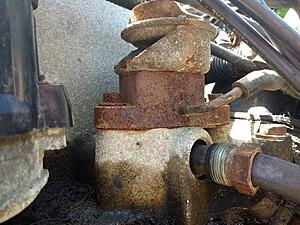
The welded flange pushes the y-pipe down about a half an inch and depending on your exhaust setup this could cause an issue where the y-pipe hits the crossmember. I think it is quite unlikely, but something to keep in mind. I still had a tiny bit of clearance as shown in this picture, and this was with the exhaust hanging low; shortening the exhaust hangers gave plenty of clearance.
This is the ever-present problem with doing these swaps--the '92 and '93 Magnums came with larger diameter y-pipes and then for '94 they downsized them. I couldn't tell you why, but it's one of those dumb things. You can see the very large gap here. Yeah, this will probably leak...

I am working on a very limited budget so I decided to make the '94 headers (smaller) work with my '93 y pipe (larger). I was fortunate to have some cut off sections of another larger diameter y-pipe, so what I did was just weld on the tapered section of that y-pipe over the '94 header exit to get rid of that gap. Pointless? Meh, to each his own. Janky? Meh, it'll work and not leak.
Not my greatest welds but it'll do.

The end result (this pic is before welding but it doesn't matter)
Then the bolts all installed.

The welded flange pushes the y-pipe down about a half an inch and depending on your exhaust setup this could cause an issue where the y-pipe hits the crossmember. I think it is quite unlikely, but something to keep in mind. I still had a tiny bit of clearance as shown in this picture, and this was with the exhaust hanging low; shortening the exhaust hangers gave plenty of clearance.

Last edited by tbugden; Jul 6, 2018 at 03:23 PM.
Thread Starter
|
All Star
Joined: Apr 2013
Posts: 941
Likes: 22
From: Connecticut
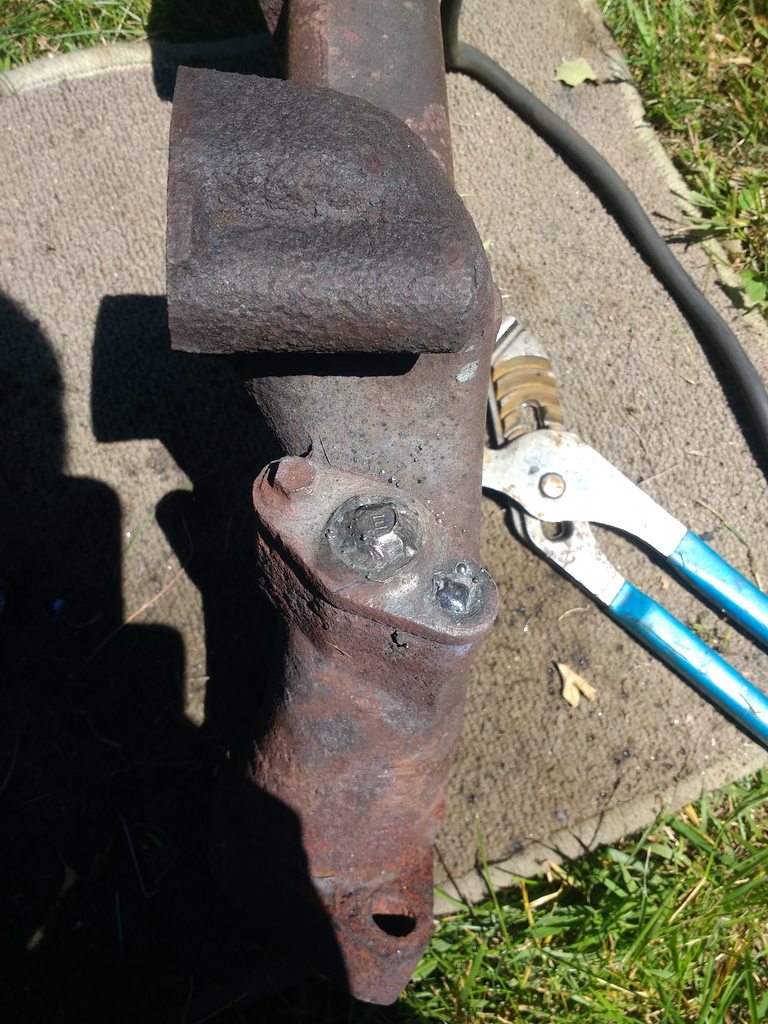
nother problem I faced was getting the passenger header off in the first place. I had to disconnect the EGR and that proved to be a tremendous pain. The bolt heads stripped out, and because I didn't particularly want to do an EGR delete I welded a nut on one of them and tried to turn it out. Success! The weld held...and then the bolt broke below the surface.
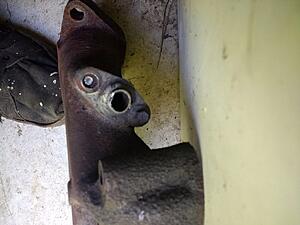
Well, EGR delete it is. So I just welded up the EGR hole with a nut.
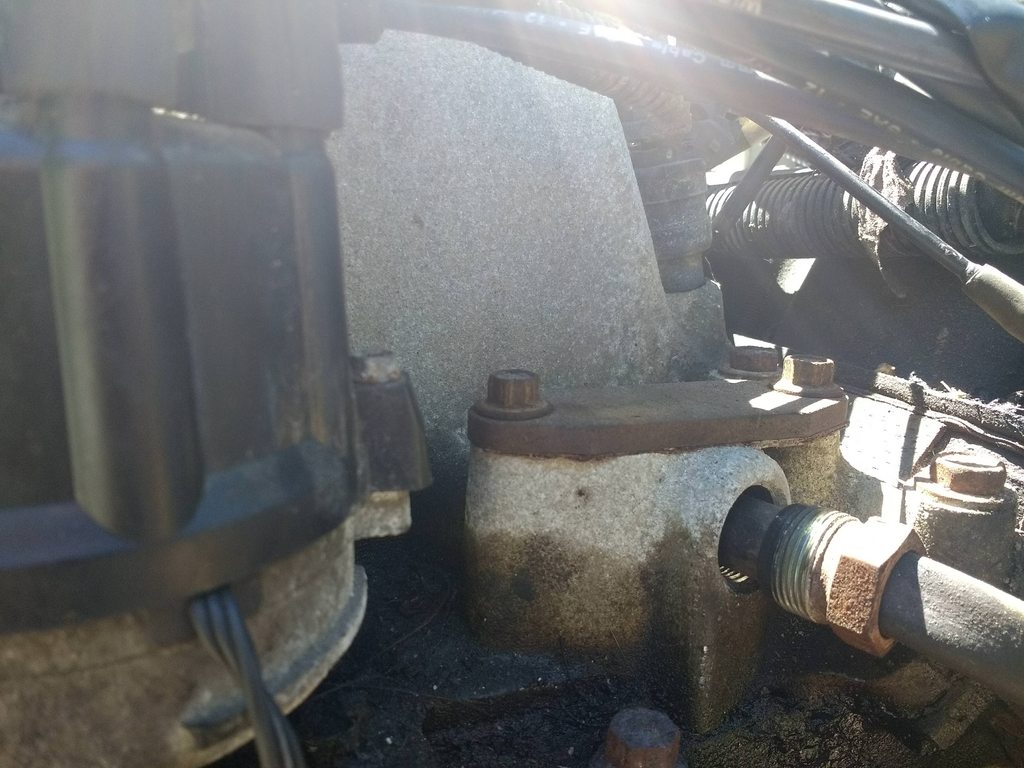
A stroke of luck! My "parts 318" sitting in the garage came factory without EGR, and therefore had a block off plate. Now you see it.
Now ya don't.


Well, EGR delete it is. So I just welded up the EGR hole with a nut.
A stroke of luck! My "parts 318" sitting in the garage came factory without EGR, and therefore had a block off plate. Now you see it.

Now ya don't.
Thread Starter
|
All Star
Joined: Apr 2013
Posts: 941
Likes: 22
From: Connecticut
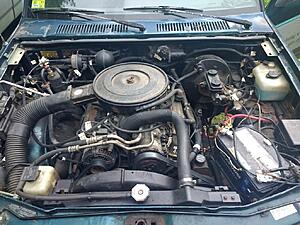
On to fuel. The '93 has a return style fuel system, so the fuel rails dump leftover fuel back into the tank. In contrast, the '94 is returnless and the fuel regulator is in the tank. Nothing to do but swap the fuel pump. This is the first time I've dropped a tank instead of pulling the bed. Easy as cake, and this picture shows how far it needs to drop to pull the pump off. The truck isn't even jacked up and the tank isn't even sitting on the ground! Cool!
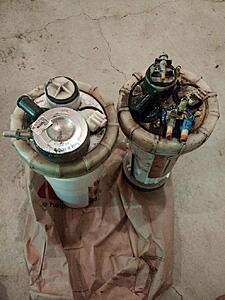
The difference in fuel pumps. Returnless on the left (Airtex, not OEM), return on the right. Interestingly enough, they share the same electrical connector, so no diagrams and running/splicing wires! (I think?)

The difference in fuel pumps. Returnless on the left (Airtex, not OEM), return on the right. Interestingly enough, they share the same electrical connector, so no diagrams and running/splicing wires! (I think?)

Last edited by tbugden; Jun 18, 2018 at 09:32 PM.
Trending Topics
Thread Starter
|
All Star
Joined: Apr 2013
Posts: 941
Likes: 22
From: Connecticut
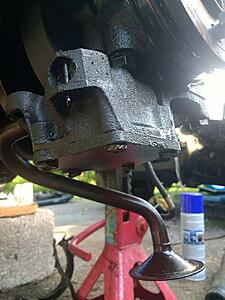
Before it started storming, I started on the oil pan/rear main seal replacement. As you can see, it's fairly obvious that the rear main is leaking.
Pulled the oil pan, a very straightforward job with the engine out of the truck...haha. And then to replace the rear main your have to remove the oil pump. Comes out really easy.
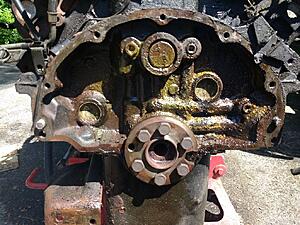
And then the rear main bearing cap. It's a really tight fit as it is supposed to be, so it doesn't drop right off. Some careful coaxing for a few minutes with a rubber mallet and some wiggling with some long bolts in the holes got it out. This picture shows the rear cap in place, I neglected to take a photo with it removed. It is still removed so I will take that picture tomorrow. That gaping hole in the cap right center scared me a lot! The edges are super rough and I thought for sure it had broken pieces off. But nope, that's how it is.
I have set the oil pickup to soak in gasoline for the night to dissolve some of the crud in the screen. Tomorrow it'll be seal replacement, oil pan install, header install (got the new fasteners today), bolting on the flywheel and clutch, swapping the slighly bent crank pulley for the one on my "parts 318" and then I suppose it's time to drop it in!

Pulled the oil pan, a very straightforward job with the engine out of the truck...haha. And then to replace the rear main your have to remove the oil pump. Comes out really easy.

And then the rear main bearing cap. It's a really tight fit as it is supposed to be, so it doesn't drop right off. Some careful coaxing for a few minutes with a rubber mallet and some wiggling with some long bolts in the holes got it out. This picture shows the rear cap in place, I neglected to take a photo with it removed. It is still removed so I will take that picture tomorrow. That gaping hole in the cap right center scared me a lot! The edges are super rough and I thought for sure it had broken pieces off. But nope, that's how it is.

I have set the oil pickup to soak in gasoline for the night to dissolve some of the crud in the screen. Tomorrow it'll be seal replacement, oil pan install, header install (got the new fasteners today), bolting on the flywheel and clutch, swapping the slighly bent crank pulley for the one on my "parts 318" and then I suppose it's time to drop it in!
Last edited by tbugden; Jun 18, 2018 at 09:34 PM.


Champion
Joined: Jan 2013
Posts: 4,737
Likes: 374
From: Northwest Louisiana
RwP