

The Victim Build Thread -- Featuring frame replacement

Thread Starter
|
All Star
Joined: Apr 2013
Posts: 941
Likes: 22
From: Connecticut
The bushings and ball joints were replaced in the upper control arms, along with new crossbar bolts and nuts.
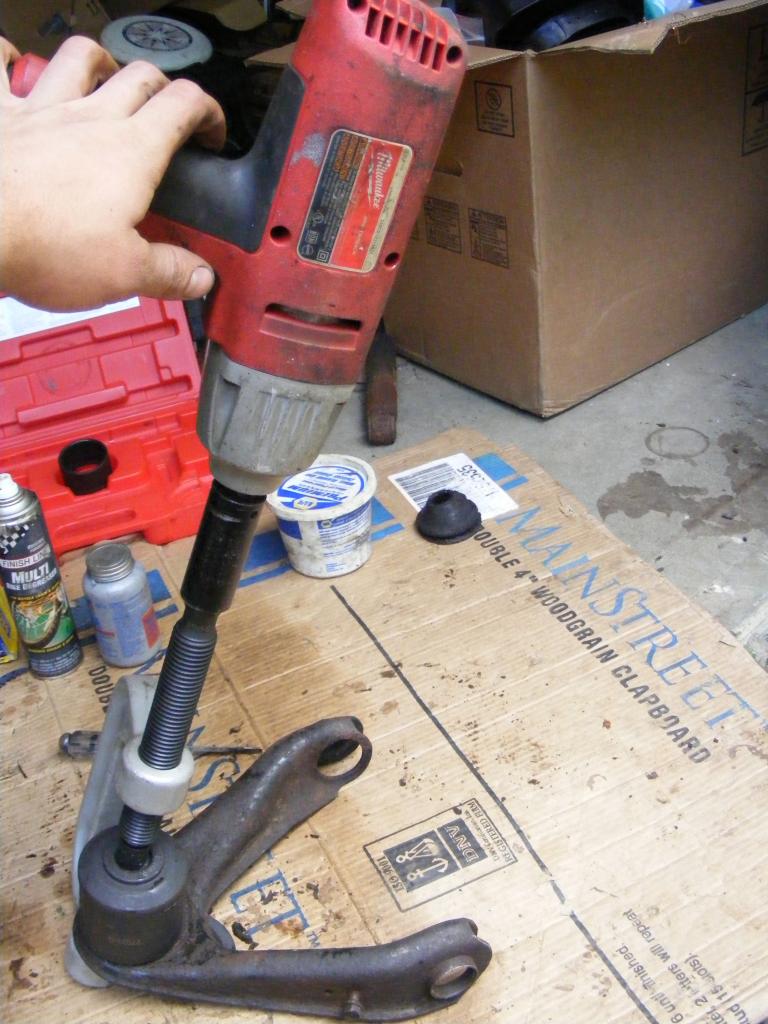
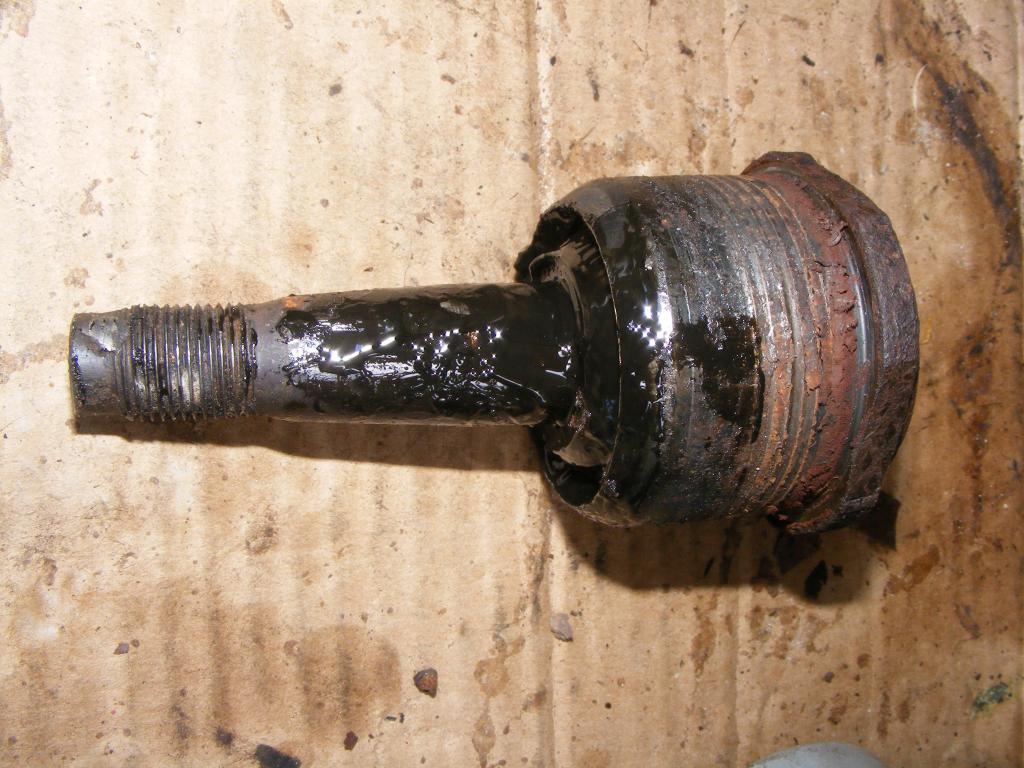
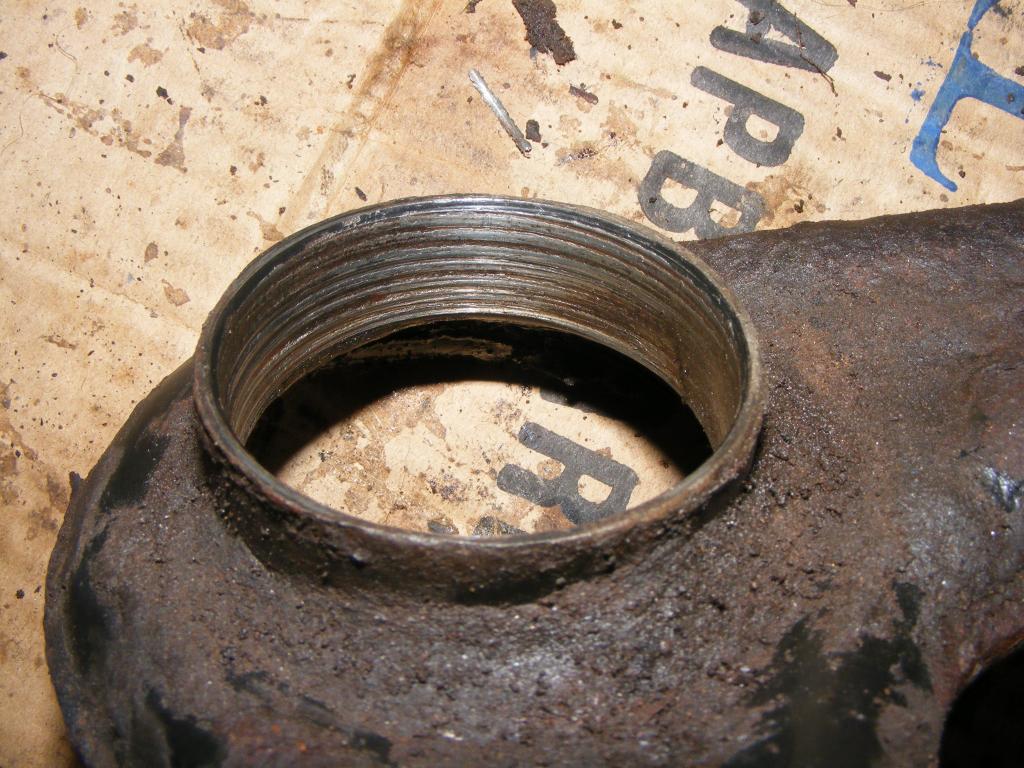
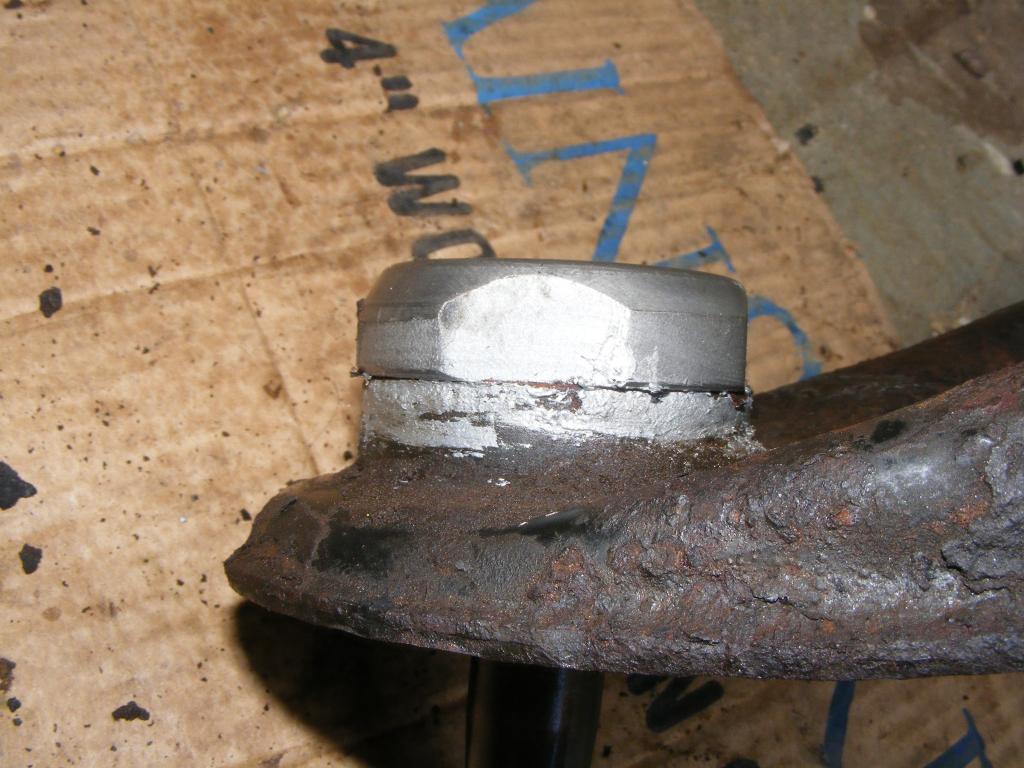
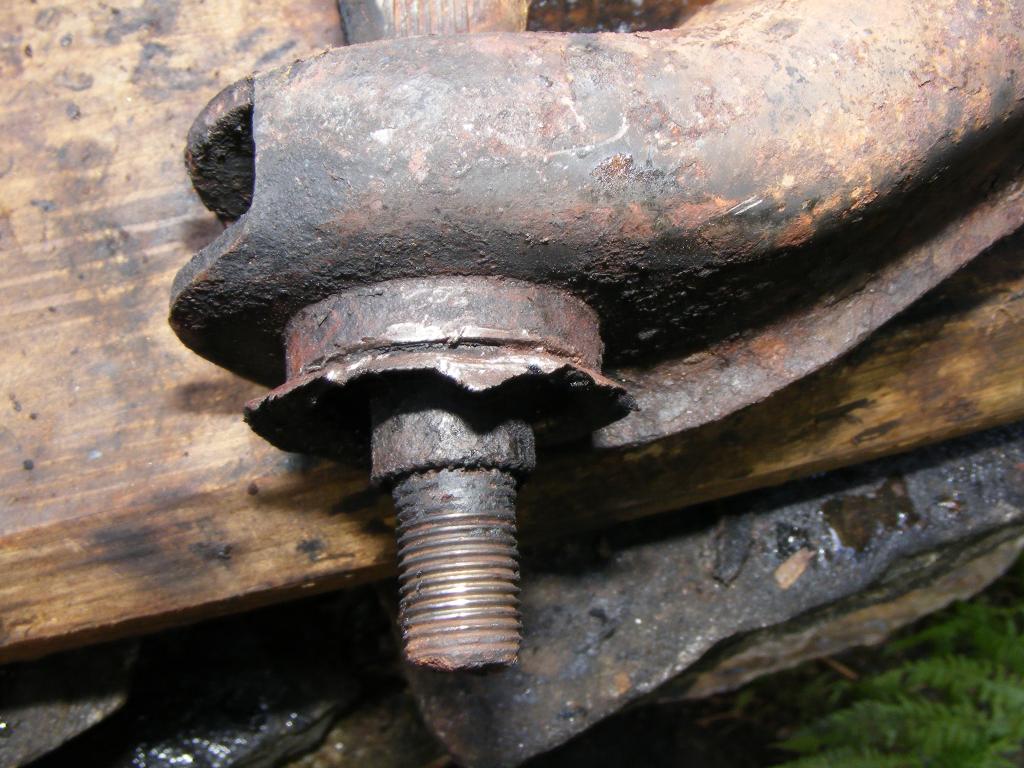
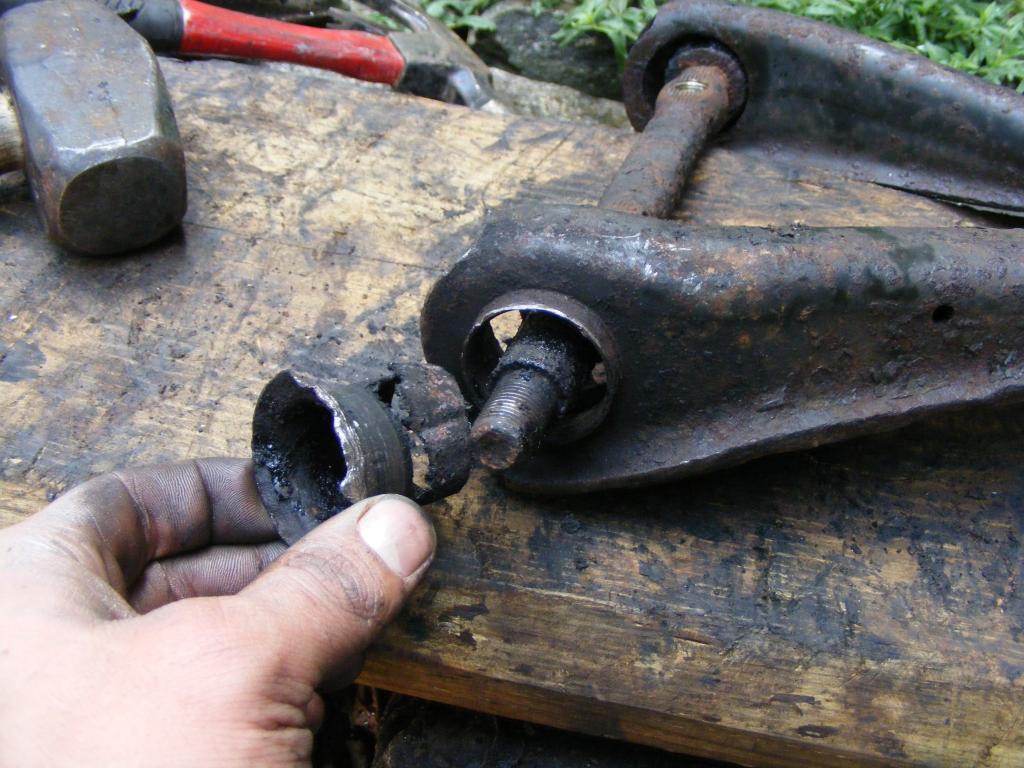
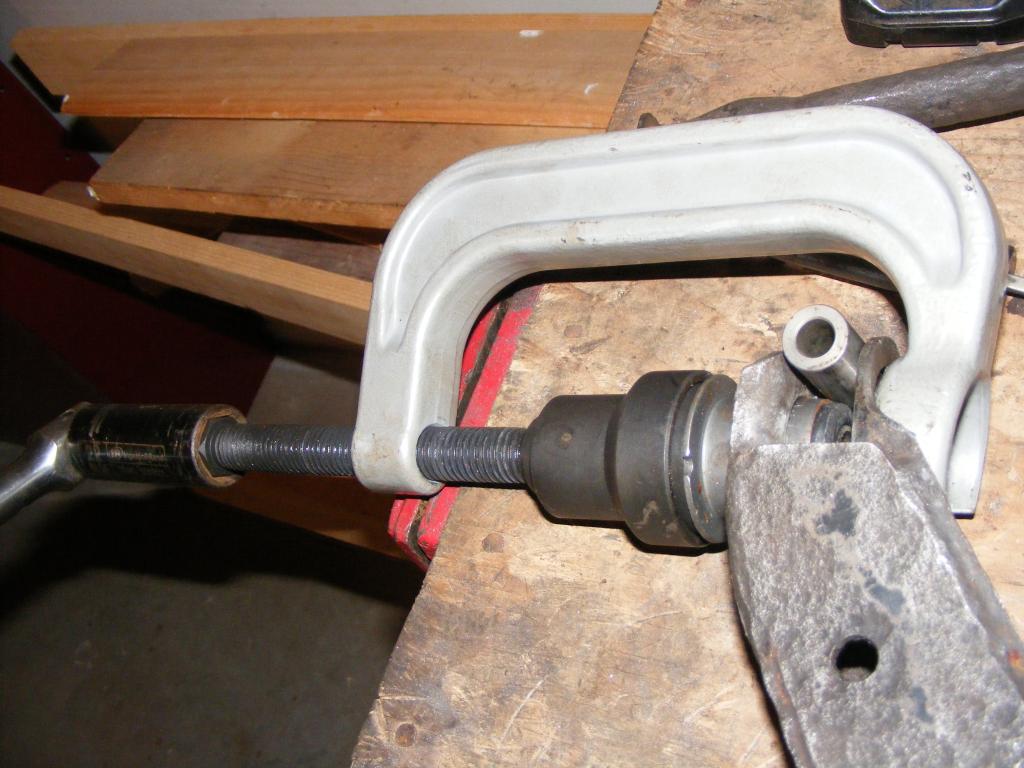
The upper control arms utilize threaded ball joints. I was unable to unthread the upper control arm ball joints. I cranked so hard I was worried about bending the arms. I even put the ball joint in a vice and put a pry bar through the crossbar holes. It felt like I was going to pull the whole bench out of the wall. I ended up pressing them out with a tool from Autozone. I don't know if this damaged the threads in the control arm, but the new Moog ball joints threaded in just fine.
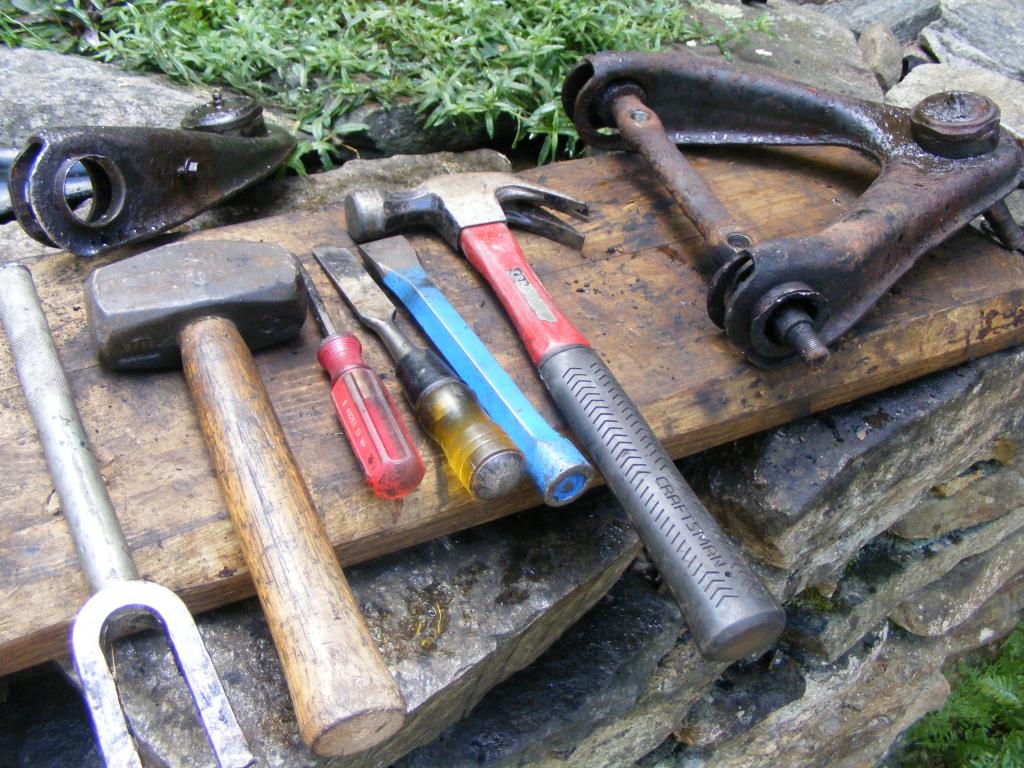
Ball Joints
Removing ball joint from upper control arm using Autozone ball joint press
Ball joint removed
Control arm threads
New ball joint threaded in
Upper Control Arm Bushings
The upper control arms use pressed in bushings. First, I burned out the rubber of the old bushing. You MUST use a vapor respirator if you do this. Later, I found it was easier and quicker to use a drill to drill a bunch of holes through the bushing until it can be pried out.
I was then left with the outer metal shell. I removed these using a myriad of cold chisels and screwdrivers, a pickle fork, and a mini sledge. I would have used an air hammer, but at this point in the project, I did not have access to a compressor. I did have an air hammer, but I can't blow hard enough for it to be of any use.
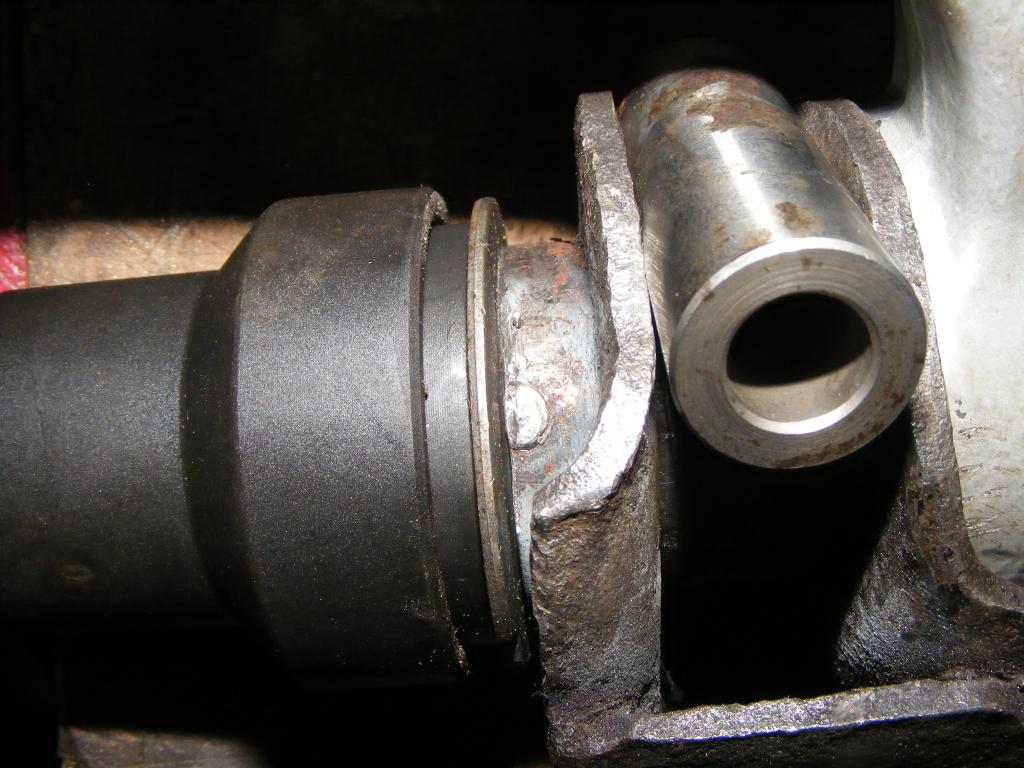
To install the new bushing, I bought a special control arm bushing install tool, which is basically a heavy duty c-clamp with a forked end so a bushing can be installed with the control arm crossbar in place.
After a little whacking...
One bushing removed
Special control arm bushing tool
Notice the piece of round stock between the two sides. THIS IS IMPORTANT!!!!!!!!!!!!
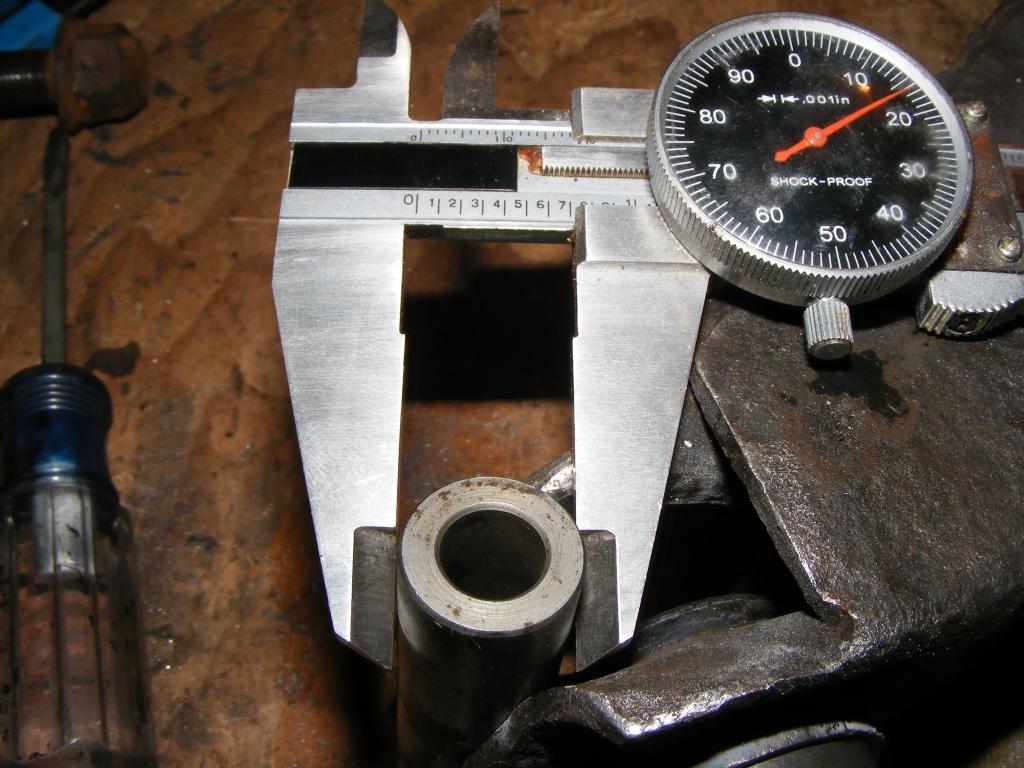
When you're installing the new bushings, you must put something between the two sides of the control arm. If you do not, the two sides will bend. This piece of round stock is ~0.72" and worked perfectly. You don't have to use round stock but you must use something.
All pressed in
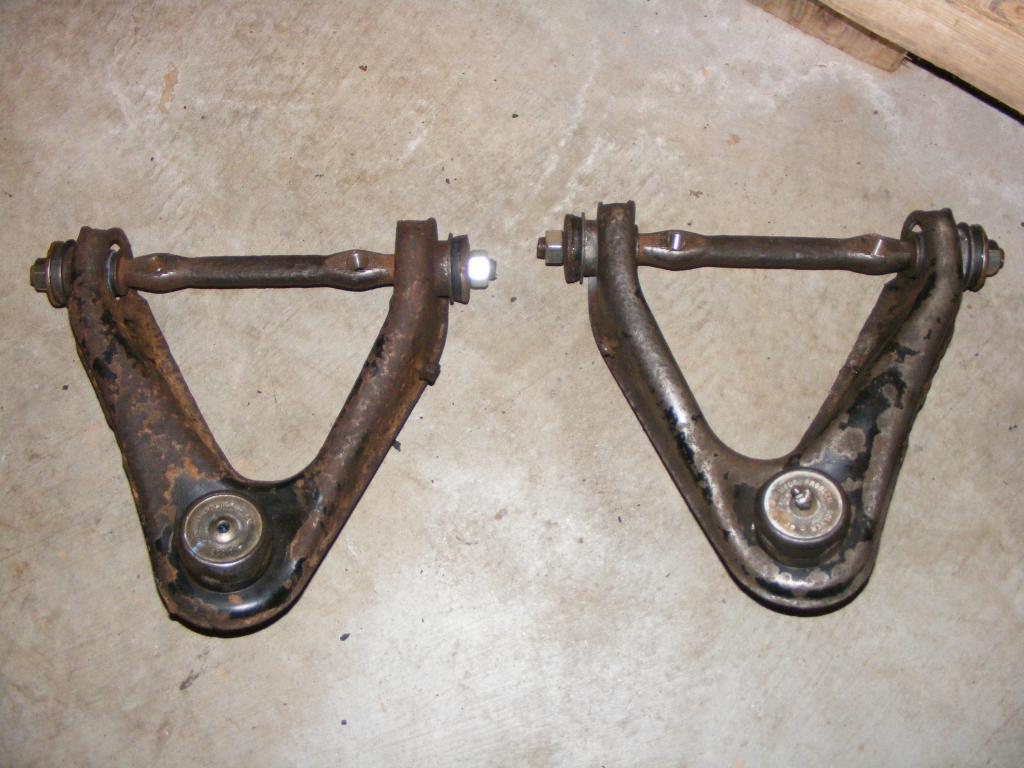
Good to go. I have the crossbar nuts tightened down in this picture, but when I install them in the truck, they will be loose. This is important because rubber bushings work by deflection and must be "undeflected" at suspension ride height. That is, with the weight of the truck on them, they are "at rest". Also, the arm on the right was put through electrolytic rust removal (to be explained later)); the arm on the left has not completed electrolysis yet.
The upper control arms utilize threaded ball joints. I was unable to unthread the upper control arm ball joints. I cranked so hard I was worried about bending the arms. I even put the ball joint in a vice and put a pry bar through the crossbar holes. It felt like I was going to pull the whole bench out of the wall. I ended up pressing them out with a tool from Autozone. I don't know if this damaged the threads in the control arm, but the new Moog ball joints threaded in just fine.
Ball Joints
Removing ball joint from upper control arm using Autozone ball joint press

Ball joint removed

Control arm threads

New ball joint threaded in

Upper Control Arm Bushings
The upper control arms use pressed in bushings. First, I burned out the rubber of the old bushing. You MUST use a vapor respirator if you do this. Later, I found it was easier and quicker to use a drill to drill a bunch of holes through the bushing until it can be pried out.
I was then left with the outer metal shell. I removed these using a myriad of cold chisels and screwdrivers, a pickle fork, and a mini sledge. I would have used an air hammer, but at this point in the project, I did not have access to a compressor. I did have an air hammer, but I can't blow hard enough for it to be of any use.
To install the new bushing, I bought a special control arm bushing install tool, which is basically a heavy duty c-clamp with a forked end so a bushing can be installed with the control arm crossbar in place.

After a little whacking...

One bushing removed

Special control arm bushing tool

Notice the piece of round stock between the two sides. THIS IS IMPORTANT!!!!!!!!!!!!
When you're installing the new bushings, you must put something between the two sides of the control arm. If you do not, the two sides will bend. This piece of round stock is ~0.72" and worked perfectly. You don't have to use round stock but you must use something.

All pressed in

Good to go. I have the crossbar nuts tightened down in this picture, but when I install them in the truck, they will be loose. This is important because rubber bushings work by deflection and must be "undeflected" at suspension ride height. That is, with the weight of the truck on them, they are "at rest". Also, the arm on the right was put through electrolytic rust removal (to be explained later)); the arm on the left has not completed electrolysis yet.

Last edited by tbugden; Oct 12, 2014 at 10:25 PM.

Professional

Joined: Mar 2008
Posts: 162
Likes: 2
From: Fort Lewis
What year is the 318? The magnum engines are different then the LA engines. It might affect the performance with the PCM. The 5 speed will bolt up to the 318 but you need a V8 flywheel they are different between the two. Just some helpful info from my dakota service manual.
Dudester.
Dudester.
Thread Starter
|
All Star
Joined: Apr 2013
Posts: 941
Likes: 22
From: Connecticut
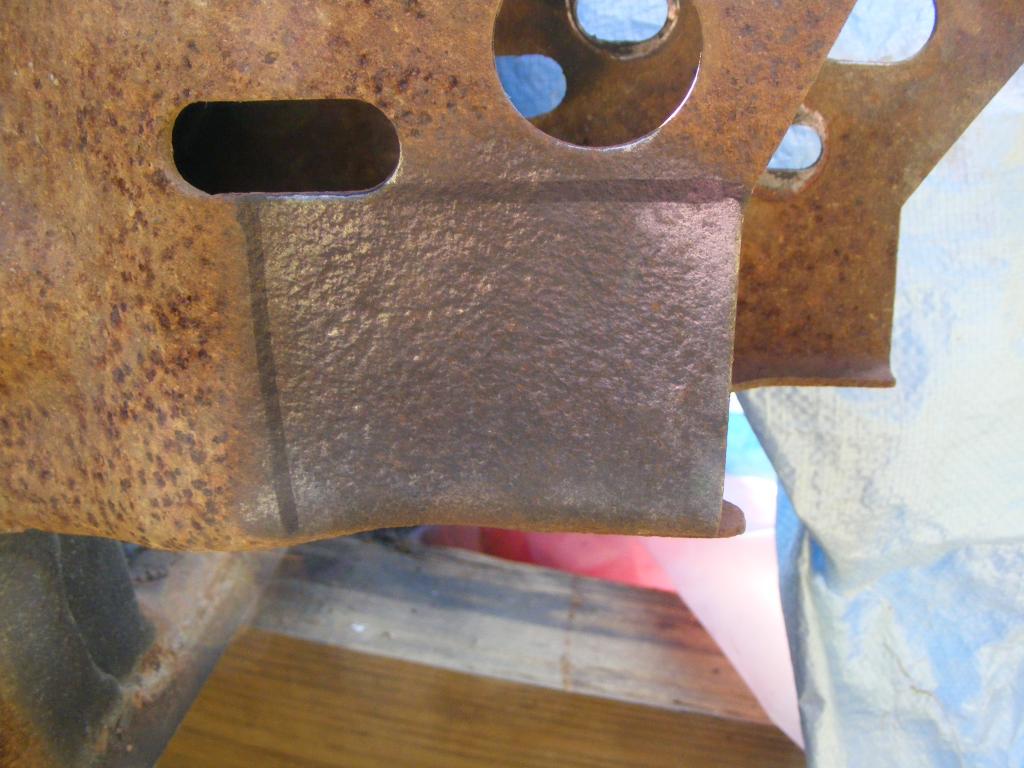
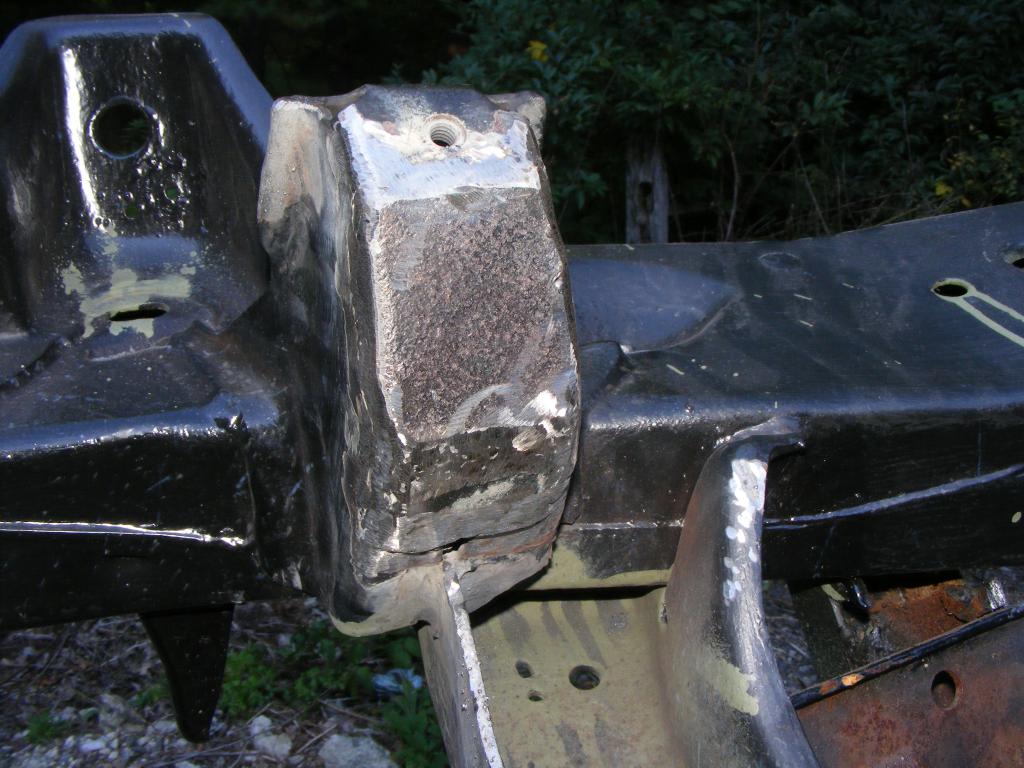
As I mentioned, the new frame had one spot of bad rust on the lower control arm bumpstop mount. In fact, the whole bottom of the mount was no good. I recently bought a welder and this was a great way to practice.
This is what the old bumpstop mount looked like from above (I can't find a picture from below, dammit!). See the rust hole. I cut out the entire bottom of the mount.
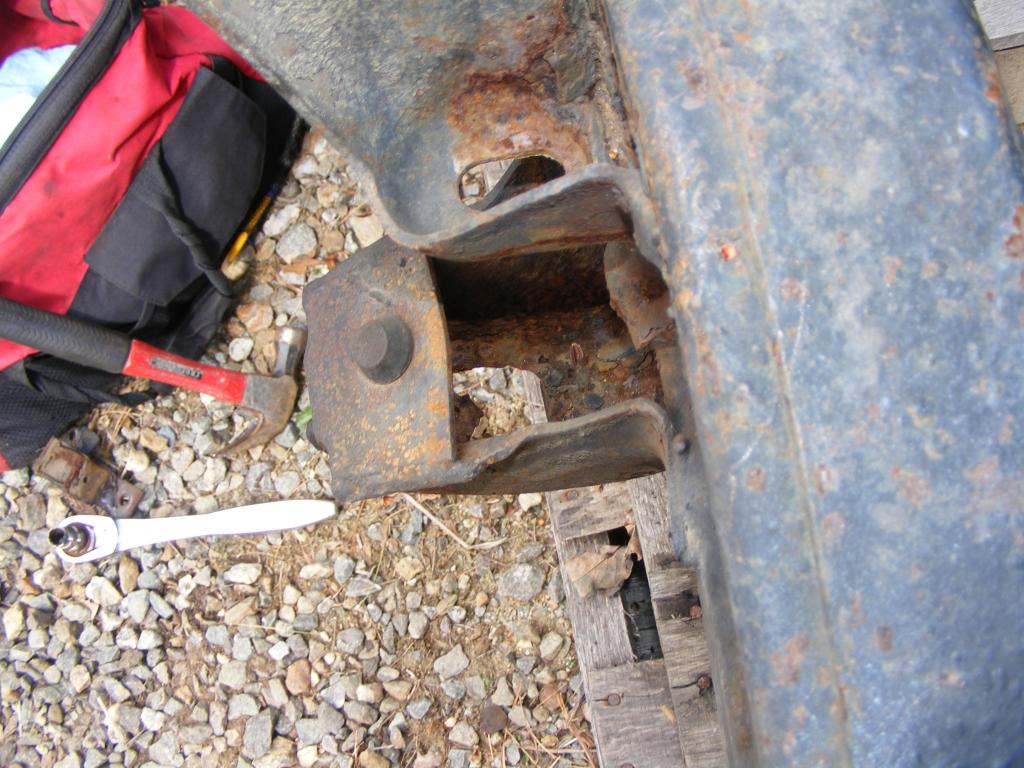
Edit: You can see what the mount looked like in this video. Skip to 40 seconds in (or watch the whole thing )
)
Cardboard cut to approximate the size of the new piece.
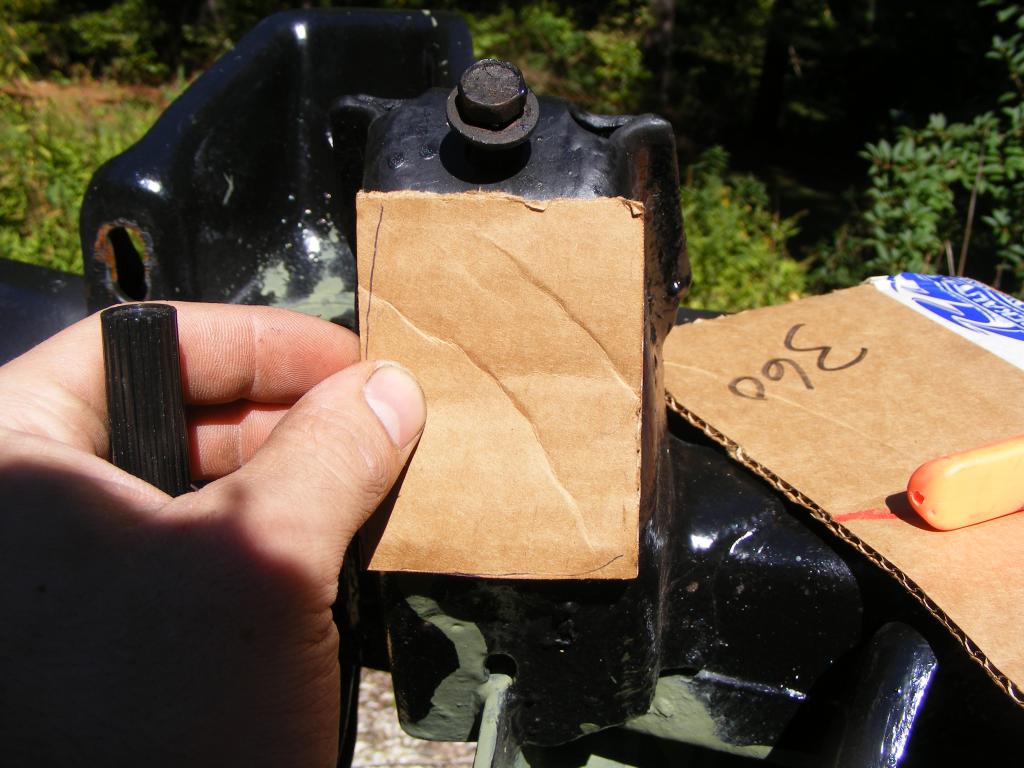
Used cardboard to trace and cut a section of my old frame out
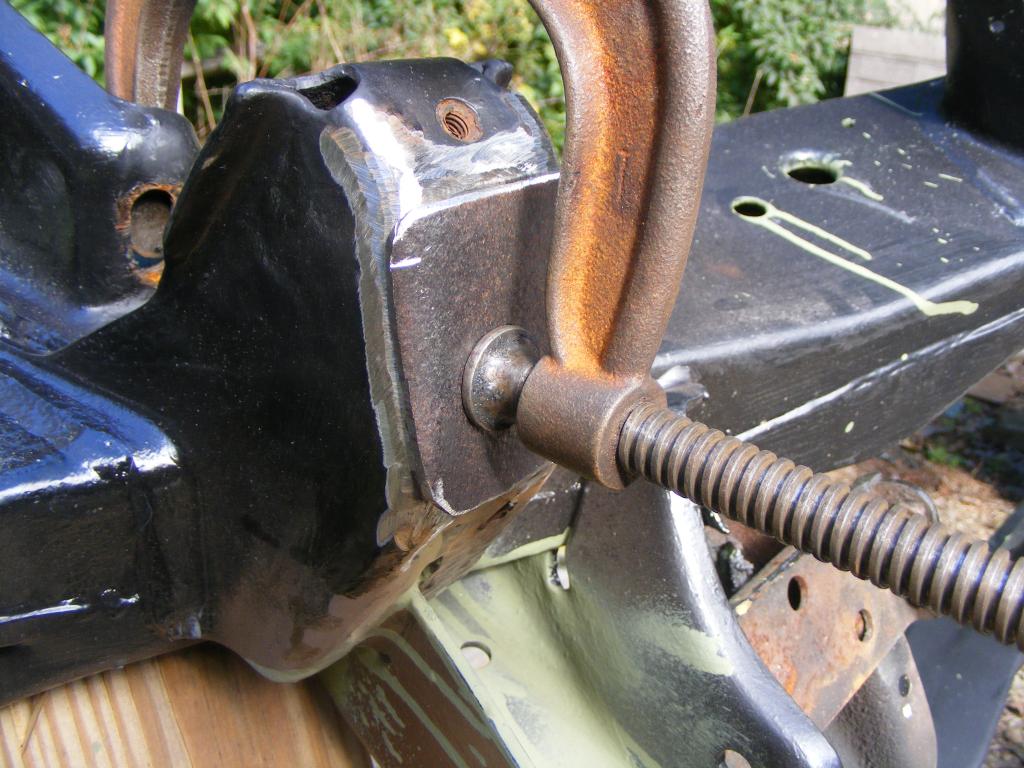
Good enough
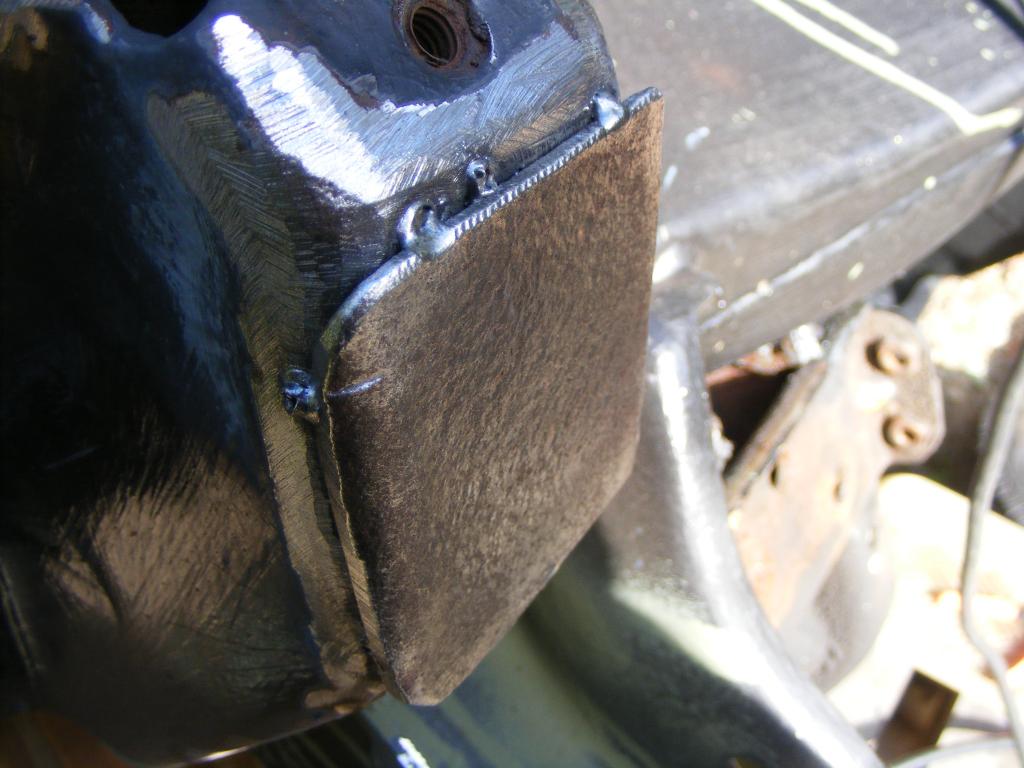
Tacked in place
I didn't take any pictures of my welds. I'm a noob so they weren't pretty...but I am confident they are strong enough. Once I get my new bumpstops I will drill a hole in the mount for it.

This is what the old bumpstop mount looked like from above (I can't find a picture from below, dammit!). See the rust hole. I cut out the entire bottom of the mount.

Edit: You can see what the mount looked like in this video. Skip to 40 seconds in (or watch the whole thing
)Cardboard cut to approximate the size of the new piece.

Used cardboard to trace and cut a section of my old frame out

Good enough

Tacked in place

I didn't take any pictures of my welds. I'm a noob so they weren't pretty...but I am confident they are strong enough. Once I get my new bumpstops I will drill a hole in the mount for it.


Last edited by tbugden; Sep 22, 2014 at 11:57 PM.
Thread Starter
|
All Star
Joined: Apr 2013
Posts: 941
Likes: 22
From: Connecticut
What year is the 318? The magnum engines are different then the LA engines. It might affect the performance with the PCM. The 5 speed will bolt up to the 318 but you need a V8 flywheel they are different between the two. Just some helpful info from my dakota service manual.
Dudester.
Dudester.
edit: I got tons more to post, but that's all for today. I want to detail what I did for frame prep and paint. I project that this will be a rolling chassis very soon. I just need to finish the rear axle, get some new ubolts, and then bolt everything up! Front suspension is ready to go in once I get the bumpstops located correctly (I bought universal bumpstops because they don't make LCA bumpstops for this truck anymore)
Last edited by tbugden; Sep 23, 2014 at 12:04 AM.

All Star
Joined: Mar 2012
Posts: 752
Likes: 2
From: Southeastern Virginia
Very informative! Thanks, and please continue as you can. If you have any questions on putting the 5.2 in, I can probably help. I recently replaced the 3.9 V6 in my '89 4X4 Dak with a '92 5.2. I retained the '92's MPI, and I also upgraded the 5 speed, from the original NV2500 to a '97 NV3500, probably have much in common with your project.
Thread Starter
|
All Star
Joined: Apr 2013
Posts: 941
Likes: 22
From: Connecticut
When I have a little free time I will continue to post more pictures/write-ups of what I've done. Yesterday all I did was replace my rear axle seals/bearings with Timken repair bearings. Easy job, but not easy enough seeing as I smashed my hand with a deadblow hammer. 
Thanks ragged89! I'm sure I'll have questions. The '93 has the AX-15 transmission which I will keep for now. I really want to be able to have this truck on the road for the winter, so the V6 will be staying in it for now, barring some miracle. I want to freshen the V8 up before I drop it in. I did notice one thing about the 318 I have; it is from a 1994 Dakota and it is setup for a returnless fuel system. I was thinking about plumbing in a return line on the '94 motor. I do also have a spare returnless style tank. In any event, at bare minimum the engine NEEDS a compatible fuel system (whether that means switching it to return-style or converting to returnless tank), headers, and some borked electrical connectors. Other than that it *COULD* be good to go, but there's no way I'm going to drop in a dirty old engine without at least making it look good. A full rebuild is not out of the question but that's something that would take me a long time. I want the truck now, dammit!
Updates to follow. Soon, I promise.
Thanks ragged89! I'm sure I'll have questions. The '93 has the AX-15 transmission which I will keep for now. I really want to be able to have this truck on the road for the winter, so the V6 will be staying in it for now, barring some miracle. I want to freshen the V8 up before I drop it in. I did notice one thing about the 318 I have; it is from a 1994 Dakota and it is setup for a returnless fuel system. I was thinking about plumbing in a return line on the '94 motor. I do also have a spare returnless style tank. In any event, at bare minimum the engine NEEDS a compatible fuel system (whether that means switching it to return-style or converting to returnless tank), headers, and some borked electrical connectors. Other than that it *COULD* be good to go, but there's no way I'm going to drop in a dirty old engine without at least making it look good
. A full rebuild is not out of the question but that's something that would take me a long time. I want the truck now, dammit! Updates to follow. Soon, I promise.
All Star
Joined: Mar 2012
Posts: 752
Likes: 2
From: Southeastern Virginia
If your new chassis is a '92-'93 it will have had a return style fuel system and the fuel lines and pump from that chassis would work with the 5.2 - but as you probably know, you'd need a return style fuel rail for that '94 engine. I used a '94 22 gal. fuel tank and pump, but converted the pump module to return style which matched up with the '92 engine. The conversion was a little tricky, but turned out well. The actual pump for the 3.9 & 5.2 is the same by the way.
I know what you mean about putting in a "dirty" engine! Whatever it is, if it's going in, it must be new and/or clean!!!
I know what you mean about putting in a "dirty" engine! Whatever it is, if it's going in, it must be new and/or clean!!!

Record Breaker


Joined: Jan 2014
Posts: 1,852
Likes: 109
From: Va
I am following your thread, especially the bump stops. FWIW. I purchased a energy suspension control arm bushing set for a 97. The tops were the same, one of the bottoms was the same, but had to shorten the other side. It wasn't a big deal. I just used my bench grinder to shorten the bushing, and I use a pipe cutter to cut the metal insert
Last edited by 93 ragtop; Oct 1, 2014 at 08:12 AM.
Thread Starter
|
All Star
Joined: Apr 2013
Posts: 941
Likes: 22
From: Connecticut
I had the idea of posting all the part numbers and/or dimensions of the parts I'm putting on this truck, so I will be updating the original post with a list of that information soon.
My bumpstops are all set, I will post pictures/writeup soon once I get the pictures off my camera. As I said, I've got a lot of catching up to do on this build thread. For now, how about a little bit of...
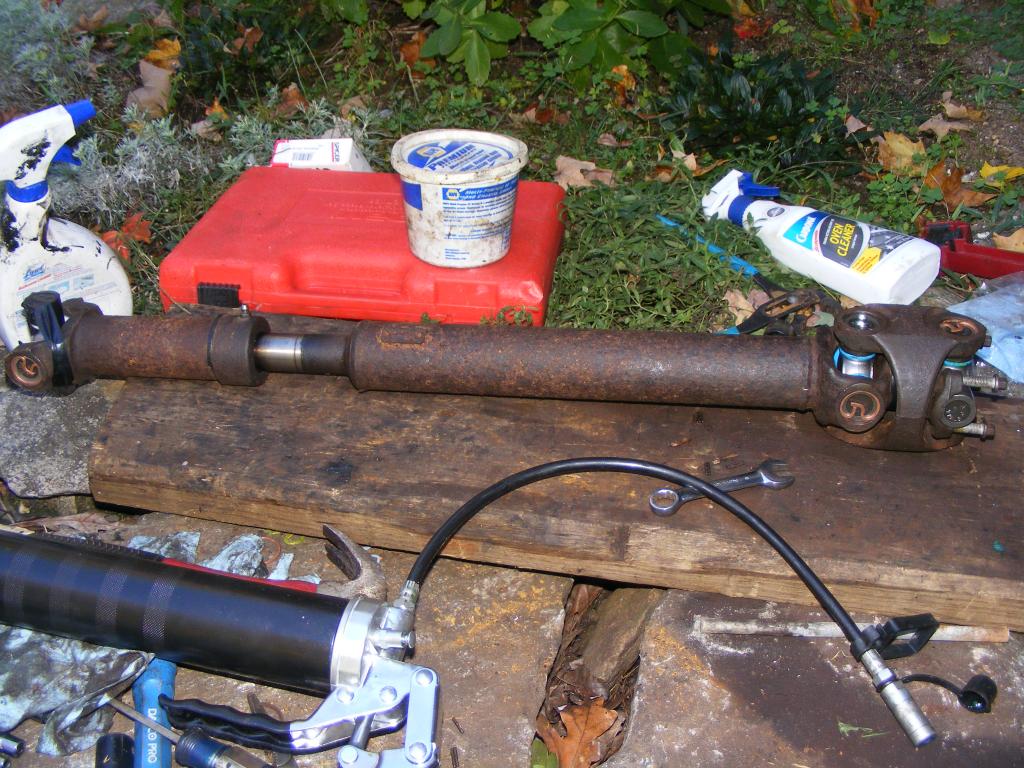
Front Driveshaft Overhaul
I do not want to have to remove the front driveshaft for a long long time, so I figured I'd replace all the universal joints.
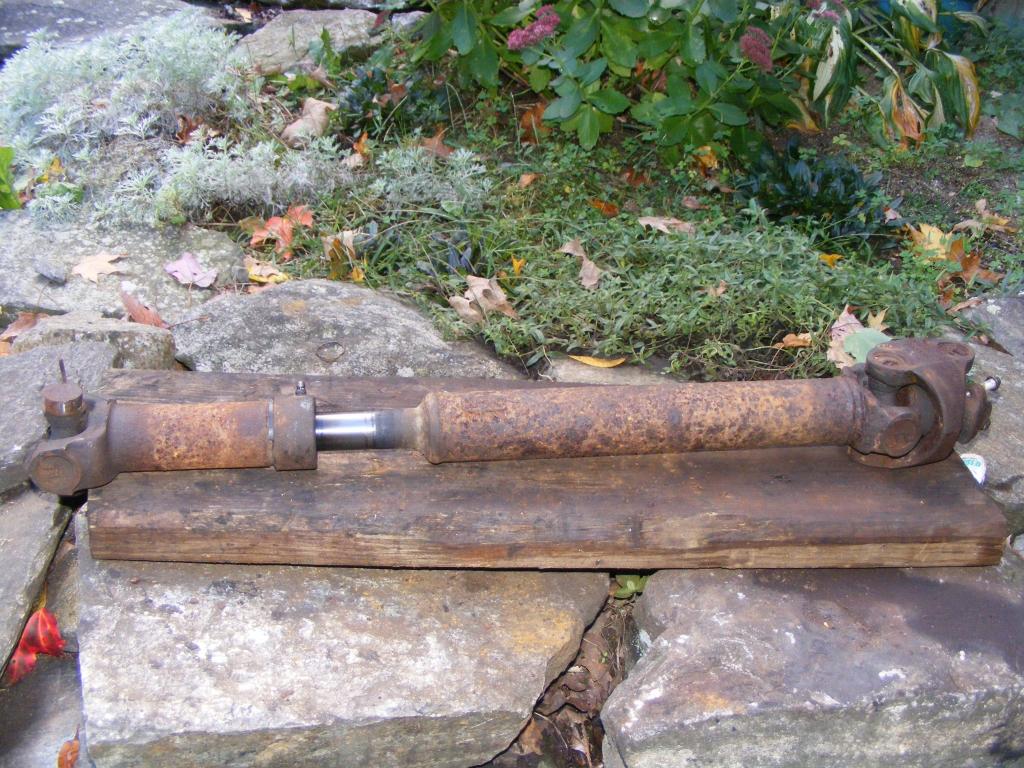
I used an Autozone-rented ball joint/u joint press to press the old ball joints out.
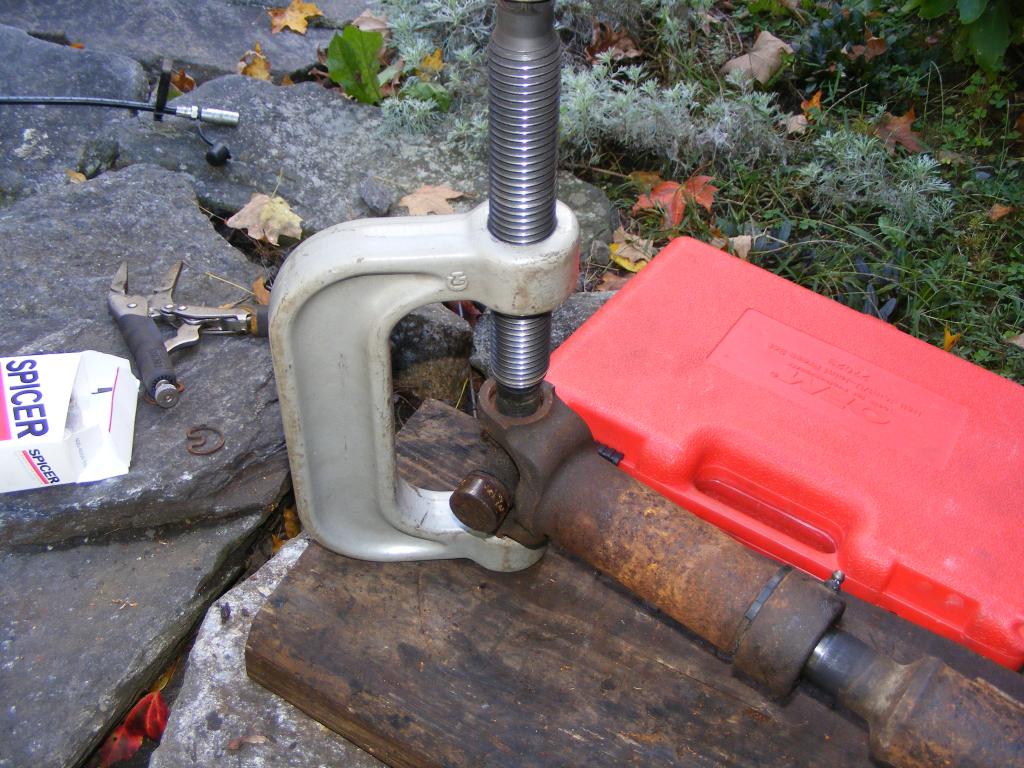
Forward u-joint (@ front differential) Spicer Life part # 5-788X (non-greasable)
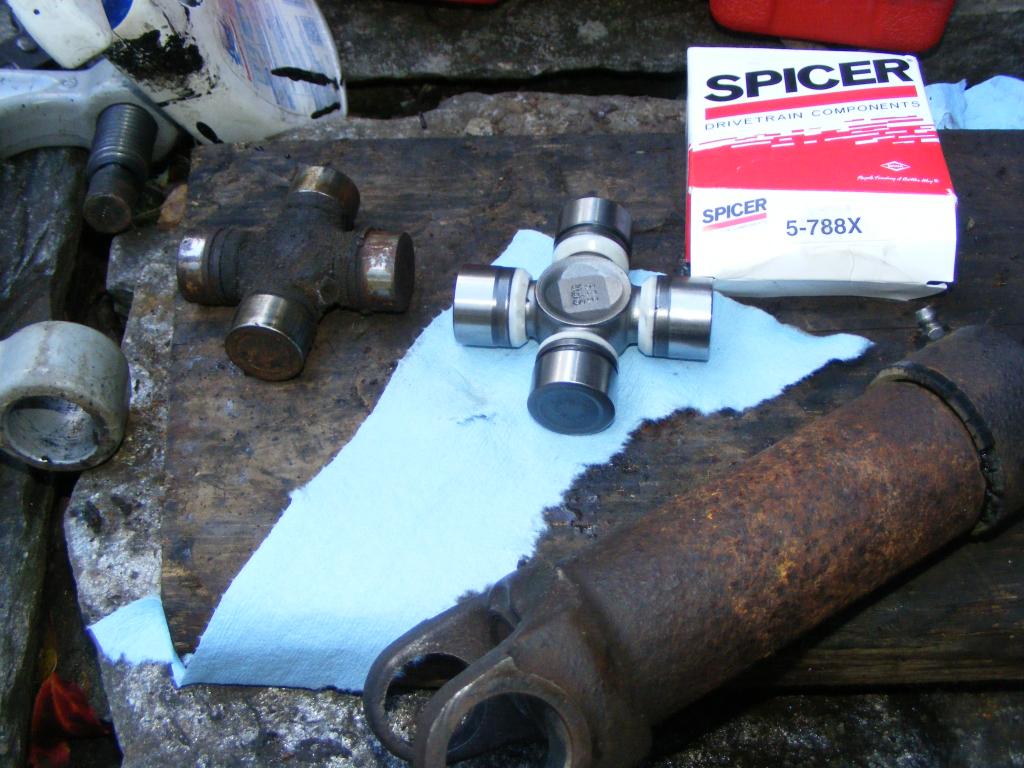
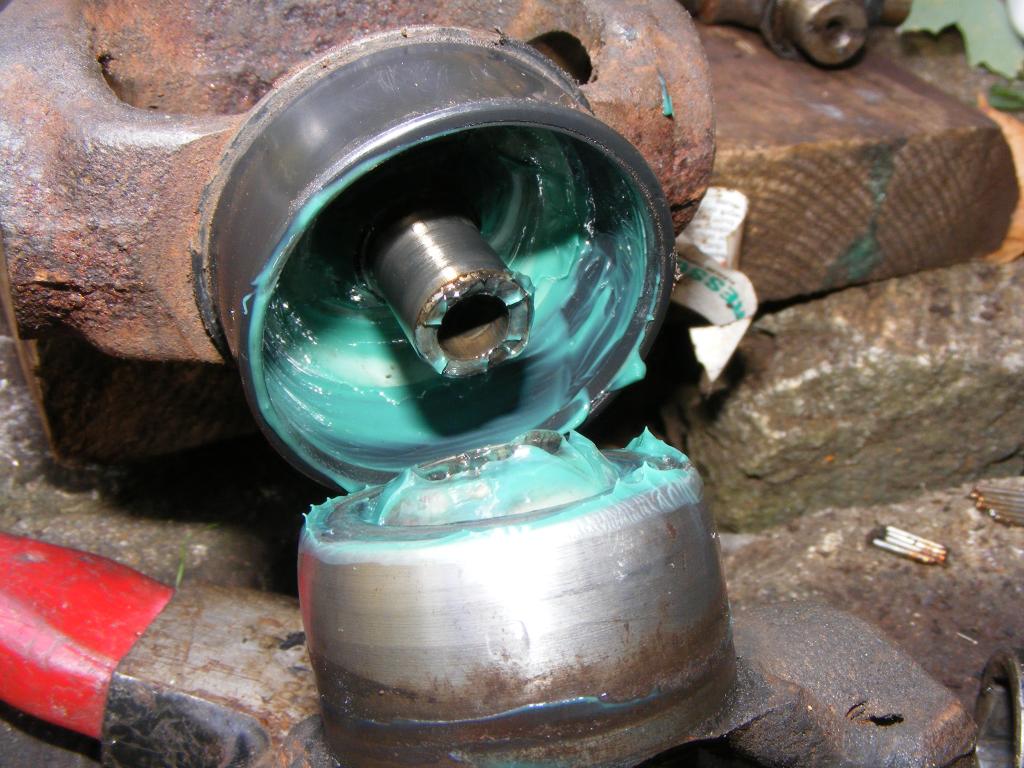
The rear u-joints sit on either side of a CV joint. It's a bit of a pain to remove the whole assembly, but if you know how to remove a u-joint, you'll be able to do it no problem. Many of you will probably be able to do it a lot quicker than I. One thing to note: the CV joint is indeed rebuildable, and the MOOG part # is 617. It includes the ball and seal and spring, but no socket. You can get one at Rockauto for about $25, but for the life of me I can't see how you could manage to destroy that joint. Mine seems to be in fine condition and I don't think it will ever fail, so I just greased it up.
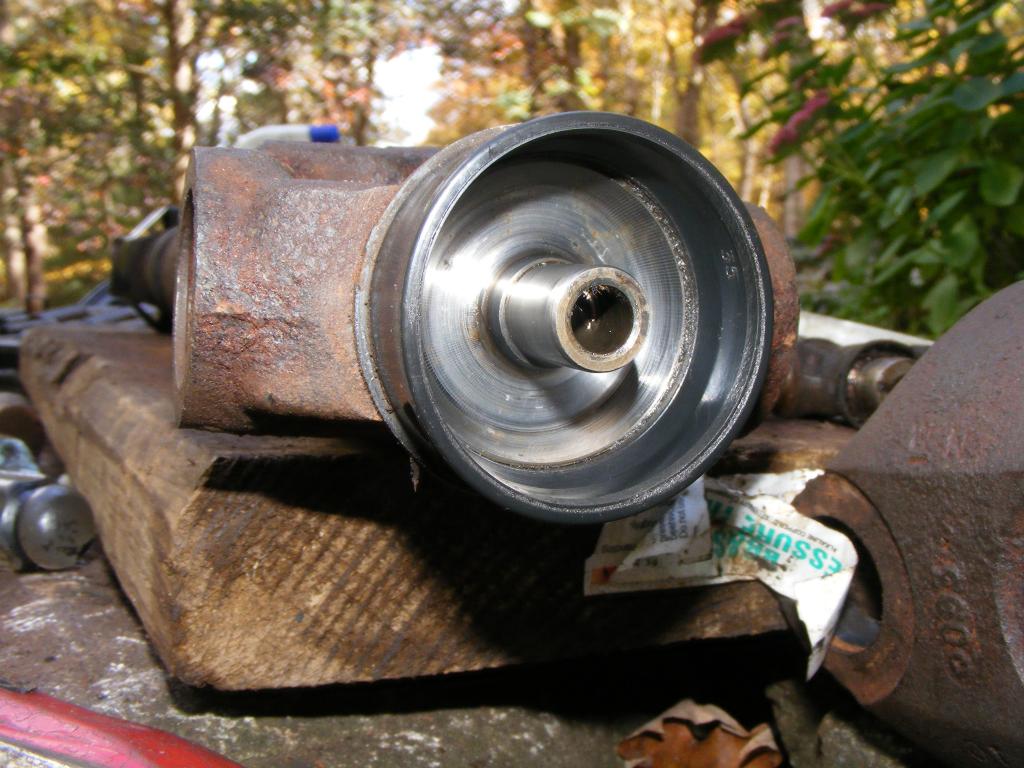
Transfer case side of the CV joint (lower ball) and driveshaft side of the CV joint (upper socket)
Rear u-joints (@ transfer case/CV joint) Spicer part # 5-1310-1X (greasable).
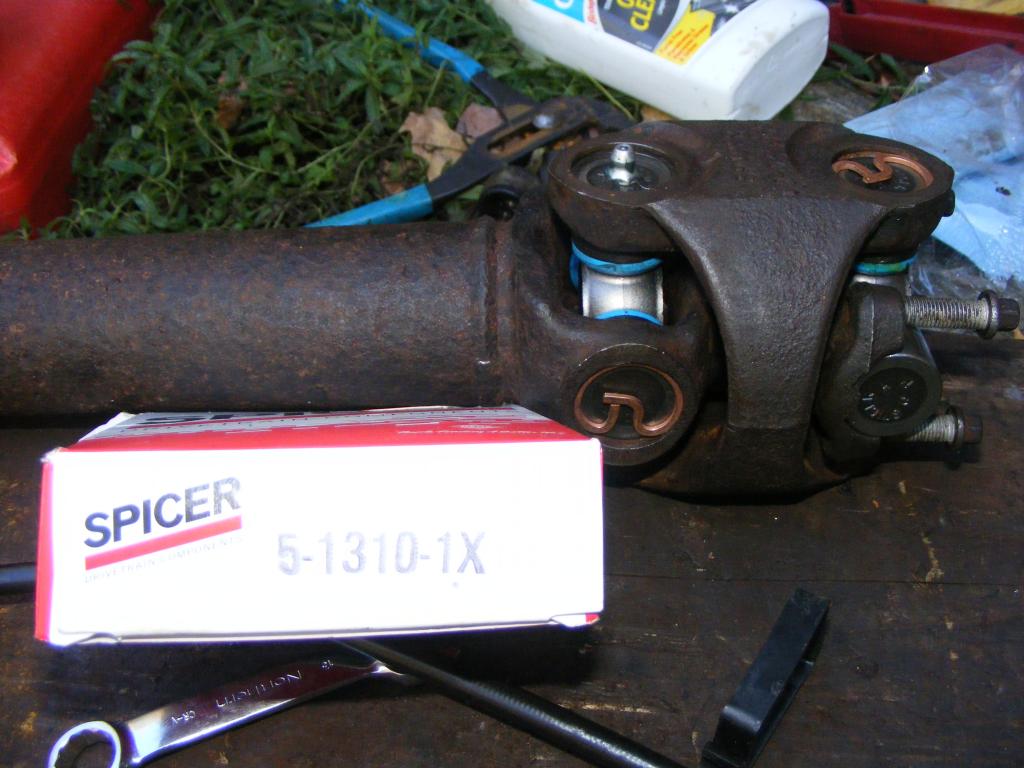
I greased up the two greasable u-joints as well as the slip joint which has a zerk fitting. It's good to go, sans paint.
My bumpstops are all set, I will post pictures/writeup soon once I get the pictures off my camera. As I said, I've got a lot of catching up to do on this build thread. For now, how about a little bit of...
Front Driveshaft Overhaul
I do not want to have to remove the front driveshaft for a long long time, so I figured I'd replace all the universal joints.

I used an Autozone-rented ball joint/u joint press to press the old ball joints out.

Forward u-joint (@ front differential) Spicer Life part # 5-788X (non-greasable)

The rear u-joints sit on either side of a CV joint. It's a bit of a pain to remove the whole assembly, but if you know how to remove a u-joint, you'll be able to do it no problem. Many of you will probably be able to do it a lot quicker than I. One thing to note: the CV joint is indeed rebuildable, and the MOOG part # is 617. It includes the ball and seal and spring, but no socket. You can get one at Rockauto for about $25, but for the life of me I can't see how you could manage to destroy that joint. Mine seems to be in fine condition and I don't think it will ever fail, so I just greased it up.

Transfer case side of the CV joint (lower ball) and driveshaft side of the CV joint (upper socket)

Rear u-joints (@ transfer case/CV joint) Spicer part # 5-1310-1X (greasable).

I greased up the two greasable u-joints as well as the slip joint which has a zerk fitting. It's good to go, sans paint.

Last edited by tbugden; Oct 12, 2014 at 10:34 PM.
Thread Starter
|
All Star
Joined: Apr 2013
Posts: 941
Likes: 22
From: Connecticut
I can't seem to find the pictures of my bumpstop setup. I could have sworn that I took some...I'll take some tomorrow. For now...
Rear Axle Seal/Bearing Replacement (using repair-style bearing)
FYI the front axle job is essentially the same. Following this guide for the front axle should net you the same result. Only difference I'm aware of is that there is no repair style bearing for the front axle...it's bearing & seal separate.
The rear axle seals on this 8 1/4" axle were shot. They sprayed gear oil all over the inside of the brake drums. It's a pretty easy job to replace them, relative to some cars. I used Timken's repair style bearing/seal, part # TRP1559TV. This style of bearing is meant for use on worn axle shafts. Basically, the seal and roller bearing are located on "fresh, clean" shaft rather than the "worn, dirty" part of the shaft that the old seal and bearing were located on. Finally, some of you need to get your mind out of the gutter...
You will need a slide hammer for this job. Slide hammers can be rented at Autozone-be sure to get the axle bearing attachment kit with it. It's also a good idea to rent a bearing drift kit for installing the new bearing, unless you have gigantic sockets. Those are the only special tools you will need.
You do not need to remove any of the brake components (except the drum) to do this job! However, if you've got gunk all over the brake parts, it's a good idea to do a full brake job anyways.
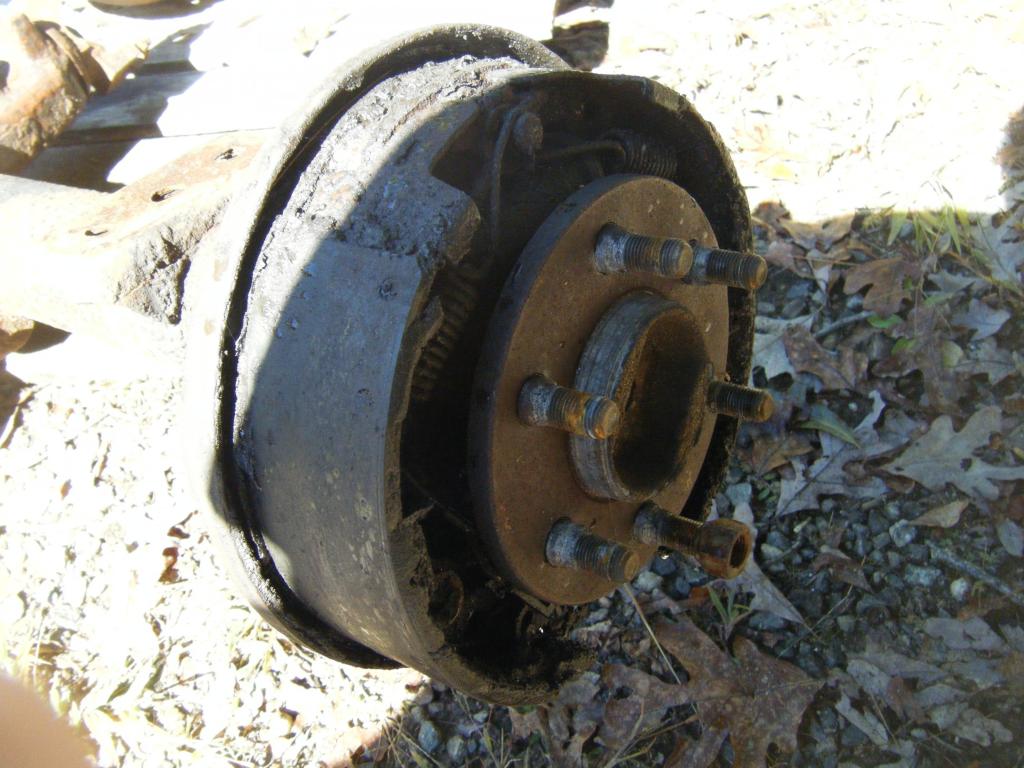
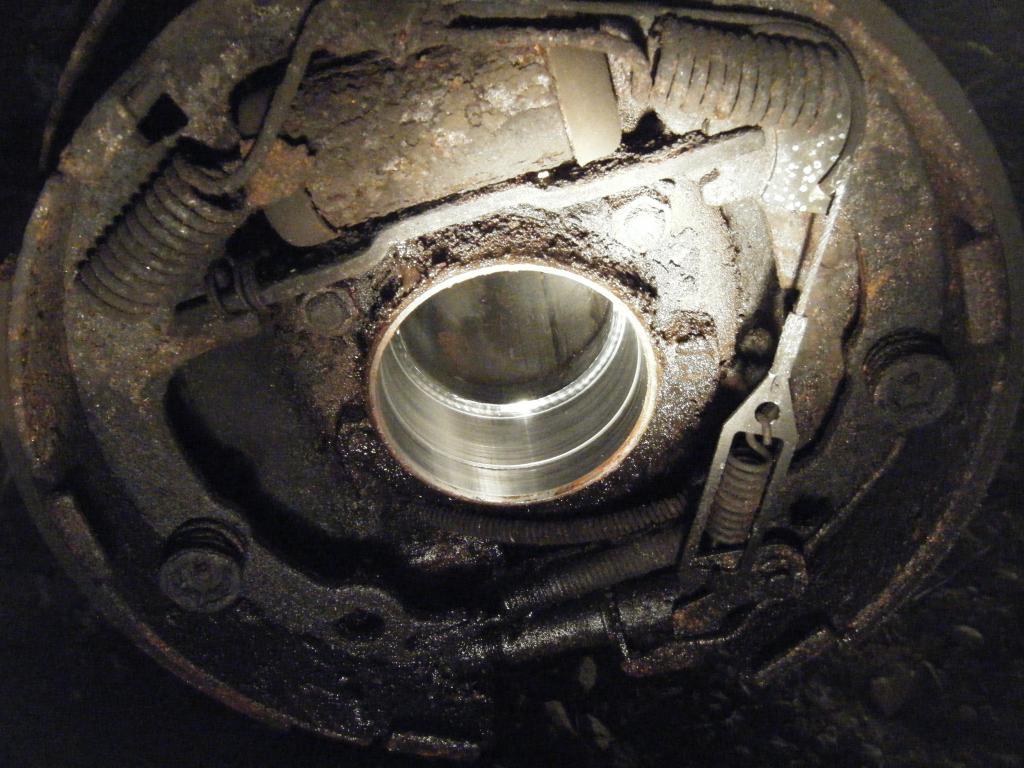
Remove the drums and differential cover. Drain the fluid. Rotate the driveshaft so you can access the pinion shaft lock bolt, which should be a 5/16" bolt. Remove the bolt, and slide the pinion shaft out.
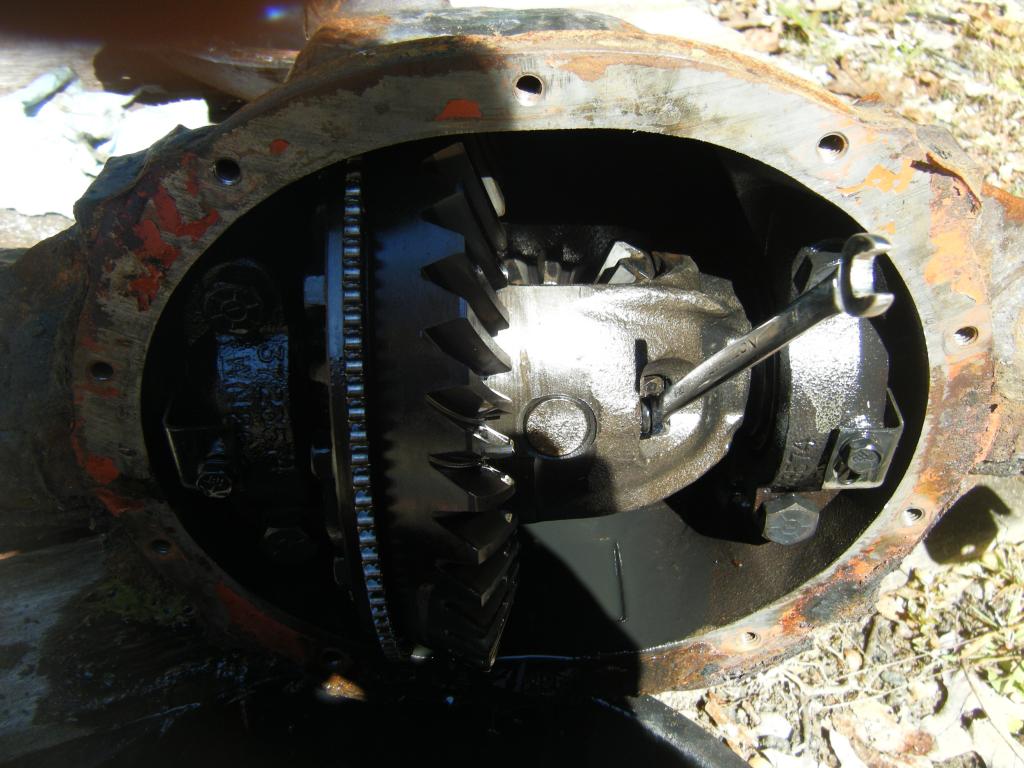
With the pinion shaft removed, you can push the axles IN. Do so to remove the axle retainers, which are thick light copper colored c clips in the picture below. It will pretty much fall out when the axle is pushed far enough in. Be careful not to rotate the axles too much because the pinion/side gears can fall out. You can put them back, but why make more work?
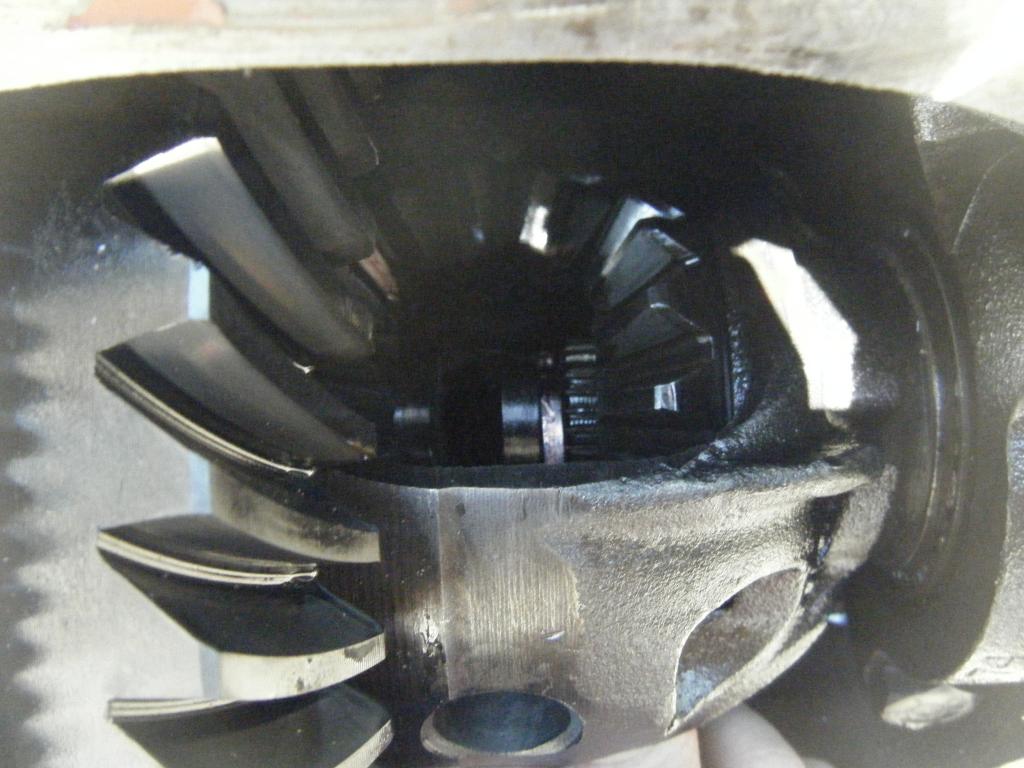
At this point you can just pull the axle shafts out either side.
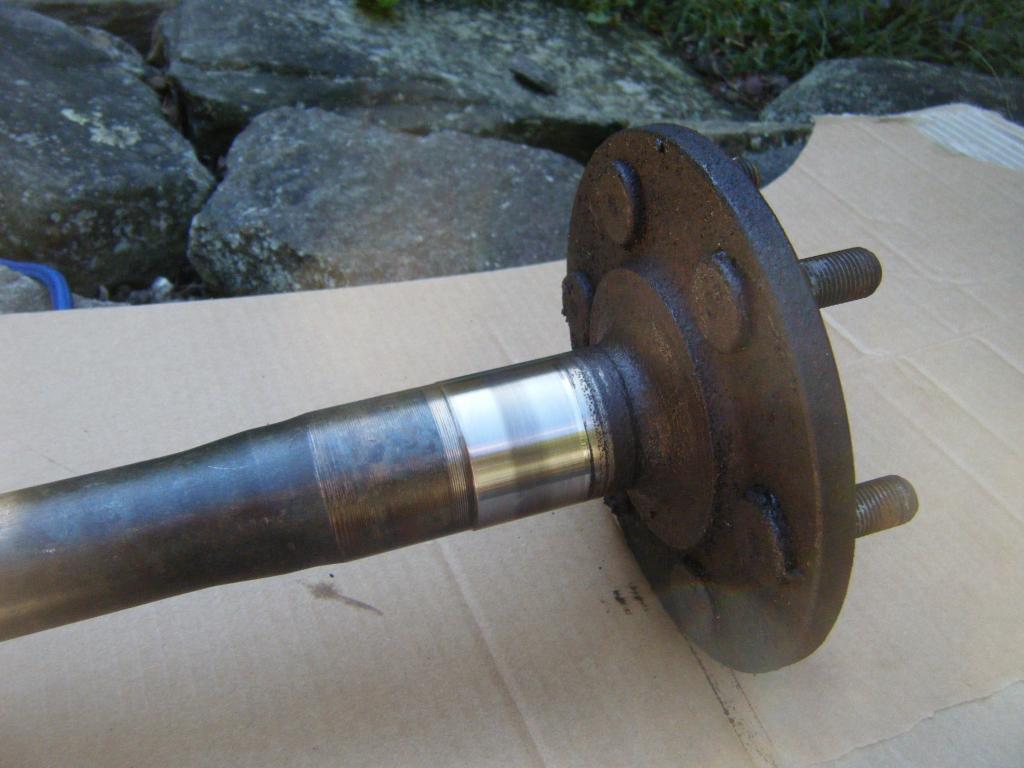
Pry the old axle seal out. A pry bar or the claw part of a hammer works well for this. Then use a slide hammer to remove the old bearing.
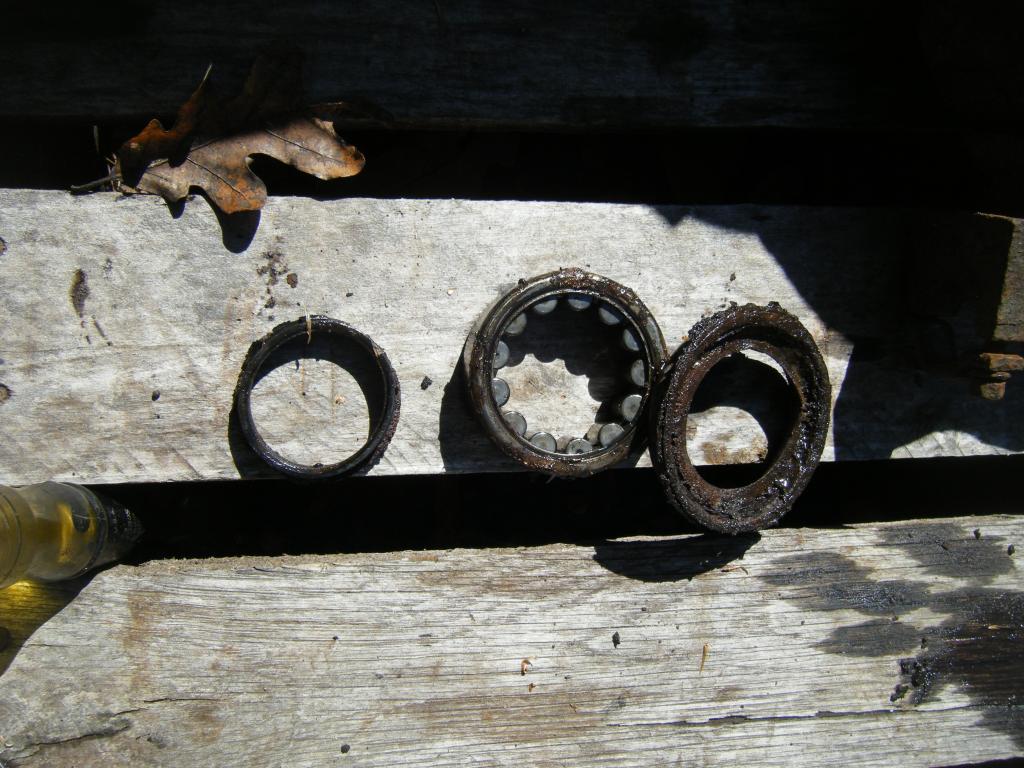
Clean inside the housing. Look down inside the axle tube. Mine was pristine, but if yours has got a lot of gunk in it, you may want to clean it out.
It's a good idea to lubricate the bearing with gear oil before install, especially if there is no grease on it (the Timken comes packed with grease) Use a big socket or the bearing drift kit to install the new bearing. It will protrude slightly from the housing. This is normal. Just whale on the drift until you're sure the bearing is as seated as it will go.
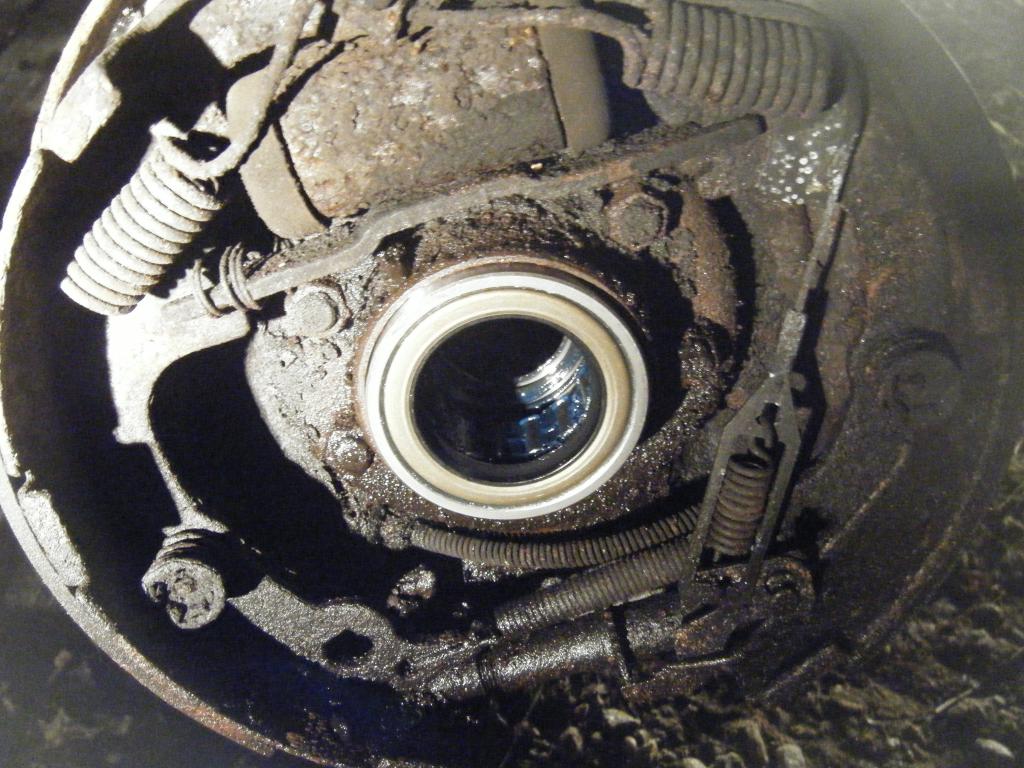
Clean up and lubricate the axle shafts, then reinstall. Installation is the reverse of removal: Push axle shafts in, install retaining clips (which may be a little more difficult to reinstall because the repair bearing makes the axle sit EVER so slightly more outboard), pull axles out to seat the retaining clip, reinstall pinion shaft, reinstall pinion locknut, reinstall differential cover (use new sealant), fill with fresh fluid. DONE. QED.
Rear Axle Seal/Bearing Replacement (using repair-style bearing)
FYI the front axle job is essentially the same. Following this guide for the front axle should net you the same result. Only difference I'm aware of is that there is no repair style bearing for the front axle...it's bearing & seal separate.
The rear axle seals on this 8 1/4" axle were shot. They sprayed gear oil all over the inside of the brake drums. It's a pretty easy job to replace them, relative to some cars. I used Timken's repair style bearing/seal, part # TRP1559TV. This style of bearing is meant for use on worn axle shafts. Basically, the seal and roller bearing are located on "fresh, clean" shaft rather than the "worn, dirty" part of the shaft that the old seal and bearing were located on. Finally, some of you need to get your mind out of the gutter...
You will need a slide hammer for this job. Slide hammers can be rented at Autozone-be sure to get the axle bearing attachment kit with it. It's also a good idea to rent a bearing drift kit for installing the new bearing, unless you have gigantic sockets. Those are the only special tools you will need.
You do not need to remove any of the brake components (except the drum) to do this job! However, if you've got gunk all over the brake parts, it's a good idea to do a full brake job anyways.

Remove the drums and differential cover. Drain the fluid. Rotate the driveshaft so you can access the pinion shaft lock bolt, which should be a 5/16" bolt. Remove the bolt, and slide the pinion shaft out.

With the pinion shaft removed, you can push the axles IN. Do so to remove the axle retainers, which are thick light copper colored c clips in the picture below. It will pretty much fall out when the axle is pushed far enough in. Be careful not to rotate the axles too much because the pinion/side gears can fall out. You can put them back, but why make more work?

At this point you can just pull the axle shafts out either side.

Pry the old axle seal out. A pry bar or the claw part of a hammer works well for this. Then use a slide hammer to remove the old bearing.

Clean inside the housing. Look down inside the axle tube. Mine was pristine, but if yours has got a lot of gunk in it, you may want to clean it out.

It's a good idea to lubricate the bearing with gear oil before install, especially if there is no grease on it (the Timken comes packed with grease) Use a big socket or the bearing drift kit to install the new bearing. It will protrude slightly from the housing. This is normal. Just whale on the drift until you're sure the bearing is as seated as it will go.

Clean up and lubricate the axle shafts, then reinstall. Installation is the reverse of removal: Push axle shafts in, install retaining clips (which may be a little more difficult to reinstall because the repair bearing makes the axle sit EVER so slightly more outboard), pull axles out to seat the retaining clip, reinstall pinion shaft, reinstall pinion locknut, reinstall differential cover (use new sealant), fill with fresh fluid. DONE. QED.
Last edited by tbugden; Jan 7, 2015 at 08:17 PM.