


DIY: Adding overhead A/C w/ pictures

Hello again Guys and Gals,
As many of you my know when I first purchased my D on January 6th, 2011 I started a modding journey that seems to never end. It often goes from mild to wild but, I am loving the adventure! My truck came with some really cool features being the SLT model but, was lacking some of the even cooler benefits that the D have to offer such as the overhead console w/auto dim mirror (see DIY thread) and Rear Overhead A/C. I had draged my feet on this one for many, many months on if I should do this but, today folks im gonna show you how the overhead A/C system works and how easy it is to install if you don't have it.
NOTE: Myself or the Dodge Forum are not responsible for any mishaps or problems while wrenching. Also we (the forum and myself) are not responsible for knuckle busters, alien abductions, fines, tantrums, whining, drinking behaviors, throwing of tools, fried electrical circuits, or other respectable conditions that may occur during this mod.. all modding is done at your OWN RISK!! This thread is intended to be used as a guide and please stay within your skill set when wrenching.....
NOTE: This DIY is a guide for the 1998-2000 model year trucks. The 2001-2003 model year systems are much different and harder as it includes more parts and the addition of rear heat.
WARNING: THE AIR CONDITIONING SYSTEM CONTAINS REFRIGERANT UNDER HIGH PRESSURE. SEVERE PERSONAL INJURY MAY RESULT FROM IMPROPER SERVICE PROCEDURES. REPAIRS SHOULD ONLY BE PERFORMED BY QUALIFIED SERVICE PERSONNEL.
ITEMS YOU WILL NEED:
*Overhead Unit – This unit has the blower motor, blower motor resistor, the blower motor switch, the rear evaporator , and all wireing that the unit will need.
*Suction and liquid lines (from engine compartment to top of B Pillar)
*Suction line jumper
*Liquid line extention
*Front and rear expansion valves ( I recommend NEW, there cheap enough at rockauto)
*Electronic cycling clutch harness from rear expansion valve
*Complete O-ring kit ($9 on rockauto)
*Spring lock coupler tool ($12ish at any auto store)
*Headliner from doner truck
*Case of beer (your choice)
When doing this mod please allow yourself ample time to do the job without distractions or any rushing. While skill levels very and affect the time to complete the job greatly I will tell you that at MY skill level from start to finish took me about 1.5 Hrs. That included the removel of the old headliner, 2 sun visors, 2 oh sh*t handles, and the 2 shirt hangers. I recommend taking the time that you think it might take you and adding 2 more hours to that for “incase sh*t happends” clearance.
Okay there we go....
STEP 1 : REMOVING THE HEADLINER
(1) Disconnect battery negative cable.
(2) Remove sunvisors and sunvisor arm supports.
(3) Remove coat hooks.
(4) Remove overhead assist handle.
(5) Remove dome lamp.
(6) Remove overhead console, if equipped.
(7) Remove outlet bezel for rear air conditioner, if
equipped.
(8) Remove blower control switch for rear air conditioner,
if equipped.
(9)Remove upper liftgate opening trim.
(10) Disengage A-pillar, B-pillar, C-pillar, and D-pillar trim as necessary to prevent trim panel
interference.
(11) Move 2nd row seats to cargo position.
(12) Move front seats to full recline position.
(13) Move 3rd row seat to cargo position, if
equipped.
(14) Remove push-in fasteners attaching headliner
to roof panel.
(15) Carefully bow headliner and remove through
the liftgate opening.
STEP 2 : INSTALLATION OF OVERHEAD UNIT
HELPFUL NOTES: Now that the headliner is removed you have a cear shot of the exposed roof. You will notice that just above the back side doors there there is a thin bracket welded into the roof with 2 threaded holes on each bracket. Also at the left side bracket there will be a 3 pin electrical plug that is secured to it... that is where the unit will plug into for the power to the blower motor.. ALL trucks have this prewired regardless of if it has it or not. For this step you might wanna get a extra set of hands for about 10 mins (my 3 y/o son came in very handy) to hold the one end of the unit it place while you start the bolts on the other side... make your not to crank them too tight or you will snap the heads off the bolts pretty easy.
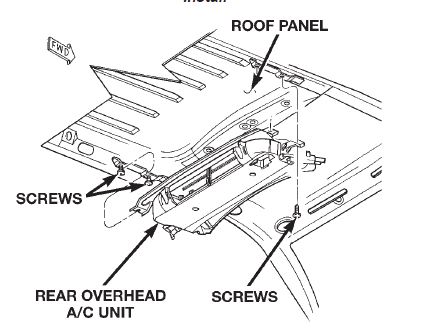
INSTALLATION
(1) Engage the slotted holes in the left end of rear
overhead A/C unit mounting bracket with the loosened
screws in the left roof rail.
(2) Support the right end of the rear overhead A/C
unit while installing the two screws that secure the
mounting bracket on the right end of the unit to the
right roof rail.
(3) Plug in the rear overhead A/C unit wire harness
connector located at the left side of the unit.
(4) Connect the B-pillar drain hoses to the wye fittings
on each side of the rear overhead A/C unit.
STEP 3 : INSTALLATION OF REFRIGERANT LINES
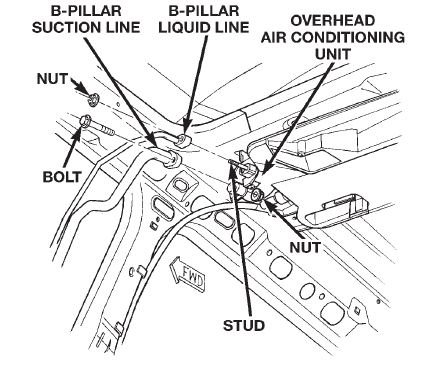
HELPFUL NOTES: Under the carpet on the right side between the B-Pillar and the back seat mount (bucket seats) there is a blank plate with 2 screws holding it in... that is your hole for the lines to come into the truck from underneath. When you remove the screws save them as you will use them to tighten the new plate with the lines in it.
(1) Install the B-pillar refrigerant line block fittings over the one
stud on the rear overhead A/C unit.
(2) Install the bolt holding the suction line, and secure the connections
with the mounting nuts.
(3) Install screws holding plate to floor board.
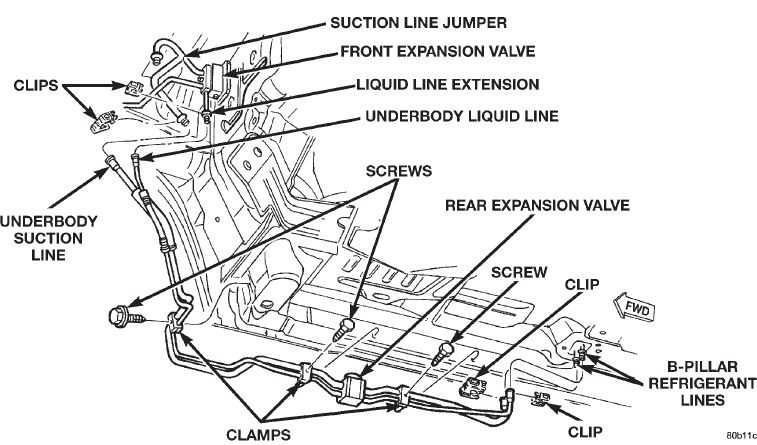
(4) Install lines underneath truck and your NEW rear expantion valve.
At this point you should have all lines installed up to the engine compartment. The next step is EXTREMELY DANGEROUS as one would have to deal with a live A/C system.
Personally I STRONGLY recommend if you are NOT a certified HVAC tech, that you leave step (5) and (12) to someone that is... I had the conveniance of a neigbor that does this for a living to help me out with the proper removel and installation of the refrigerant. Doing this other than the proper way could have potential fatal results. C,mon people mods are fun but, not worth loosing your life!
(5) Recover the refrigerant from the refrigerant system.
(6) Remove old Front expansion valve.
(7) Install NEW front expansion valve.
(8) Install suction line jumper.
(9) Install liquid line extention.
(10) Install harness for electronic cycling clutch switch.
(11) Re-install headliner
(12) Evacuate and Charge the refrigerant system.
STEP 4: INSTALLING DRAIN LINES
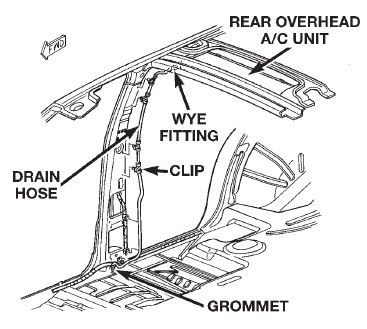
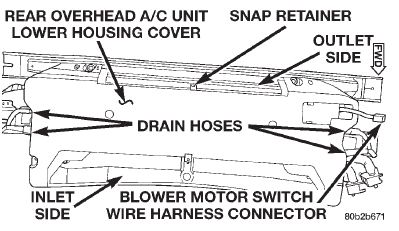
There are 2 drain lines one on each side of the unit that connect to the Y fitting on the unit.. There is a rubber gromet on the floor near the B-pillar that needs to be removed to insert the new gromet with the hose in it.
That's it! You should now be enjoying cold air blowing from your newly installed overhead A/C unit! Any questions feel free to ask and I will answer them the best I can.
As many of you my know when I first purchased my D on January 6th, 2011 I started a modding journey that seems to never end. It often goes from mild to wild but, I am loving the adventure! My truck came with some really cool features being the SLT model but, was lacking some of the even cooler benefits that the D have to offer such as the overhead console w/auto dim mirror (see DIY thread) and Rear Overhead A/C. I had draged my feet on this one for many, many months on if I should do this but, today folks im gonna show you how the overhead A/C system works and how easy it is to install if you don't have it.
NOTE: Myself or the Dodge Forum are not responsible for any mishaps or problems while wrenching. Also we (the forum and myself) are not responsible for knuckle busters, alien abductions, fines, tantrums, whining, drinking behaviors, throwing of tools, fried electrical circuits, or other respectable conditions that may occur during this mod.. all modding is done at your OWN RISK!! This thread is intended to be used as a guide and please stay within your skill set when wrenching.....
NOTE: This DIY is a guide for the 1998-2000 model year trucks. The 2001-2003 model year systems are much different and harder as it includes more parts and the addition of rear heat.
WARNING: THE AIR CONDITIONING SYSTEM CONTAINS REFRIGERANT UNDER HIGH PRESSURE. SEVERE PERSONAL INJURY MAY RESULT FROM IMPROPER SERVICE PROCEDURES. REPAIRS SHOULD ONLY BE PERFORMED BY QUALIFIED SERVICE PERSONNEL.
ITEMS YOU WILL NEED:
*Overhead Unit – This unit has the blower motor, blower motor resistor, the blower motor switch, the rear evaporator , and all wireing that the unit will need.
*Suction and liquid lines (from engine compartment to top of B Pillar)
*Suction line jumper
*Liquid line extention
*Front and rear expansion valves ( I recommend NEW, there cheap enough at rockauto)
*Electronic cycling clutch harness from rear expansion valve
*Complete O-ring kit ($9 on rockauto)
*Spring lock coupler tool ($12ish at any auto store)
*Headliner from doner truck
*Case of beer (your choice)
When doing this mod please allow yourself ample time to do the job without distractions or any rushing. While skill levels very and affect the time to complete the job greatly I will tell you that at MY skill level from start to finish took me about 1.5 Hrs. That included the removel of the old headliner, 2 sun visors, 2 oh sh*t handles, and the 2 shirt hangers. I recommend taking the time that you think it might take you and adding 2 more hours to that for “incase sh*t happends” clearance.
Okay there we go....
STEP 1 : REMOVING THE HEADLINER
(1) Disconnect battery negative cable.
(2) Remove sunvisors and sunvisor arm supports.
(3) Remove coat hooks.
(4) Remove overhead assist handle.
(5) Remove dome lamp.
(6) Remove overhead console, if equipped.
(7) Remove outlet bezel for rear air conditioner, if
equipped.
(8) Remove blower control switch for rear air conditioner,
if equipped.
(9)Remove upper liftgate opening trim.
(10) Disengage A-pillar, B-pillar, C-pillar, and D-pillar trim as necessary to prevent trim panel
interference.
(11) Move 2nd row seats to cargo position.
(12) Move front seats to full recline position.
(13) Move 3rd row seat to cargo position, if
equipped.
(14) Remove push-in fasteners attaching headliner
to roof panel.
(15) Carefully bow headliner and remove through
the liftgate opening.
STEP 2 : INSTALLATION OF OVERHEAD UNIT
HELPFUL NOTES: Now that the headliner is removed you have a cear shot of the exposed roof. You will notice that just above the back side doors there there is a thin bracket welded into the roof with 2 threaded holes on each bracket. Also at the left side bracket there will be a 3 pin electrical plug that is secured to it... that is where the unit will plug into for the power to the blower motor.. ALL trucks have this prewired regardless of if it has it or not. For this step you might wanna get a extra set of hands for about 10 mins (my 3 y/o son came in very handy) to hold the one end of the unit it place while you start the bolts on the other side... make your not to crank them too tight or you will snap the heads off the bolts pretty easy.
INSTALLATION
(1) Engage the slotted holes in the left end of rear
overhead A/C unit mounting bracket with the loosened
screws in the left roof rail.
(2) Support the right end of the rear overhead A/C
unit while installing the two screws that secure the
mounting bracket on the right end of the unit to the
right roof rail.
(3) Plug in the rear overhead A/C unit wire harness
connector located at the left side of the unit.
(4) Connect the B-pillar drain hoses to the wye fittings
on each side of the rear overhead A/C unit.
STEP 3 : INSTALLATION OF REFRIGERANT LINES
HELPFUL NOTES: Under the carpet on the right side between the B-Pillar and the back seat mount (bucket seats) there is a blank plate with 2 screws holding it in... that is your hole for the lines to come into the truck from underneath. When you remove the screws save them as you will use them to tighten the new plate with the lines in it.
(1) Install the B-pillar refrigerant line block fittings over the one
stud on the rear overhead A/C unit.
(2) Install the bolt holding the suction line, and secure the connections
with the mounting nuts.
(3) Install screws holding plate to floor board.
(4) Install lines underneath truck and your NEW rear expantion valve.
At this point you should have all lines installed up to the engine compartment. The next step is EXTREMELY DANGEROUS as one would have to deal with a live A/C system.
Personally I STRONGLY recommend if you are NOT a certified HVAC tech, that you leave step (5) and (12) to someone that is... I had the conveniance of a neigbor that does this for a living to help me out with the proper removel and installation of the refrigerant. Doing this other than the proper way could have potential fatal results. C,mon people mods are fun but, not worth loosing your life!
(5) Recover the refrigerant from the refrigerant system.
(6) Remove old Front expansion valve.
(7) Install NEW front expansion valve.
(8) Install suction line jumper.
(9) Install liquid line extention.
(10) Install harness for electronic cycling clutch switch.
(11) Re-install headliner
(12) Evacuate and Charge the refrigerant system.
STEP 4: INSTALLING DRAIN LINES
There are 2 drain lines one on each side of the unit that connect to the Y fitting on the unit.. There is a rubber gromet on the floor near the B-pillar that needs to be removed to insert the new gromet with the hose in it.
That's it! You should now be enjoying cold air blowing from your newly installed overhead A/C unit! Any questions feel free to ask and I will answer them the best I can.
Last edited by Old_School; Nov 10, 2012 at 10:26 AM.
Champion


Joined: Jan 2011
Posts: 4,099
Likes: 44
From: Pittsburgh, PA or Columbia, SC
I added most of the rear a/c system today. I got everything except the lines that go from the front to the rear expansion valve because I didn't have the tool to separate those spring clamps and it was 100� and I wanted the hell out of there. I'll have to go back another day and get the lines after those spring clamp tools get here. So for now it's just a fan for the back seats.
Putting the rear unit in place actually was easy with just me because the mounting holes are slotted on the driver's side of the unit, so I just started those screws into the roof mounting points by hand and then slid the unit into place while I started the bolts on the passenger's side.
Here's the driver's side where the mounting bracket is slotted.

Headliner removed and rear unit bolted into place.

Everything installed.

And the lines blocked off underneath for now until I get around to getting the rest of the lines.

Putting the rear unit in place actually was easy with just me because the mounting holes are slotted on the driver's side of the unit, so I just started those screws into the roof mounting points by hand and then slid the unit into place while I started the bolts on the passenger's side.
Here's the driver's side where the mounting bracket is slotted.
Headliner removed and rear unit bolted into place.
Everything installed.
And the lines blocked off underneath for now until I get around to getting the rest of the lines.


Champion
Joined: Jan 2011
Posts: 4,099
Likes: 44
From: Pittsburgh, PA or Columbia, SC
I got that last section of line installed for the rear ac. I bought for $7 so that made taking things off at the junkyard and finagling things into place much easier. Once I got things into place and pulled a vacuum I had to track down a leak because the vacuum would leak down. Turned out a pinched an o-ring on the drier. I went ahead and replaced every o-ring and gasket I could get access to (I think the only one I couldn't get was the lower condenser connection), as well as the valve cores to both pressure switches.
I added 2 oz of pag oil to the liquid line at the drier since the rear system calls for 8oz vs the front system's 5.5 oz (I figured there was still some in the rear evaporator). I left it vacuum down for an hour and left it for another hour to make sure it held the vacuum, then recharged it with 30 oz. Well I put in two hole 12 oz cans then guessed what half of the 3rd can was (probably a little shy of 30 oz). The air was blowing out of the front at 51� and out of the back at 55�. Keep in mind that was idling in the driveway at an ambient temp of 80� so hopefully it'll be cooler when going down the road.
I also thought it would be worth mentioning that there were a couple different refrigerant capacities listed for 2000 Durangos with rear ac (per sticker on core support). Some had the sticker right by the hood latch that calls for 1.88lbs (30 oz) with the rear system and others had the sticker off to the passenger's side and called for 2lbs (32 oz). The only difference I could see in the systems was that the ones that called for 1.88lbs had spring couplings at the condenser (like 99-) and the ones that called for 2lbs had bolted connections on the condenser.
Last edited by that_guy; Aug 10, 2014 at 09:05 PM.
Trending Topics

Rookie
Joined: May 2014
Posts: 72
Likes: 0
Great write up guys and thanks for sharing. I have always thought that beens heat rises it would be cooler to have some kind of air evac on the roof. At least this put some cool that will drops down.
Last edited by akuser47; Aug 10, 2014 at 09:55 PM.
Champion
Joined: Jan 2011
Posts: 4,099
Likes: 44
From: Pittsburgh, PA or Columbia, SC
Ok, here are some more pictures of everything.
The new junction block (or whatever it's called) where the lines attach to the front expansion valve.

This section of the liquid line that goes to the drier is part of that junction block too. I put some 3/8" vacuum/fuel hose I had on it to keep heat from the exhaust from warming it up, since the liquid was just cooled by the condenser, and the cooler it is, the colder the refrigerant and thus the evaporator (ie the cold air) will be when it flashes to a gas at the expansion valve.

The rest of the underbody lines.

I put vacuum hose on the pressure line after the expansion valve because the refrigerant is a cold gas at that point and we want it to stay cold to cool the air at the rear evaporator. I left the rest of the liquid line ahead of the expansion valve bare because the air moving under the truck should actually cool it down like the condenser does.

Intake to the rear unit.

Rear unit vents. I cleaned the headliner since the other day too since it was dirty.

The new junction block (or whatever it's called) where the lines attach to the front expansion valve.
This section of the liquid line that goes to the drier is part of that junction block too. I put some 3/8" vacuum/fuel hose I had on it to keep heat from the exhaust from warming it up, since the liquid was just cooled by the condenser, and the cooler it is, the colder the refrigerant and thus the evaporator (ie the cold air) will be when it flashes to a gas at the expansion valve.
The rest of the underbody lines.
I put vacuum hose on the pressure line after the expansion valve because the refrigerant is a cold gas at that point and we want it to stay cold to cool the air at the rear evaporator. I left the rest of the liquid line ahead of the expansion valve bare because the air moving under the truck should actually cool it down like the condenser does.
Intake to the rear unit.
Rear unit vents. I cleaned the headliner since the other day too since it was dirty.