

remove balance shafts in 2.4 and set screw for pickup tube?


Thread Starter
|
Captain
Joined: May 2007
Posts: 571
Likes: 0
From: tampa, florida
what is that about in the how to on the 2.4 swap. do i have to get a set screw thing? y cant i just use the bolt it came with and bolt the pickup tube back on after removeing the balanceing shafts?
also im useing 2.0 cams in my 2.4 turbo neon. i just put the motor and all in last night. do i have to rotate the cam sensor magnet 90 degrees? if so y?
and lastly do i have to mess with the ignition timing somehow since i have to change the injector timing? and how?
also im useing 2.0 cams in my 2.4 turbo neon. i just put the motor and all in last night. do i have to rotate the cam sensor magnet 90 degrees? if so y?
and lastly do i have to mess with the ignition timing somehow since i have to change the injector timing? and how?

Record Breaker
Joined: Dec 2006
Posts: 1,216
Likes: 0
From: Baltimore, Maryland
NOTE: That I have not installed the fuel rail and injectors yet, it will get in the way when you lift the motor back up.[/size][/font]
[/align][align=left][/align][align=left]WIRING HARNESS[/align][align=left][/align][align=left]You can do the wiring harness many ways. Do the obvious ones first if you not familiar with how the wiring harness connects. If you run into problems with plugs not fitting you will have to go back to your old 2.0 motor and get the plugs that fit, make sure to clip them about 6 inches back on the 2.0, then cut the plug on the 2.4 wiring harness and SOLDER new plug into place, make sure to match wires up using the same color wires. And either shrink wrap or use electrical tape all soldered connections. IF YOU ARE NOT GOOD AT SOLDERING FIND SOMEONE THAT IS. [/align][align=left][/align][align=left]Below is instructions on how to do all wiring modifications for the 2.4 swap at the PCM plug. This only includes how to swap thecoil pack wires and injector wires.
[/align][align=left][/align][align=left]1.Locatebig blackclip tha plugs into PCM it will look something like this.[/align][align=left][/align][align=left]
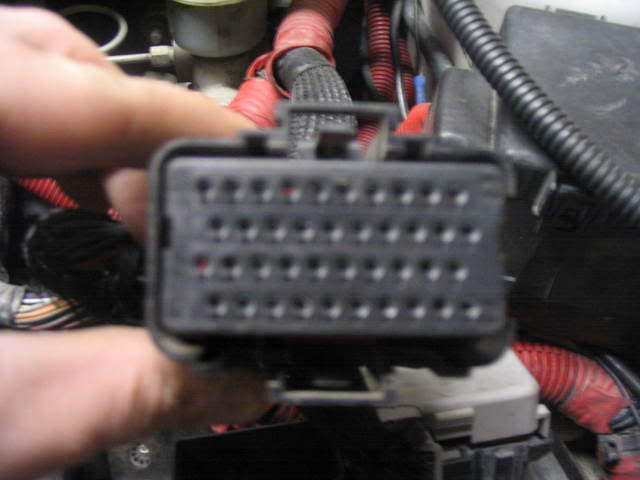 [/align]
2.Take small flat blade screwdriver and pry bottom pin protectorplate out and then up. Be careful not tosnap this just be gentle. The other side has the same clip and is not accesable, I had to play with it forbit to get the other side to come loose.
This is where you pry.

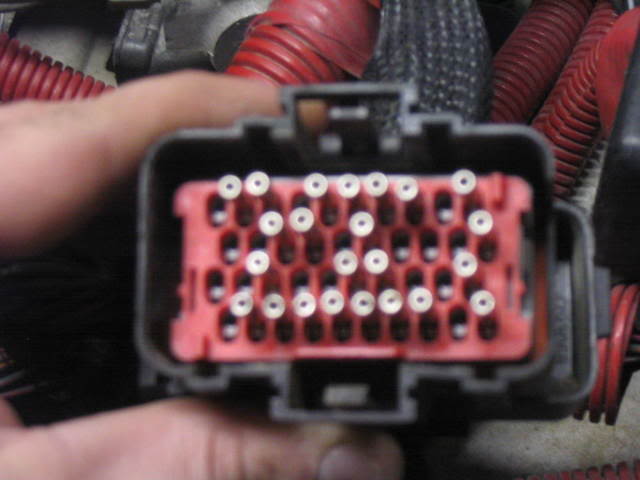
After you get the bottome plate off This is what it should look like.
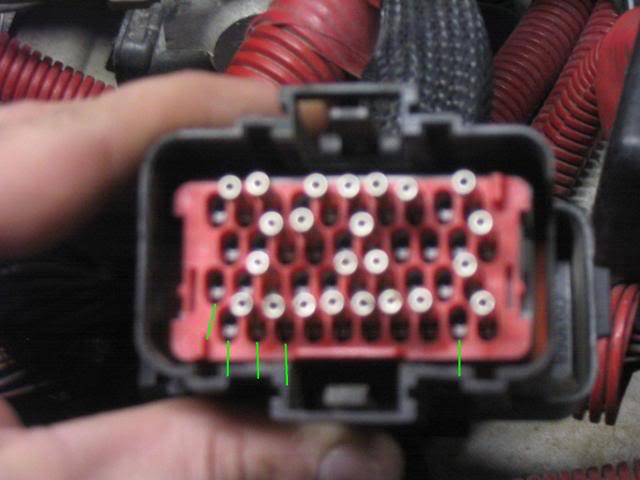
3.Oknow look at thepicture below.
There are small silver tabs that hold each pin in place I have a green linepointing to some of these tabs each hole whether it has a pin or not.
Bytaking asmall screwdriver in one hand and gently pulling back you will be able to use another small screwdriver to push that pin down and out of the connector allowing it to be pushed back into the connector in a different location.
This picture shows you where each pin number is.
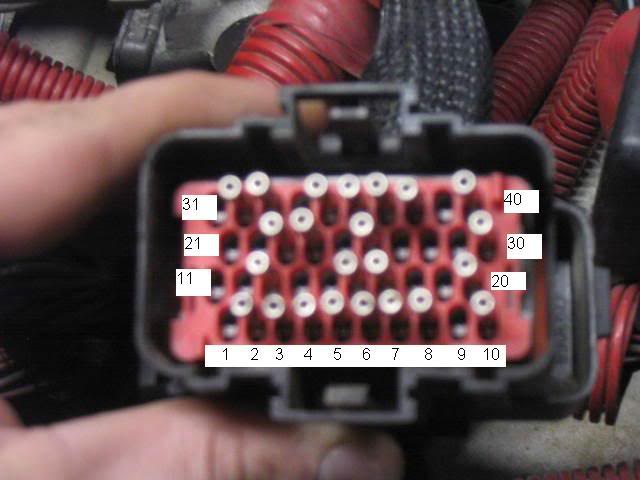
4. Now that you know how to remove the pins and where each pin is you are going to have to move some wires around.
Find pin 2 and 3
Pin 2should be Black and Grey
Pin 3 should be Dark Blue and Tan
Removeboth wires and switch them. Put pin 2 in pin 3's spot and pin 3 in pin 2's spot.
You just swaped the outer 2 coil pack wires.See its easy.
Nowlets take care of the fuel injector plugs.
It's going to get a little more confuesing but just dont read ahead and go slow. And do exactly as I say.
1.Move pin 7 to 16
2.Then take 16's original wire and move it to 13
3.Then take 13's original wire and move it to 17
4.Then take 17's original wire and move itto 7
So after your done.
Pin7 should be Tan
Pin 13 should be Light Blue/Brown
Pin 16 should be Yellow/White
Pin 17 should be White/Dark Blue
You justmovedall the injector plugs down one. It willnow appearstock up front. You now willNOT have to extend the injector plugs or move them down one. Just install the injector plugs where there supposed to normally.
Have any other question, refer to this link : https://dodgeforum.com/forum/1st-gen...ake-a-nap.html
Veteran
Joined: May 2006
Posts: 446
Likes: 0
From: Riverside
You only need to remove the balance shafts if your going for more than 300whp, but it is nice to remove anyways and get the 10 more whp. Course you'll have more vibration on the car but hey it is what it is
Thread Starter
|
Captain
Joined: May 2007
Posts: 571
Likes: 0
From: tampa, florida
so instead of messing with the camshaft magnet and all that, cant i just simply turn the cam position sensor upside down? bolt it on upside down and extend the wires so it'll plug in.it'll be doing the same thing right?
and instead of re pinning the plug i just plugged fuel injector 1 into number 2 plugged number 2 into number 3 and extended number 4 to reach to number 1 and plugged number 4 into number 1.
and i was also told to take the 3 wires that feed the coil pack and cut the outside wires and switch the outside wires.
Thread Starter
|
Captain
Joined: May 2007
Posts: 571
Likes: 0
From: tampa, florida
and also on the 2.4 swap how to it says to rotate the cam magnet 90 degrees clockwise after cutting the little nipple things with a dremel tool. i was told to do it 180 degrees by another person to but how to says to do it 90 clockwise
Thread Starter
|
Captain
Joined: May 2007
Posts: 571
Likes: 0
From: tampa, florida
so i got a 1/4 in 20 set screw 3/8 in. in length now where do i thread that at. i have no oil pressure after removeing the balanceing shafts so i figured i should get that screw now i just dont know where to put it.
Veteran
Joined: May 2006
Posts: 446
Likes: 0
From: Riverside
You put it in the oil hole, if you look at the balance shaft assembly you will see a feed hole next to one of the mounting bolt holes, thats where you put the screw into.
Trending Topics

Registered User
Joined: Aug 2010
Posts: 6
Likes: 0
You can just bolt some shim stock on the corner of the balance shaft carrier assembly where the oil hole is next to the mounting bolt. The oil pickup is not what causes the oil pressure to drop. It is the oil supply into the BS carrier that must be blocked. A 1 1/4 inch piece of metal shim stock with a hole poked in it for the carrier mounting bolt will effectively shut off the oil supply.