

My 4.56 Gear Swap

Thread Starter
|
Veteran


Joined: Sep 2012
Posts: 464
Likes: 4
As a few of you know I have recently bought front and rear gear sets in the 4.56 flavor to replace the factory 3.55's with the intent of installing them myself. I have not done a gear swap before (I'm 22, first vehicle) but have been reading up on the net about doing them and have had my head in the factory manual for a few weeks trying to understand the process.
I have been running 3.55's and 35" tires for 2 years and was getting really sick and tired of the truck being a dog, having no ***** from a dig, not being able to use overdrive on the highway, no passing power, no power when towing my boat, etc. It was pretty pathetic.
I just recently completed the rear end (Chrysler 9.25") and thought I'd share my experience as I found very little info related to this axle when researching how to regear it. It ended up taking me 2.5 days to complete with a lot of bumps in the road. Still need to do the D44 front end, but I'll do that in the months coming when I get some time and post up (I rarely use 4x4 anyway). I didn't take as many pics as I would have liked as I usually get way too into it and forget but hopefully some of the pics / comments in this thread can help out other people looking to regear their truck.
Anyway, onto the pics. The goodies I bought for the swap:
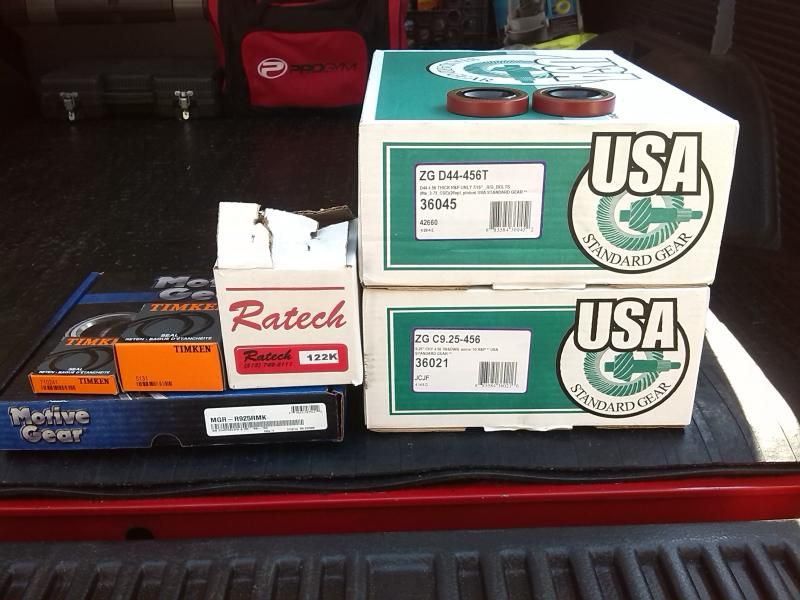
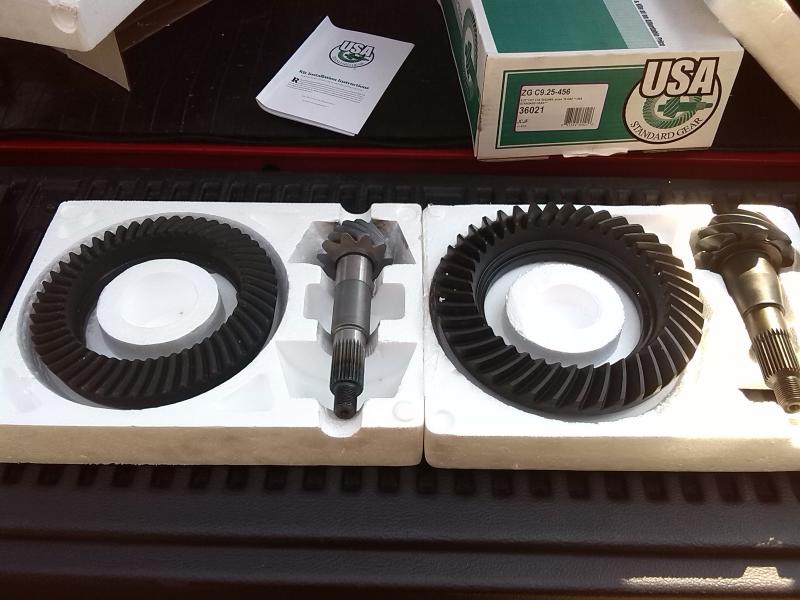
Gears:
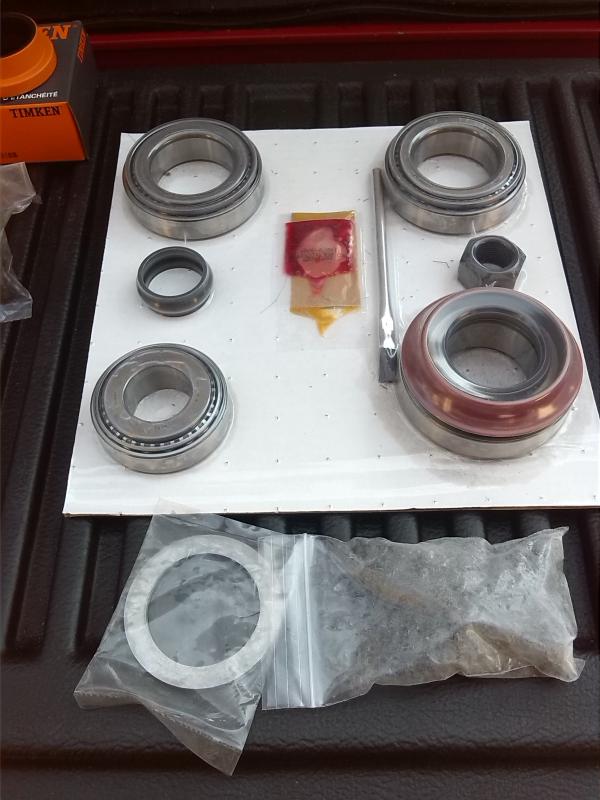
Master install kit for the rear:
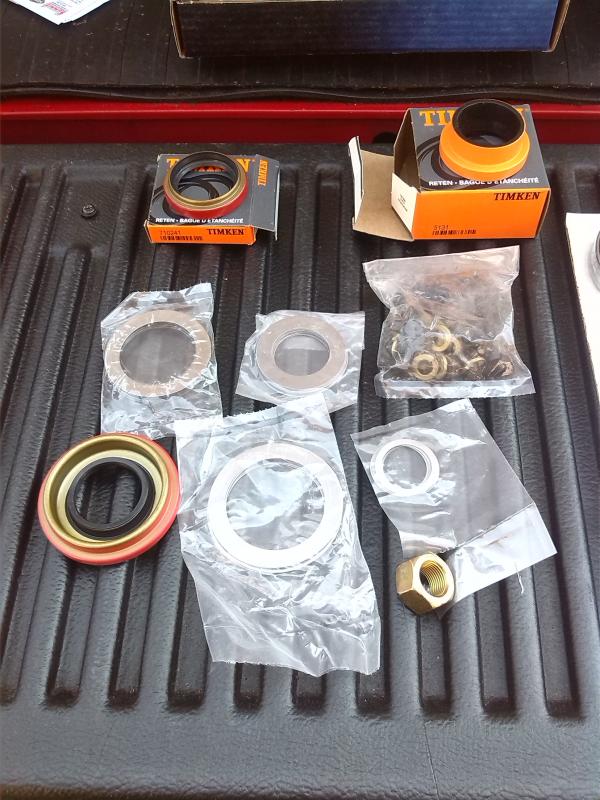
Minor for the front:
I opted to do a minor install on the front as the truck has only 120K km's and no one has messed with it. The rear....not quite the same. The story goes that the previous owner (a neighbour) had complaints of a whirring / crunching sound from the rear end as he drove by walls / fences after a few years of ownership. He's not very mechanically inclined so he took the truck to a mechanic whom had apparently swapped the trac-lok unit for $1000+ in parts alone. Same loud whirring sound was there but the crunching was gone, so he just dealt with it.
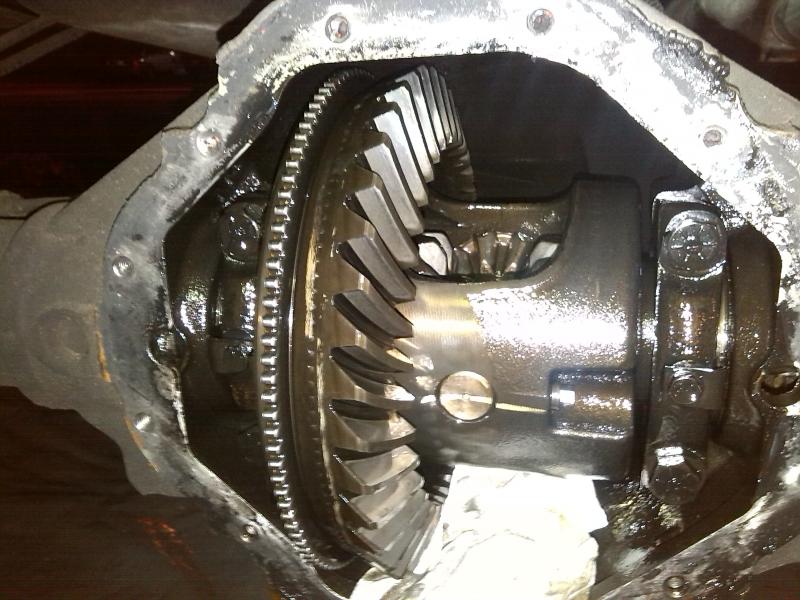
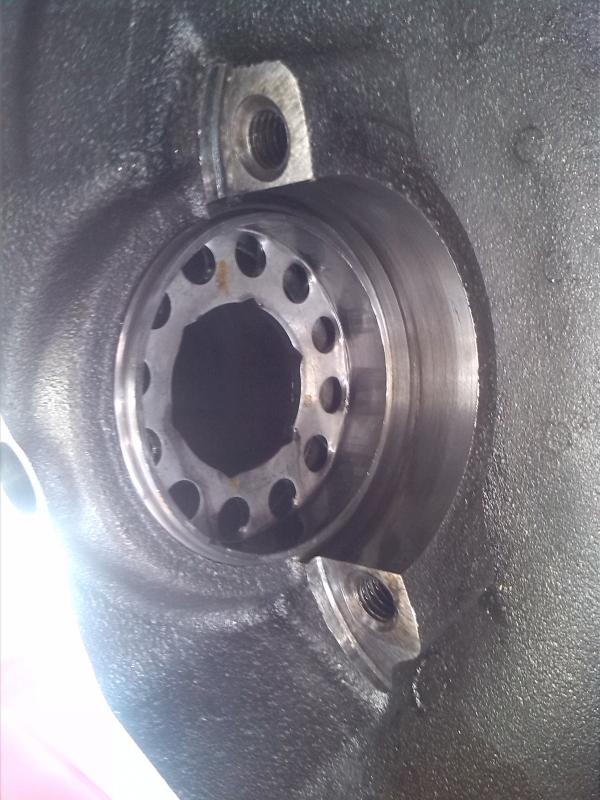
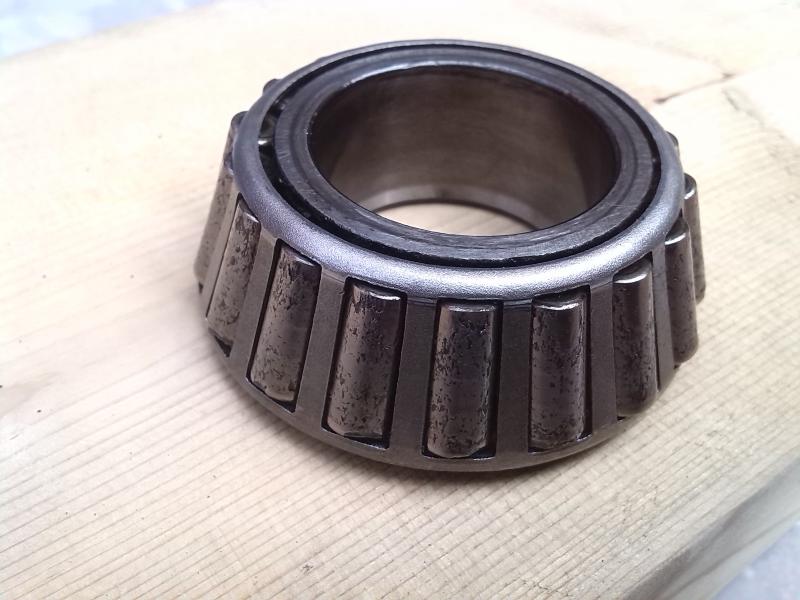
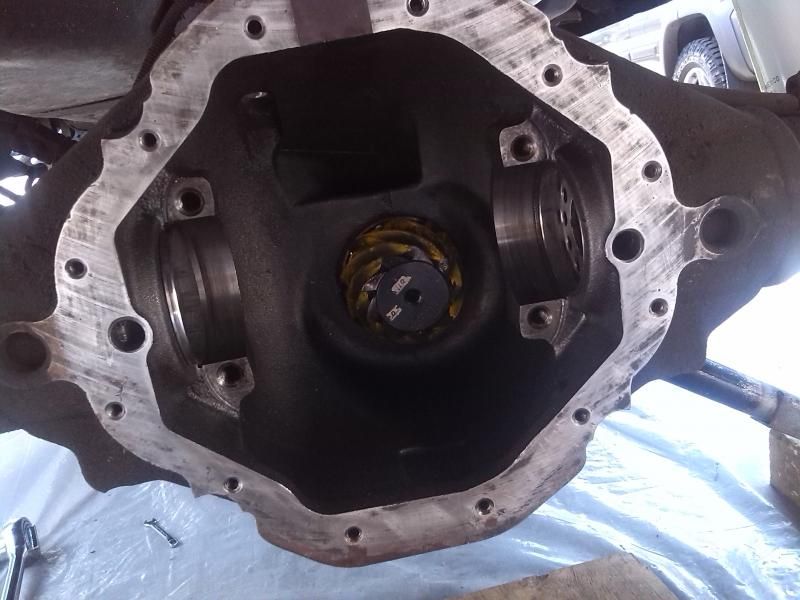
Fast forward to the gear swap. I cracked open the diff and everything looked good:
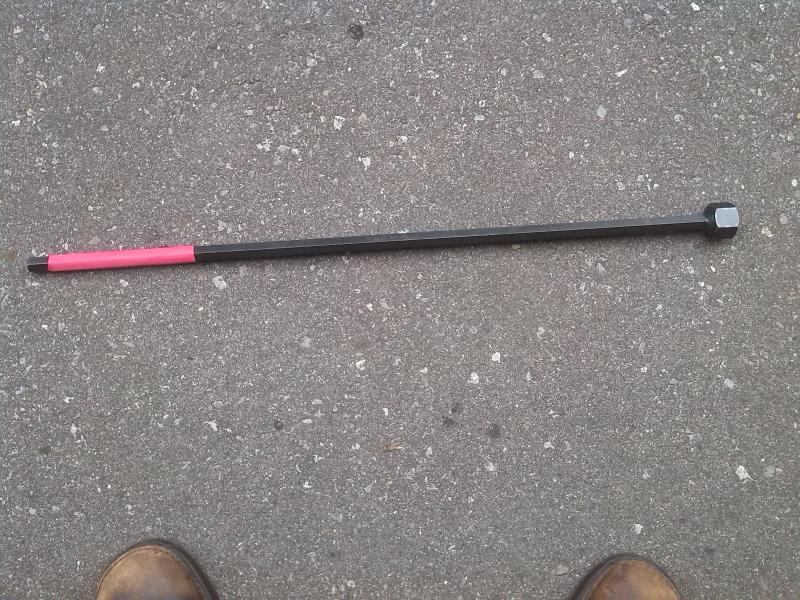
To get the carrier out after pulling the axles, a Miller C-4164 tool to loosen / tighten the adjuster screws is required since there are no carrier shims in this axle for setting backlash. I was lucky enough to find that my Dad had bought the tool back in the day for his Dakota and still had it collecting dust
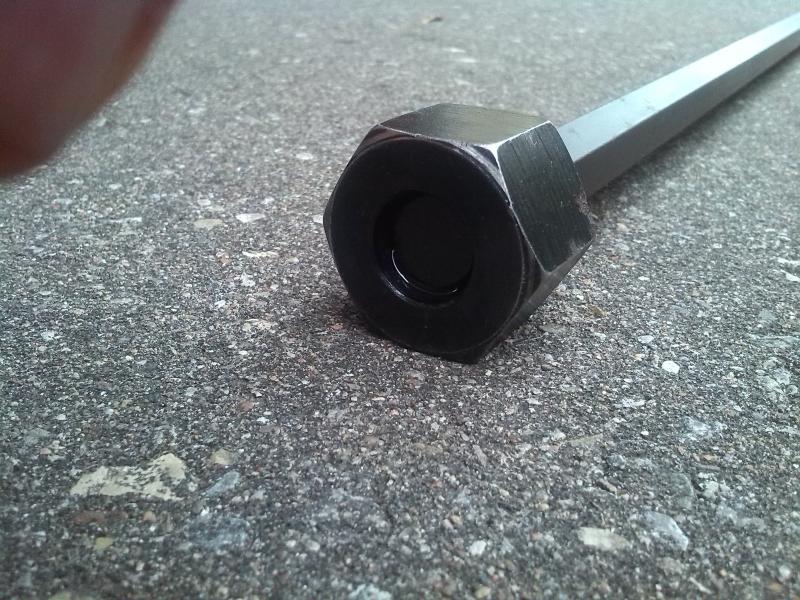
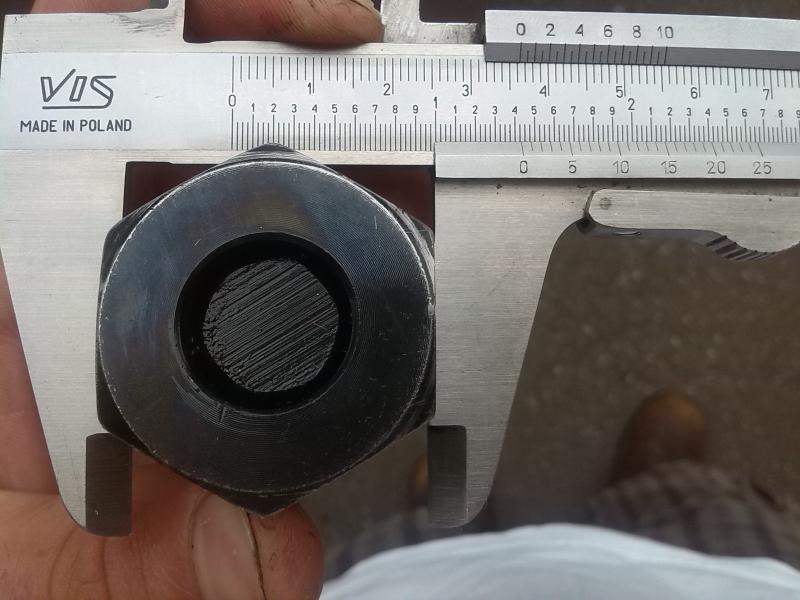
In case someone wants to fake this tool instead of buying it, I took a measurement of the business end:
After backing off the threaded adjusters and marking the bearing caps, I yanked the carrier. You can see the threaded adjusters:
I recommend taking these right out and cleaning the threads / cavities behind them where junk and sludge likes to collect.
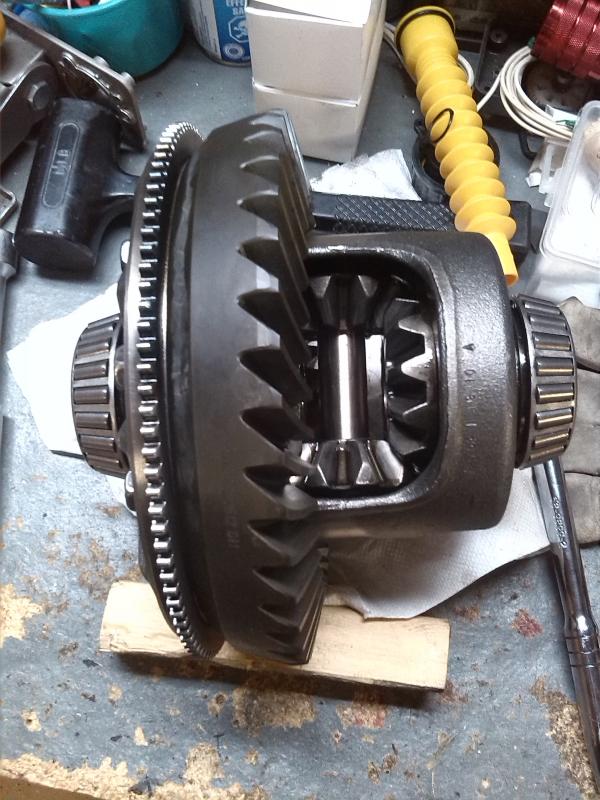
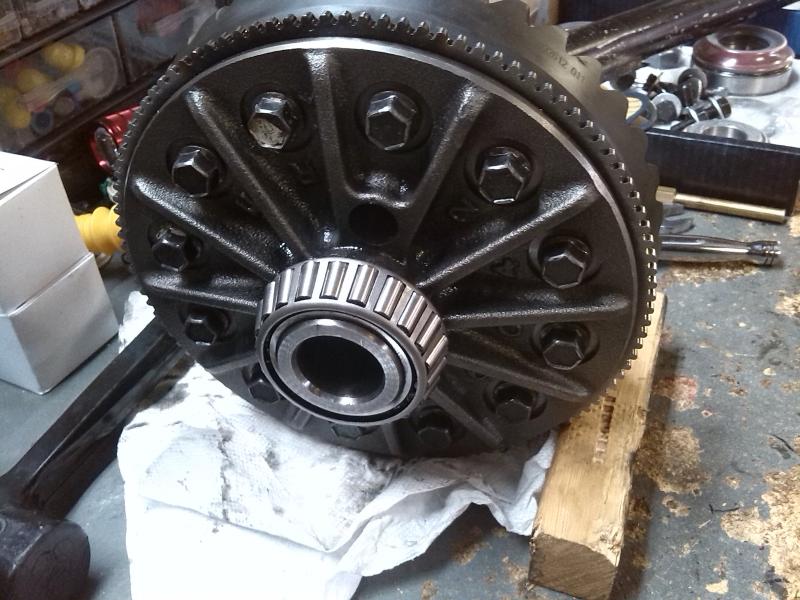
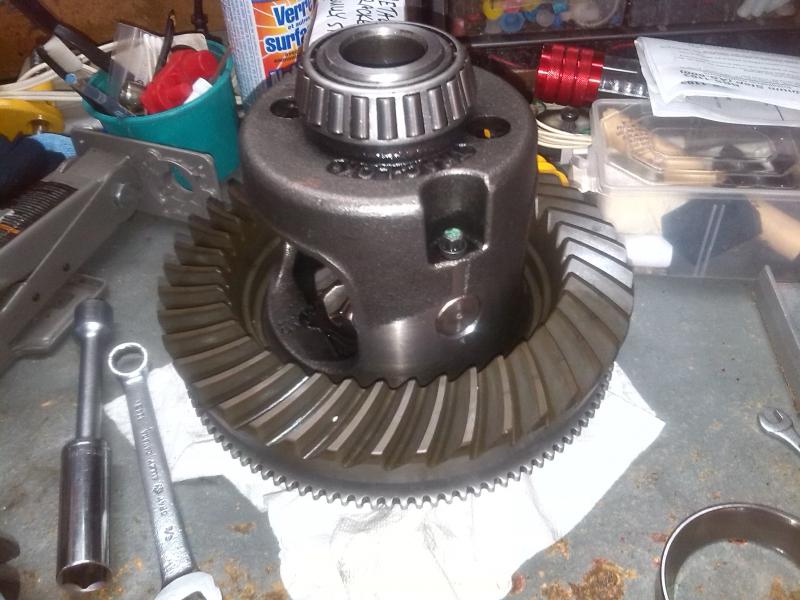
Installed the new ring gear:
I had a good oh **** moment here...almost ****ed the ring gear over-torquing the bolts down. I have a cheap torque wrench from Princess Auto (Harbor Freight equivalent in Canada) that I usually trust just fine. I had the carrier in a vise and had them all started, set the wrench to the final 75 ft lbs and started cranking them all in a star pattern. Found out after I stripped a bolt that the human hand is awful for gauging torque. Also found out that my junk chinese torque wrench doesn't do left handed torquing. After a bunch of cussing and swearing I took all the bolts out waiting to find a stripped out ring gear and I was sure I'd have to order another gear set, not to mention have the truck down for another week. Turns out I stripped the bolt threads only (the 11 others weren't far behind). Thankfully the hardened ring gear threads were OK. Re-used the old ring bolts (which were a much better fit than those given in the Motive kit), torqued them down with my other wrench and I was good to go.
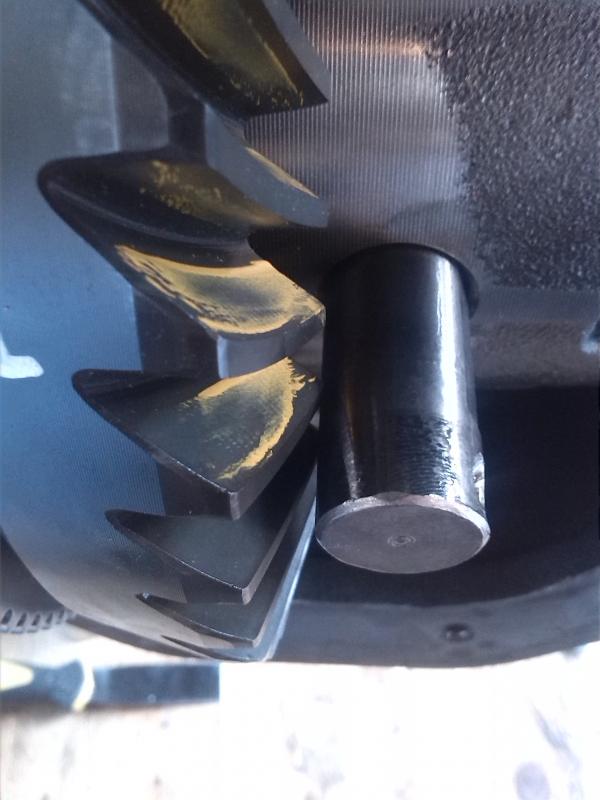
Before starting the job I knew I'd have to grind down a tooth on the ring gear in order to insert the cross-pin once the gear was installed. I was pleasantly surprised to find that with a trac-lok carrier the stock cross pin clears by just a hair, so no grinding required!
Next I made up a yoke holder:
left side is for the 9.25 I made, right is for an 8.8 Ford
I should probably mention the pinion nut is 1 1/4". Had to run to the store for that. Before loosening the nut, I gave the pinion a spin
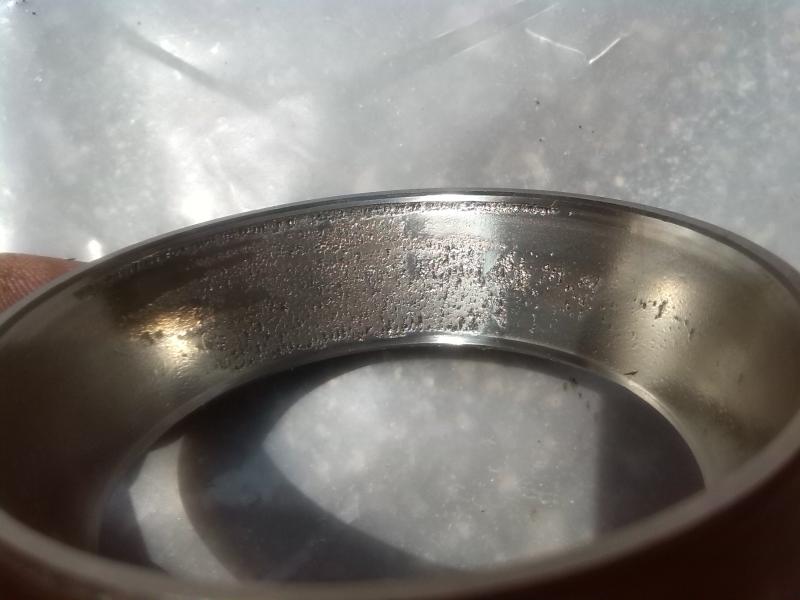
Sounds awesome, right? And look at that preload...Probably where all that howling is coming from. Started loosening the nut and noticed it was pretty easy to get off, which was concerning as this thing was supposed to be 210+ ft lbs. Used a 2-jaw puller to get the yoke off and tapped the old pinion out. This is where the fun starts. There is a well / cavity between the front and rear pinion bearings where gear lube collects to the keep everything lubed up. I stuck my fingers in the well to feel around and found this:
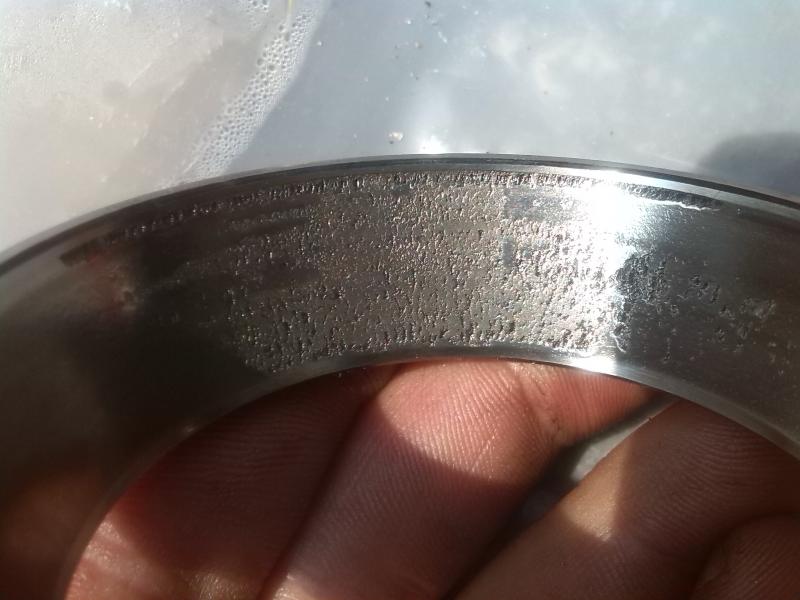
All about 3/4" in length. Then I looked at the front pinion bearing and this is what I saw
and the race
Pretty effed, huh? I knew there was something drastically wrong with the diff when I picked up the truck but I figured putting on a lift kit was more important. The neighbour had been driving for years with it like that. After I put on the exhaust a year ago I couldn't hear the howling from the rear end anymore, so I forgot about it.
Here's what happened. I reasoned that since everything on the new carrier looked fine and that the shrapnel I found couldn't have been from it, it must have been leftover crap from the previous carrier that likely exploded and sent parts up through the lubrication port for the pinion bearings and had nowhere to go but sit in the cavity. You can see the lube port here above the pinion:
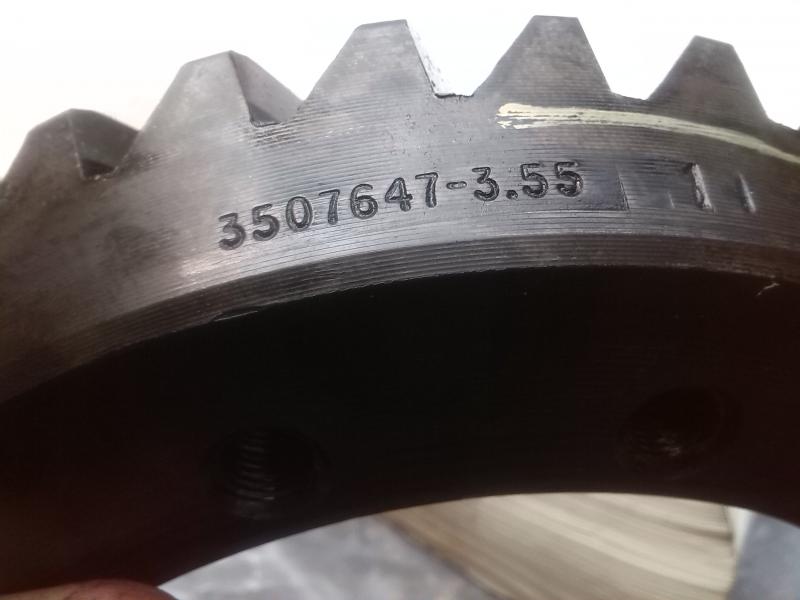
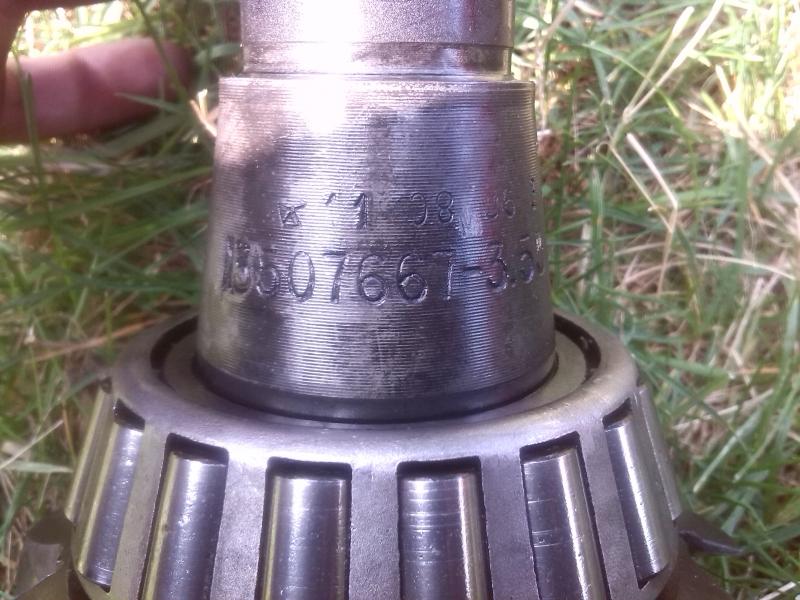
But why didn't the shop notice these bits of metal? I decided to check the ring and pinion gears to see if the serial numbers matched...
ring
pinion
No dice. The idiots replaced the carrier and left the pinion gear in place, never bothered to check the bearings or mesh pattern and slapped it back together. This is precisely why I have never and will never take my vehicles to "mechanics". You can't trust anyone to do a job properly when they're on the clock.
Moving along...got the new front race in:
Bought a race installer kit with 11 different sizes and none of them were even close to the right size so I had to improvise. I found that a fence post cap was almost exactly the right diameter to use as a driver for the front race:
Cut the loop off, grind down the sides just a tad, and it fits in like a glove

Don't have any pics, but for the rear race I resorted to a block of wood to get it started, followed by a brass punch and a hammer working evenly around the rim.
Next was the pinion bearing. Before I started the job I bought a bearing separator and puller kit from PA for $99 which covered up to 3" bearings:
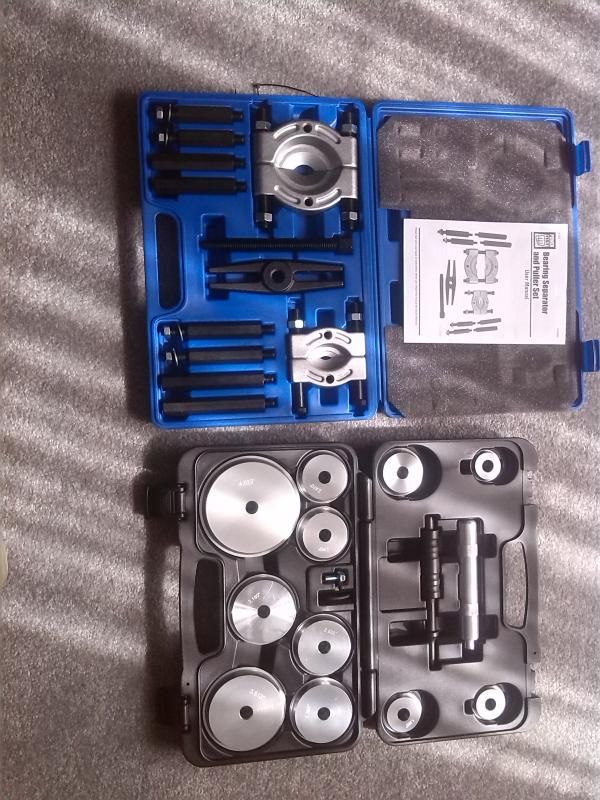
It looked like a nice kit, but as soon as I fitted up the large separator on the pinion bearing I couldn't even thread the nuts back on the threaded rods. Needed something bigger and more manly, so I did some calling around late in the afternoon, got desperate and dropped too much cash on this:
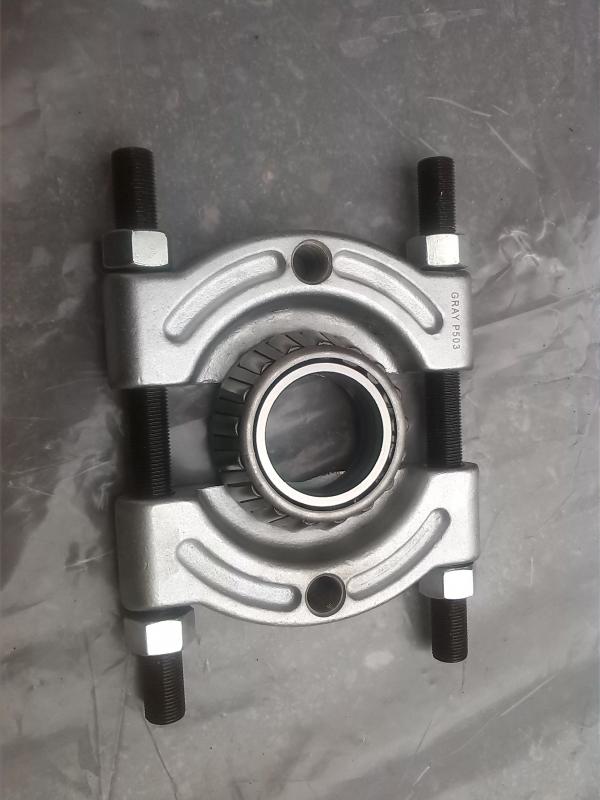
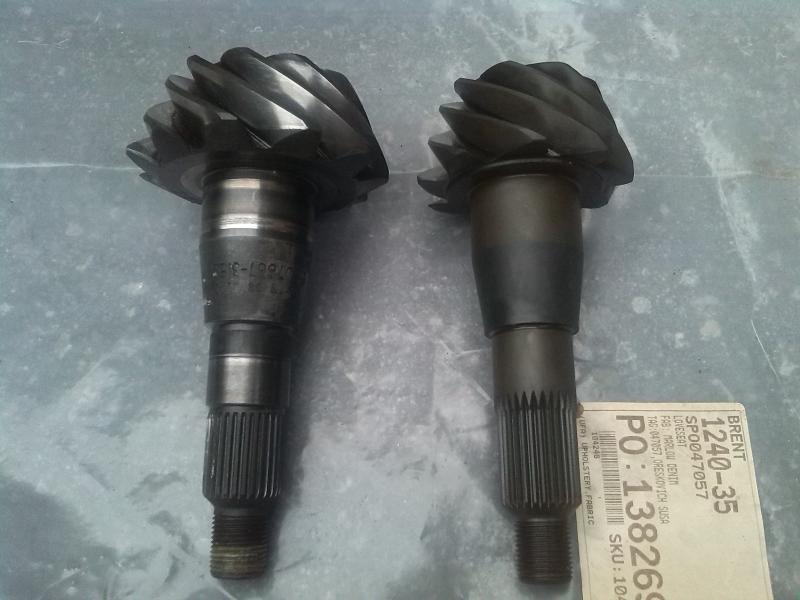
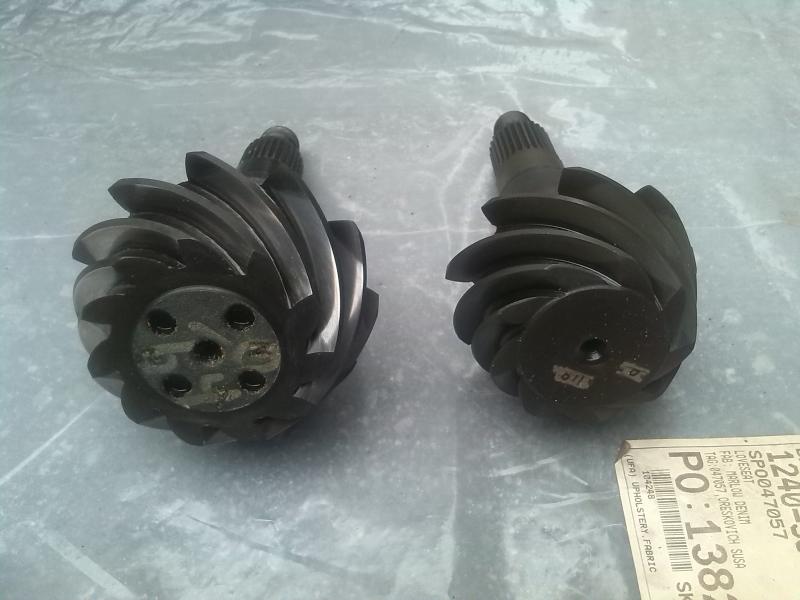
It's a Gray P503 separator that covers up to 5" or so bearings. Worked perfect as you can see and popped the pinion bearing right off. Then I compared the old pinion to the new one:
Factory had a 0.027" shim on it. From what I could gather from the markings on each gear, it looked like my pinion depth variance was marked as "0" on each gear. This meant I could reuse the factory shim thickness and should end up with a similar pattern to what the factory gear set was. The FSM has a table of variances depending on what the factory gear vs. the new gear are marked as where you either add or subtract a certain amount from the factory shim thickness.
Forgot to take pics, but to press the new pinion bearing on I used a length of 2 1/4" exhaust pipe which contacted the inner race nicely. I then hammered it on with a sledge using a block of wood on top of the pipe. A press would have been nice, but I didn't have one at my disposal.
Next was replacing the carrier bearings.
These things were a huge PITA and I don't have many pics as I got super pissed off. Tried using the separator first to yank them off but the diff housing and the inner race are the same diameter, so you need a knife edge to slip in between them. It didn't help that they were pressed on like a mother. I ended up cutting the outer bearing cages off, taking out the tapered rollers then splitting the inner races on each side 180 degrees from each other with a dremel and a small cutting disc. After I got the notches deep enough I took a big chisel and a sledge and split the race on both sides and they peeled right off. Pressing the new carrier bearings on wasn't too bad, just used exhaust pipe sized for the inner race the same as on the pinion.
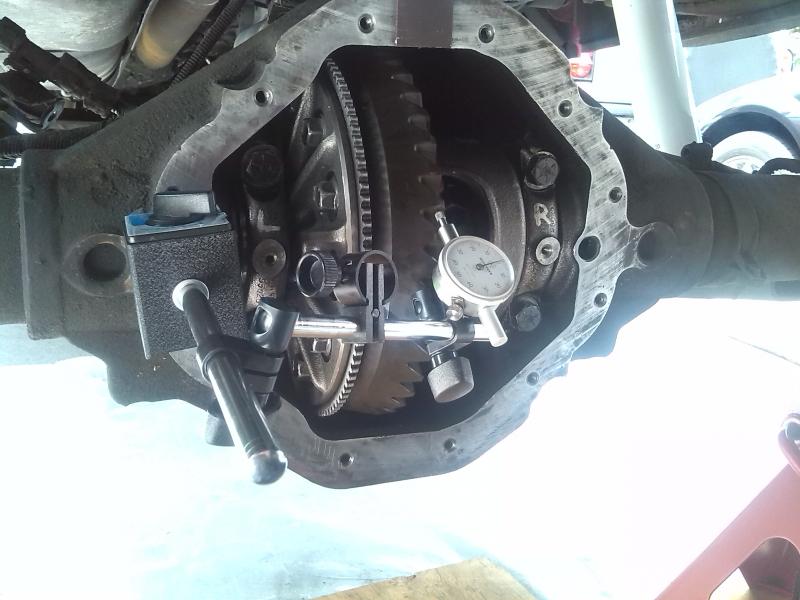
After doing a thorough clean of the diff it was time to run a pattern. I stuck the pinion gear in with no crush sleeve and tightened the nut down just until the play was taken out of the bearings. Next, I put the carrier back in and set the backlash to spec after following the procedure in the manual. Acceptable range is 0.006" - 0.008" final backlash, got it bang on 0.007" at the tightest point. Set my dial indicator up as such:
Put on some marking compound, rolled it back and forth and got a pattern.
Drive
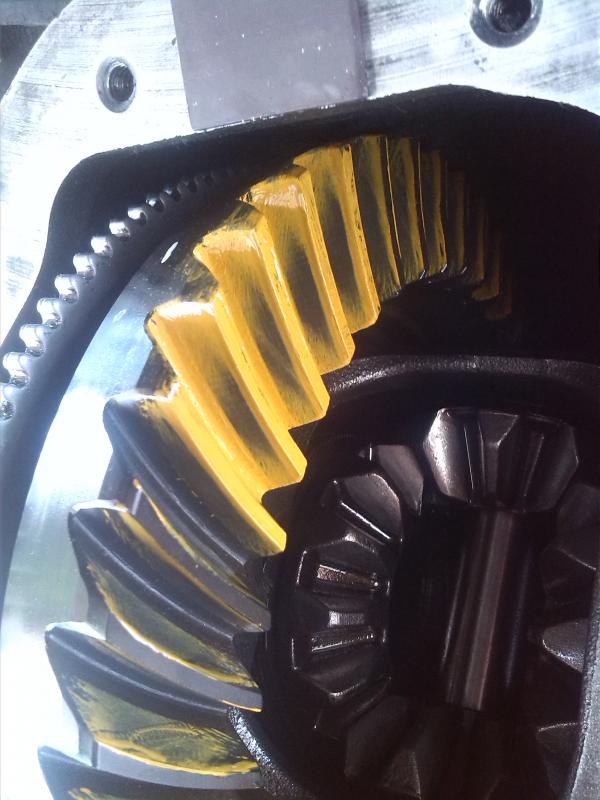
Coast

As you can see the pattern was pretty much textbook. I was elated when I saw the results as I expected to be there for hours messing with pinion shims and redoing the backlash adjustment to get it right. I could not have hoped for a better result, pattern was nice and centered tip to root as well as toe to heel. It pays to pay attention to the variance markings on the stock and new pinion gear in order to avoid running a bunch of patterns.
From here I had to take the carrier out again in order to get the front pinion bearing back out, as it was pressed on when I tightened the pinion nut. I reassembled everything, this time with the new crush sleeve. The book says to start with 210 ft lb on the pinion nut, and move up to 285 ft lbs max in increments. After torquing to 210 my pinion still moved back and forth 1/4", so the bearings weren't even seated. Moved up to 250 ft lb and i got maybe 1/16 of a turn on the nut and still around 1/4" of movement. I ended up having to jump on the torque wrench to get the damn sleeve to crush enough just to eliminate the free play. I had to tweak it very slightly in small increments and check it with an in. lb torque wrench. Finally got up at 25 in lbs rotating torque, where spec is 15-35 in lbs for new bearings. I was probably around 350 - 400 ft lbs by the time the thing actually crushed enough, which I read may be the case on other forums.
From here I stuck the carrier back in, set it to 0.007" backlash and ran the pattern again to confirm. Pattern came out perfect once again so I put some new axle seals in, slapped the axles back in the tubes, threw the diff cover on, filled up with gear oil and LSD additive till it puked out and went for a drive.
Driving Impressions
Right off the bat I noticed the truck had more pull when letting off the brake when idling. With the 3.55's I could let off the brake at a stoplight with a very slight incline and it would not move. When lightly accelerating the transmission shifts MUCH earlier and sounds so much more "normal". The truck used to wind up to around 2500RPM in 1st on a normal take off, whereas now it feels so much less strained and shifts far before then. Also found that the shifts feel much more solid, which should be easier on the transmission. Almost feels like there is a shift kit in it which feels nice. Shifting felt very slushy with the 3.55's. The ratios feel very nicely placed and the motor seems like it can now move the truck properly.
Before the gear swap I would always baby the truck as it felt like I was straining the thing to get it to move all the time. Another big difference is the truck used to "hammer" when pressing the throttle hard in 2nd / 3rd gear to the point just before it downshifts (I have a loud exhaust so it may be more noticeable for me). The truck no longer "hammers" when I do this, but rather it sounds much smoother.
When flooring it from a dig, the truck winds up WAY faster than it used to and the shift points are drastically lower. I actually get the "seat of the pants" feeling now. With the 3.55's I would get up around 70 km/h before the thing would shift out of first and it was super annoying. It would bog like crazy before getting in the power band, whereas now it is in it from the get-go.
On the highway merging power is way better and I run approximately 2200 RPM at around 65 MPH in OD which I think is perfect for both economy and towing. The truck enters OD at around 65km/h which I find a little low, however it seems to have plenty of pulling power to move up in speed at a decent pace if you so desire.
Overall the job was a big pain in the *** but it could have been worse. After driving it the truck no longer howls from the rear, the gear set is incredibly quiet and makes zero noise, and I actually feel less vibration / feedback through the truck which must have been from the trashed pinion bearings. I would do the gear swap again in a heartbeat despite the work involved as there is NO better way to wake up a small block powered truck. If I were to do it again I would go AT LEAST 4.56 if not 4.88. I went with 4.56 as that is quite a step up from factory even with 35" tires on. I now know why they say "don't fear the gear"...it just gives the truck a swift kick in the nads.
If anyone has any questions feel free to ask. Wish I took more pics of the process but I always forget to grab the camera. I'll be doing the D44 and hopefully will add to this thread in the coming months.
I have been running 3.55's and 35" tires for 2 years and was getting really sick and tired of the truck being a dog, having no ***** from a dig, not being able to use overdrive on the highway, no passing power, no power when towing my boat, etc. It was pretty pathetic.
I just recently completed the rear end (Chrysler 9.25") and thought I'd share my experience as I found very little info related to this axle when researching how to regear it. It ended up taking me 2.5 days to complete with a lot of bumps in the road. Still need to do the D44 front end, but I'll do that in the months coming when I get some time and post up (I rarely use 4x4 anyway). I didn't take as many pics as I would have liked as I usually get way too into it and forget but hopefully some of the pics / comments in this thread can help out other people looking to regear their truck.
Anyway, onto the pics. The goodies I bought for the swap:
Gears:
Master install kit for the rear:
Minor for the front:
I opted to do a minor install on the front as the truck has only 120K km's and no one has messed with it. The rear....not quite the same. The story goes that the previous owner (a neighbour) had complaints of a whirring / crunching sound from the rear end as he drove by walls / fences after a few years of ownership. He's not very mechanically inclined so he took the truck to a mechanic whom had apparently swapped the trac-lok unit for $1000+ in parts alone. Same loud whirring sound was there but the crunching was gone, so he just dealt with it.
Fast forward to the gear swap. I cracked open the diff and everything looked good:
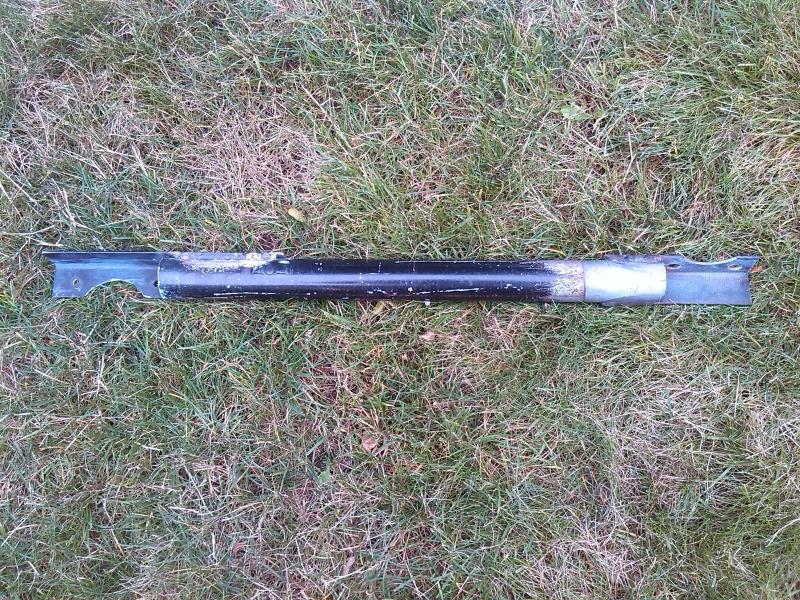
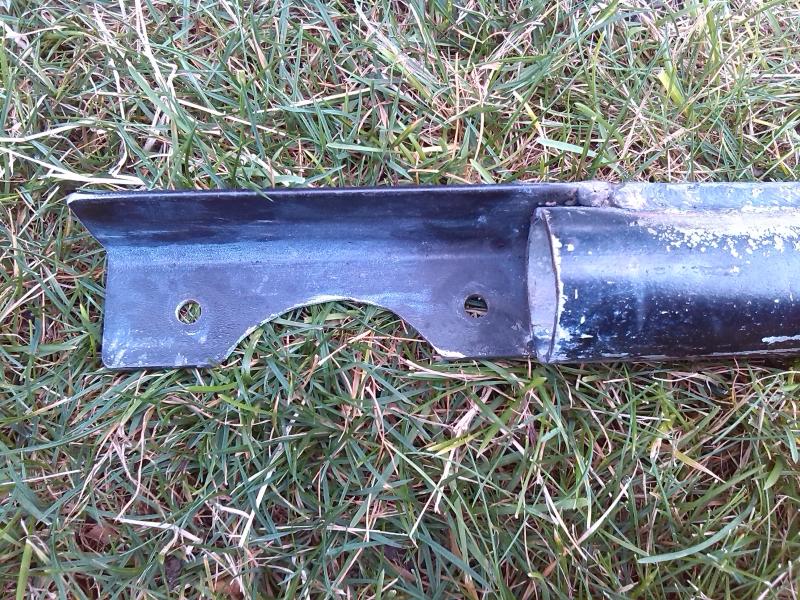
To get the carrier out after pulling the axles, a Miller C-4164 tool to loosen / tighten the adjuster screws is required since there are no carrier shims in this axle for setting backlash. I was lucky enough to find that my Dad had bought the tool back in the day for his Dakota and still had it collecting dust
In case someone wants to fake this tool instead of buying it, I took a measurement of the business end:
After backing off the threaded adjusters and marking the bearing caps, I yanked the carrier. You can see the threaded adjusters:
I recommend taking these right out and cleaning the threads / cavities behind them where junk and sludge likes to collect.
Installed the new ring gear:
I had a good oh **** moment here...almost ****ed the ring gear over-torquing the bolts down. I have a cheap torque wrench from Princess Auto (Harbor Freight equivalent in Canada) that I usually trust just fine. I had the carrier in a vise and had them all started, set the wrench to the final 75 ft lbs and started cranking them all in a star pattern. Found out after I stripped a bolt that the human hand is awful for gauging torque. Also found out that my junk chinese torque wrench doesn't do left handed torquing. After a bunch of cussing and swearing I took all the bolts out waiting to find a stripped out ring gear and I was sure I'd have to order another gear set, not to mention have the truck down for another week. Turns out I stripped the bolt threads only (the 11 others weren't far behind). Thankfully the hardened ring gear threads were OK. Re-used the old ring bolts (which were a much better fit than those given in the Motive kit), torqued them down with my other wrench and I was good to go.
Before starting the job I knew I'd have to grind down a tooth on the ring gear in order to insert the cross-pin once the gear was installed. I was pleasantly surprised to find that with a trac-lok carrier the stock cross pin clears by just a hair, so no grinding required!
Next I made up a yoke holder:
left side is for the 9.25 I made, right is for an 8.8 Ford
I should probably mention the pinion nut is 1 1/4". Had to run to the store for that. Before loosening the nut, I gave the pinion a spin
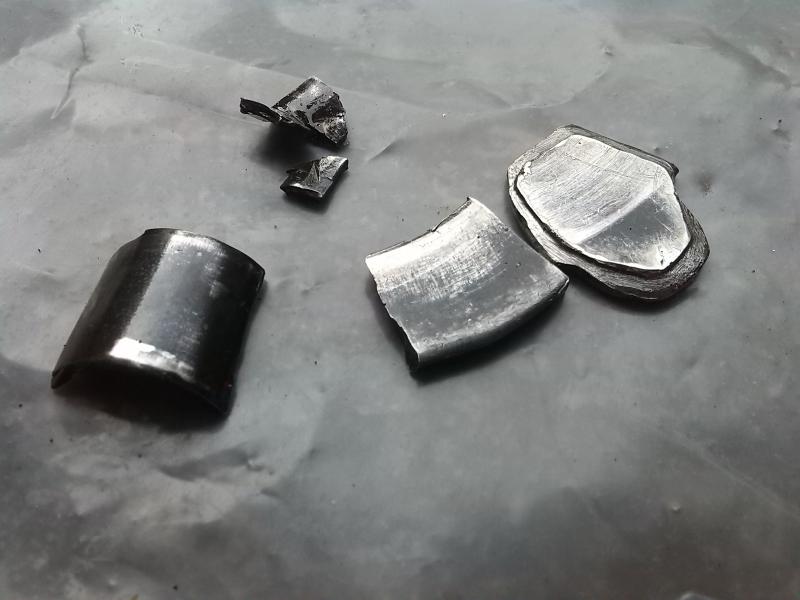
Sounds awesome, right? And look at that preload...Probably where all that howling is coming from. Started loosening the nut and noticed it was pretty easy to get off, which was concerning as this thing was supposed to be 210+ ft lbs. Used a 2-jaw puller to get the yoke off and tapped the old pinion out. This is where the fun starts. There is a well / cavity between the front and rear pinion bearings where gear lube collects to the keep everything lubed up. I stuck my fingers in the well to feel around and found this:
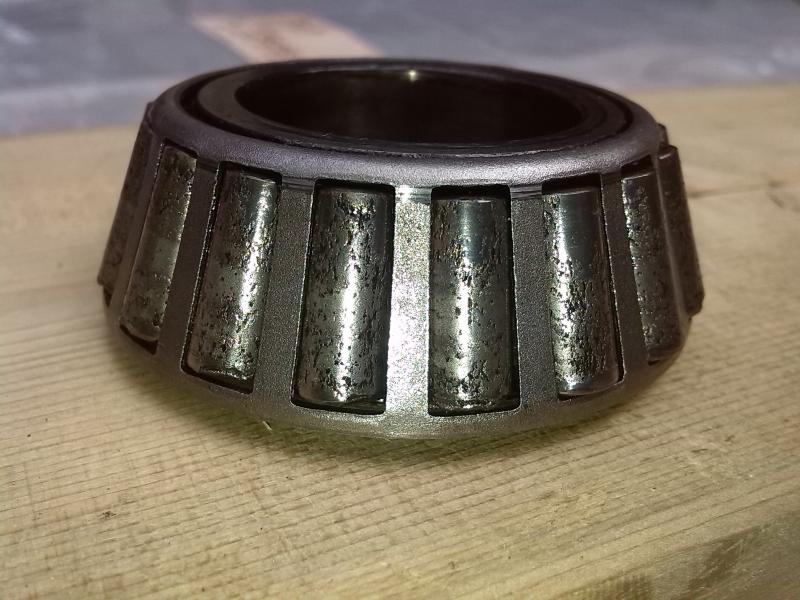
All about 3/4" in length. Then I looked at the front pinion bearing and this is what I saw
and the race
Pretty effed, huh? I knew there was something drastically wrong with the diff when I picked up the truck but I figured putting on a lift kit was more important.
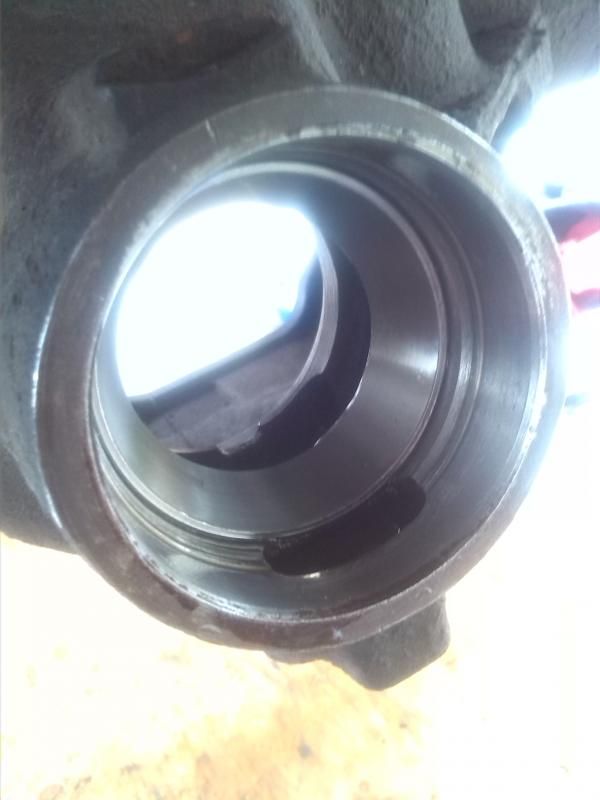
Here's what happened. I reasoned that since everything on the new carrier looked fine and that the shrapnel I found couldn't have been from it, it must have been leftover crap from the previous carrier that likely exploded and sent parts up through the lubrication port for the pinion bearings and had nowhere to go but sit in the cavity. You can see the lube port here above the pinion:
But why didn't the shop notice these bits of metal? I decided to check the ring and pinion gears to see if the serial numbers matched...
ring
pinion
No dice. The idiots replaced the carrier and left the pinion gear in place, never bothered to check the bearings or mesh pattern and slapped it back together. This is precisely why I have never and will never take my vehicles to "mechanics". You can't trust anyone to do a job properly when they're on the clock.
Moving along...got the new front race in:
Bought a race installer kit with 11 different sizes and none of them were even close to the right size so I had to improvise. I found that a fence post cap was almost exactly the right diameter to use as a driver for the front race:
Cut the loop off, grind down the sides just a tad, and it fits in like a glove
Don't have any pics, but for the rear race I resorted to a block of wood to get it started, followed by a brass punch and a hammer working evenly around the rim.
Next was the pinion bearing. Before I started the job I bought a bearing separator and puller kit from PA for $99 which covered up to 3" bearings:
It looked like a nice kit, but as soon as I fitted up the large separator on the pinion bearing I couldn't even thread the nuts back on the threaded rods. Needed something bigger and more manly, so I did some calling around late in the afternoon, got desperate and dropped too much cash on this:
It's a Gray P503 separator that covers up to 5" or so bearings. Worked perfect as you can see and popped the pinion bearing right off. Then I compared the old pinion to the new one:
Factory had a 0.027" shim on it. From what I could gather from the markings on each gear, it looked like my pinion depth variance was marked as "0" on each gear. This meant I could reuse the factory shim thickness and should end up with a similar pattern to what the factory gear set was. The FSM has a table of variances depending on what the factory gear vs. the new gear are marked as where you either add or subtract a certain amount from the factory shim thickness.
Forgot to take pics, but to press the new pinion bearing on I used a length of 2 1/4" exhaust pipe which contacted the inner race nicely. I then hammered it on with a sledge using a block of wood on top of the pipe. A press would have been nice, but I didn't have one at my disposal.
Next was replacing the carrier bearings.
These things were a huge PITA and I don't have many pics as I got super pissed off. Tried using the separator first to yank them off but the diff housing and the inner race are the same diameter, so you need a knife edge to slip in between them. It didn't help that they were pressed on like a mother. I ended up cutting the outer bearing cages off, taking out the tapered rollers then splitting the inner races on each side 180 degrees from each other with a dremel and a small cutting disc. After I got the notches deep enough I took a big chisel and a sledge and split the race on both sides and they peeled right off. Pressing the new carrier bearings on wasn't too bad, just used exhaust pipe sized for the inner race the same as on the pinion.
After doing a thorough clean of the diff it was time to run a pattern. I stuck the pinion gear in with no crush sleeve and tightened the nut down just until the play was taken out of the bearings. Next, I put the carrier back in and set the backlash to spec after following the procedure in the manual. Acceptable range is 0.006" - 0.008" final backlash, got it bang on 0.007" at the tightest point. Set my dial indicator up as such:
Put on some marking compound, rolled it back and forth and got a pattern.
Drive
Coast
As you can see the pattern was pretty much textbook. I was elated when I saw the results as I expected to be there for hours messing with pinion shims and redoing the backlash adjustment to get it right. I could not have hoped for a better result, pattern was nice and centered tip to root as well as toe to heel. It pays to pay attention to the variance markings on the stock and new pinion gear in order to avoid running a bunch of patterns.
From here I had to take the carrier out again in order to get the front pinion bearing back out, as it was pressed on when I tightened the pinion nut. I reassembled everything, this time with the new crush sleeve. The book says to start with 210 ft lb on the pinion nut, and move up to 285 ft lbs max in increments. After torquing to 210 my pinion still moved back and forth 1/4", so the bearings weren't even seated. Moved up to 250 ft lb and i got maybe 1/16 of a turn on the nut and still around 1/4" of movement. I ended up having to jump on the torque wrench to get the damn sleeve to crush enough just to eliminate the free play. I had to tweak it very slightly in small increments and check it with an in. lb torque wrench. Finally got up at 25 in lbs rotating torque, where spec is 15-35 in lbs for new bearings. I was probably around 350 - 400 ft lbs by the time the thing actually crushed enough, which I read may be the case on other forums.
From here I stuck the carrier back in, set it to 0.007" backlash and ran the pattern again to confirm. Pattern came out perfect once again so I put some new axle seals in, slapped the axles back in the tubes, threw the diff cover on, filled up with gear oil and LSD additive till it puked out and went for a drive.
Driving Impressions
Right off the bat I noticed the truck had more pull when letting off the brake when idling. With the 3.55's I could let off the brake at a stoplight with a very slight incline and it would not move. When lightly accelerating the transmission shifts MUCH earlier and sounds so much more "normal". The truck used to wind up to around 2500RPM in 1st on a normal take off, whereas now it feels so much less strained and shifts far before then. Also found that the shifts feel much more solid, which should be easier on the transmission. Almost feels like there is a shift kit in it which feels nice. Shifting felt very slushy with the 3.55's. The ratios feel very nicely placed and the motor seems like it can now move the truck properly.
Before the gear swap I would always baby the truck as it felt like I was straining the thing to get it to move all the time. Another big difference is the truck used to "hammer" when pressing the throttle hard in 2nd / 3rd gear to the point just before it downshifts (I have a loud exhaust so it may be more noticeable for me). The truck no longer "hammers" when I do this, but rather it sounds much smoother.
When flooring it from a dig, the truck winds up WAY faster than it used to and the shift points are drastically lower. I actually get the "seat of the pants" feeling now. With the 3.55's I would get up around 70 km/h before the thing would shift out of first and it was super annoying. It would bog like crazy before getting in the power band, whereas now it is in it from the get-go.
On the highway merging power is way better and I run approximately 2200 RPM at around 65 MPH in OD which I think is perfect for both economy and towing. The truck enters OD at around 65km/h which I find a little low, however it seems to have plenty of pulling power to move up in speed at a decent pace if you so desire.
Overall the job was a big pain in the *** but it could have been worse. After driving it the truck no longer howls from the rear, the gear set is incredibly quiet and makes zero noise, and I actually feel less vibration / feedback through the truck which must have been from the trashed pinion bearings. I would do the gear swap again in a heartbeat despite the work involved as there is NO better way to wake up a small block powered truck. If I were to do it again I would go AT LEAST 4.56 if not 4.88. I went with 4.56 as that is quite a step up from factory even with 35" tires on. I now know why they say "don't fear the gear"...it just gives the truck a swift kick in the nads.
If anyone has any questions feel free to ask. Wish I took more pics of the process but I always forget to grab the camera. I'll be doing the D44 and hopefully will add to this thread in the coming months.
Thread Starter
|
Veteran
Joined: Sep 2012
Posts: 464
Likes: 4
Thanks guys, really happy with the outcome after a lot of hard work. Still lots ahead of me for the front. I have always been interested in fixing things since I was a kid and I'm thrilled I could get a gear swap under my belt.
HeyYou, I was able to borrow both the magnetic base and the Mitutoyo dial indicator, however the setup can be had pretty inexpensively at Princess Auto or Harbor Freight. The same base I used is $12.99 and a dial indicator (however not a Mitutoyo) is $14.99 at HF. I wouldn't hesitate to pick up a cheapo gauge to do this job if I had to.
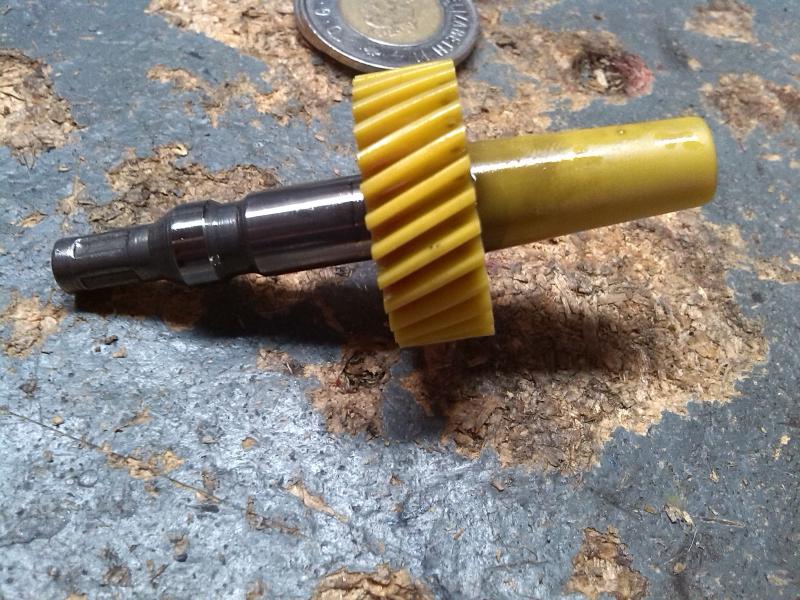
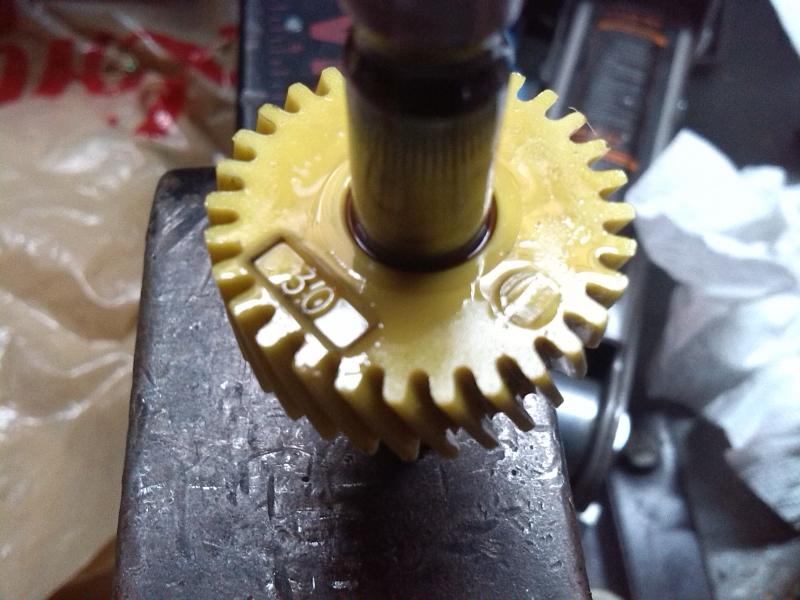
Also noticed my speedo is waaaay off. Tried searching online to find out what speedo gear was in the truck and ended up just yanking it off. Found out I have a 30 tooth pinion gear
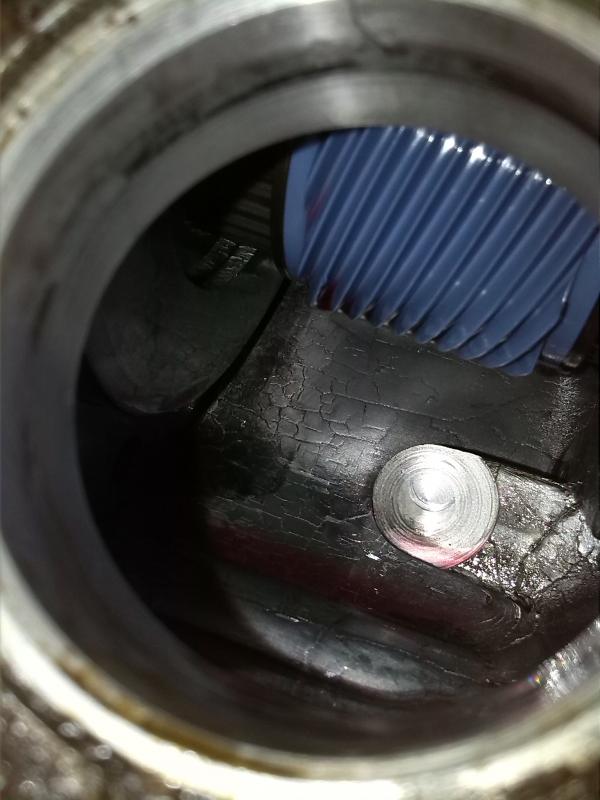
Took a peek in the transfer case to see what the gear reduction was. The drive gear is a blue 13 toother
I took the truck for a spin yesterday and compared the indicated speed to GPS. At 90 km/h indicated I was running 75 km/h on the GPS, and at 120 km/h I was running 100 km/h on the GPS. That makes the speedo high by a factor of 1.2.
The reduction ratio currently in the truck is 30/13 = 2.308
Multiply that by the correction factor 2.308x1.2 = 2.769
Now multiplying by the # of drive gear teeth gives me the number of pinion gear teeth I need so 2.769 x 13 = 36
After searching I found I needed a Crown automotive red gear with PN 52067635. Went to the dealer and they wanted...............wait for it.............. $240 for a stupid little speedo gear. I told the guy I was insulted and promptly walked out.
Tried to see if I could head to the junkyard and yank a gear from a vehicle that came with a 36 tooth gear from the factory. Looks like 96-99 Cherokees and Grand Cherokees have a 36 tooth gear, but only when equipped with a 3.70 rear end (which I'm guessing is fairly uncommon). My junkyard listed two 99 Cherokees that came in ~ 2 months ago, plus its a far drive and my luck usually sucks so I resorted to finding the best price I could online. $39 shipped off eBay was good enough for me so I should get it in the next week or two.
HeyYou, I was able to borrow both the magnetic base and the Mitutoyo dial indicator, however the setup can be had pretty inexpensively at Princess Auto or Harbor Freight. The same base I used is $12.99 and a dial indicator (however not a Mitutoyo) is $14.99 at HF. I wouldn't hesitate to pick up a cheapo gauge to do this job if I had to.
Also noticed my speedo is waaaay off. Tried searching online to find out what speedo gear was in the truck and ended up just yanking it off. Found out I have a 30 tooth pinion gear
Took a peek in the transfer case to see what the gear reduction was. The drive gear is a blue 13 toother
I took the truck for a spin yesterday and compared the indicated speed to GPS. At 90 km/h indicated I was running 75 km/h on the GPS, and at 120 km/h I was running 100 km/h on the GPS. That makes the speedo high by a factor of 1.2.
The reduction ratio currently in the truck is 30/13 = 2.308
Multiply that by the correction factor 2.308x1.2 = 2.769
Now multiplying by the # of drive gear teeth gives me the number of pinion gear teeth I need so 2.769 x 13 = 36
After searching I found I needed a Crown automotive red gear with PN 52067635. Went to the dealer and they wanted...............wait for it.............. $240 for a stupid little speedo gear. I told the guy I was insulted and promptly walked out.
Tried to see if I could head to the junkyard and yank a gear from a vehicle that came with a 36 tooth gear from the factory. Looks like 96-99 Cherokees and Grand Cherokees have a 36 tooth gear, but only when equipped with a 3.70 rear end (which I'm guessing is fairly uncommon). My junkyard listed two 99 Cherokees that came in ~ 2 months ago, plus its a far drive and my luck usually sucks so I resorted to finding the best price I could online. $39 shipped off eBay was good enough for me so I should get it in the next week or two.
Last edited by oxymoron29; Aug 3, 2014 at 01:10 AM.
Administrator


Joined: Apr 2010
Posts: 87,482
Likes: 4,223
From: Clayton MI
Not a bad price...... I think Wittrans sells them as well as PATC. I think they were right around that neighborhood in price. (wittrans also has the cool little chart for figuring out what gear you need.  )
)
)
Awesome write-up man! I actually read the whole thing! Makes me more excited to get these 4.88s in mine. Does yours already have the locker in the rear or a LSD? I'm gunna put the TruTrac in mine too when I do the rear.
Captain
Joined: Jan 2011
Posts: 703
Likes: 0
From: Northern Ontario

Trending Topics
Thread Starter
|
Veteran
Joined: Sep 2012
Posts: 464
Likes: 4
I have the factory LSD in the rear which is a step up from an open diff and good enough for my needs
Administrator
Joined: Apr 2010
Posts: 87,482
Likes: 4,223
From: Clayton MI
Ah, I missed that part. Yep. That funny little line on the map makes things expensive.....
Captain
Joined: Jan 2011
Posts: 703
Likes: 0
From: Northern Ontario
Ain't that the truth. I buy all my parts from summit and even with shipping its still cheaper than anything in Canada.