


 Aug 6, 2015, 01:49 PM
Last edit by: IB Advertising
See related guides and technical advice from our community experts:
Browse all: Cooling System
- Dodge Ram 2nd Gen How to Replace Thermostat
Step by step instructions for the do-it-yourself repairs.
Browse all: Cooling System

DIY Thermostat Install
It has come to my attention that there are some folks here on this forum that get a little confused on how to change a thermostat. I think there is already a DIY on this, but the pics have been moved, and are no longer working.
First off let me say that everyone has their own preference when it comes to changing out a stat. Some prefer tearing the top of the motor down to make access easier, but this is not 100% necessary. The way I change mine is by removing a few pieces and going from there. Lets begin:
1. Tools and supplies that you will need
A. New Thermostat
B. Either a new gasket, or RTV (or both)
C. 9/16 socket or wrench.
D. 1/2 Socket with an extension
E. 11/16 nut driver or flat head screwdriver.
F. Telescoping magnet (Optional)
G. Grinder (Optional)
H. Needle nose pliers
I. Razor Blade
2. The first thing you need to do when you get back from the parts store, is to submerge the new thermostat in hot water (above the temperature range) to make sure that the stat is opening all the way.
3. Once you have established that your new thermostat is working, its time to dig in.
4. Make sure that you have allowed ample time for the engine and coolant to cool down before you start. Working on a hot motor is never fun.
5. Start by removing the air cleaner.
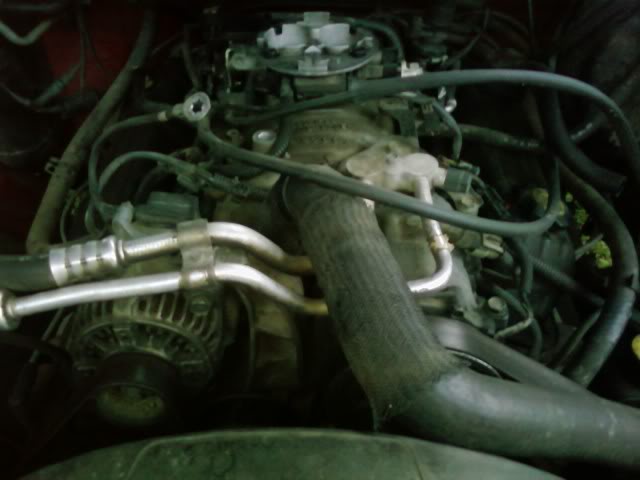
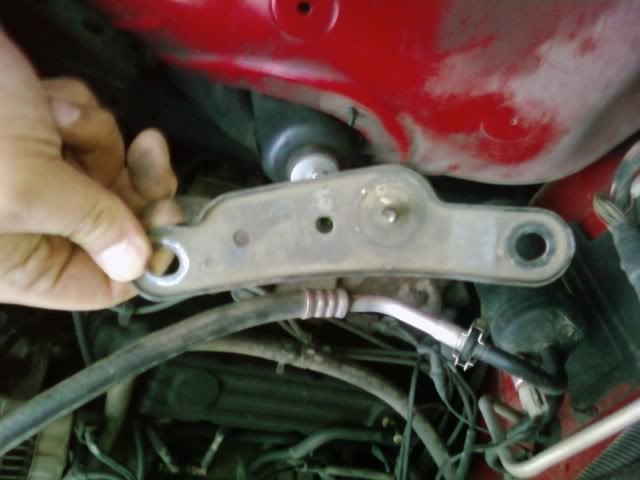
6. There is a black metal bracket attached to the intake and the alternator. This has to come out. (The same bracket that has the little plastic lock that your air cleaner sits down on) The nut and bolt on this are both 9/16. If your truck has air conditioning, you need to carefully raise the metal lines up and away from the from the top of the bolt. Once you have that removed, you can finish taking out the bolt. After that is removed, you should have one more bolt on the intake manifold to remove. (Another option is to just loosen that back side and swing it out of the way)
Here is the bracket:
7. You will probably have the throttle cables in your way now, you can just bend thous back and either hang a wrench on them to hold them down, or wedge them underneath the bracket that you swung out of the way.
8. There are two bolts on the stat housing. Both of them should be 1/2". Use your extension and remove these bolts. This is also where a magnetic retrieval tool will come in handy.
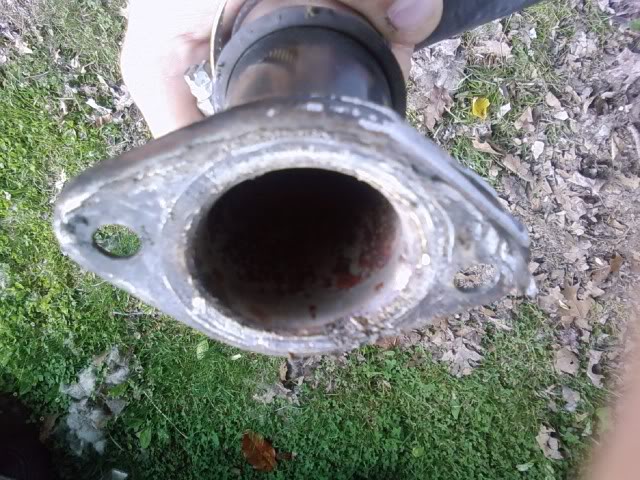
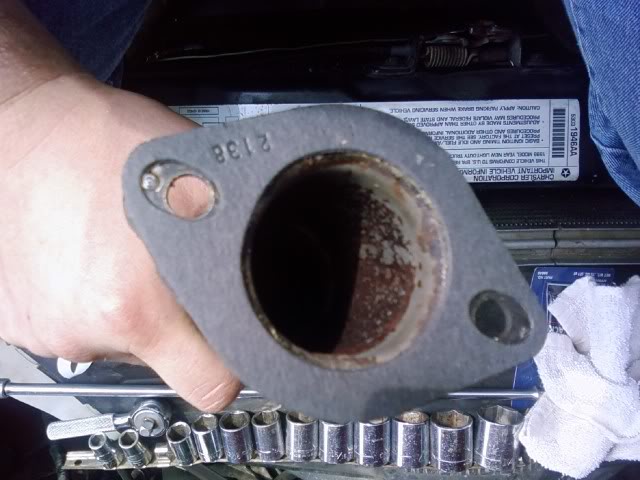
9. Now you should be able to wiggle the hose and the housing enough to remove it. You can also remove the clip on the opposite end of the hose and pull it out completely. (This is a good time to change out your clamps since the simple squeeze on clamps are prone to failing.)
Below is a pic of the housing:

Expect some coolant/water to gush out when you remove the hose.
Notice that there is a little tab on the housing with the words "FRONT" labeled on it. (This is just to let you know which way to install the housing.) This tab will become troublesome when trying to reinstall the housing. You can grind the tab down like I did, and it removes a lot of the headaches.
10. Now you will be able to remove the old thermostat. You should be able to just reach down and pop it out, but sometimes they will get stuck and you will need a set of pliers to remove it.
More than likely the block is still going to be full of water. I usually will start the motor and let it run for a few seconds to blow out this water. At this point, I tend to let things dry over night, but you can towel dry everything off and resume.
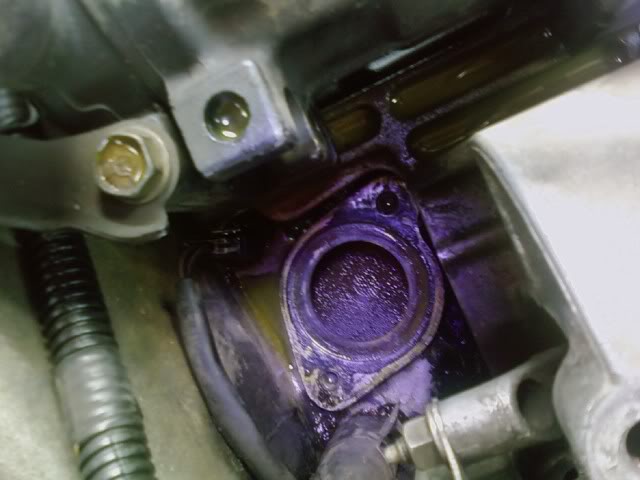
11. Take the new stat and set it in the block with the spring side down.
12. Take your housing, and wipe it down with a dry cloth. (you might need to scrape the old gasket off) Then take your paper gasket and stick it on the housing. I tend to use both the gasket and RTV to make sure I have a good seal.
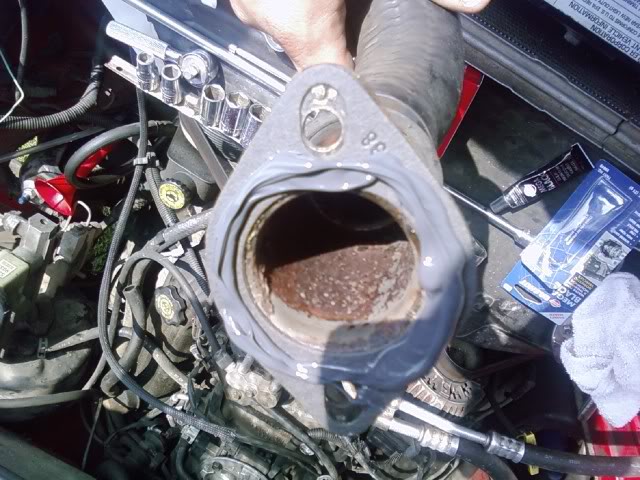
You should wait about 10 minutes before reinstalling the housing. (This allows the liquid to set up a bit and reduces mess) I also usually leave the housing attached to the hose with the clamp since it is kinda hard to get access to the clamp after things have been put back.
Carefully set the housing back in to the crevice and align the holes up. Use your magnetic tool to set the bolts back in. If your magnet is strong enough, you might be able to tighten the bolts down a couple of turns so they stay put. Use your extension and tighten down both bolts. I am not positive of the torque specification, but make sure it is tight.
Let the RTV set for at least 12 hours before trying to start the motor.
Don't forget to reinsert the other end of the hose back into the radiator.
Now that the gasket is dry, it is time to try to start the motor. Once started, get out and inspect for leaks. If you have some coming from around the housing area, either the housing didn't seal, or the stat didn't set fully down.
If everything is good to go, reinstall your bracket, AC lines, and your air cleaner.
Now you are set for a good drive.
Oh, and you might want a bucket to stand on, or do something like this:

First off let me say that everyone has their own preference when it comes to changing out a stat. Some prefer tearing the top of the motor down to make access easier, but this is not 100% necessary. The way I change mine is by removing a few pieces and going from there. Lets begin:
1. Tools and supplies that you will need
A. New Thermostat
B. Either a new gasket, or RTV (or both)
C. 9/16 socket or wrench.
D. 1/2 Socket with an extension
E. 11/16 nut driver or flat head screwdriver.
F. Telescoping magnet (Optional)
G. Grinder (Optional)
H. Needle nose pliers
I. Razor Blade
2. The first thing you need to do when you get back from the parts store, is to submerge the new thermostat in hot water (above the temperature range) to make sure that the stat is opening all the way.
3. Once you have established that your new thermostat is working, its time to dig in.
4. Make sure that you have allowed ample time for the engine and coolant to cool down before you start. Working on a hot motor is never fun.
5. Start by removing the air cleaner.
6. There is a black metal bracket attached to the intake and the alternator. This has to come out. (The same bracket that has the little plastic lock that your air cleaner sits down on) The nut and bolt on this are both 9/16. If your truck has air conditioning, you need to carefully raise the metal lines up and away from the from the top of the bolt. Once you have that removed, you can finish taking out the bolt. After that is removed, you should have one more bolt on the intake manifold to remove. (Another option is to just loosen that back side and swing it out of the way)
Here is the bracket:
7. You will probably have the throttle cables in your way now, you can just bend thous back and either hang a wrench on them to hold them down, or wedge them underneath the bracket that you swung out of the way.
8. There are two bolts on the stat housing. Both of them should be 1/2". Use your extension and remove these bolts. This is also where a magnetic retrieval tool will come in handy.
9. Now you should be able to wiggle the hose and the housing enough to remove it. You can also remove the clip on the opposite end of the hose and pull it out completely. (This is a good time to change out your clamps since the simple squeeze on clamps are prone to failing.)
Below is a pic of the housing:
Expect some coolant/water to gush out when you remove the hose.
Notice that there is a little tab on the housing with the words "FRONT" labeled on it. (This is just to let you know which way to install the housing.) This tab will become troublesome when trying to reinstall the housing. You can grind the tab down like I did, and it removes a lot of the headaches.
10. Now you will be able to remove the old thermostat. You should be able to just reach down and pop it out, but sometimes they will get stuck and you will need a set of pliers to remove it.
More than likely the block is still going to be full of water. I usually will start the motor and let it run for a few seconds to blow out this water. At this point, I tend to let things dry over night, but you can towel dry everything off and resume.
11. Take the new stat and set it in the block with the spring side down.
12. Take your housing, and wipe it down with a dry cloth. (you might need to scrape the old gasket off) Then take your paper gasket and stick it on the housing. I tend to use both the gasket and RTV to make sure I have a good seal.
You should wait about 10 minutes before reinstalling the housing. (This allows the liquid to set up a bit and reduces mess) I also usually leave the housing attached to the hose with the clamp since it is kinda hard to get access to the clamp after things have been put back.
Carefully set the housing back in to the crevice and align the holes up. Use your magnetic tool to set the bolts back in. If your magnet is strong enough, you might be able to tighten the bolts down a couple of turns so they stay put. Use your extension and tighten down both bolts. I am not positive of the torque specification, but make sure it is tight.
Let the RTV set for at least 12 hours before trying to start the motor.
Don't forget to reinsert the other end of the hose back into the radiator.
Now that the gasket is dry, it is time to try to start the motor. Once started, get out and inspect for leaks. If you have some coming from around the housing area, either the housing didn't seal, or the stat didn't set fully down.
If everything is good to go, reinstall your bracket, AC lines, and your air cleaner.
Now you are set for a good drive.
Oh, and you might want a bucket to stand on, or do something like this:
Last edited by Laramie1997; Jun 9, 2009 at 06:31 PM.

Captain
Joined: Oct 2007
Posts: 706
Likes: 0
From: Green Bay WI
Now that I saw you were in your 20's on another thread, have to ask this...
To guys over 30, do you use rtv anymore? Have to admit I did when I was younger, but eventually figured out if the factory gasket held for years, the aftermarket one would too. Saves waiting hours to start your truck to go on a beer run. Never had a leak just using a gasket.
To guys over 30, do you use rtv anymore? Have to admit I did when I was younger, but eventually figured out if the factory gasket held for years, the aftermarket one would too. Saves waiting hours to start your truck to go on a beer run. Never had a leak just using a gasket.
I use it just for the simple fact that it is easier to just use both the gasket and RTV and know that you are more than likely not going to have a leak.
As far beer run? Had plenty at the house, and its not the only ride
As far beer run? Had plenty at the house, and its not the only ride
Trending Topics
Captain
Joined: Oct 2007
Posts: 706
Likes: 0
From: Green Bay WI
All Star
Joined: May 2009
Posts: 754
Likes: 0
From: Carbondale,PA
The only time I use rtv is in the corners where the intake gaskets and end seals meet when resealing an intake and I have never had one leak even when starting it right up after finishing install. Guess I have just been lucky.