


Harsh shifting when hot


Thread Starter
|
Amateur
Joined: Oct 2012
Posts: 29
Likes: 0
From: Cody, WY
Thanks. I'm just getting back into the Ram. The water pump on the tractor went, then the heat blend actuator on the third truck went. Unfortunately that was the vehicle my wife was using. She has a thing about driving around when the temp is below freezing.
I'm getting organized and should have my experiences up within a couple of days.
I'm getting organized and should have my experiences up within a couple of days.
Thread Starter
|
Amateur
Joined: Oct 2012
Posts: 29
Likes: 0
From: Cody, WY
Okay I'm have a slight problem with my photos. So this is a test. I had a problem with my wife's heating in her vehicle. She has a patience value of -10, so I took a picture of my fix and gave it to her when she walked in. Hopefully it works, both the picture and the heating.


Thread Starter
|
Amateur
Joined: Oct 2012
Posts: 29
Likes: 0
From: Cody, WY
Hey,
I'm having a formatting problem. I did the write up in Word. When i paste it in here I loose some of the verbiage on the the right side in the preview. Tried changing margins in word but no go. Any ideas, besides rewriting the deal here?
I'm having a formatting problem. I did the write up in Word. When i paste it in here I loose some of the verbiage on the the right side in the preview. Tried changing margins in word but no go. Any ideas, besides rewriting the deal here?
Last edited by gunner10; Oct 13, 2013 at 12:07 PM.
Administrator


Joined: Apr 2010
Posts: 87,480
Likes: 4,223
From: Clayton MI
The forums sometimes aren't really friendly with formatting.... and things like tabs, and a few spaces in a row are edited out..... copy it to a txt file, fix your formatting, then paste, and see what happens.
Thread Starter
|
Amateur
Joined: Oct 2012
Posts: 29
Likes: 0
From: Cody, WY
Done! And it works!
This is slightly long but I think it is important to show or tell why something was done. I hate forums where things are said with no factual backup. After reading this you can decide what you want to do. Before you drill out you cooler check valve you ought to read this first.
A quick note on me. I was the **** engineer, who never believed anything until it was proven to me. I was the kid in college chemistry who was always blowing up things. How, why and why not, where my mental outlook at the time. Probably haven’t changed much. Also became a part time/full time engine mechanic, depending on the school time. How old am I. We set up Hemi’s, big block Fords and small block Chevy’s for the strip. I think we had the first 327 Chevy that turned 10,000 RPM, and stayed in one piece. Obviously I was a southern boy and, oh by way, human. I’m sure there are easier or better ways to address this, but this is how I did it.
As stated before, the problem vehicle is a 1999 Ram 2500 V-10 Sport Auto 4x4 with tow package-the transmission is a 47RE . Mileage is 137,567, and it is in excellent body and engine shape. It is my lovely wife’s primary transportation. The V-10 closely mimics the diesel of that year in HP and torque. So, some of this will work with the diesel engine, but will not cut it for smaller transmissions-42RE thru 46RE’s.
The problem was harsh shifting when hot, and primarily going into reverse. I ignored the problem until I had to drive it. MF, almost lost my fillings. We are a 3 truck family, 2 drivers, so she had the spare to drive while I fooled around. One good note she mentioned, was that the truck would downshift out of overdrive and then pop back. Hunting.
If you are seriously thinking of doing this, download the 2nd Gen service/technical manual that’s in the forum. A lot of the quotes found here come directly from this source. Valuable for what “it” looks like and torque values. Just make sure you use common sense before you get a bigger hammer. Rather than rewrite the manual I gave the section and page where you can find it, anything from the manual is noted with an asterisk. This is a good place to note, even though this looks like a factory publication-use common sense. Look things over before you put a wrench or hammer to the truck. Some areas look to be the subject of copy and paste, so be careful. What I did was to read like areas on the smaller transmissions and began to see the light.
What I picked up in the manual and could handle: 21-663*, 21-665*
Fluid level incorrect
Drive line bolts loose
U joints loose
Misadjusted TVC –Throttle Valve Cable
Misadjusted bands.
Linkage problems
Axle backlash problem
Axle Flange loose
Issues found on various forums and digging in the manual:
Cooling line check valve plugged
Cooler plugged, either in radiator or exterior cooler.
Governor Pressure Solenoid not working properly
Governor Pressure Sensor ditto.
High ATF temperature
What I ended up doing mechanically:
Checked all linkage, drive line bolts, axle parts: visually, hot and cold – you’ll need a helper for this, while you’re under the hood or the truck.
Checked the TVC; 21-770* Note pictures of engine connection are for a smaller block, take your time and trace it out for the V-10.
Added drain plug to the pan.
Replaced fluid filter 21-717*
Adjusted front and rear bands; 21-709*
Replaced the Governor Pressure Solenoid and Pressure Sensor; 21-712* with notes.
Removed the famous cooler line check valve for flushing; 7-84* with notes
Flushed the cooler lines and cooler; 7-84* with notes.
Drained and replaced 80% of transmission fluid.
Along the way I stopped thinking, and I’ll note that.Also, I had to make a conscious decision to “go for it”. This contradicts everything I learned over the years. The rule, which applies to cars, trains and airplanes, is to make one change at a time. Two many can get you in trouble, or if the problem is fixed you have no idea on what actually fixed it. Time said forget it, fix or replace anything that could be causing the problem.
First I checked the fluid level, although the tranny was checked by a factory mechanic, before my wife bought it. The tranny she told them was making some noise. Of course they said they would have to tear it down to find the problem. Anyway the fluid level was about one quart high. Yes, it was hot, shifted through all the gears and left it in neutral. Hmm, how get a quart out, without a drain plug. Bummer. Went to NAPA and purchased a suction gun and some hose long enough to get to the pan. It worked…removing the fluid. No change in shifting.

Next, I took care of all the easy ones. Linkage, drive line bolts, axle/differential parts and TVC. There was some play in the differential but not enough to contribute to noise in the tranny. By the way, try to print the index of the manual. It saves a ton of time from surfing the manual looking for the section you need.
Since this could be messy I placed a 4x8x1/2” OSB under the tranny area and covered that with two dog blankets. The blankets would soak up spills and the OSB would soak up any excess and make sure it didn’t hit the floor. It worked, and yes it is messy.
The next exercise was to scrape, wire brush all the crap around the transmission pan and above it. Shake out the blankets and you’re good to go.
My plan was to disconnect the lines at the tranny and flush everything. But, because at first I couldn’t find the check valve (actual name “converter drain back valve”) I took a break. All the things I read said this was the culprit causing harsh shifting, so I really wanted to look at it. After a through cleaning of all the lines I found it, on the lower hose going into the radiator cooler on the passenger side. Wipe it down and an arrow will appear showing direction of installation.

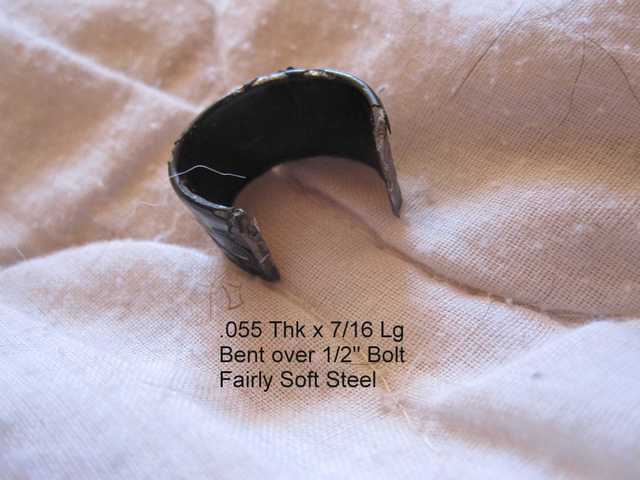
Stopped thinking. I had to remove the QD at the radiator to get the check valve out. Folks said just get a 3/8 QD disconnect tool and you’re good to go. Bought a couple-NADA. I went back and checked spec’s on all the trannny’s (0-6*)42RE thru 47RE. The light came on. Everyone, 42RE thru 46RE have a 10 quart capacity, the 47RE has a 16 quart capacity. Daah, it’s a lot bigger. So I took out my calipers and yes the line is �”. Now get a �” QD disconnect tool. Not in Cody, WY you will. So I made one. Found a sheet metal wire harness clamp. Cut it roughly to size and trimed with a dremel. Bent the metal over a �” bolt to form a circle. Then trimed lengh to 7/16” long. Metal was .055 thick, close to 1/16”. Not pretty but it works.
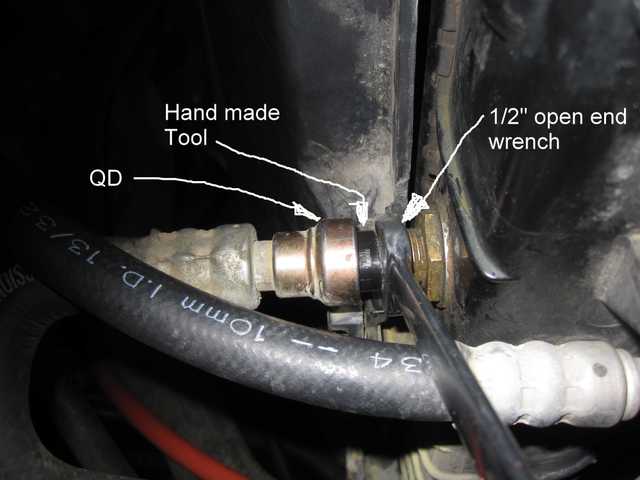
Opened it back up enough to fit over the radiator pipe, closed it with pliers and backed it up with a �” open end wrench. Pushed towards the QD, then pushed the QD towards the tool and off it popped.
Next I got some small baggies and rubber bands. As I disconnected lines that are not part of the cleaning deal, bag and rubber band. You will be amazed on much crap one kick’s up doing this. You don’t want it in the tranny or the lines.
I removed the line with the check valve.

Looked inside the cavity for crap, using a bent light deal for bores of firearms. Much to my surprise clean.

I also read the check valve could stick. So I walked over to my compressor and slowly added pressure. The gauge on the outlet of the compressor is certified to be �% accurate. The check valve broke at 3 PSI, specs say about 2 PSI, 21-778*, pretty close, but close enough?

What was the pressure in the cooling line? Where did it go?
Cooling line pressures: 21-690* thru 21-701*.
Park; 0 PSI
Neutral; 57-63 PSI
Reverse; 95-130 PSI
First Gear; 5-75 PSI
Second Gear; 5-57 PSI
Third Gear no Converter Clutch engaged; 5-57 PSI
Third Gear Converter Clutch engaged; 5-57 PSI
Fourth Gear Converter Clutch not engaged; 5-57 PSI
Fourth Gear Converter Clutch engaged; 5-60 PSI
Manual Low; 5-57 PSI
Manual Second; 5-57 PSI
Cooling line flow goes to transmission lubrication, then thru the tranny. My trusty magnet told me the check ball was not steel, either stainless or plastic. I’ve read plastic.
Okay now I had a problem, the check valve appeared okay. After my fiasco of removing a quart overfill, I had already made up my mind to add a drain to the pan. So I start to drop the pan. Had a very large drum under it, the lower half of 55 gal. plastic drum. Barely large enough. I cut a 2x4 and jammed it under the pan, then removed the last of the bolts, 21-717*. The board held the pan in place until I could clean out tools, gently pulled the board out and here comes the fluid!! Placed pan in drum, pulled it out and went to my draining area. Not to be done for you city folks. Anyway I cleaned the pan, all fluid going into the drum. Then slowly drained the drum. No metal parts, but found two cornflake size soft brown flakes. An indication the converter was starting to come apart-oh good. But no metal parts, a plus.
I dropped the fluid filter, an after market type. There were a few very small flecks of aluminum. No big deal there. By this time I had ordered a BW Governor Pressure. Solenoid and Pressure Sensor, they had not arrived. Put the pan up after installing the drain, with two bolts and muddled on.
Why buy the solenoid and sensor? Well I read that a bad Gov. Press. Sol. could cause poor shifting. In my mind the sensor could have been bad also. It also contains a thermister to send temperature readings to the brain (PCM). My thought here was, I have a clean check valve, but the down shifting, hunting indicated a high fluid temperature problem. What also bothered me was the truck has a high transmission temp light. Never came on. 8J-31* Well the good news, no water in the fluid if the light comes on. Fluid temp is now 275F. Why did it down shift? A signal to the PCM indicating fluid temp is at 260F, 21-779*, causing the downshift. Speeding up the engine supposedly cools it down faster. At 230F, it up shifts. Now how stupid is that Chrysler, the temp is high enough to cause a downshift but no light! So maybe the sensor was bad, just my thought, nothing concrete.
Worked on disconnecting the lines to the tranny. Tied off the front drive shaft to get it out of the way.

The return line came off easy, rear connection. The feed line, front connection, would not budge. Put a cheater on the wrench and was rewarded with a screech. The nut was digging into the tubing. Looking at it closer showed a double bend in the tube at the nut. If I took it off I could own it. Torque value is listed at 13 ftlbs, I’m pushing 100, so based on the clean check valve I did not disconnect the feed line. It was disconnected already at the check valve. I removed the three clamps on the lines to free up the return line. That gave me enough room to proceed.
I had a lot of old 3/8” air hose laying around so used it for flushing. Found some stuff on a forum for flushing, it was available here so I went with it. This was for the forward flush.

Had to use a hot air gun to soften the hose so it would fit over the tubing and pipe. Opened it up to �” ID.

Fitted one end of hose over pipe in radiator.

The other end to the cleaning solution can.

The other hose went over the return line under the truck, held with a hose clamp then to the drum.

Was I happy with the cleaning solution? Hell no. But at the moment it was all I could find. Before introducing the cleaning solution I blew the cooling line out with air. Don’t know if that was smart, but the size of the solution can told me it would get really diluted by the tranny fluid. Followed the instructions on the can and was rewarded with a milky flow of chemicals in the return line. Ooops! Make sure you put the hose end in a container, like a soda bottle or milk bottle. The spray, even at low pressure it makes a mess. Bottle with rag over the end works just fine. I did not see any crap. The solution looked good.
Okay now I have a cooler filled with cleaning solution, that needs to be evacuated. Being prepared @#%#@#, I had a couple of pumps kicking around. The one I used had a flow of 2 – 4 GPM at a flat 9 PSI with water. Needless to say I was concerned about the low pressure of the pump.
I put 4 quarts of ATF-4 in hot water and them soak, did this three times until they felt hot. Why? The ATF viscosity when cold is like pushing maple syrup out of a bottle when just out of the fridge. My pump could not handle it in a timely fashion when cold. Put the ATF on a stand and fired the pump up.

Pumped 1 � quarts into a milk jug, stop the pump and gave it a whiff. Smelled of cleaner. Emptied the jug and pumped another 1/1/2 quarts, no smell and fluid looked good.! By the way it took about a total of 15-20 seconds to pump the 4 quarts in Not bad, that’s 3 to 4 GPM, but not conclusive as to real flow. Stopping and starting a stopwatch and a pump and changing out ATF was very loose at best.
Now for the reverse flow. I was not particularly impressed with the cleaning solution volume. So I wanted a solution that had more volume and would put my pump to use. Looking at the cleaning solution can, one of the main ingredients was Stoddard solution. Thinking for a moment it came to me – mineral spirits! Picked up 2 gallons and set up for the reverse flush. I basically pumped right out of the mineral spirit container into the cooler. This way I drained a gallon at a time. Time for pumping a gallon was 12 seconds. Consistent for both gallons. Even though I blew the lines out before pumping in the spirits,the first gallon was filled with ATF, then it cleared up on the second, Average flow was then about 4 � GPM.
Blew the lines out, and put four quarts of ATF in a clean milk bottle, pumped in two quarts of ATF feed flow, barely got a cup out of the hose which smelled of spirits. Pumped another 2 quarts and the ATF smelled and looked clean. Cleaned up.
I should mention all this did not happen in a day. There were a lot of distractions. Between now and putting the pan up I drained it twice, getting ATF, never measured it but it was considerable.
The BW parts arrived, drained the pan for the third time, drop the pan and proceeded to install the parts. The BW Gov. Press. Sol. is big compared to the stock unit.

Installation is fairly straightforward, 21-712*, or so I thought. Note the instructions say remove Gov Sol retainer plate and then slide Solenoid and Sensor out. The solenoid pops right out, don’t get a bigger hammer to move the sensor. Remove the Governor body, turn over and then remove the clip holding the sensor in.
About to reconnect the wire connector to the sol and saw the holding clip was 180 degrees off. B.S.! Now what! Went back to the distributor, said it was correct. Called five, yes five BW offices they did not want to know nothing. Thanks. Went back to the distributor. He said he’s sold over 300 and no problems. So….with tongue in cheek I untwisted the wires 180 degrees.

Why was I concerned. First it was supposed to be a direct replacement. Second I belong to a diesel truck –all types- forum. A couple of years ago a guy replaced his Gov Sol with a BW and the truck shifted like crap. He put the old one back in. Too far gone for me to ask him if he reversed the wires. But in my mind that clip keeps the wires attached, plus sets up the continuity with the PCM.
Installed a new gasket and buttoned everything up. Now I figured I had about 1 � to 1 � quarts in the cooling lines and cooler, after deducting for hose volume. So I had to add a lot of ATF to refill the tranny. There are instructions on how to refill, I’m going to leave those out so if you are doing this you don’t total the transmission. Use them if you want. A problem with cut and paste I believe. Anyway, fill the tranny to the tip of the dip stick, about 4 to 5 quarts first fill. Start the truck, shift to neutral and shut down after 10 seconds. Now refill, checking after ever quart. At tip of dipstick restart engine, shift to neutral and shutdown after 5 seconds, 10 seconds max . Repeat. When ATF stays close to tip slowly add until fluid is at first hole in dip stick. Run until hot, go for a short ride if you want. Once hot, add slowly until in full area.
How much ATF did I add? More than I ever thought. Remember, the truck was out of service for over 2 weeks. I drained the pan when I thought of it. Including the ATF in the cooling lines, I added 13 quarts of new ATF. So, without the check valve the convertor will drain out, that is for sure!
How does it shift, not as good as my F350, but very acceptable. No banging when going into reverse, all up shifts are okay, so twisting the wires was okay.
Now here’s the kicker. Most of this, at least for me, did not have to happen. Do I feel good about that! Take a trip to 21-724* oil pump volume check. Believe it not, this is a check for adequate flow to the cooler. Here is another area that the manual and I disagree. The test here is 1 quart in 20 seconds, or � of a GPM. Hard to believe, when I check the other trannys, the flow is the same. Why then a bigger line. Trust me, they hate to spend $ if they don’t have to. So, without knowing the real flow I would say 2 quarts in 20 seconds would probably be okay or 1 � GPM. Double the flow for a 60 % increase in ATF volume.
But I do not agree with the manual on where to take the test. It says before the cooler. B.S.!!! If the cooler is plugged you would never know it. But because of the way they connect things-at least on this truck- you have to go to the return line on the side of the radiator, which can done a lot easier than check valve drilling. Checking what is going in comes under the heading of nice to know. But what is really important is how much cool ATF is coming out of the cooler and going back to the tranny!

The manuals spot for flow testing is center lower radiator. My suggested spot is passenger side return line.

Other notes.
If you really want to remove the check valve NAPA has the whole line from tranny to radiator less valve for around $56.00. The dealer $165.00, but it is a genuine Chrysler part. Good reason to stay away. That leaves you the out to replace it if things don’t go good. THERE ARE NO FACTORY CHECK VALVES AVAILABLE!! Drill it out you have closed the door.
Why not drill it out. I was concerned with the spring and crap that could be left over and not cleaned out. This is lube oil, post filter. Then back at the diesel forum another guy had a rebuilt 47RE, read about the check valve problem and replaced the line. He had almost instant heat issues. Put the old line back and the tranny settled down.
I don’t know what the engineers were thinking when they sized the ball size and corresponding hole size. But being in fluids for over 30 years I do know there was a thought process behind it. (I hope!) My thoughts on this guys problem are this. The hole for the check valve could be acting as an orifice. We used orifices as a cheap way of controlling flow or pressure down steam of the orifice. All pumps have a finite capacity. If a pump runs out of control it over heats. Also the cooler is designed with a specific flow in mind. Go too fast and it doesn’t do it’s job, go too slow and the volume coming out will be a lot cooler. But if the total volume is not there it may not be cold enough to keep the tranny under control.
Someday I’ll do the cooler test. Right, sure, okay! But those of you who think the check valve is causing heat problems, the pump test would be a real good place to start. With suggested pressures in the cooling line of 5-130 PSI makes one think twice about plugging the check valve, the cooler with a lot lower velocity and pressure per cooling tube-maybe. I’m thinking our problem was either, Governor Pressure Solenoid, Pressure sensor, or maybe just a simple band adjustment (sort of stretching here). Also, if I wanted to flush the cooler again, I would call a tranny shop and see what they charge. Not everyone has pumps and stuff hanging around, and even so is it worth the trip?
Have a nice day. Thanks for reading, hope it helps someone. I’ll answer questions. Maybe not the same day posted. I have over 2,000 feet of irrigation pipe on the ground the needs picking up, and winter is coming fast here.
This is slightly long but I think it is important to show or tell why something was done. I hate forums where things are said with no factual backup. After reading this you can decide what you want to do. Before you drill out you cooler check valve you ought to read this first.
A quick note on me. I was the **** engineer, who never believed anything until it was proven to me. I was the kid in college chemistry who was always blowing up things. How, why and why not, where my mental outlook at the time. Probably haven’t changed much. Also became a part time/full time engine mechanic, depending on the school time. How old am I. We set up Hemi’s, big block Fords and small block Chevy’s for the strip. I think we had the first 327 Chevy that turned 10,000 RPM, and stayed in one piece. Obviously I was a southern boy and, oh by way, human. I’m sure there are easier or better ways to address this, but this is how I did it.
As stated before, the problem vehicle is a 1999 Ram 2500 V-10 Sport Auto 4x4 with tow package-the transmission is a 47RE . Mileage is 137,567, and it is in excellent body and engine shape. It is my lovely wife’s primary transportation. The V-10 closely mimics the diesel of that year in HP and torque. So, some of this will work with the diesel engine, but will not cut it for smaller transmissions-42RE thru 46RE’s.
The problem was harsh shifting when hot, and primarily going into reverse. I ignored the problem until I had to drive it. MF, almost lost my fillings. We are a 3 truck family, 2 drivers, so she had the spare to drive while I fooled around. One good note she mentioned, was that the truck would downshift out of overdrive and then pop back. Hunting.
If you are seriously thinking of doing this, download the 2nd Gen service/technical manual that’s in the forum. A lot of the quotes found here come directly from this source. Valuable for what “it” looks like and torque values. Just make sure you use common sense before you get a bigger hammer. Rather than rewrite the manual I gave the section and page where you can find it, anything from the manual is noted with an asterisk. This is a good place to note, even though this looks like a factory publication-use common sense. Look things over before you put a wrench or hammer to the truck. Some areas look to be the subject of copy and paste, so be careful. What I did was to read like areas on the smaller transmissions and began to see the light.
What I picked up in the manual and could handle: 21-663*, 21-665*
Fluid level incorrect
Drive line bolts loose
U joints loose
Misadjusted TVC –Throttle Valve Cable
Misadjusted bands.
Linkage problems
Axle backlash problem
Axle Flange loose
Issues found on various forums and digging in the manual:
Cooling line check valve plugged
Cooler plugged, either in radiator or exterior cooler.
Governor Pressure Solenoid not working properly
Governor Pressure Sensor ditto.
High ATF temperature
What I ended up doing mechanically:
Checked all linkage, drive line bolts, axle parts: visually, hot and cold – you’ll need a helper for this, while you’re under the hood or the truck.
Checked the TVC; 21-770* Note pictures of engine connection are for a smaller block, take your time and trace it out for the V-10.
Added drain plug to the pan.
Replaced fluid filter 21-717*
Adjusted front and rear bands; 21-709*
Replaced the Governor Pressure Solenoid and Pressure Sensor; 21-712* with notes.
Removed the famous cooler line check valve for flushing; 7-84* with notes
Flushed the cooler lines and cooler; 7-84* with notes.
Drained and replaced 80% of transmission fluid.
Along the way I stopped thinking, and I’ll note that.Also, I had to make a conscious decision to “go for it”. This contradicts everything I learned over the years. The rule, which applies to cars, trains and airplanes, is to make one change at a time. Two many can get you in trouble, or if the problem is fixed you have no idea on what actually fixed it. Time said forget it, fix or replace anything that could be causing the problem.
First I checked the fluid level, although the tranny was checked by a factory mechanic, before my wife bought it. The tranny she told them was making some noise. Of course they said they would have to tear it down to find the problem. Anyway the fluid level was about one quart high. Yes, it was hot, shifted through all the gears and left it in neutral. Hmm, how get a quart out, without a drain plug. Bummer. Went to NAPA and purchased a suction gun and some hose long enough to get to the pan. It worked…removing the fluid. No change in shifting.
Next, I took care of all the easy ones. Linkage, drive line bolts, axle/differential parts and TVC. There was some play in the differential but not enough to contribute to noise in the tranny. By the way, try to print the index of the manual. It saves a ton of time from surfing the manual looking for the section you need.
Since this could be messy I placed a 4x8x1/2” OSB under the tranny area and covered that with two dog blankets. The blankets would soak up spills and the OSB would soak up any excess and make sure it didn’t hit the floor. It worked, and yes it is messy.
The next exercise was to scrape, wire brush all the crap around the transmission pan and above it. Shake out the blankets and you’re good to go.
My plan was to disconnect the lines at the tranny and flush everything. But, because at first I couldn’t find the check valve (actual name “converter drain back valve”) I took a break. All the things I read said this was the culprit causing harsh shifting, so I really wanted to look at it. After a through cleaning of all the lines I found it, on the lower hose going into the radiator cooler on the passenger side. Wipe it down and an arrow will appear showing direction of installation.
Stopped thinking. I had to remove the QD at the radiator to get the check valve out. Folks said just get a 3/8 QD disconnect tool and you’re good to go. Bought a couple-NADA. I went back and checked spec’s on all the trannny’s (0-6*)42RE thru 47RE. The light came on. Everyone, 42RE thru 46RE have a 10 quart capacity, the 47RE has a 16 quart capacity. Daah, it’s a lot bigger. So I took out my calipers and yes the line is �”. Now get a �” QD disconnect tool. Not in Cody, WY you will. So I made one. Found a sheet metal wire harness clamp. Cut it roughly to size and trimed with a dremel. Bent the metal over a �” bolt to form a circle. Then trimed lengh to 7/16” long. Metal was .055 thick, close to 1/16”. Not pretty but it works.
Opened it back up enough to fit over the radiator pipe, closed it with pliers and backed it up with a �” open end wrench. Pushed towards the QD, then pushed the QD towards the tool and off it popped.
Next I got some small baggies and rubber bands. As I disconnected lines that are not part of the cleaning deal, bag and rubber band. You will be amazed on much crap one kick’s up doing this. You don’t want it in the tranny or the lines.
I removed the line with the check valve.
Looked inside the cavity for crap, using a bent light deal for bores of firearms. Much to my surprise clean.
I also read the check valve could stick. So I walked over to my compressor and slowly added pressure. The gauge on the outlet of the compressor is certified to be �% accurate. The check valve broke at 3 PSI, specs say about 2 PSI, 21-778*, pretty close, but close enough?
What was the pressure in the cooling line? Where did it go?
Cooling line pressures: 21-690* thru 21-701*.
Park; 0 PSI
Neutral; 57-63 PSI
Reverse; 95-130 PSI
First Gear; 5-75 PSI
Second Gear; 5-57 PSI
Third Gear no Converter Clutch engaged; 5-57 PSI
Third Gear Converter Clutch engaged; 5-57 PSI
Fourth Gear Converter Clutch not engaged; 5-57 PSI
Fourth Gear Converter Clutch engaged; 5-60 PSI
Manual Low; 5-57 PSI
Manual Second; 5-57 PSI
Cooling line flow goes to transmission lubrication, then thru the tranny. My trusty magnet told me the check ball was not steel, either stainless or plastic. I’ve read plastic.
Okay now I had a problem, the check valve appeared okay. After my fiasco of removing a quart overfill, I had already made up my mind to add a drain to the pan. So I start to drop the pan. Had a very large drum under it, the lower half of 55 gal. plastic drum. Barely large enough. I cut a 2x4 and jammed it under the pan, then removed the last of the bolts, 21-717*. The board held the pan in place until I could clean out tools, gently pulled the board out and here comes the fluid!! Placed pan in drum, pulled it out and went to my draining area. Not to be done for you city folks. Anyway I cleaned the pan, all fluid going into the drum. Then slowly drained the drum. No metal parts, but found two cornflake size soft brown flakes. An indication the converter was starting to come apart-oh good. But no metal parts, a plus.
I dropped the fluid filter, an after market type. There were a few very small flecks of aluminum. No big deal there. By this time I had ordered a BW Governor Pressure. Solenoid and Pressure Sensor, they had not arrived. Put the pan up after installing the drain, with two bolts and muddled on.
Why buy the solenoid and sensor? Well I read that a bad Gov. Press. Sol. could cause poor shifting. In my mind the sensor could have been bad also. It also contains a thermister to send temperature readings to the brain (PCM). My thought here was, I have a clean check valve, but the down shifting, hunting indicated a high fluid temperature problem. What also bothered me was the truck has a high transmission temp light. Never came on. 8J-31* Well the good news, no water in the fluid if the light comes on. Fluid temp is now 275F. Why did it down shift? A signal to the PCM indicating fluid temp is at 260F, 21-779*, causing the downshift. Speeding up the engine supposedly cools it down faster. At 230F, it up shifts. Now how stupid is that Chrysler, the temp is high enough to cause a downshift but no light! So maybe the sensor was bad, just my thought, nothing concrete.
Worked on disconnecting the lines to the tranny. Tied off the front drive shaft to get it out of the way.
The return line came off easy, rear connection. The feed line, front connection, would not budge. Put a cheater on the wrench and was rewarded with a screech. The nut was digging into the tubing. Looking at it closer showed a double bend in the tube at the nut. If I took it off I could own it. Torque value is listed at 13 ftlbs, I’m pushing 100, so based on the clean check valve I did not disconnect the feed line. It was disconnected already at the check valve. I removed the three clamps on the lines to free up the return line. That gave me enough room to proceed.
I had a lot of old 3/8” air hose laying around so used it for flushing. Found some stuff on a forum for flushing, it was available here so I went with it. This was for the forward flush.
Had to use a hot air gun to soften the hose so it would fit over the tubing and pipe. Opened it up to �” ID.
Fitted one end of hose over pipe in radiator.
The other end to the cleaning solution can.
The other hose went over the return line under the truck, held with a hose clamp then to the drum.
Was I happy with the cleaning solution? Hell no. But at the moment it was all I could find. Before introducing the cleaning solution I blew the cooling line out with air. Don’t know if that was smart, but the size of the solution can told me it would get really diluted by the tranny fluid. Followed the instructions on the can and was rewarded with a milky flow of chemicals in the return line. Ooops! Make sure you put the hose end in a container, like a soda bottle or milk bottle. The spray, even at low pressure it makes a mess. Bottle with rag over the end works just fine. I did not see any crap. The solution looked good.
Okay now I have a cooler filled with cleaning solution, that needs to be evacuated. Being prepared @#%#@#, I had a couple of pumps kicking around. The one I used had a flow of 2 – 4 GPM at a flat 9 PSI with water. Needless to say I was concerned about the low pressure of the pump.
I put 4 quarts of ATF-4 in hot water and them soak, did this three times until they felt hot. Why? The ATF viscosity when cold is like pushing maple syrup out of a bottle when just out of the fridge. My pump could not handle it in a timely fashion when cold. Put the ATF on a stand and fired the pump up.
Pumped 1 � quarts into a milk jug, stop the pump and gave it a whiff. Smelled of cleaner. Emptied the jug and pumped another 1/1/2 quarts, no smell and fluid looked good.! By the way it took about a total of 15-20 seconds to pump the 4 quarts in Not bad, that’s 3 to 4 GPM, but not conclusive as to real flow. Stopping and starting a stopwatch and a pump and changing out ATF was very loose at best.
Now for the reverse flow. I was not particularly impressed with the cleaning solution volume. So I wanted a solution that had more volume and would put my pump to use. Looking at the cleaning solution can, one of the main ingredients was Stoddard solution. Thinking for a moment it came to me – mineral spirits! Picked up 2 gallons and set up for the reverse flush. I basically pumped right out of the mineral spirit container into the cooler. This way I drained a gallon at a time. Time for pumping a gallon was 12 seconds. Consistent for both gallons. Even though I blew the lines out before pumping in the spirits,the first gallon was filled with ATF, then it cleared up on the second, Average flow was then about 4 � GPM.
Blew the lines out, and put four quarts of ATF in a clean milk bottle, pumped in two quarts of ATF feed flow, barely got a cup out of the hose which smelled of spirits. Pumped another 2 quarts and the ATF smelled and looked clean. Cleaned up.
I should mention all this did not happen in a day. There were a lot of distractions. Between now and putting the pan up I drained it twice, getting ATF, never measured it but it was considerable.
The BW parts arrived, drained the pan for the third time, drop the pan and proceeded to install the parts. The BW Gov. Press. Sol. is big compared to the stock unit.
Installation is fairly straightforward, 21-712*, or so I thought. Note the instructions say remove Gov Sol retainer plate and then slide Solenoid and Sensor out. The solenoid pops right out, don’t get a bigger hammer to move the sensor. Remove the Governor body, turn over and then remove the clip holding the sensor in.
About to reconnect the wire connector to the sol and saw the holding clip was 180 degrees off. B.S.! Now what! Went back to the distributor, said it was correct. Called five, yes five BW offices they did not want to know nothing. Thanks. Went back to the distributor. He said he’s sold over 300 and no problems. So….with tongue in cheek I untwisted the wires 180 degrees.
Why was I concerned. First it was supposed to be a direct replacement. Second I belong to a diesel truck –all types- forum. A couple of years ago a guy replaced his Gov Sol with a BW and the truck shifted like crap. He put the old one back in. Too far gone for me to ask him if he reversed the wires. But in my mind that clip keeps the wires attached, plus sets up the continuity with the PCM.
Installed a new gasket and buttoned everything up. Now I figured I had about 1 � to 1 � quarts in the cooling lines and cooler, after deducting for hose volume. So I had to add a lot of ATF to refill the tranny. There are instructions on how to refill, I’m going to leave those out so if you are doing this you don’t total the transmission. Use them if you want. A problem with cut and paste I believe. Anyway, fill the tranny to the tip of the dip stick, about 4 to 5 quarts first fill. Start the truck, shift to neutral and shut down after 10 seconds. Now refill, checking after ever quart. At tip of dipstick restart engine, shift to neutral and shutdown after 5 seconds, 10 seconds max . Repeat. When ATF stays close to tip slowly add until fluid is at first hole in dip stick. Run until hot, go for a short ride if you want. Once hot, add slowly until in full area.
How much ATF did I add? More than I ever thought. Remember, the truck was out of service for over 2 weeks. I drained the pan when I thought of it. Including the ATF in the cooling lines, I added 13 quarts of new ATF. So, without the check valve the convertor will drain out, that is for sure!
How does it shift, not as good as my F350, but very acceptable. No banging when going into reverse, all up shifts are okay, so twisting the wires was okay.
Now here’s the kicker. Most of this, at least for me, did not have to happen. Do I feel good about that! Take a trip to 21-724* oil pump volume check. Believe it not, this is a check for adequate flow to the cooler. Here is another area that the manual and I disagree. The test here is 1 quart in 20 seconds, or � of a GPM. Hard to believe, when I check the other trannys, the flow is the same. Why then a bigger line. Trust me, they hate to spend $ if they don’t have to. So, without knowing the real flow I would say 2 quarts in 20 seconds would probably be okay or 1 � GPM. Double the flow for a 60 % increase in ATF volume.
But I do not agree with the manual on where to take the test. It says before the cooler. B.S.!!! If the cooler is plugged you would never know it. But because of the way they connect things-at least on this truck- you have to go to the return line on the side of the radiator, which can done a lot easier than check valve drilling. Checking what is going in comes under the heading of nice to know. But what is really important is how much cool ATF is coming out of the cooler and going back to the tranny!
The manuals spot for flow testing is center lower radiator. My suggested spot is passenger side return line.
Other notes.
If you really want to remove the check valve NAPA has the whole line from tranny to radiator less valve for around $56.00. The dealer $165.00, but it is a genuine Chrysler part. Good reason to stay away. That leaves you the out to replace it if things don’t go good. THERE ARE NO FACTORY CHECK VALVES AVAILABLE!! Drill it out you have closed the door.
Why not drill it out. I was concerned with the spring and crap that could be left over and not cleaned out. This is lube oil, post filter. Then back at the diesel forum another guy had a rebuilt 47RE, read about the check valve problem and replaced the line. He had almost instant heat issues. Put the old line back and the tranny settled down.
I don’t know what the engineers were thinking when they sized the ball size and corresponding hole size. But being in fluids for over 30 years I do know there was a thought process behind it. (I hope!) My thoughts on this guys problem are this. The hole for the check valve could be acting as an orifice. We used orifices as a cheap way of controlling flow or pressure down steam of the orifice. All pumps have a finite capacity. If a pump runs out of control it over heats. Also the cooler is designed with a specific flow in mind. Go too fast and it doesn’t do it’s job, go too slow and the volume coming out will be a lot cooler. But if the total volume is not there it may not be cold enough to keep the tranny under control.
Someday I’ll do the cooler test. Right, sure, okay! But those of you who think the check valve is causing heat problems, the pump test would be a real good place to start. With suggested pressures in the cooling line of 5-130 PSI makes one think twice about plugging the check valve, the cooler with a lot lower velocity and pressure per cooling tube-maybe. I’m thinking our problem was either, Governor Pressure Solenoid, Pressure sensor, or maybe just a simple band adjustment (sort of stretching here). Also, if I wanted to flush the cooler again, I would call a tranny shop and see what they charge. Not everyone has pumps and stuff hanging around, and even so is it worth the trip?
Have a nice day. Thanks for reading, hope it helps someone. I’ll answer questions. Maybe not the same day posted. I have over 2,000 feet of irrigation pipe on the ground the needs picking up, and winter is coming fast here.
Last edited by gunner10; Oct 15, 2013 at 09:50 AM. Reason: Formatting problem